2011 PEUGEOT 5008 ESP
[x] Cancel search: ESPPage 156 of 340
D
R
I
154
CRUISE CONTROL
System which automatically maintains
the speed of the vehicle at the value
programmed by the driver, without any
action on the accelerator pedal.
The cruise control is switched on
manually: it requires a minimum vehicle
speed of 25 mph (40 km/h) and the en-
gagement of:
- fourth gear on the manual gearbox,
- second gear in sequential mode on
the electronic gear control gearbox
or automatic gearbox,
- position A
on the electronic gear
control gearbox or D
on the auto-
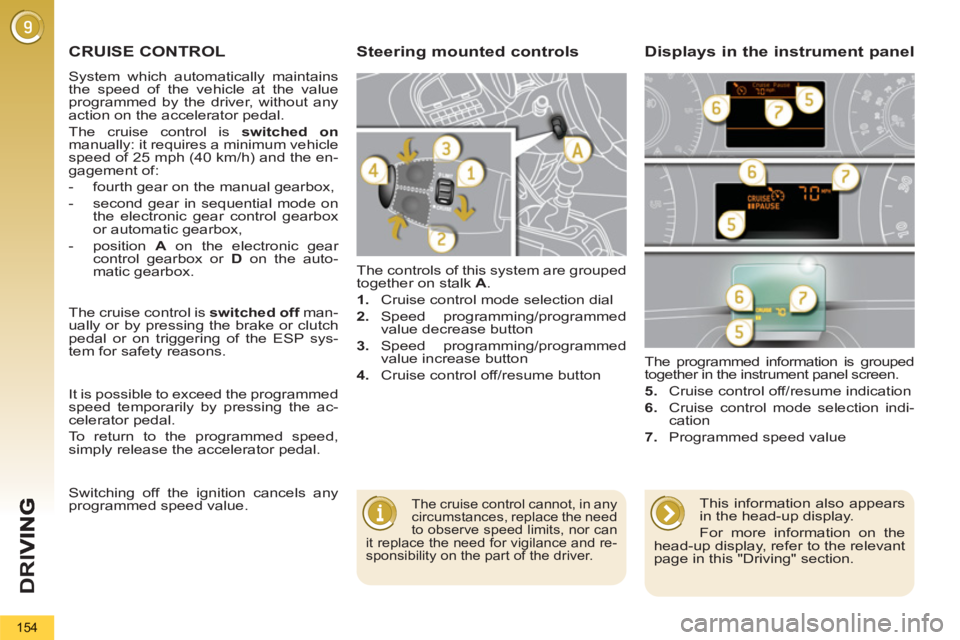
matic gearbox. The controls of this system are grouped
together on stalk A
.
1.
Cruise control mode selection dial
2.
Speed programming/programmed
value decrease button
3.
Speed programming/programmed
value increase button
4.
Cruise control off/resume button The programmed information is grouped
together in the instrument panel screen.
5.
Cruise control off/resume indication
6.
Cruise control mode selection indi-
cation
7.
Programmed speed value
Steering mounted controls Displays in the instrument panel
The cruise control cannot, in any
circumstances, replace the need
to observe speed limits, nor can
it replace the need for vigilance and re-
sponsibility on the part of the driver.
The cruise control is switched off
man-
ually or by pressing the brake or clutch
pedal or on triggering of the ESP sys-
tem for safety reasons.
It is possible to exceed the programmed
speed temporarily by pressing the ac-
celerator pedal.
To return to the programmed speed,
simply release the accelerator pedal.
Switching off the ignition cancels any
programmed speed value.
This information also appears
in the head-up display.
For more information on the
head-up display, refer to the relevant
page in this "Driving" section.
Page 158 of 340

D
R
I
156
6-SPEED MANUAL GEARBOX
As a safety precaution and to
facilitate starting of the engine:
Only engage reverse gear
when the vehicle is stationary
with the engine at idle.
Engaging 5th or 6th gear
�)
Move the lever fully to the right to
engage 5th or 6th gear.
*
According to engine.
GEAR EFFICIENCY INDICATOR *
System which reduces fuel consumption
by advising the driver to change up on
vehicles fi tted with a manual gearbox.
Operation
The system intervenes only when driv-
ing economically.
Depending on the driving situation and
your vehicle's equipment, the system
may advise you to skip one or more
gears. You can follow this instruc-
tion without engaging the intermediate
gears.
The gear recommended should not
be considered compulsory. In fact, the
confi guration of the road, the amount
of traffi c and safety remain determining
factors when choosing the best gear.
Therefore, the driver remains responsi-
ble for deciding whether or not to follow
the advice given by the system.
This function cannot be deactivated.
Example:
- You are in third gear.
In the case of driving which makes
particular demands on the perfor-
mance of the engine (fi rm pres-
sure on the accelerator pedal, for example,
when overtaking...), the system will not rec-
ommend a gear change.
The system never suggests:
- engaging fi rst gear,
- engaging reverse gear,
- engaging a lower gear.
- You press the accelerator pedal
moderately.
- The system may suggest that you
engage a higher gear, if appropriate.
The information appears in the form
of an arrow in the instrument panel
screen.
Depending on your vehicle's equipment,
this arrow may be accompanied by the
recommended gear.
This equipment will become available
during the year.
- always select neutral,
- press the clutch pedal.
�)
Raise the ring under the knob and
move the gear lever to the left then
forwards.
Engaging reverse gear
Page 163 of 340
D
R
161
"PORSCHE TIPTRONIC
SYSTEM" AUTOMATIC
GEARBOX
Six speed automatic gearbox which of-
fers a choice between the comfort of
fully automatic operation, enhanced by
sport and snow programmes, or manual
gear changing.
Four driving modes are offered:
- automatic
operation for electronic
management of the gears by the
gearbox,
- sport
programme for a more dy-
namic style of driving,
- snow
programme to improve driv-
ing when traction is poor,
- manual
operation for sequential
changing of the gears by the driver.
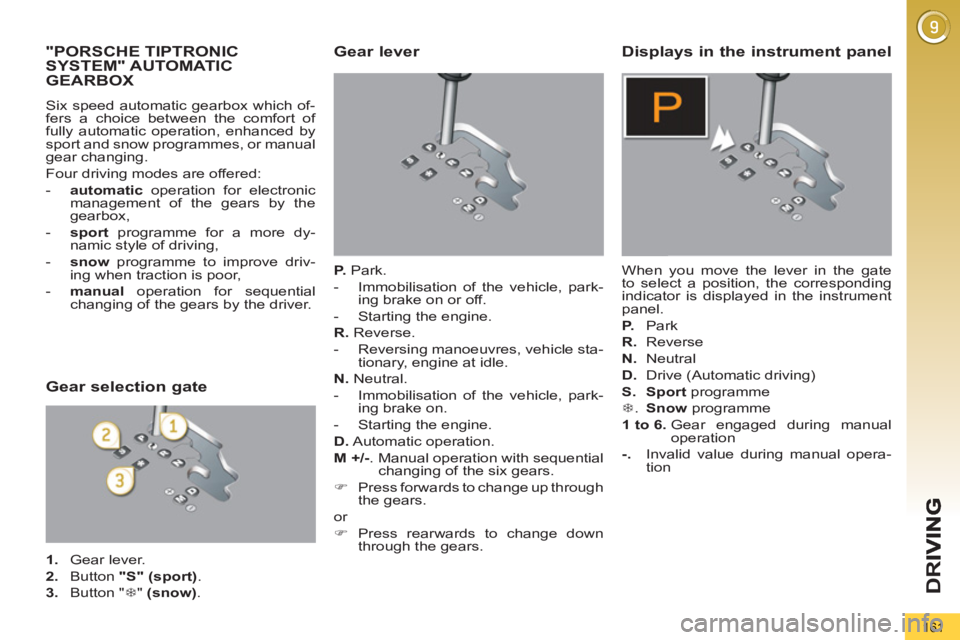
Gear lever
P.
Park.
- Immobilisation of the vehicle, park-
ing brake on or off.
- Starting the engine.
R.
Reverse.
- Reversing manoeuvres, vehicle sta-
tionary, engine at idle.
N.
Neutral.
- Immobilisation of the vehicle, park-
ing brake on.
- Starting the engine.
D.
Automatic operation.
M +/-
. Manual operation with sequential
changing of the six gears.
�)
Press forwards to change up through
the gears.
or
�)
Press rearwards to change down
through the gears.
Displays in the instrument panel
When you move the lever in the gate
to select a position, the corresponding
indicator is displayed in the instrument
panel.
P.
Park
R.
Reverse
N.
Neutral
D.
Drive (Automatic driving)
S.
Sport
programme
�7
. Snow
programme
1 to 6.
Gear engaged during manual
operation
-.
Invalid value during manual opera-
tion
Gear selection gate
1.
Gear lever.
2.
Button "S"
(sport)
.
3.
Button " �7
" (snow)
.
Page 170 of 340
D
R
I
168
The parking sensor system
cannot, in any circumstances,
replace the need for vigilance
and responsibility on the part
of the driver. The parking sensors are switched off
:
- when you exit reverse gear,
- when the speed is higher than 6 mph
(10 km/h) in forward gear,
- when the vehicle has been station-
ary for more than three seconds in
forward gear.
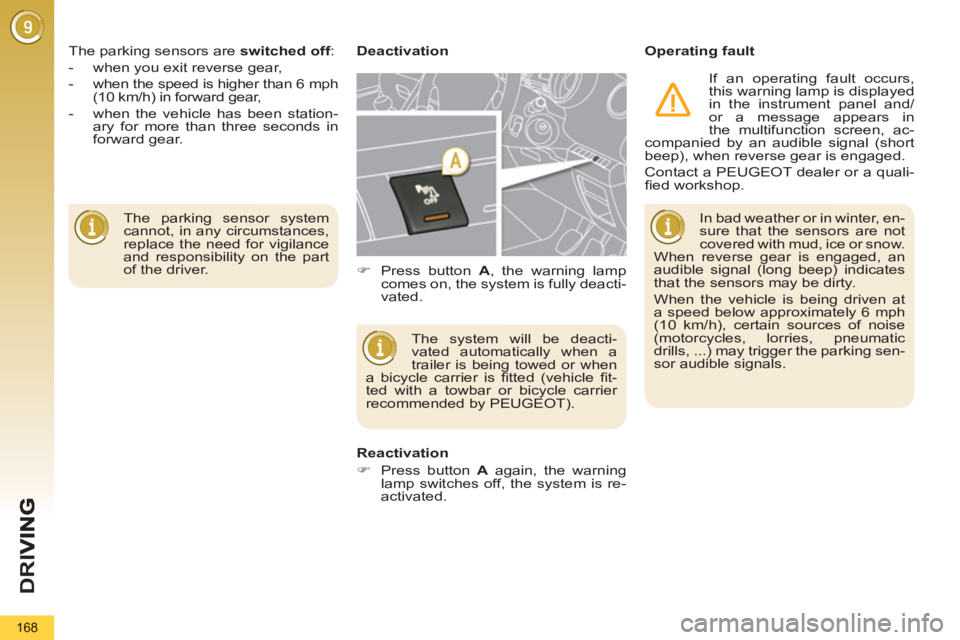
Deactivation
Operating fault
The system will be deacti-
vated automatically when a
trailer is being towed or when
a bicycle carrier is fi tted (vehicle fi t-
ted with a towbar or bicycle carrier
recommended by PEUGEOT).
Reactivation
�)
Press button A
again, the warning
lamp switches off, the system is re-
activated.
�)
Press button A
, the warning lamp
comes on, the system is fully deacti-
vated. In bad weather or in winter, en-
sure that the sensors are not
covered with mud, ice or snow.
When reverse gear is engaged, an
audible signal (long beep) indicates
that the sensors may be dirty.
When the vehicle is being driven at
a speed below approximately 6 mph
(10 km/h), certain sources of noise
(motorcycles, lorries, pneumatic
drills, ...) may trigger the parking sen-
sor audible signals.
If an operating fault occurs,
this warning lamp is displayed
in the instrument panel and/
or a message appears in
the multifunction screen, ac-
companied by an audible signal (short
beep), when reverse gear is engaged.
Contact a PEUGEOT dealer or a quali-
fi ed workshop.
Page 178 of 340
CHECKS
176
CHECKING LEVELS
Check all of these levels regularly and
top them up if necessary, unless other-
wise indicated.
If a level drops signifi cantly, have the
corresponding system checked by a
PEUGEOT dealer or a qualifi ed work-
shop.
Brake fluid level
Oil level
The check is carried out either
when the ignition is switched on
using the oil level indicator on
the instrument panel, or using
the dipstick.
This manual check will only be correct if the vehicle is on level ground and the engine
has been off for more than 30 minutes.
After topping up the oil, the check when
switching on the ignition with the oil level in-
dicator in the instrument panel will only be
valid 30 minutes after topping up. The brake fl uid level should be
close to the "MAX" mark. If it is
not, check the brake pad wear.
Changing the fl uid
Refer to the servicing booklet for details
of the interval for this operation.
Power steering fluid level
The power steering fl uid level
should be close to the "MAX"
mark. Unscrew the cap, with the
engine cold, to check the level.
Screenwash and headlamp
wash fluid
In the case of vehicles fi tted
with headlamp washers, the
low fl uid level is indicated by an
audible signal and a message
in the instrument panel screen.
Top up the reservoir when you stop the
vehicle.
Engine oil change
Refer to the servicing booklet for details
of the interval for this operation.
In order to maintain the reliability of the
engine and emission control system,
the use of additives in the engine oil is
prohibited.
Fluid specifi cation
The brake fl uid must conform to the
manufacturer's recommendations and
meet the DOT4 standard.
When the engine is warm, the temperature
of the coolant is regulated by the fan. This
can operate with the ignition off.
On vehicles which are fi tted with a par-
ticle emission fi lter, the fan may operate
after the vehicle has been switched off,
even if the engine is cold.
In addition, as the cooling system is
pressurised, wait at least one hour after
switching off the engine before carrying
out any work.
To avoid any risk of scalding, unscrew the
cap by two turns to allow the pressure to
drop. When the pressure has dropped, re-
move the cap and top up the level.
Coolant level
The coolant level should be
close to the "MAX" mark but
should never exceed it.
When working under the bon-
net, take care, as certain areas
of the engine may be extremely
hot (risk of burns).
It is normal to top up the oil level
between services. PEUGEOT
recommends that you check the
oil level and top up if necessary every
3 000 miles (5 000 kilometres).
Oil specifi cation
The oil must be the correct grade for
your engine and conform to the manu-
facturer's recommendations.
Changing the coolant
The coolant does not have to be changed.
Fluid specifi cation
The coolant must conform to the manu-
facturer's recommendations.
Page 201 of 340

PRACTICAL INFORMATION
199
PEUGEOT will not accept re-
sponsibility for the cost incurred
in repairing your vehicle or for
rectifying malfunctions resulting from the installation of accessories not supplied
and not recommended by PEUGEOT
and not installed in accordance with
its instructions, in particular when the
combined consumption of all of the ad-
ditional equipment connected exceeds
10 milliamperes.
Installing electrical
accessories
Your vehicle's electrical sys-
tem is designed to operate with stan-
dard or optional equipment.
Before installing other electrical
equipment or accessories on your
vehicle, contact a PEUGEOT dealer
or a qualifi ed workshop.
CHANGING A FUSE
Procedure for replacing a failed fuse
with a new fuse to rectify a failure of the
corresponding function.
Access to the tools
The fuse extraction tweezer is fi tted
to the back of the dashboard fusebox
cover.
To gain access to it:
�)
remove the cover completely,
�)
remove the tweezer.
Changing a fuse
Before changing a fuse, the cause of
the failure must be identifi ed and recti-
fi ed.
�)
Identify the failed fuse by checking
the condition of its fi lament.
�)
Use the special tweezer to extract
the fuse from its housing.
�)
Always replace the failed fuse with a
fuse of the same rating.
�)
Check that the number marked on
the fusebox, the rating marked on
the fuse and the following tables all
agree.
Good
Failed
Page 205 of 340

PRACTICAL INFORMATION
203
Engine compartment fuses
The fusebox is placed in the engine
compartment near the battery (left-hand
side).
Access to the fuses
�)
Unclip the cover.
�)
Change the fuse (see correspond-
ing paragraph).
�)
When you have fi nished, close the
cover carefully to ensure correct
sealing of the fusebox.
Fuse table
Fuse
N°
Rating
(A)
Functions
F1
20
Engine management unit supply, injection pump
and EGR electrovalves (2 litre HDI), injectors
(2 litre HDI).
F2
15
Horn.
F3
10
Front/rear screenwash.
F4
10
Daytime running lamps.
F5
15
Canister purge electrovalves, turbine discharge
and Turbo pressure regulation electrovalves
(1.6 l THP 16V), oil vapour heater (1.6 l THP 16V),
diesel heater (1.6 l HDI 16V).
F6
10
Diagnostic socket, directional headlamps, particle
emission fi lter pump (Diesel), Distance alert,
engine coolant level detector, mirror adjustment
control.
F7
10
Power steering control unit, automatic gearbox,
directional headlamps height adjustment motor.
F8
20
Starter motor control.
F9
10
Clutch and brake pedal switches.
F10
30
Engine management unit actuators (petrol: ignition
coils, electrovalves, oxygen sensors, injectors,
heaters, fuel pump, electronic thermostat)
(Diesel: electrovalves, heaters).
F11
40
Air conditioning blower.
Page 207 of 340
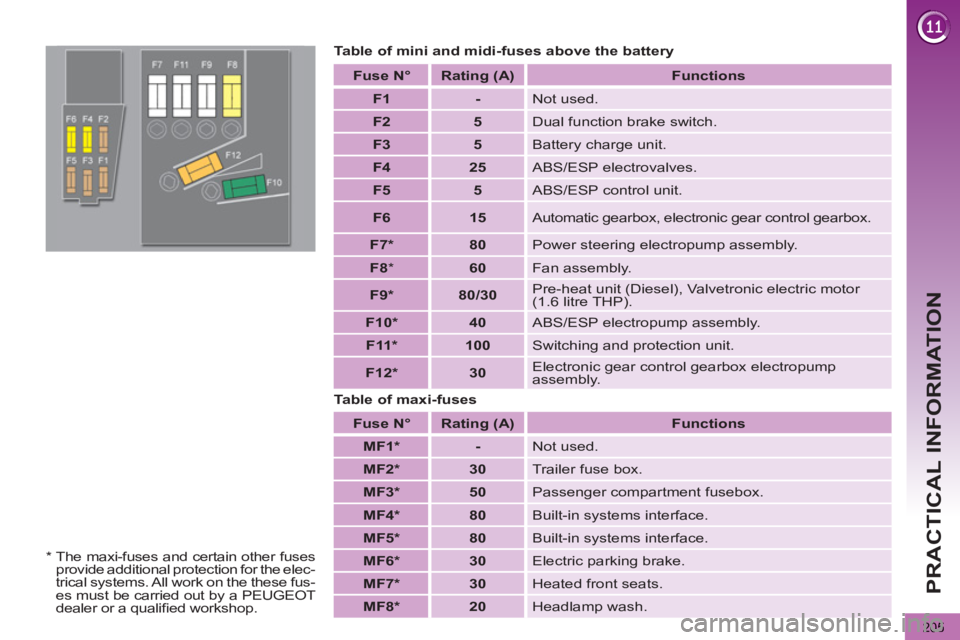
PRACTICAL INFORMATION
205
Table of mini and midi-fuses above the battery
Table of maxi-fuses
Fuse N°
Rating
(A)
Functions
F1
-
Not used.
F2
5
Dual function brake switch.
F3
5
Battery charge unit.
F4
25
ABS/ESP electrovalves.
F5
5
ABS/ESP control unit.
F6
15
Automatic gearbox, electronic gear control gearbox.
F7 *
80
Power steering electropump assembly.
F8
*
60
Fan assembly.
F9 *
80/30
Pre-heat unit (Diesel), Valvetronic electric motor
(1.6 litre THP).
F10 *
40
ABS/ESP electropump assembly.
F11 *
100
Switching and protection unit.
F12 *
30
Electronic gear control gearbox electropump
assembly.
Fuse N°
Rating (A)
Functions
MF1 *
-
Not used.
MF2 *
30
Trailer fuse box.
MF3 *
50
Passenger compartment fusebox.
MF4 *
80
Built-in systems interface.
MF5 *
80
Built-in systems interface.
MF6 *
30
Electric parking brake.
MF7 *
30
Heated front seats.
MF8 *
20
Headlamp wash.
*
The maxi-fuses and certain other fuses
provide additional protection for the elec-
trical systems. All work on the these fus-
es must be carried out by a PEUGEOT
dealer or a qualifi ed workshop.