2011 PEUGEOT 5008 ESP
[x] Cancel search: ESPPage 11 of 340
FA
M
9
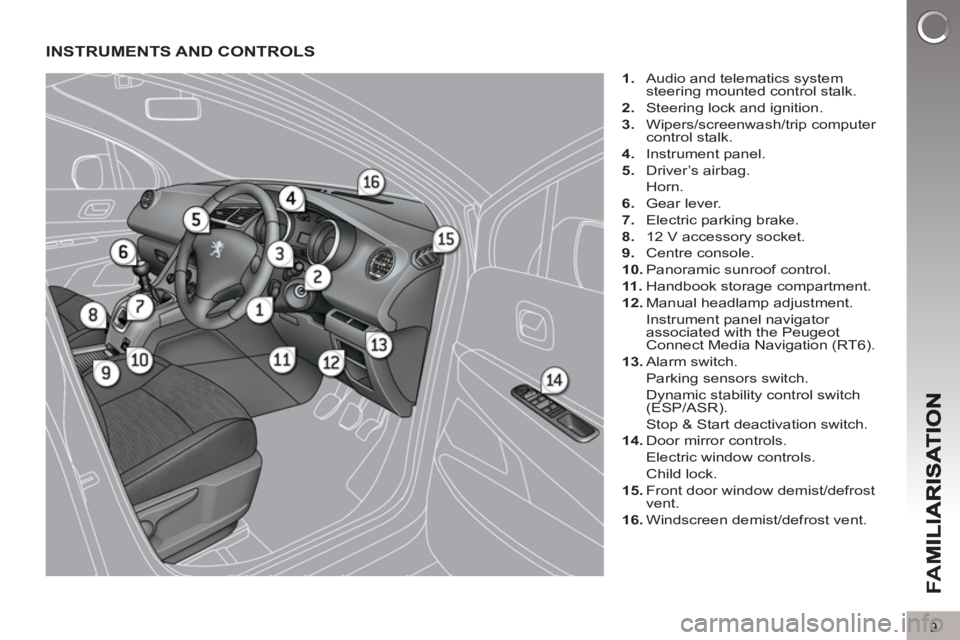
INSTRUMENTS AND CONTROLS
1.
Audio and telematics system
steering mounted control stalk.
2.
Steering lock and ignition.
3.
Wipers/screenwash/trip computer
control stalk.
4.
Instrument panel.
5.
Driver’s airbag.
Horn.
6.
Gear lever.
7.
Electric parking brake.
8.
12 V accessory socket.
9.
Centre console.
10.
Panoramic sunroof control.
11 .
Handbook storage compartment.
12.
Manual headlamp adjustment.
Instrument panel navigator
associated with the Peugeot
Connect Media Navigation (RT6).
13.
Alarm switch.
Parking sensors switch.
Dynamic stability control switch
(ESP/ASR).
Stop & Start deactivation switch.
14.
Door mirror controls.
Electric window controls.
Child lock.
15.
Front door window demist/defrost
vent.
16.
Windscreen demist/defrost vent.
Page 16 of 340
FA
M
14
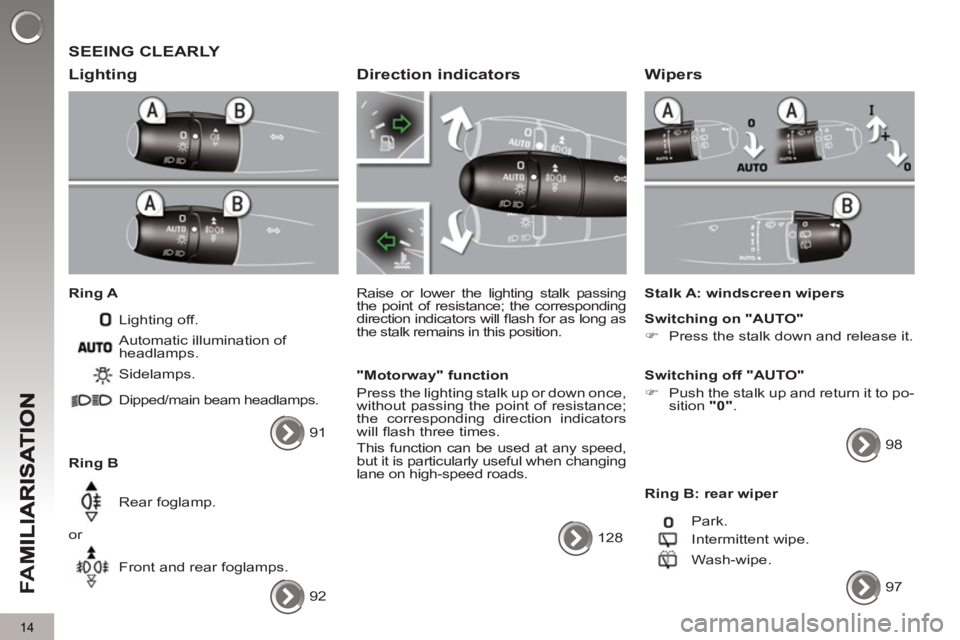
SEEING CLEARLY
Li
ghting
Ring A
Lighting off.
Ring B Sidelamps.
Dipped/main beam headlamps.
Rear foglamp.
or
Front and rear foglamps. Automatic illumination of
headlamps.
92
Direction indicators
Raise or lower the lighting stalk passing
the point of resistance; the corresponding
direction indicators will fl ash for as long as
the stalk remains in this position.
"Motorway" function
Press the lighting stalk up or down once,
without passing the point of resistance;
the corresponding direction indicators
will fl ash three times.
This function can be used at any speed,
but it is particularly useful when changing
lane on high-speed roads.
128
Wipers
Stalk A: windscreen wipers
Switching on "AUTO"
�)
Press the stalk down and release it.
Switching off "AUTO"
�)
Push the stalk up and return it to po-
sition "0"
.
98
Ring B: rear wiper
Park.
Intermittent wipe.
Wash-wipe.
97
91
Page 18 of 340
FA
M
16
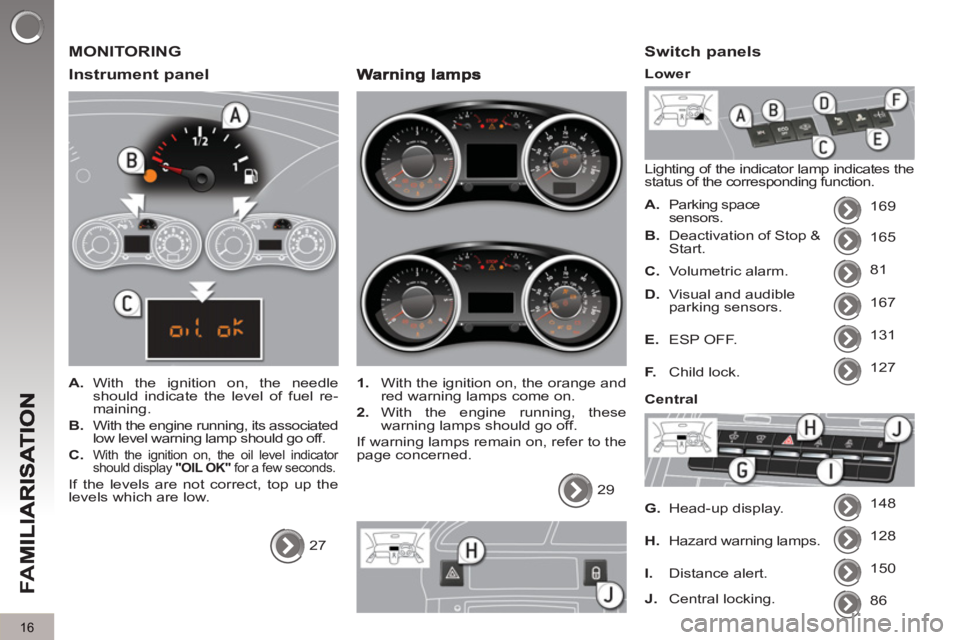
MONITORING
Instrument
panel
A.
With the ignition on, the needle
should indicate the level of fuel re-
maining.
B.
With the engine running, its associated
low level warning lamp should go off.
C.
With the ignition on, the oil level indicator
should display "OIL OK"
for a few seconds.
If the levels are not correct, top up the
levels which are low.
27
1.
With the ignition on, the orange and
red warning lamps come on.
2.
With the engine running, these
warning lamps should go off.
If warning lamps remain on, refer to the
page concerned.
29
Switch panels
Lighting of the indicator lamp indicates the
status of the corresponding function.
A.
Parking space
sensors. 169
165
81
167
131
127
148
128
B.
Deactivation of Stop &
Start.
C.
Volumetric alarm.
D.
Visual and audible
parking sensors.
E.
ESP OFF.
F.
Child lock.
G.
Head-up display.
H.
Hazard warning lamps.
Lower
Central
150
I.
Distance alert.
86
J.
Central locking.
Page 19 of 340
FA
M
17
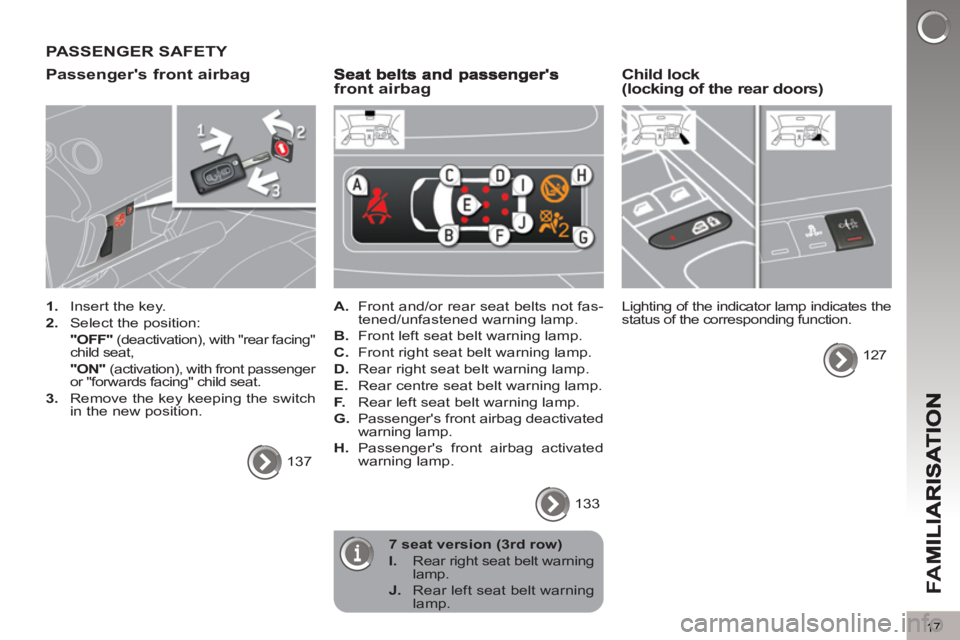
PASSENGER SAFETY
Passen
ger's front airbag
1.
Insert the key.
2.
Select the position:
"OFF"
(deactivation), with "rear facing"
child seat,
"ON"
(activation), with front passenger
or "forwards facing" child seat.
3.
Remove the key keeping the switch
in the new position.
137
front airbag
A.
Front and/or rear seat belts not fas-
tened/unfastened warning lamp.
B.
Front left seat belt warning lamp.
C.
Front right seat belt warning lamp.
D.
Rear right seat belt warning lamp.
E.
Rear centre seat belt warning lamp.
F.
Rear left seat belt warning lamp.
G.
Passenger's front airbag deactivated
warning lamp.
H.
Passenger's front airbag activated
warning lamp.
133
Child lock (locking of the rear doors)
Lighting of the indicator lamp indicates the
status of the corresponding function.
127
7 seat version (3rd row)
I.
Rear right seat belt warning
lamp.
J.
Rear left seat belt warning
lamp.
Page 31 of 340
29
IN
S
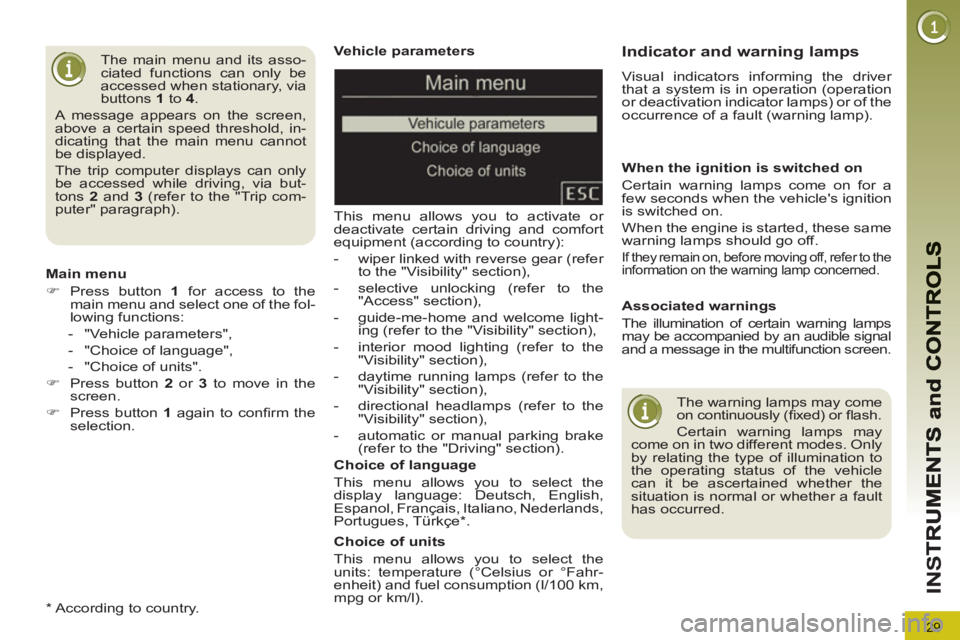
Vehicle parameters
This menu allows you to activate or
deactivate certain driving and comfort
equipment (according to country):
- wiper linked with reverse gear (refer
to the "Visibility" section),
- selective unlocking (refer to the
"Access" section),
- guide-me-home and welcome light-
ing (refer to the "Visibility" section),
- interior mood lighting (refer to the
"Visibility" section),
- daytime running lamps (refer to the
"Visibility" section),
- directional headlamps (refer to the
"Visibility" section),
- automatic or manual parking brake
(refer to the "Driving" section).
Choice of units
This menu allows you to select the
units: temperature (°Celsius or °Fahr-
enheit) and fuel consumption (l/100 km,
mpg or km/l).
Choice of language
This menu allows you to select the
display language: Deutsch, English,
Espanol, Français, Italiano, Nederlands,
Portugues, Türkçe * . The main menu and its asso-
ciated functions can only be
accessed when stationary, via
buttons 1
to 4
.
A message appears on the screen,
above a certain speed threshold, in-
dicating that the main menu cannot
be displayed.
The trip computer displays can only
be accessed while driving, via but-
tons 2
and 3
(refer to the "Trip com-
puter" paragraph).
Main menu
�)
Press button 1
for access to the
main menu and select one of the fol-
lowing functions:
- "Vehicle parameters",
- "Choice of language",
- "Choice of units".
�)
Press button 2
or 3
to move in the
screen.
�)
Press button 1
again to confi rm the
selection.
* According to country.
Indicator and warning lamps
Visual indicators informing the driver
that a system is in operation (operation
or deactivation indicator lamps) or of the
occurrence of a fault (warning lamp).
When the ignition is switched on
Certain warning lamps come on for a
few seconds when the vehicle's ignition
is switched on.
When the engine is started, these same
warning lamps should go off.
If they remain on, before moving off, refer to the
information on the warning lamp concerned.
Associated warnings
The illumination of certain warning lamps
may be accompanied by an audible signal
and a message in the multifunction screen.
The warning lamps may come
on continuously (fi xed) or fl ash.
Certain warning lamps may
come on in two different modes. Only
by relating the type of illumination to
the operating status of the vehicle
can it be ascertained whether the
situation is normal or whether a fault
has occurred.
Page 32 of 340
30
IN
S
Diesel engine
pre-heating
fi xed. The ignition switch is at the
2nd position (ignition on). Wait until the warning lamp has switched off before starting.
The duration for which the warning lamp is on is
determined by the climatic conditions.
Left-hand
direction
indicato
r
fl ashing
with buzzer. The lighting stalk is pushed
down.
Right-hand
direction
indicator
fl ashing
with buzzer. The lighting stalk is pushed
up.
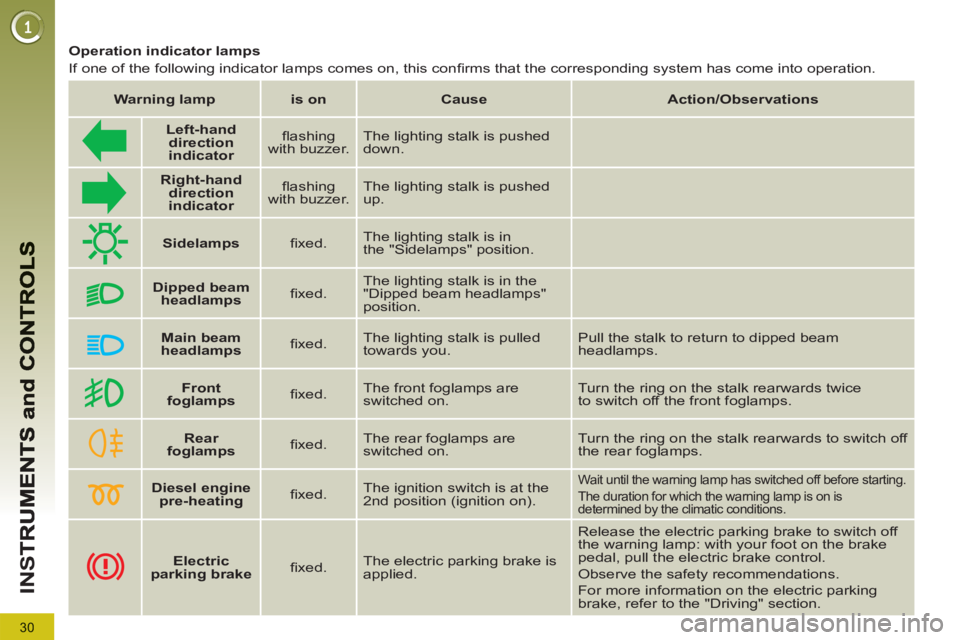
Operation indicator lamps
If one of the following indicator lamps comes on, this confi rms that the corresponding system has come into operation.
Warning lamp
is on
Cause
Action/Observations
Sidelamps
fi xed. The lighting stalk is in
the "Sidelamps" position.
Dipped beam
headlamps
fi xed. The lighting stalk is in the
"Dipped beam headlamps"
position.
Main beam
headlamps
fi xed. The lighting stalk is pulled
towards you. Pull the stalk to return to dipped beam
headlamps.
Front
foglamps
fi xed. The front foglamps are
switched on. Turn the ring on the stalk rearwards twice
to switch off the front foglamps.
Rear
foglamps
fi xed.
The rear foglamps are
switched on. Turn the ring on the stalk rearwards to switch off
the rear foglamps.
Electric
parking brake
fi xed. The electric parking brake is
applied. Release the electric parking brake to switch off
the warning lamp: with your foot on the brake
pedal, pull the electric brake control.
Observe the safety recommendations.
For more information on the electric parking
brake, refer to the "Driving" section.
Page 33 of 340
31
IN
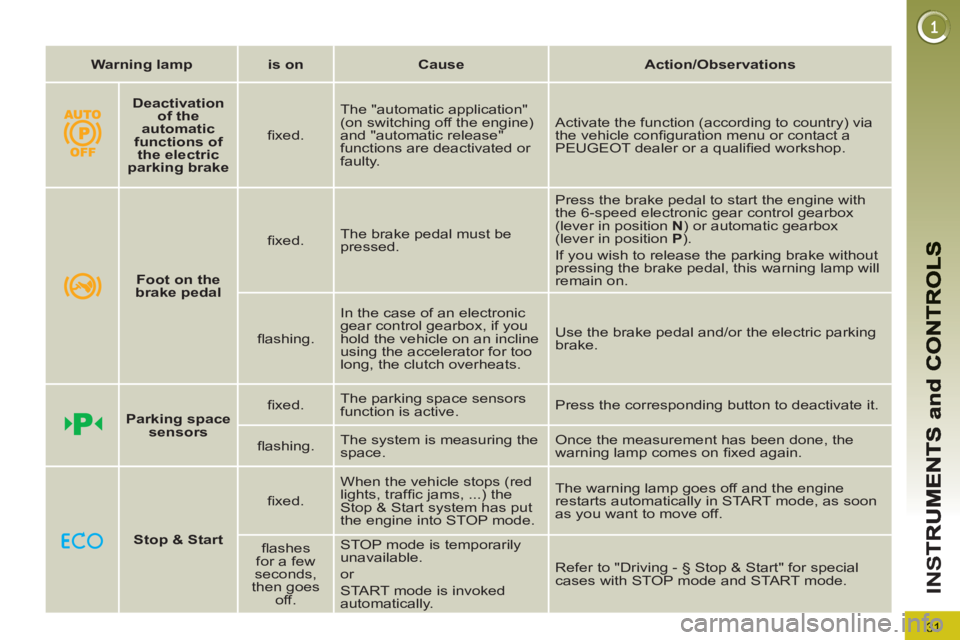
S
Warning lamp
is on
Cause
Action/Observations
Deactivation
of the
automatic
functions of
the electric
parking brake
fi xed. The "automatic application"
(on switching off the engine)
and "automatic release"
functions are deactivated or
faulty. Activate the function (according to country) via
the vehicle confi guration menu or contact a
PEUGEOT dealer or a qualifi ed workshop.
Foot on the
brake pedal
fi xed. The brake pedal must be
pressed. Press the brake pedal to start the engine with
the 6-speed electronic gear control gearbox
(lever in position N
) or automatic gearbox
(lever in position P
).
If you wish to release the parking brake without
pressing the brake pedal, this warning lamp will
remain on.
fl ashing. In the case of an electronic
gear control gearbox, if you
hold the vehicle on an incline
using the accelerator for too
long, the clutch overheats. Use the brake pedal and/or the electric parking
brake.
Parking space
sensors
fi xed. The parking space sensors
function is active. Press the corresponding button to deactivate it.
fl ashing. The system is measuring the
space. Once the measurement has been done, the
warning lamp comes on fi xed again.
Stop & Start
fi xed. When the vehicle stops (red
lights, traffi c jams, ...) the
Stop & Start system has put
the engine into STOP mode. The warning lamp goes off and the engine
restarts automatically in START mode, as soon
as you want to move off.
fl ashes
for a few
seconds,
then goes
off. STOP mode is temporarily
unavailable.
or
START mode is invoked
automatically. Refer to "Driving - § Stop & Start" for special
cases with STOP mode and START mode.
Page 34 of 340
32
IN
S
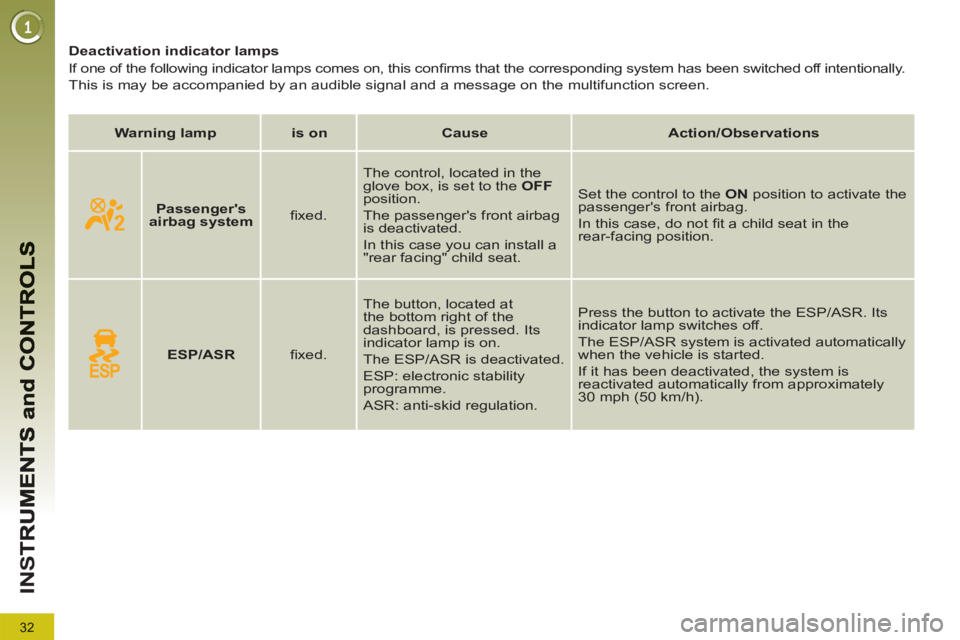
Deactivation indicator lamps
If one of the following indicator lamps comes on, this confi rms that the corresponding system has been switched off intentionally.
This is may be accompanied by an audible signal and a message on the multifunction screen.
Warning lamp
is on
Cause
Action/Observations
Passenger's
airbag system
fi xed. The control, located in the
glove box, is set to the OFF
position.
The passenger's front airbag
is deactivated.
In this case you can install a
"rear facing" child seat. Set the control to the ON
position to activate the
passenger's front airbag.
In this case, do not fi t a child seat in the
rear-facing position.
ESP/ASR
fi xed. The button, located at
the bottom right of the
dashboard, is pressed. Its
indicator lamp is on.
The ESP/ASR is deactivated.
ESP: electronic stability
programme.
ASR: anti-skid regulation. Press the button to activate the ESP/ASR. Its
indicator lamp switches off.
The ESP/ASR system is activated automatically
when the vehicle is started.
If it has been deactivated, the system is
reactivated automatically from approximately
30 mph (50 km/h).