2011 Peugeot 308 SW BL key
[x] Cancel search: keyPage 103 of 336
i
i
!
101
VISIBILITY
COURTESY LAMPS
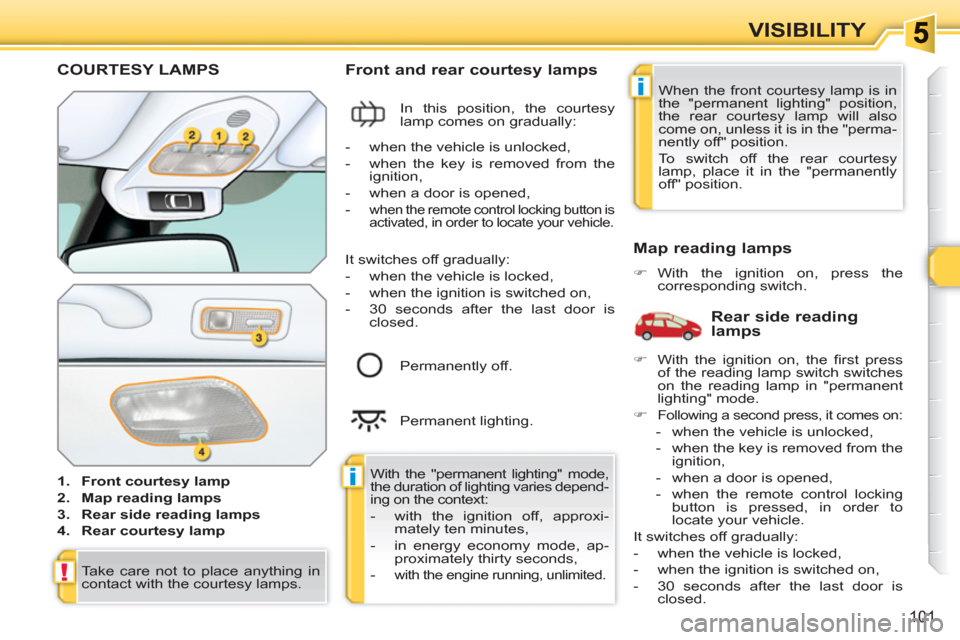
1.
Front courtesy lamp
2.
Map reading lamps
3.
Rear side reading lamps
4.
Rear courtesy lamp
Front and rear courtesy lamps
In this position, the courtesy
lamp comes on gradually:
Map reading lamps
�)
With the ignition on, press the
corresponding switch.
With the "permanent lighting" mode,
the duration of lighting varies depend-
ing on the context:
- with the ignition off, approxi-
mately ten minutes,
- in energy economy mode, ap-
proximately thirty seconds,
-
with the engine running, unli mited.
- when the vehicle is unlocked,
- when the key is removed from the
ignition,
- when a door is opened,
-
when the remote control locking button is
activated, in order to locate your vehicle.
Permanently off.
Permanent lighting.
When the front courtesy lamp is in
the "permanent lighting" position,
the rear courtesy lamp will also
come on, unless it is in the "perma-
nently off" position.
To switch off the rear courtesy
lamp, place it in the "permanently
off" position.
Rear side reading
lamps
It switches off gradually:
- when the vehicle is locked,
- when the ignition is switched on,
- 30 seconds after the last door is
closed.
Take care not to place anything in
contact with the courtesy lamps.
�)
With the ignition on, the fi rst press
of the reading lamp switch switches
on the reading lamp in "permanent
lighting" mode.
�)
Following a second press, it comes on:
- when the vehicle is unlocked,
- when the key is removed from the
ignition,
- when a door is opened,
- when the remote control locking
button is pressed, in order to
locate your vehicle.
It switches off gradually:
- when the vehicle is locked,
- when the ignition is switched on,
- 30 seconds after the last door is
closed.
Page 118 of 336
i
116
FITTINGS
High load retaining net
Hooked onto the special upper and lower
fi xings, this permits use of the entire load-
ing volume up to the roof behind the seats
of the 2nd row.
12 V accessory socket
�)
To connect a 12 V accessory (max
power: 120 W), remove the cap and
connect an appropriate adaptor.
�)
Turn the key to the ignition position.
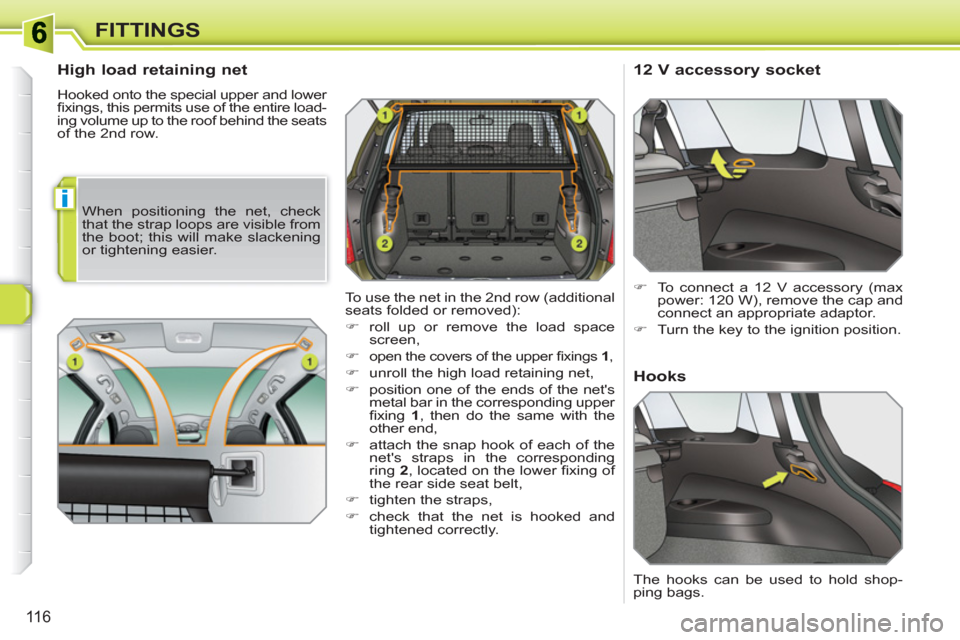
To use the net in the 2nd row (additional
seats folded or removed):
�)
roll up or remove the load space
screen,
�)
open the covers of the upper fi xings 1
,
�)
unroll the high load retaining net,
�)
position one of the ends of the net's
metal bar in the corresponding upper
fi xing 1
, then do the same with the
other end,
�)
attach the snap hook of each of the
net's straps in the corresponding
ring 2
, located on the lower fi xing of
the rear side seat belt,
�)
tighten the straps,
�)
check that the net is hooked and
tightened correctly.
Hooks
When positioning the net, check
that the strap loops are visible from
the boot; this will make slackening
or tightening easier.
The hooks can be used to hold shop-
ping bags.
Page 124 of 336

!
122
CHILD SAFETY
Installing a booster seat
The chest part of the seat belt must
be positioned on the child's shoulder
without touching the neck.
Ensure that the lap part of the seat
belt passes correctly over the child's
thighs.
PEUGEOT recommends the use of
a booster seat which has a back, fi t-
ted with a seat belt guide at shoulder
level.
As a safety precaution, do not leave:
- a child or children alone and
unsupervised in a vehicle,
- a child or an animal in a vehicle
which is exposed to the sun, with
the windows closed,
- the keys within reach of children
inside the vehicle.
To prevent accidental opening of the
doors and rear windows, use the "Child
lock".
Take care not to open the rear windows
by more than one third.
To protect young children from the
rays of the sun, fi t side blinds on the
rear windows.
The incorrect installation of a child
seat in a vehicle compromises the
child's protection in the event of an
accident.
Remember to fasten the seat belts or the
child seat harnesses keeping the slack
relative to the child's body to a minimum,
even for short journeys.
When installing a child seat using the
seat belt, ensure that the seat belt is
tightened correctly on the child seat and
that it secures the child seat fi rmly on the
seat of your vehicle.
For optimum installation of the "forwards-
facing" child seat, ensure that the back of
the child seat is in contact with the back
of the vehicle's seat and that the head re-
straint does not cause any discomfort.
If the head restraint has to be removed,
ensure that it is stored or attached se-
curely to prevent it from being thrown
around the vehicle in the event of sharp
braking. Children under the age of 10 must not
travel in the "forwards-facing" position
on the front passenger seat, unless
the rear seats are already occupied
by other children, cannot be used or
are absent.
Deactivate the passenger airbag
when a "rearwards-facing" child seat
is installed on the front seat.
Otherwise, the child would risk being
seriously injured or killed if the airbag
were to infl ate.
Page 129 of 336
!
!
127
CHILD SAFETY
This system is independent and in
no circumstances does it take the
place of the central locking control.
Check the status of the child lock each
time you switch on the ignition.
Always remove the key from the
ignition when leaving the vehicle,
even for a short time.
In the event of a serious impact,
the electric child lock is deactivated
automatically to permit the exit of
the rear passengers.
MANUAL CHILD LOCK
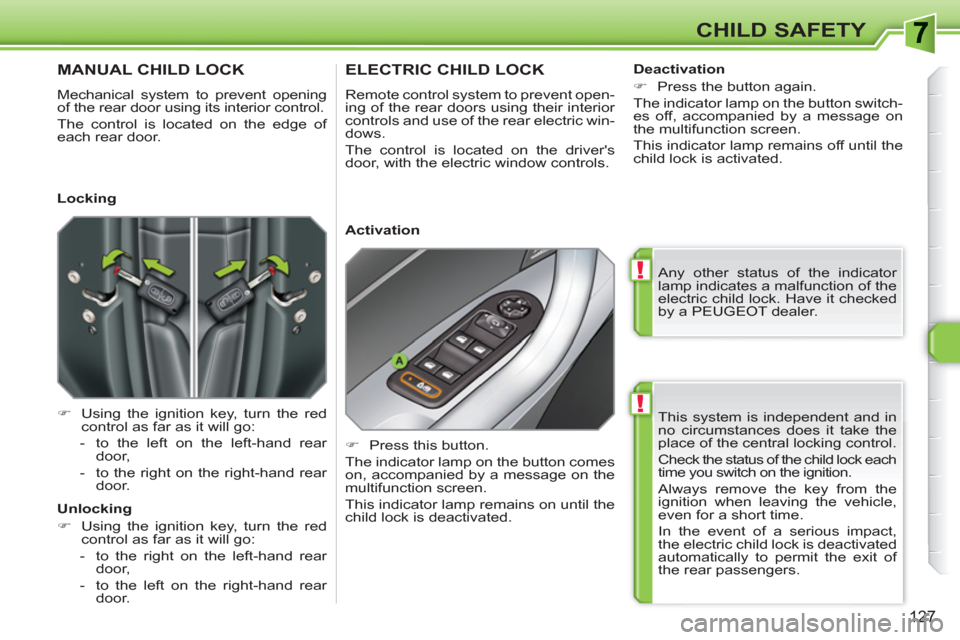
Mechanical system to prevent opening
of the rear door using its interior control.
The control is located on the edge of
each rear door.
�)
Using the ignition key, turn the red
control as far as it will go:
- to the left on the left-hand rear
door,
- to the right on the right-hand rear
door.
ELECTRIC CHILD LOCK
Remote control system to prevent open-
ing of the rear doors using their interior
controls and use of the rear electric win-
dows.
The control is located on the driver's
door, with the electric window controls.
�)
Press this button.
The indicator lamp on the button comes
on, accompanied by a message on the
multifunction screen.
This indicator lamp remains on until the
child lock is deactivated.
Locking
Unlocking
�)
Using the ignition key, turn the red
control as far as it will go:
- to the right on the left-hand rear
door,
- to the left on the right-hand rear
door.
Activation
Deactivation
�)
Press the button again.
The indicator lamp on the button switch-
es off, accompanied by a message on
the multifunction screen.
This indicator lamp remains off until the
child lock is activated.
Any other status of the indicator
lamp indicates a malfunction of the
electric child lock. Have it checked
by a PEUGEOT dealer.
Page 140 of 336
!
!
138
SAFETY
If at least one of the two airbag
warning lamps come on continu-
ously, do not install a child seat on
the front passenger seat.
Have the system checked by a
PEUGEOT dealer.
Operating fault
If this warning lamp comes on on
the instrument panel, accompa-
nied by an audible warning and
a message on the multifunction
screen, contact a PEUGEOT dealer to
have the system checked. The airbags
may no longer be triggered in the event
of a serious impact.
Knee airbag *
System which protects the driver's
knees in the event of a serious front im-
pact.
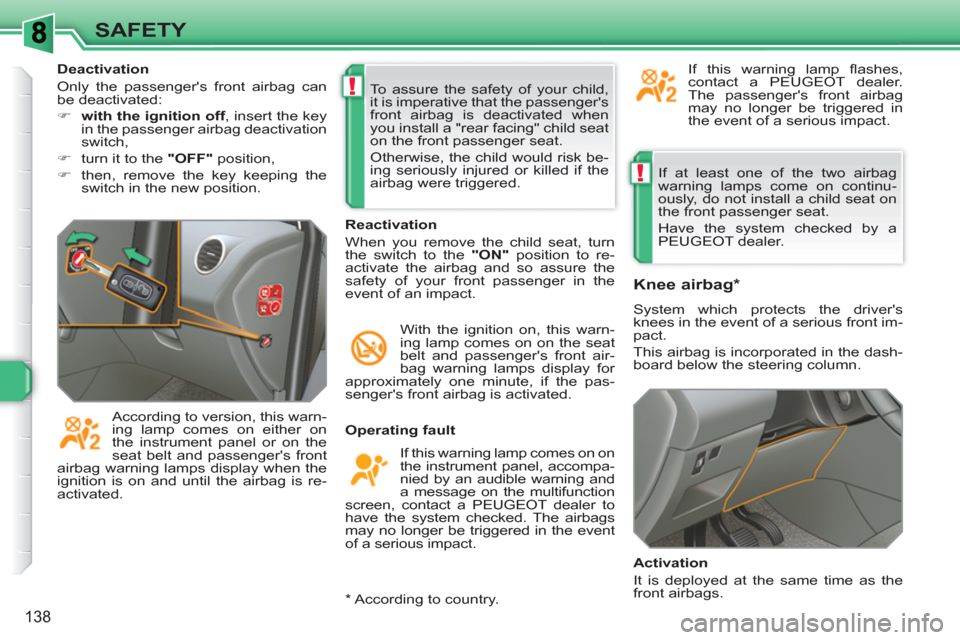
This airbag is incorporated in the dash-
board below the steering column.
Activation
It is deployed at the same time as the
front airbags.
Reactivation
When you remove the child seat, turn
the switch to the "ON"
position to re-
activate the airbag and so assure the
safety of your front passenger in the
event of an impact.
With the ignition on, this warn-
ing lamp comes on on the seat
belt and passenger's front air-
bag warning lamps display for
approximately one minute, if the pas-
senger's front airbag is activated. To assure the safety of your child,
it is imperative that the passenger's
front airbag is deactivated when
you install a "rear facing" child seat
on the front passenger seat.
Otherwise, the child would risk be-
ing seriously injured or killed if the
airbag were triggered.
According to version, this warn-
ing lamp comes on either on
the instrument panel or on the
seat belt and passenger's front
airbag warning lamps display when the
ignition is on and until the airbag is re-
activated. If this warning lamp fl ashes,
contact a PEUGEOT dealer.
The passenger's front airbag
may no longer be triggered in
the event of a serious impact.
Deactivation
Only the passenger's front airbag can
be deactivated:
�)
with the ignition off
, insert the key
in the passenger airbag deactivation
switch,
�)
turn it to the "OFF"
position,
�)
then, remove the key keeping the
switch in the new position.
*
According to country.
Page 195 of 336

1
!
i
193
PRACTICAL INFORMATION
Do not disconnect the terminals
while the engine is running.
Do not charge the batteries without
disconnecting the terminals fi rst.
Do not push the vehicle to start the
engine if it is fi tted with a 6-speed
electronic gear control gearbox.
The batteries contain harmful sub-
stances such as sulphuric acid and
lead. They must be disposed of in
accordance with regulations and
must not, in any circumstances, be
discarded with household waste.
Take used remote control batteries
and vehicle batteries to a special
collection point.
It is advisable to disconnect the
battery if the vehicle is to be left un-
used for more than one month.
Before disconnecting the battery
Wait 2 minutes after switching off
the ignition before disconnecting
the battery.
Close the windows and the doors
before disconnecting the battery.
Following reconnection of the
battery
Following reconnection of the bat-
tery, switch on the ignition and wait
1 minute before starting to permit
initialisation of the electronic sys-
tems. However, if problems are en-
countered following this operation,
contact a PEUGEOT dealer.
Referring to the corresponding sec-
tion, you must yourself reinitialise:
- the remote control key,
- the panoramic sunroof blind,
- the GPS satellite navigation
system.
Charging the battery using a
battery charger
�)
Disconnect the battery from the
vehicle.
�)
Follow the instructions for use
provided by the manufacturer of the
charger.
�)
Reconnect starting with the negative
terminal (-).
�)
Check that the terminals and connectors
are clean. If they are covered with
sulphate (whitish or greenish deposit),
remove them and clean them.
�)
Connect one end of the green
or black cable to the negative
terminal (-) of the slave battery B
.
�)
Connect the other end of the green
or black cable to the earth point C
on the broken down vehicle.
�)
Operate the starter, let the engine
run.
�)
Wait until the engine returns to idle
and disconnect the cables.
Page 236 of 336

234
01
2ABC3DEF
5JKL4GHI6MNO
8TUV7PQRS9WXYZ
0*#
1
RADIO MEDIANAV ESC TRAFFIC
SETUPADDR
BOOK
1
10
2
3
4
612
9
7
8
115
TU PQRS
0*
1. CD eject.
2.RADIO: access to the "Radio" Menu. Display the list of stations in alphabetical order (FM waveband) or frequency order (AM waveband).
MEDIA: access to the "Media" Menu (Audio CD, Jukebox, External Device). Display the list of tracks. Change of source.
NAV: access to the "Navigation" Menu and display of thelast destinations.
ESC: abandon the operation in progress. Long press: return to the main display.
TRAFFIC: access to the "Traffi c" Menu (function describedin detail in sections 02 and 10).
ADDR BOOK: access to the "Address book" Menu (function described in detail in section 10).
SETUP: access to the "SETUP" Menu (confi guration) (function described in detail in sections 02 and 10). Long press: GPS coverage.
3. Audio settings (Balance/Fader, Bass/Treble, MusicalAmbience...).
4. Volume adjustment (each source is independent, including message and navigation alert) Long press: reinitialisation of the system. Short press: mute.
5. Automatic search for a radio station on a lower frequency. Selection of the previous CD or MP3 track.
6. Automatic search for a radio station on a higher frequency. Selection of the next CD or MP3 track.
FIRST STEPS
Peugeot Connect Media CONTROL PANEL
7.
Normal display or black screen.
8.
Selection of the successive display on the screen of "MAP"/"NAV" (if navigation is in progress)/"TEL" (if a conversation is inprogress)/"RADIO" or "MEDIA" currently being played.
9.
PICK UP: access to the "Phone" menu. With Bluetooth connection, accept an incoming call.
10.
HANG UP: access to the "Phone" menu. Hang up the current call or refuse an incoming call, withBluetooth connection.
11 .
Entering of numbers or letters on the alpha-numeric keypad, pre-selection of 10 radio frequencies.
12.
SD card reader.
Short press: clears the last character.
Long press: activates voicerecognition.
Page 237 of 336
235
01
2ABC3DEF
5JKL4GHI6MNO
8TUV7PQRS9WXYZ
0*#
1
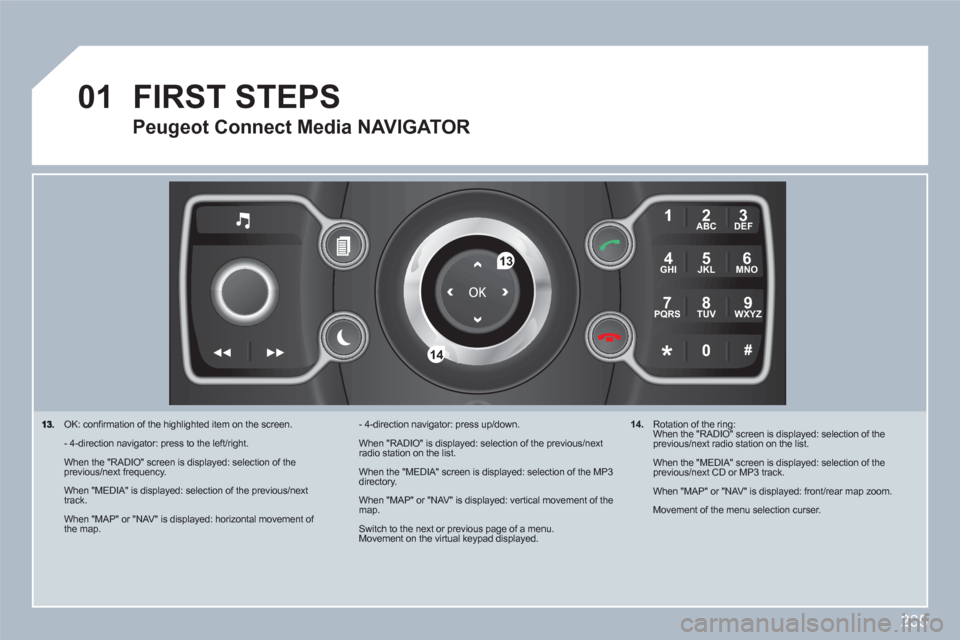
13
14
OK: confi rmation of the highlighted item on the screen.
- 4-direction navigator: press to the left/right.
When the "RADIO" screen is displayed: selection of theprevious/next frequency.
When "MEDIA" is displayed: selection of the previous/nexttrack.
When "MAP" or "NAV" is displayed: horizontal movement of the map.
- 4-direction navigator: press up/down.
When "RADIO" is displayed: selection of the previous/nextradio station on the list.
When the "MEDIA" screen is displayed: selection of the MP3directory.
When "MAP" or "NAV" is displayed: vertical movement of themap.
Switch to the next or previous page of a menu. Movement on the virtual keypad displayed.
FIRST STEPS
Peugeot Connect Media NAVIGATOR
14.
Rotation of the ring: When the "RADIO" screen is displayed: selection of the previous/next radio station on the list.
When the "MEDIA" screen is displayed: selection of the previous/next CD or MP3 track.
When "MAP" or "NAV" is displayed: front/rear map zoom.
Movement of the menu selection curser.