2011 PEUGEOT 308 instrument panel
[x] Cancel search: instrument panelPage 4 of 328

CONTENTS
FAMILIARISATION 4-26
INSTRUMENTS and
CONTROLS 27-41CHILD SAFETY 113-123
MULTIFUNCTION
SCREENS 42-57SAFETY 124-136 COMFORT 58-73
ACCESS 74-88
VISIBILITY 89-99FITTINGS 100-112
Instrument panels 27
Indicator and warning lamps 29
Indicators 37
Adjustment buttons 41Child seats 113
ISOFIX child seats 120
Child lock 123
Screen A without audio equipment 42
Screen A with audio equipment 44
Screen C
(Peugeot Connect Sound) 46
16/9 retractable colour screen
(Peugeot Connect Navigation
(RNEG)) 49
16/9 high definition retractable colour
screen (Peugeot Connect Media) 51
Trip computer 54Direction indicators 124
Hazard warning lamps 124
Horn 124
Tyre under-inflation detection 125
ESC system 126
Grip control 128
Front seat belts 130
Airbags 133 Heating and Ventilation 58
Manual air conditioning 60
Rear screen demist/defrost 61
Dual-zone digital air conditioning 62
Front seats 65
Rear seats 69
Mirrors 71
Steering wheel adjustment 73
Remote control key 74
Alarm 79
Electric windows 81
Doors 83
Boot 85
Lower tailgate 86
Fuel tank 87
Misfuel prevention 88
Lighting controls 89
Automatic illumination
of headlamps 92
Headlamp adjustment 92
Directional lighting 93
Wiper controls 94
Automatic rain sensitive wipers 96
Courtesy lamps 97
Interior mood lighting 98Interior fittings 100
Front armrest 102
Rear multimedia 104
Panoramic sunroof 106
Boot fittings 107
ECO-DRIVING 25
Page 12 of 328

10
FAMILIARISATION
INSTRUMENTS AND CONTROLS
1.
Wiper/screenwash/trip computer
control stalk.
2.
Audio and telematics system
steering mounted control.
3.
Steering lock and ignition.
4.
Instrument panel.
5.
Driver’s airbag.
Horn.
6.
Gear lever.
7.
Electric parking brake.
8.
Front armrest - Peugeot Connect
USB and/or JACK auxiliary socket.
9.
12 V accessory socket.
10.
Driver’s storage compartment
(Handbook).
11 .
Alarm switch.
Parking sensors switch.
Dynamic stability control switch
(ESP/ASR).
Stop & Start deactivation switch.
12.
Manual headlamp adjustment.
Instrument panel navigator
associated with the Peugeot
Connect Media Navigation (RT6).
13.
Door mirror controls.
Electric window controls.
Child lock.
14.
Front side window demisting vent.
15.
Windscreen demisting vent.
Page 18 of 328

16
FAMILIARISATION
MONITORING
Instrument panel
A.
With the ignition on, the needle should
indicate the level of fuel remaining.
B.
With the engine running, its associated
low level warning lamp should go off.
C.
With the ignition on, the oil level in-
dicator should display "OIL OK"
for
a few seconds.
If the levels are not correct, top up the
levels which are low.
27
Warning lamps
1.
With the ignition on, the orange and
red warning lamps come on.
2.
With the engine running, these
warning lamps should go off.
If warning lamps remain on, refer to the
page concerned.
29
Switch panels
Lighting of the indicator lamp indicates
the status of the corresponding function.
A.
Deactivating the
Stop & Start system. 162
79
164
127
82, 123
145
124
147
B.
Volumetric alarm.
C.
Visual and audible
parking sensors.
D.
ESP OFF (without
Grip control).
E.
Child lock.
F.
Head-up display.
G.
Hazard warning lamps.
H.
Distance alert.
Lower
Central
I.
Central locking. 84
Page 22 of 328

20
FAMILIARISATION
Before refuelling or doing any-
thing under the bonnet, you
must switch off the ignition us-
ing the key.
DRIVING SAFELY
Stop & Start
Going into engine STOP mode
The "ECO"
warning lamp
comes on in the instrument
panel and the engine automati-
cally goes into standby, with a
6-speed electronic gear control gear-
box
and at speeds below 4 mph (6 km/h),
press the brake pedal or put the gear
lever in position N
.
Going into engine START mode
Deactivation/Reactivation
You can deactivate the system at any
time by pressing the "ECO OFF"
but-
ton; the warning lamp in the button
comes on.
161 The system is reactivated au-
tomatically at every new start
using the key. The "ECO"
warning lamp goes
off and the engine restarts auto-
matically with a 6-speed elec-
tronic gear control gearbox
:
- gear lever in position A
or M
, release
the brake pedal,
- or gear lever in position N
and the
brake pedal released, move the
gear lever to position A
or M
,
- or engage reverse.
In some circumstances, STOP mode
may not be available; the "ECO"
warn-
ing lamp fl ashes for few seconds, then
goes off. In some circumstances START mode
may be invoked automatically; the
"ECO"
warning lamp fl ashes for a few
seconds, then goes off.
Page 23 of 328

21
FAMILIARISATION
Electric parking brake
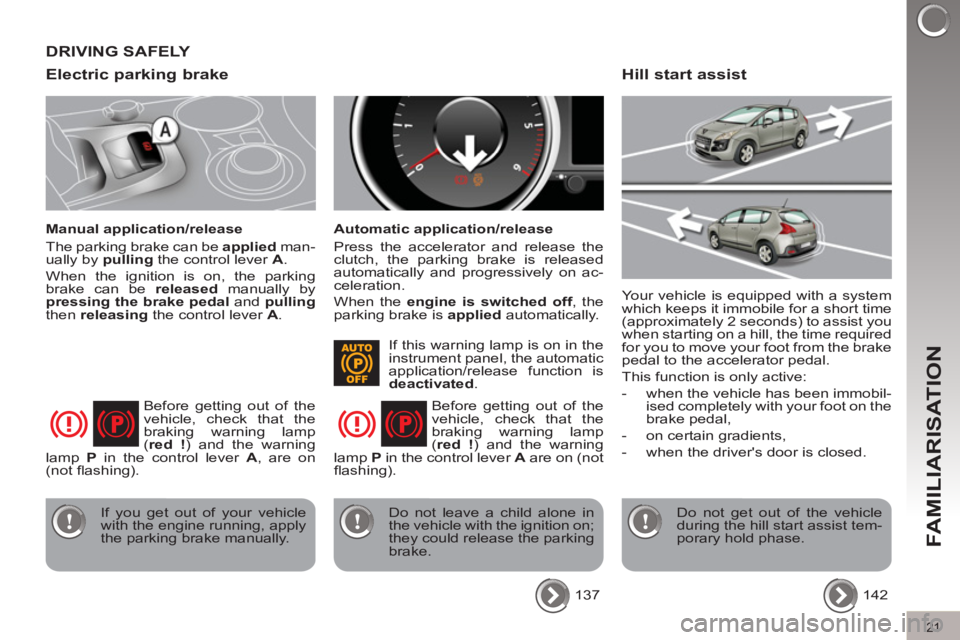
Manual application/release
The parking brake can be applied
man-
ually by pulling
the control lever A
.
When the ignition is on, the parking
brake can be released
manually by
pressing the brake pedal
and pulling
then releasing
the control lever A
.
Automatic application/release
Press the accelerator and release the
clutch, the parking brake is released
automatically and progressively on ac-
celeration.
When the engine is switched off
, the
parking brake is applied
automatically.
Before getting out of the
vehicle, check that the
braking warning lamp
( red !
) and the warning
lamp P
in the control lever A
, are on
(not fl ashing).
If you get out of your vehicle
with the engine running, apply
the parking brake manually. Before getting out of the
vehicle, check that the
braking warning lamp
( red !
) and the warning
lamp P
in the control lever A
are on (not
fl ashing).
Do not leave a child alone in
the vehicle with the ignition on;
they could release the parking
brake.
137
Your vehicle is equipped with a system
which keeps it immobile for a short time
(approximately 2 seconds) to assist you
when starting on a hill, the time required
for you to move your foot from the brake
pedal to the accelerator pedal.
This function is only active:
- when the vehicle has been immobil-
ised completely with your foot on the
brake pedal,
- on certain gradients,
- when the driver's door is closed.
Do not get out of the vehicle
during the hill start assist tem-
porary hold phase.
142
Hill start assist
If this warning lamp is on in the
instrument panel, the automatic
application/release function is
deactivated
.
DRIVING SAFELY
Page 25 of 328

23
FAMILIARISATION
DRIVING SAFELY
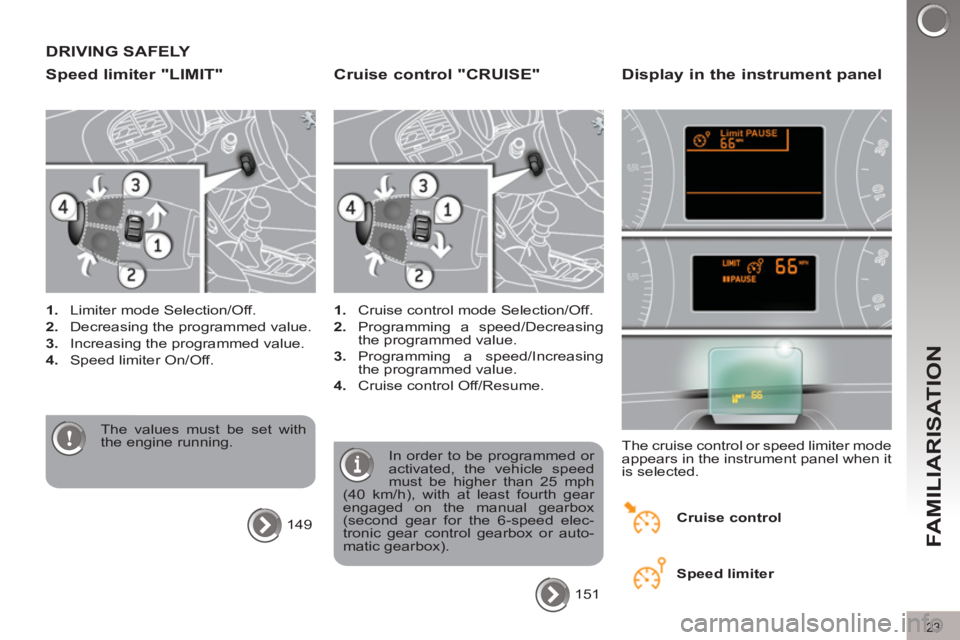
Speed limiter "LIMIT"
1.
Limiter mode Selection/Off.
2.
Decreasing the programmed value.
3.
Increasing the programmed value.
4.
Speed limiter On/Off.
The values must be set with
the engine running.
149
Cruise control "CRUISE"
1.
Cruise control mode Selection/Off.
2.
Programming a speed/Decreasing
the programmed value.
3.
Programming a speed/Increasing
the programmed value.
4.
Cruise control Off/Resume.
In order to be programmed or
activated, the vehicle speed
must be higher than 25 mph
(40 km/h), with at least fourth gear
engaged on the manual gearbox
(second gear for the 6-speed elec-
tronic gear control gearbox or auto-
matic gearbox).
151
Display in the instrument panel
The cruise control or speed limiter mode
appears in the instrument panel when it
is selected.
Cruise control
Speed limiter
Page 27 of 328

Optimise the use of your
gearbox
With a manual gearbox, move off gen-
tly, change up without waiting and
drive by changing up quite soon. If
your vehicle has the system, the gear
shift indicator invites you to change up;
it is displayed in the instrument panel,
follow its instructions.
With an automatic or electronic gear-
box, stay in Drive "D"
or Auto "A"
, ac-
cording to the type of gearbox, without
pressing the accelerator pedal heavily
or suddenly.
Drive smoothly
Maintain a safe distance between vehi-
cles, use engine braking rather than the
brake pedal, and press the accelerator
progressively. These practices contrib-
ute towards a reduction in fuel consump-
tion and CO
2 emissions and also helps
reduce the background traffi c noise.
If your vehicle has cruise control, make
use of the system at speeds above
25 mph (40 km/h) when the traffi c is
fl owing well.
Control the use of your electrical equipment
Before moving off, if the passenger
compartment is too warm, ventilate it by
opening the windows and air vents be-
fore using the air conditioning.
Above 30 mph (50 km/h), close the win-
dows and leave the air vents open.
Remember to make use of equipment
that can help keep the temperature in
the passenger compartment down (sun
roof and window blinds...).
Switch off the air conditioning, unless
it has automatic digital regulation, as
soon as the desired temperature is at-
tained.
Switch off the demisting and defrosting
controls, if not automatic.
Switch off the heated seat as soon as
possible.
Switch off the headlamps and front
foglamps when the level of light does
not require their use.
Avoid running the engine before moving
off, particularly in winter; your vehicle will
warm up much faster while driving.
As a passenger, if you avoid connecting
your multimedia devices (fi lm, music,
video game...), you will contribute to-
wards limiting the consumption of elec-
trical energy, and so of fuel.
Disconnect your portable devices be-
fore leaving the vehicle.
ECO-DRIVING
25
Eco-driving is a range of everyday practices that allow the motorist to optimise their fuel consumption and CO2 emis-
sions.
Page 29 of 328

27
INSTRUMENTS and CONTROLS
INSTRUMENT PANELS
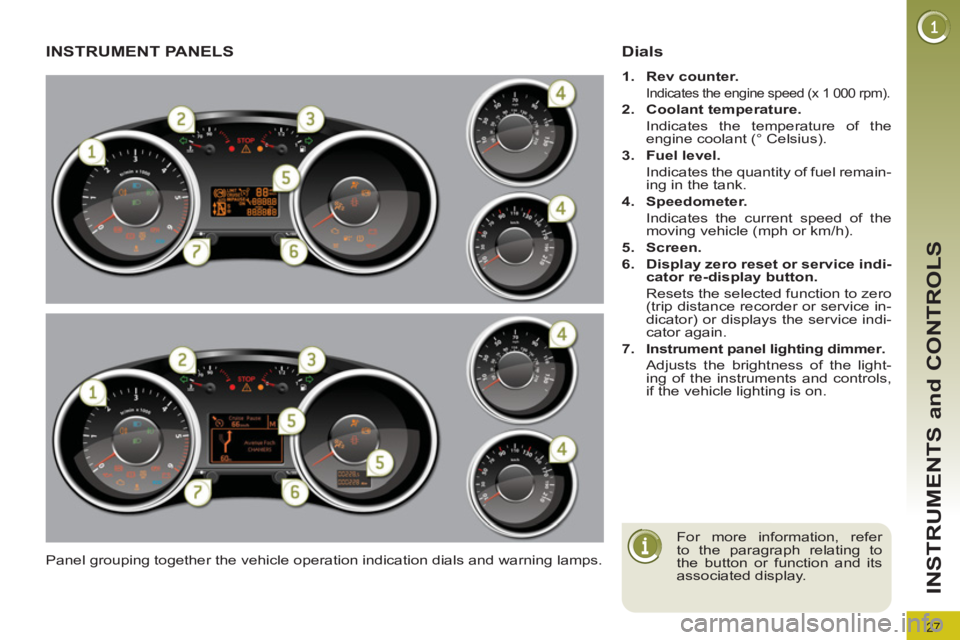
Panel grouping together the vehicle operation indication dials and warning lamps.
Dials
1.
Rev counter.
Indicates the engine speed (x 1 000 rpm).
2.
Coolant temperature.
Indicates the temperature of the
engine coolant (° Celsius).
3.
Fuel level.
Indicates the quantity of fuel remain-
ing in the tank.
4.
Speedometer.
Indicates the current speed of the
moving vehicle (mph or km/h).
5.
Screen.
6.
Display zero reset or service indi-
cator re-display button.
Resets the selected function to zero
(trip distance recorder or service in-
dicator) or displays the service indi-
cator again.
7.
Instrument panel lighting
dimmer
.
Adjusts the brightness of the light-
ing of the instruments and controls,
if the vehicle lighting is on.
For more information, refer
to the paragraph relating to
the button or function and its
associated display.