2011 Peugeot 308 CC manual radio set
[x] Cancel search: manual radio setPage 216 of 292
214
08
1
4
5
2ABC3DEF5JKL4GHI6MNO8TUV7PQRS9WXYZ0*#
1RADIO MEDIANAV ESC TRAFFIC
SETUPADDR
BOOK
2ABC3DEF5JKL4GHI6MNO8TUV7PQRS9WXYZ0*#
1RADIO MEDIANAV ESC TRAFFIC
SETUPADDR
BOOK
32ABC3DEF5JKL4GHI6MNO8TUV7PQRS9WXYZ0*#
1RADIO MEDIANAV ESC TRAFFIC
SETUPADDR
BOOK
22ABC3DEF5JKL4GHI6MNO8TUV7PQRS9WXYZ0*#
1RADIO MEDIANAV ESC TRAFFIC
SETUPADDR
BOOK2ABC3DEF5JKL4GHI6MNO8TUV7PQRS9WXYZ0*#
1RADIO MEDIANAV ESC TRAFFIC
SETUPADDR
BOOK
2ABC3DEF5JKL4GHI6MNO8TUV7PQRS9WXYZ0*#
1RADIO MEDIANAV ESC TRAFFIC
SETUPADDR
BOOK
*
The services available via the telephone depend on the network, the
SIM card and the compatibility of the Bluetooth equipment used. Refer to
your telephone's manual and your operator to check which services you
have access to. A list of mobile telephones which offer the best range of
services is available from dealers.
USING THE TELEPHONE
PAIRING A BLUETOOTH TELEPHONE
FIRST CONNECTION
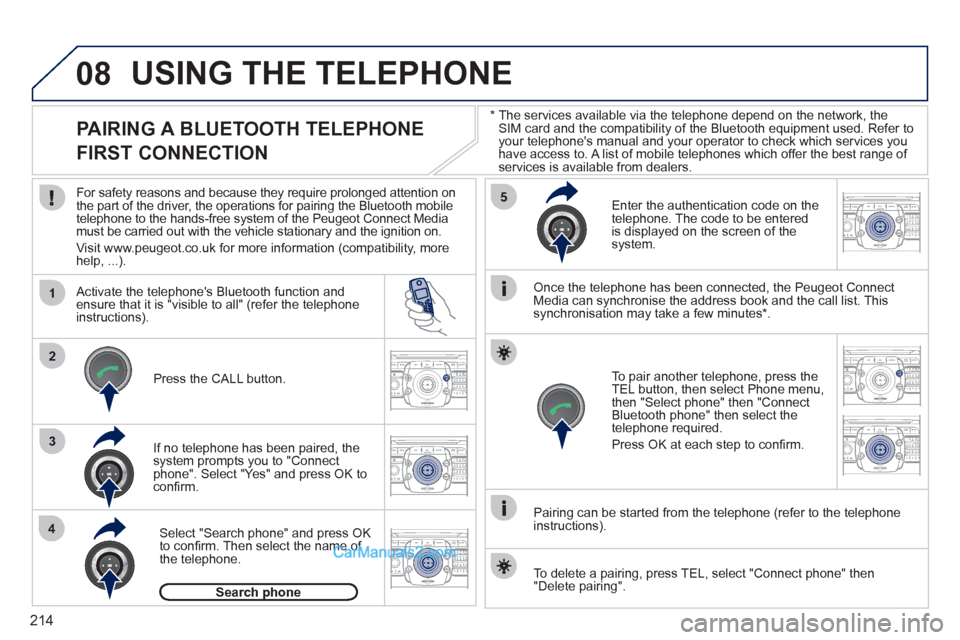
For safety reasons and because they require prolonged attention on
the part of the driver, the operations for pairing the Bluetooth mobile
telephone to the hands-free system of the Peugeot Connect Media
must be carried out with the vehicle stationary and the ignition on.
Visit www.peugeot.co.uk for more information (compatibility, more
help, ...).
Activate the telephone's Bluetooth function and
ensure that it is "visible to all" (refer the telephone
instructions).
If no telephone has been paired, the
system prompts you to "Connect
phone". Select "Yes" and press OK to
confi rm.
Enter the authentication code on the
telephone. The code to be entered
is displayed on the screen of the
system.
To pair another telephone, press the
TEL button, then select Phone menu,
then "Select phone" then "Connect
Bluetooth phone" then select the
telephone required.
Press OK at each step to confi rm.
Once the telephone has been connected, the Peugeot Connect
Media can synchronise the address book and the call list. This
synchronisation may take a few minutes * .
Pairing can be started from the telephone (refer to the telephone
instructions).
Press the CALL button.
Select "Search phone" and press OK
to confi rm. Then select the name of
the telephone.
Search phone
To delete a pairing, press TEL, select "Connect phone" then
"Delete pairing".
Page 217 of 292
215
08
1
2
2ABC3DEF5JKL4GHI6MNO8TUV7PQRS9WXYZ0*#
1RADIO MEDIANAV ESC TRAFFIC
SETUPADDR
BOOK
*
The services available via the telephone depend on the network, the
SIM card and the compatibility of the Bluetooth equipment used. Refer to
your telephone's manual and your operator to check which services you
have access to. A list of mobile telephones which offer the best range of
services is available from dealers.
USING THE TELEPHONE
CONNECTING A BLUETOOTH
TELEPHONE
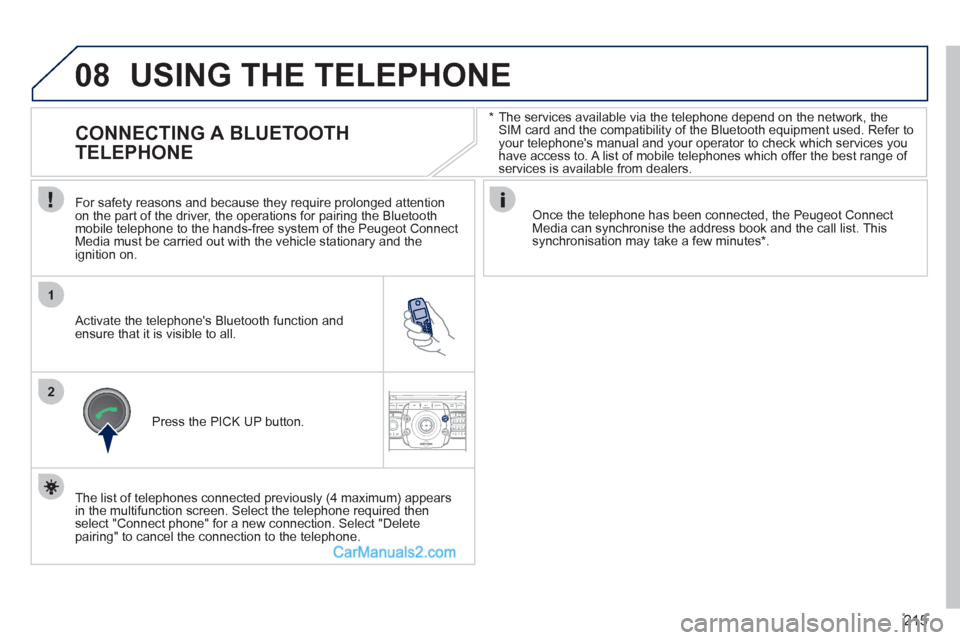
For safety reasons and because they require prolonged attention
on the part of the driver, the operations for pairing the Bluetooth
mobile telephone to the hands-free system of the Peugeot Connect
Media must be carried out with the vehicle stationary and the
ignition on.
Activate the telephone's Bluetooth function and
ensure that it is visible to all.
Once the telephone has been connected, the Peugeot Connect
Media can synchronise the address book and the call list. This
synchronisation may take a few minutes * .
Press the PICK UP button.
The list of telephones connected previously (4 maximum) appears
in the multifunction screen. Select the telephone required then
select "Connect phone" for a new connection. Select "Delete
pairing" to cancel the connection to the telephone.
Page 220 of 292
218
09
1
4
5
2ABC3DEF5JKL4GHI6MNO8TUV7PQRS9WXYZ0*#
1RADIO MEDIANAV ESC TRAFFIC
SETUPADDR
BOOK
3
2ABC3DEF5JKL4GHI6MNO8TUV7PQRS9WXYZ0*#
1RADIO MEDIANAV ESC TRAFFIC
SETUPADDR
BOOK
2ABC3DEF5JKL4GHI6MNO8TUV7PQRS9WXYZ0*#
1NAV ESC TRAFFICADDR
BOOKSETUPSETUP
2ABC3DEF5JKL4GHI6MNO8TUV7PQRS9WXYZ0*#
1RADIO MEDIANAV ESC TRAFFIC
SETUPADDR
BOOK26
2ABC3DEF5JKL4GHI6MNO8TUV7PQRS9WXYZ0*#
1RADIO MEDIANAV ESC TRAFFIC
SETUPADDR
BOOK
2ABC3DEF5JKL4GHI6MNO8TUV7PQRS9WXYZ0*#
1RADIO MEDIANAV ESC TRAFFIC
SETUPADDR
BOOK
CONFIGURATION
SETTING THE DATE AND TIME
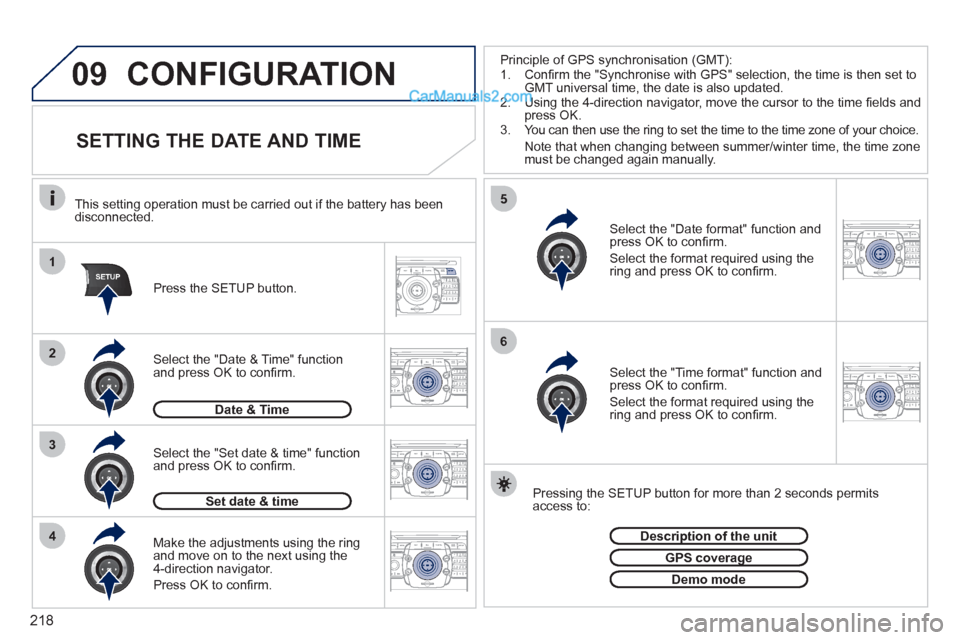
Make the adjustments using the ring
and move on to the next using the
4-direction navigator.
Press OK to confi rm.
Select the "Date format" function and
press OK to confi rm.
Select the format required using the
ring and press OK to confi rm.
Select the "Set date & time" function
and press OK to confi rm.
Pressing the SETUP button for more than 2 seconds permits
access to:
This setting operation must be carried out if the battery has been
disconnected.
Press the SETUP button.
Select the "Time format" function and
press OK to confi rm.
Select the format required using the
ring and press OK to confi rm.
Set date & time
Select the "Date & Time" function
and press OK to confi rm.
Description of the unit
GPS coverage
Demo mode
Date & Time
Principle of GPS synchronisation (GMT):
1. Confi rm the "Synchronise with GPS" selection, the time is then set to
GMT universal time, the date is also updated.
2. Using the 4-direction navigator, move the cursor to the time fi elds and
press OK.
3. You can then use the ring to set the time to the time zone of your choice.
Note that when changing between summer/winter time, the time zone
must be changed again manually.
Page 222 of 292
220
NAV
RADIO
AUX standard 3
Reset video settings
3
Off/Audio/Audio and Video (AV)
Ext. Device (Aux) management
2
3
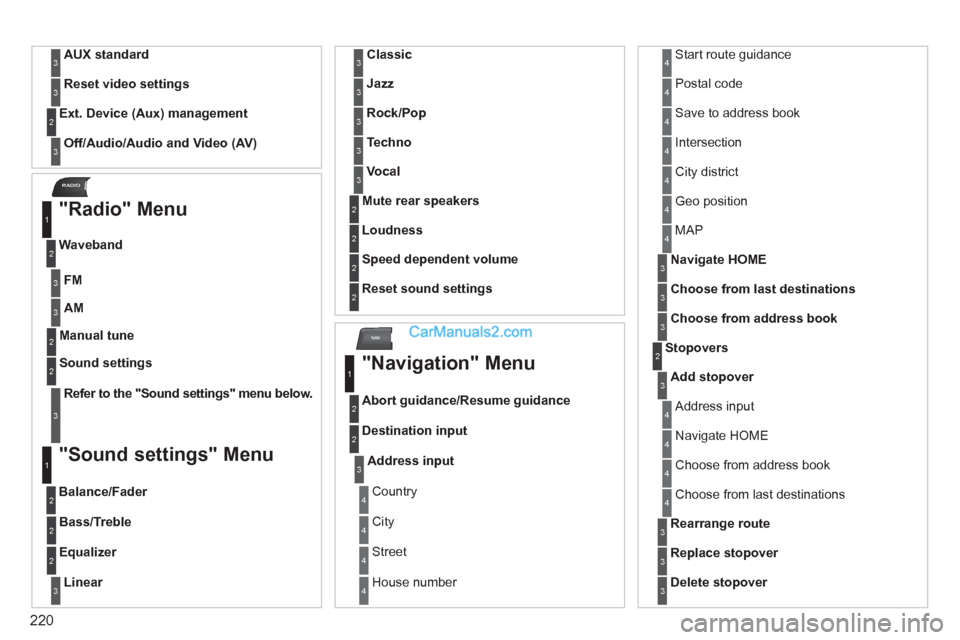
"Radio" Menu
FM
Waveband
1
2
3
AM
3
Manual tune 2
Refer to the "
Sound settings
" menu below.
Sound settings
2
3
"Sound settings" Menu
Balance/Fader
1
2
Bass/Treble 2
Equalizer 2
Linear
3
Classic
3
Jazz
3
Rock/Pop
3
Techno
3
Vocal
3
Mute rear speakers 2
Loudness 2
Speed dependent volume 2
Reset sound settings
2
"Navigation" Menu
Abort guidance/Resume guidance
1
2
Destination input 2
Address input
3
Country 4
City 4
Street 4
House number 4
Start route guidance 4
Postal code 4
Save to address book 4
Intersection 4
City district 4
Geo position 4
MAP 4
Navigate HOME
3
Choose from last destinations
3
Choose from address book
3
Stopovers 2
Add stopover
3
Address input 4
Navigate HOME 4
Choose from address book 4
Choose from last destinations 4
Rearrange route
3
Replace stopover
3
Delete stopover
3
Page 255 of 292
253
10
RADIO
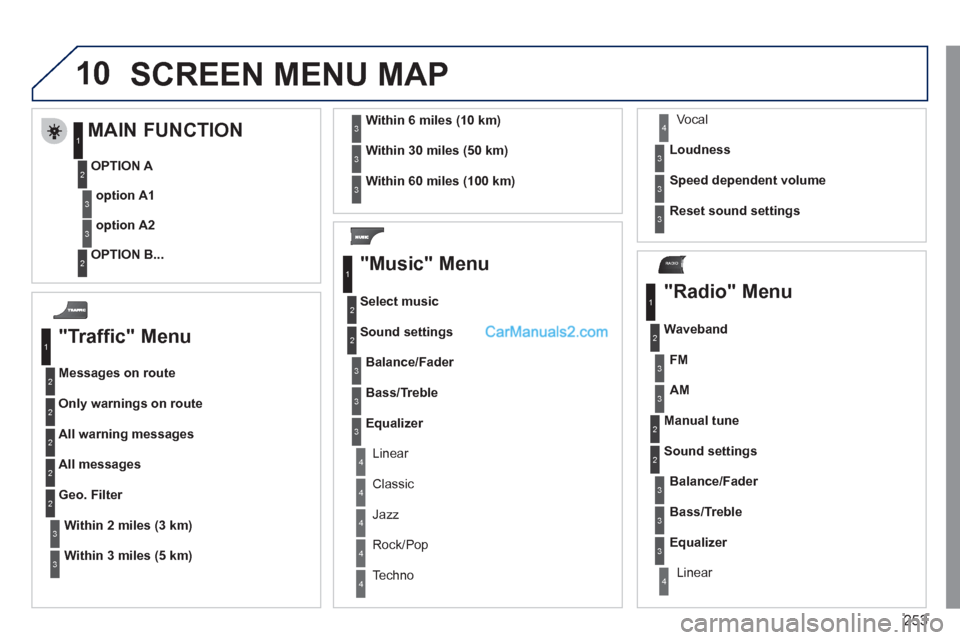
SCREEN MENU MAP
"Traffic" Menu
Messages on route
Only warnings on route
All warning messages
All messages
Within
2 miles (3 km)
Geo. Filter
Within
3 miles (5 km)
Within
6 miles (10 km)
Within
30 miles (50 km)
Within 60 miles (100 km)
"Music" Menu
Select music
Sound settings
Balance/Fader
Bass/Treble
Linear
Equalizer
Classic
Jazz
Rock/Pop
Techno Vocal
Loudness
Speed dependent volume
Reset sound settings
"Radio" Menu
Waveband
AM
Linear
FM
Manual tune
Sound settings
Balance/Fader
Bass/Treble
Equalizer
MAIN FUNCTION
OPTION A
option A1
option A2
OPTION B...
1
2
3
1
2
4
1
2
3
4
3
3
3
3
2
2
2
2
4
4
4
4
4
3
3
3
3
3
2
3
2
2
3
3
3
3
1
2
3
2
3