2011 Peugeot 3008 Hybrid 4 height
[x] Cancel search: heightPage 101 of 280

99
In fog or snow, the sunshine
sensor may detect suffi cient
light. Therefore, the lighting
will not come on automatically.
Do not cover the sunshine sensor,
coupled with the rain sensor and lo-
cated in the centre of the windscreen
behind the rear view mirror; the as-
sociated functions would no longer
be controlled.
Associated with the automatic
"Guide-me-home" lighting
Association with the automatic lighting
provides the "guide-me-home" lighting
with the following additional options:
- selection of the lighting duration of
15, 30 or 60 seconds in the vehicle
parameters on the multifunction
screen confi guration menu,
-
automatic activation of "guide-me-home"
lighting when automatic lighting is in
operation.
Automatic illumination of headlamps
The sidelamps and dipped beam head-
lamps are switched on automatically,
without any action on the part of the
driver, when a low level of external light
is detected or in certain cases of activa-
tion of the windscreen wipers.
As soon as the brightness returns to a
suffi cient level or after the windscreen
wipers are switched off, the lamps are
switched off automatically.
Activation
�)
Turn the ring to the "AUTO"
position.
The automatic illumination of head-
lamps is accompanied by a mes-
sage on the multifunction screen.
Deactivation
�)
Turn the ring to another position.
Deactivation is accompanied by
a message on the multifunction
screen.
Operating fault
In the event of a malfunction of
the sunshine sensor, the light-
ing comes on, this warning
lamp is displayed on the instru-
ment panel and/or a message appears
on the multifunction screen, accompa-
nied by an audible signal.
Consult a PEUGEOT dealer.
MANUAL ADJUSTMENT OF
HALOGEN HEADLAMPS
The initial setting is position "0"
.
To avoid causing a nuisance to other
road users, the height of the halogen
headlamps should be adjusted accord-
ing to the load in the vehicle.
0.
1 or 2 people in the front seats.
-.
3 people.
1.
5 people.
-.
Intermediate setting.
2.
5 people + maximum authorised
load.
-.
Intermediate setting.
3.
Driver + maximum authorised load.
Page 122 of 280
CHILD SAFETY
120
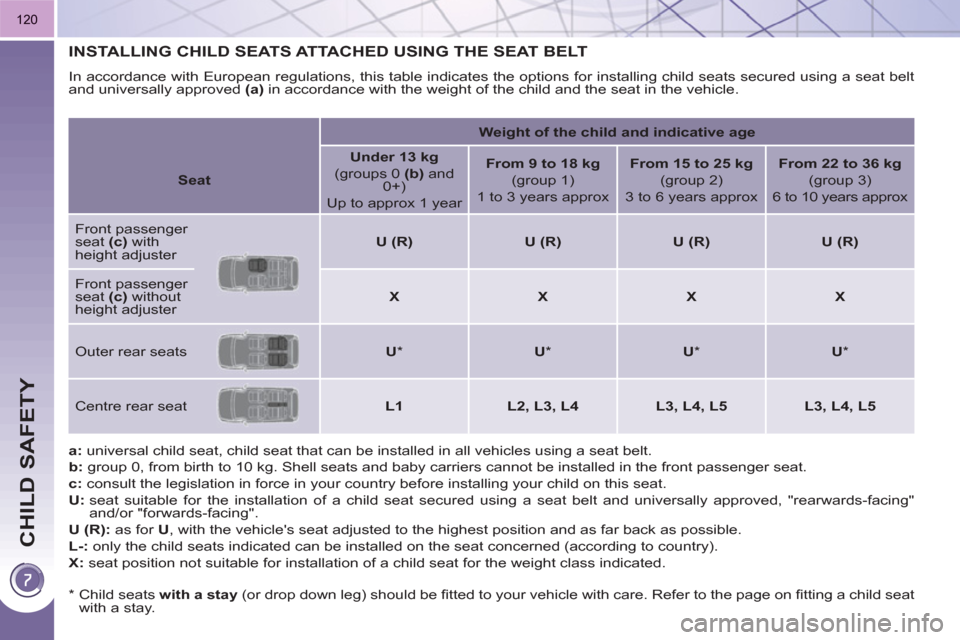
INSTALLING CHILD SEATS ATTACHED USING THE SEAT BELT
In accordance with European regulations, this table indicates the options for installing child seats secured using a seat belt
and universally approved (a)
in accordance with the weight of the child and the seat in the vehicle.
a:
universal child seat, child seat that can be installed in all vehicles using a seat belt.
b:
group 0, from birth to 10 kg. Shell seats and baby carriers cannot be installed in the front passenger seat.
c:
consult the legislation in force in your country before installing your child on this seat.
U:
seat suitable for the installation of a child seat secured using a seat belt and universally approved, "rearwards-facing"
and/or "forwards-facing".
U (R):
as for U
, with the vehicle's seat adjusted to the highest position and as far back as possible.
L-:
only the child seats indicated can be installed on the seat concerned (according to country).
X:
seat position not suitable for installation of a child seat for the weight class indicated.
Weight of the child and indicative age
Seat
Under 13 kg
(groups 0 (b)
and
0+)
Up to approx 1 year
From 9 to 18 kg
(group 1)
1 to 3 years approx
From 15 to 25 kg
(group 2)
3 to 6 years approx
From 22 to 36 kg
(group 3)
6 to 10 years approx
Front passenger
seat (c)
with
height adjuster
U (R)
U (R)
U (R)
U (R)
Front passenger
seat (c)
without
height adjuster
X
X
X
X
Outer rear seats
U
*
U
*
U
*
U
*
Centre rear seat
L1
L2, L3, L4
L3, L4, L5
L3, L4, L5
*
Child seats with a
stay
(or drop down leg) should be fi tted to your vehicle with care. Refer to the page on fi tting a child seat
with a stay.
Page 131 of 280
129
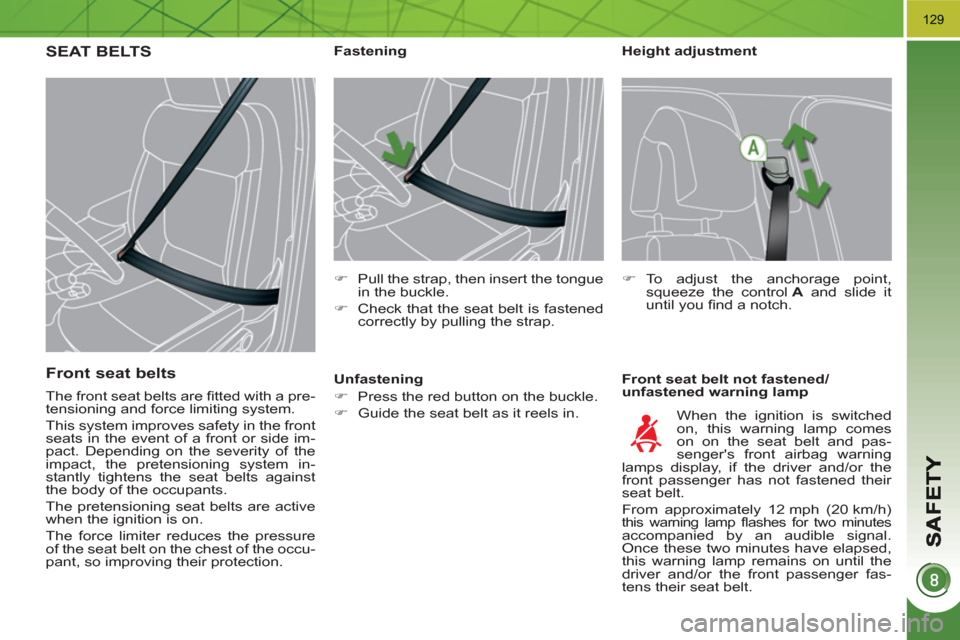
Height adjustment
Front seat belt not fastened/
unfastened warning lamp
Fastening
�)
Pull the strap, then insert the tongue
in the buckle.
�)
Check that the seat belt is fastened
correctly by pulling the strap.
�)
To adjust the anchorage point,
squeeze the control A
and slide it
until you fi nd a notch.
When the ignition is switched
on, this warning lamp comes
on on the seat belt and pas-
senger's front airbag warning
lamps display, if the driver and/or the
front passenger has not fastened their
seat belt.
From approximately 12 mph (20 km/h)
this warning lamp fl ashes for two minutes
accompanied by an audible signal.
Once these two minutes have elapsed,
this warning lamp remains on until the
driver and/or the front passenger fas-
tens their seat belt.
Unfastening
�)
Press the red button on the buckle.
�)
Guide the seat belt as it reels in.
SEAT BELTS
Front seat belts
The front seat belts are fi tted with a pre-
tensioning and force limiting system.
This system improves safety in the front
seats in the event of a front or side im-
pact. Depending on the severity of the
impact, the pretensioning system in-
stantly tightens the seat belts against
the body of the occupants.
The pretensioning seat belts are active
when the ignition is on.
The force limiter reduces the pressure
of the seat belt on the chest of the occu-
pant, so improving their protection.
Page 146 of 280
144
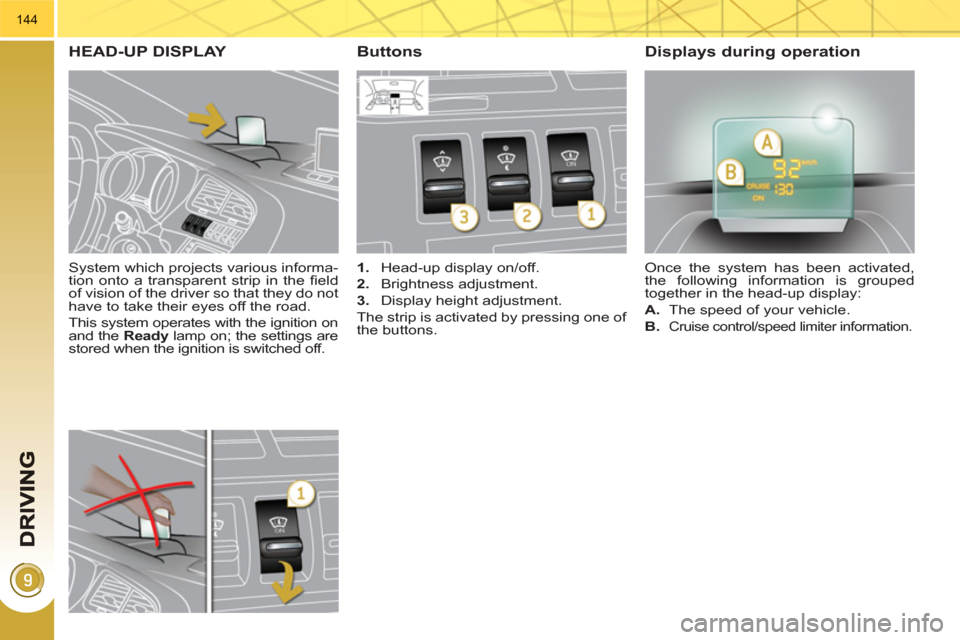
System which projects various informa-
tion onto a transparent strip in the fi eld
of vision of the driver so that they do not
have to take their eyes off the road.
This system operates with the ignition on
and the Ready
lamp on; the settings are
stored when the ignition is switched off.
HEAD-UP DISPLAY
1.
Head-up display on/off.
2.
Brightness adjustment.
3.
Display height adjustment.
The strip is activated by pressing one of
the buttons. Once the system has been activated,
the following information is grouped
together in the head-up display:
A.
The speed of your vehicle.
B.
Cruise control/speed limiter information.
Buttons Displays during operation
Page 147 of 280
145
In certain extreme weather
conditions (rain and/or snow,
bright sunshine, ...) the head-
up display may not be legible or may
suffer temporary interference.
Certain glasses (sunglasses, specta-
cles or polarised lenses) may hamper
reading of the information.
To clean the transparent strip, which
is made of organic glass, use a clean,
soft cloth (such as a spectacles cloth
or microfi bre cloth). Do not use a dry
or abrasive cloth or detergent or sol-
vent products as these could scratch
the strip or damage the anti-refl ec-
tion coating.
We recommend that adjust-
ments are only made using
these buttons when the vehicle
is stationary.
When stationary or while driving, no
objects should be placed around the
transparent strip (or on its cover) to
avoid blocking the strip output and
preventing its correct operation.
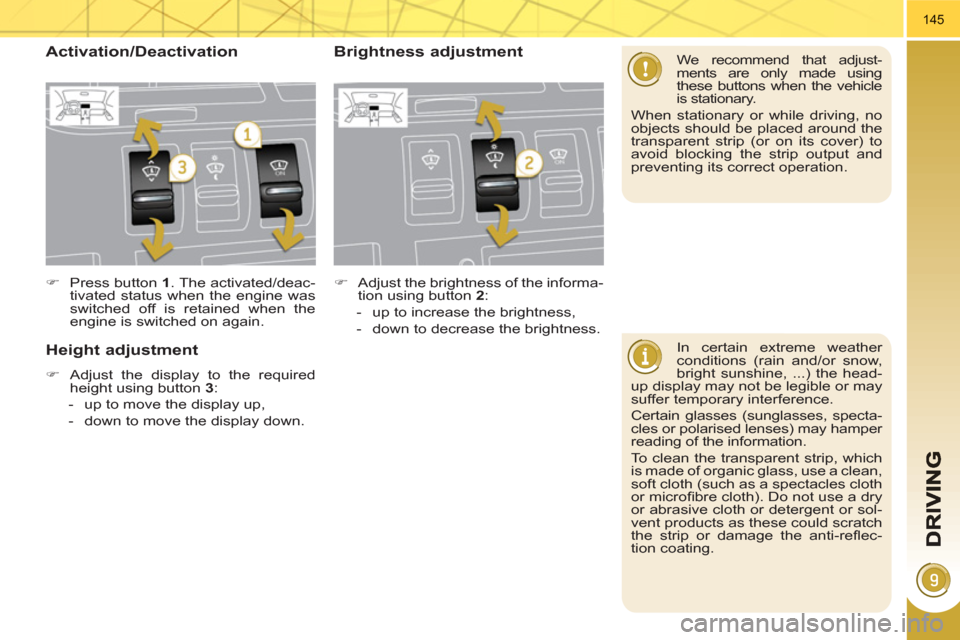
�)
Press button 1
. The activated/deac-
tivated status when the engine was
switched off is retained when the
engine is switched on again.
Height adjustment
�)
Adjust the display to the required
height using button 3
:
- up to move the display up,
- down to move the display down.
Activation/Deactivation Brightness adjustment
�)
Adjust the brightness of the informa-
tion using button 2
:
- up to increase the brightness,
- down to decrease the brightness.
Page 182 of 280

PRACTICAL INFORMATION
180
Engine compartment fuses
The fusebox is placed in the engine
compartment near the battery (left-hand
side).
Access to the fuses
�)
Unclip the cover.
�)
Change the fuse (see correspond-
ing paragraph).
�)
When you have fi nished, close the
cover carefully to ensure correct
sealing of the fusebox.
Fuse table
Fuse
N°
Rating
(A)
Functions
F1
20
Engine control unit supply, injection pump and
EGR electrovalves, injectors.
F2
15
Horn.
F3
10
Front/rear wash-wipe.
F4
10
Daytime running lamps.
F5
15
Air fl ow sensor, wiper, sensor heater, hybrid control
unit, hybrid selector dial, electronic thermostat,
variable valve timing electrovalves, turbo pressure
regulation electrovalves (Diesel), engine coolant
level sensor (Diesel).
F6
10
Diagnostic socket, directional headlamps, particle
emission fi lter pump (Diesel), mirror adjustment
control, network interface unit, head-up display.
F7
10
Power steering control unit, directional headlamps
height adjustment motor.
F8
20
Starter motor control.
F9
10
Clutch and brake pedal switches.
F10
30
Heaters (Diesel).
F11
40
Air conditioning blower.
Page 192 of 280
PRACTICAL INFORMATION
190
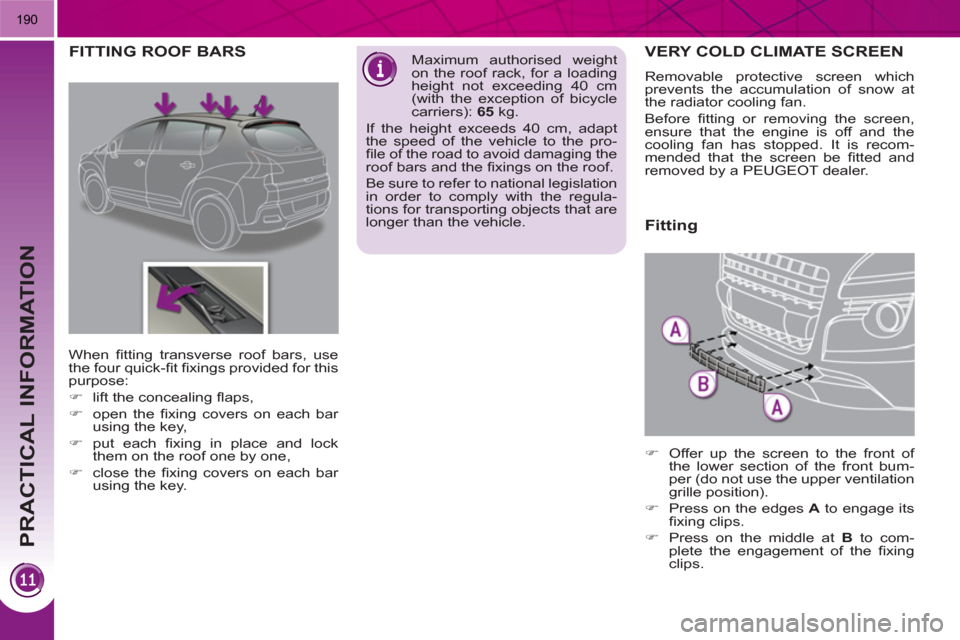
VERY COLD CLIMATE SCREEN
Removable protective screen which
prevents the accumulation of snow at
the radiator cooling fan.
Before fi tting or removing the screen,
ensure that the engine is off and the
cooling fan has stopped. It is recom-
mended that the screen be fi tted and
removed by a PEUGEOT dealer.
FITTING ROOF BARS
Maximum authorised weight
on the roof rack, for a loading
height not exceeding 40 cm
(with the exception of bicycle
carriers): 65
kg.
If the height exceeds 40 cm, adapt
the speed of the vehicle to the pro-
fi le of the road to avoid damaging the
roof bars and the fi xings on the roof.
Be sure to refer to national legislation
in order to comply with the regula-
tions for transporting objects that are
longer than the vehicle.
When fi tting transverse roof bars, use
the four quick-fi t fi xings provided for this
purpose:
�)
lift the concealing fl aps,
�)
open the fi xing covers on each bar
using the key,
�)
put each fi xing in place and lock
them on the roof one by one,
�)
close the fi xing covers on each bar
using the key.
Fitting
�)
Offer up the screen to the front of
the lower section of the front bum-
per (do not use the upper ventilation
grille position).
�)
Press on the edges A
to engage its
fi xing clips.
�)
Press on the middle at B
to com-
plete the engagement of the fi xing
clips.
Page 268 of 280
ALPHABETICAL INDEX
266
Accessories ........................191, 192
Accessories socket,
12 volt ...................... 106, 108, 114
Adjustable boot fl oor ................... 114
Adjusting headlamps ....................99
Adjusting head restraints ..............74
Adjusting seat belt height ...........129
Adjusting the steering wheel.........78
Air conditioning (digital) ..........68, 69
Air fi lter .......................................161
Air vents........................................67
Alarm ............................................86
Anti-pinch.............................. 88, 112
Anti-theft steering lock ..................83
Armrest .......................................106
Assistance call ....................200, 201
Audible warning ..........................126
Audio/video sockets....................230
Audio streaming
(Bluetooth) ...............................258
Audio systems ....................203, 247
Automatic illumination
of headlamps .......................96, 99
Automatic operation of hazard
warning lamps .........................126
Automatic rain sensitive
windscreen wipers ...........100, 102
Auxiliary sockets .................230, 256Bluetooth (telephone) .........231, 257
Bonnet ........................................157
Bonnet stay.................................157
Boot lamp ...................................105
Boot lid..........................................92
Brake discs .................................162
Brake lamps................................174
Brake pads .................................162
Brakes ........................................162
Capacity, fuel tank ........................94
CD MP3 ..............................227, 253
Central locking ........................82, 91
Changing a bulb ................. 172-175
Changing a fuse ................. 176-182
Changing a wheel ............... 169-171
Changing a wiper blade ......102, 187
Changing the date ..............235, 259
Changing the remote
control battery ............................84
Changing the time ..............235, 259
Checking levels ..................160, 161
Checking the engine oil level ........56
Checking tyre pressures
(using the kit) ...........................168
Checks................................ 157-162
Child lock ....................................125
Children .......117-125, 131, 133, 135
Child seats ................................. 117
Child seats, conventional.... 118, 120
Child seats, Isofi x ...............123, 124
Closing the boot................82, 92, 93
Closing the doors....................82, 90
Cold climate screen ....................190
Connectors,
audio ....... 107, 108, 230, 254, 256Control for panoramic
sunroof blind ............................ 112
Control stalk, wipers ........... 100-102
Coolant level .........................53, 160
Coolant temperature .....................53
Coolant temperature indicator ......53
Courtesy lamps...........................103
Courtesy mirror ...........................107
Cruise control .............................148
Cup holder ..................................106
Curtain airbags ...................134, 135
A
C
Battery ......................... 39, 161, 183
Battery, remote control ...........84, 85
Battery recharge .........................184
Blind for panoramic sunroof........ 112
Blinds .......................................... 116
Bluetooth (hands-free) ........231, 257
B
Dashboard fusebox ....................177
Date (display) .....................235, 259
Daytime running lamps .........98, 172
Deactivating ESP ........................128
Deactivating
the passenger airbag ...............133
Deadlocking ..................................82
Defrosting .....................................68
Dials and gauges ..........................43
Diesel............................................95
Diesel additive level ....................161
Diesel engine ................ 36, 95, 158,
159, 194, 195
Dimensions .................................196
Dipped beam ........................96, 172
Dipstick .................................56, 160
Direction indicators .... 126, 173, 174
Door mirrors ..................................79
Doors ............................................90
Doors emergency control .............92
Door POCKETS..........................106
Dynamic emergency braking ......139
D