Page 84 of 248

4
82
VISIBILITY
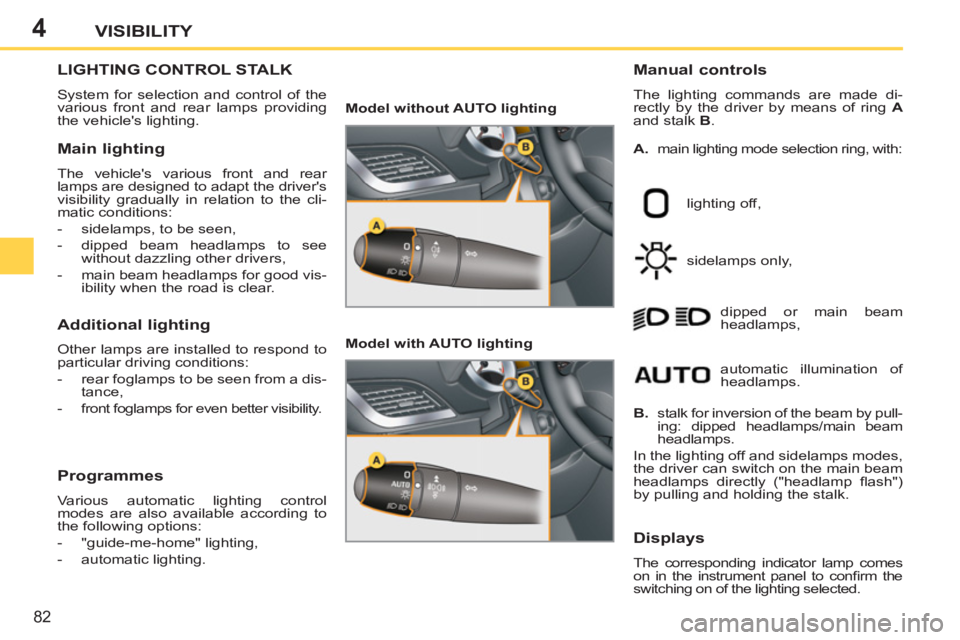
LIGHTING CONTROL STALK
System for selection and control of the
various front and rear lamps providing
the vehicle's lighting.
Manual controls
The lighting commands are made di-
rectly by the driver by means of ring A
and stalk B
.
lighting off,
sidelamps only,
dipped or main beam
headlamps,
B.
stalk for inversion of the beam by pull-
ing: dipped headlamps/main beam
headlamps.
In the lighting off and sidelamps modes,
the driver can switch on the main beam
headlamps directly ("headlamp fl ash")
by pulling and holding the stalk.
Displays
The corresponding indicator lamp comes
on in the instrument panel to confi rm the
switching on of the lighting selected.
Main lighting
The vehicle's various front and rear
lamps are designed to adapt the driver's
visibility gradually in relation to the cli-
matic conditions:
- sidelamps, to be seen,
- dipped beam headlamps to see
without dazzling other drivers,
- main beam headlamps for good vis-
ibility when the road is clear.
Additional lighting
Other lamps are installed to respond to
particular driving conditions:
- rear foglamps to be seen from a dis-
tance,
- front foglamps for even better visibility.
Programmes
Various automatic lighting control
modes are also available according to
the following options:
- "guide-me-home" lighting,
- automatic lighting.
A.
main lighting mode selection ring, with:
Model without AUTO lighting
Model with AUTO lighting
automatic illumination of
headlamps.
Page 85 of 248

4
!
i
83
VISIBILITY
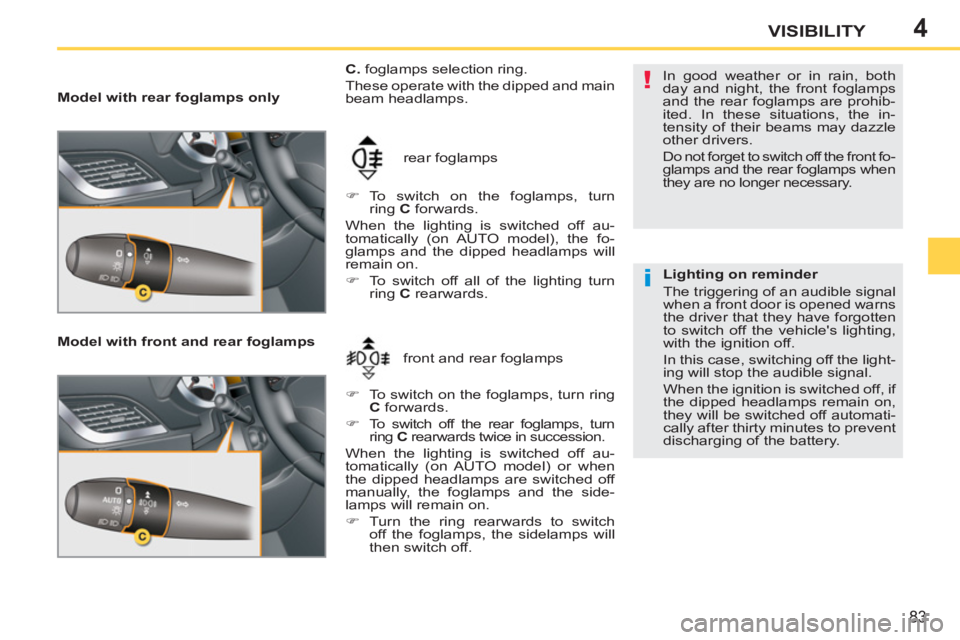
Model with rear foglamps only
Model with front and rear foglamps
front and rear foglamps rear foglamps
C.
foglamps selection ring.
These operate with the dipped and main
beam headlamps.
�)
To switch on the foglamps, turn
ring C
forwards.
When the lighting is switched off au-
tomatically (on AUTO model), the fo-
glamps and the dipped headlamps will
remain on.
�)
To switch off all of the lighting turn
ring C
rearwards.
�)
To switch on the foglamps, turn ring
C
forwards.
�)
To switch off the rear foglamps, turn
ring C
rearwards twice in succession.
When the lighting is switched off au-
tomatically (on AUTO model) or when
the dipped headlamps are switched off
manually, the foglamps and the side-
lamps will remain on.
�)
Turn the ring rearwards to switch
off the foglamps, the sidelamps will
then switch off. In good weather or in rain, both
day and night, the front foglamps
and the rear foglamps are prohib-
ited. In these situations, the in-
tensity of their beams may dazzle
other drivers.
Do not forget to switch off the front fo-
glamps and the rear foglamps when
they are no longer necessary.
Lighting on reminder
The triggering of an audible signal
when a front door is opened warns
the driver that they have forgotten
to switch off the vehicle's lighting,
with the ignition off.
In this case, switching off the light-
ing will stop the audible signal.
When the ignition is switched off, if
the dipped headlamps remain on,
they will be switched off automati-
cally after thirty minutes to prevent
discharging of the battery.
Page 86 of 248

4
!
84
VISIBILITY
In fog or snow, the sunshine sen-
sor may detect suffi cient light.
Therefore, the lighting will not
come on automatically.
Do not cover the sunshine sen-
sor, coupled with the rain sensor
and located in the centre of the
windscreen behind the rear view
mirror; the associated functions
would no longer be controlled.
Coupling with the "Guide-me-home"
lighting
Association with the automatic illumination of
headlamps provides the "guide-me-home"
lighting with the following additional options:
- selection of the lighting duration to 15, 30
or 60 seconds in the vehicle parameters
in the multifunction screen confi guration
menu,
- automatic activation of "guide-me-home"
lighting when automatic illumination of
headlamps is in operation.
Automatic illumination
of headlamps
The sidelamps and dipped beam head-
lamps are switched on automatically,
without any action on the part of the
driver, when a low level of external light
is detected (sensor behind the rear view
mirror) or when the windscreen wipers
are switched on.
As soon as the brightness returns to a
suffi cient level or after the windscreen
wipers are switched off, the lighting is
switched off automatically.
"Guide-me-home" lighting
The dipped headlamps remain on tem-
porarily, after switching off the vehicle's
ignition, to make the driver's exit easier
in poor light.
Activation
�)
With the ignition off, activate a
"headlamp fl ash" using stalk B
.
�)
A second "headlamp fl ash" switches
the function off again.
Switching off
The "guide-me-home" lighting is switched
off automatically following the door lock-
ing command, after a given time.
Activation
�)
Turn ring A
to the " AUTO
" position. The
automatic illumination of headlamps
is accompanied by a message in the
multifunction screen.
Operating fault
In the event of a malfunction of
the brightness sensor, the light-
ing comes on accompanied by
the service warning lamp, an
audible signal and a message on the
multifunction screen.
Have it checked by a PEUGEOT dealer
or a qualifi ed workshop.
Daytime running lamps *
On vehicles fi tted with daytime running
lamps, the dipped headlamps come on
when the vehicle is started.
This indicator lamp comes on
in the instrument panel.
The instruments and controls (multi-
function screen, air conditioning control
panel, ...) are not lit, unless the auto-
matic lighting mode is activated or the
lighting is switched on manually.
Deactivation
�)
Turn ring A
to a position other than
" AUTO
". Deactivation is accompa-
nied by a message in the multifunction
screen.
*
According to country.
Page 87 of 248
4
i
85
VISIBILITY
HEADLAMP ADJUSTMENT
This position is suffi cient to avoid
causing dazzle.
Higher settings may limit the spread
of light from the headlamps.
The initial setting is position "0"
. To avoid causing a nuisance to other
road users, the height of the headlam-
ps should be adjusted in relation to the
load in the vehicle.
0
.
Driver only or driver + front passenger.
-
. Intermediate setting
1.
5 people.
-
. 5 people + load in the boot.
2.
Driver only + maximum authorised
load in the boot.
Page 89 of 248

4
!
i
87
VISIBILITY
Windscreen and headlamp
wash
B.
rear wiper selection ring:
off,
intermittent wipe,
wiping with screenwash (fi xed
duration).
Reverse gear
When reverse gear is engaged, if the
windscreen wipers are operating, the
rear wiper will start.
Programming
�)
Pull the windscreen wiper stalk to-
wards you.
The headlamp wash is only activate if
the dipped headlamps are on
.
Rear wiper
In the presence of snow or con-
siderable frost and when using a
tailgate bicycle carrier, deactivate
the automatic rear wiper via the
multifunction screen confi gura-
tion menu. The function is activated or
switched off via the multi-
function screen confi guration
menu.
By default, this function is
activated.
With daytime running lamps, to
activate the headlamp wash,
position the lighting stalk in the
dipped beam position.
On vehicles fi tted with digital air
conditioning, any action on the
windscreen wash control results
in temporary closing of the air
intake to avoid odours inside the
passenger compartment.
Page 128 of 248
8CHECKS
126
PETROL ENGINES
The caps and covers provide access for checking the levels of the various fl uids and to replace certain components.
1.
Coolant reservoir.
2.
Passenger compartment fi lter.
3.
Screenwash and headlamp wash
reservoir.
4.
Air fi lter.
5.
Brake fl uid reservoir.
6.
Fusebox.
7.
Battery.
8.
Engine oil dipstick.
9.
Engine oil fi ller cap.
Page 129 of 248
8CHECKS
127
DIESEL ENGINES
The caps and covers provide access for checking the levels of the various fl uids, to replace certain components and to prime
the fuel system.
1.
Coolant reservoir.
2.
Passenger compartment fi lter.
3.
Screenwash and headlamp wash
reservoir.
4.
Priming pump.
5.
Brake fl uid reservoir.
6.
Fusebox.
7.
Battery.
8.
Engine oil dipstick.
9.
Engine oil fi ller cap.
10.
Air fi lter.
Page 131 of 248

8
!
CHECKS
129
To avoid any risk of scalding, unscrew
the cap by two turns to allow the pres-
sure to drop. When the pressure has
dropped, remove the cap and top up
the level.
Coolant level
The coolant level should be close
to the "MAX" mark but should nev-
er exceed it.
When the engine is warm, the tem-
perature of the coolant is regulated by the
fan. This can operate with the ignition off.
On vehicles which are fi tted with a par-
ticle emission fi lter, the fan may operate
after the vehicle has been switched off,
even if the engine is cold.
In addition, as the cooling system is pres-
surised, wait at least one hour after switch-
ing off the engine before carrying out any
work.
Screenwash and headlamp
wash * fluid
The minimum level of this fl uid
is indicated by an audible sig-
nal and a message on the mul-
tifunction screen.
Top up the level when you stop the
vehicle.
*
According to country.
Changing the coolant
The coolant does not have to be
changed.
Fluid specifi cation
The coolant must conform to the manu-
facturer's recommendations.
Fluid specifi cation
To guarantee optimum cleaning and
avoid freezing, plain water should not
be used to top up or replace this fl uid.
Avoid any prolonged contact of
used oil or fl uids with the skin.
Most of these fl uids are harmful to
health or indeed very corrosive.
Do not discard used oil or fl uids
into sewers or onto the ground.
Take used oil to a PEUGEOT
dealer or a qualifi ed workshop
(France) or an authorised waste
disposal site.
Diesel additive level (Diesel with
particle emission filter)
The minimum level of this additive is in-
dicated by lighting of the service warn-
ing lamp, accompanied by an audible
signal and a message on the multifunc-
tion screen.
Used products
Topping up
This additive must be topped up by a
PEUGEOT dealer or a qualifi ed work-
shop without delay.