2011 NISSAN TIIDA fuse diagram
[x] Cancel search: fuse diagramPage 2311 of 3787
![NISSAN TIIDA 2011 Service Repair Manual FUEL PUMPEC-1017
< SERVICE INFORMATION > [MR18DE]
C
D
E
F
G H
I
J
K L
M A
EC
NP
O
4.DETECT MALFUNCTIONING PART
Check the following.
• Harness connectors E8, F8
• Harness for open or short between NISSAN TIIDA 2011 Service Repair Manual FUEL PUMPEC-1017
< SERVICE INFORMATION > [MR18DE]
C
D
E
F
G H
I
J
K L
M A
EC
NP
O
4.DETECT MALFUNCTIONING PART
Check the following.
• Harness connectors E8, F8
• Harness for open or short between](/manual-img/5/57396/w960_57396-2310.png)
FUEL PUMPEC-1017
< SERVICE INFORMATION > [MR18DE]
C
D
E
F
G H
I
J
K L
M A
EC
NP
O
4.DETECT MALFUNCTIONING PART
Check the following.
• Harness connectors E8, F8
• Harness for open or short between IPDM E/R and ECM
>> Repair open circuit or short to ground or short to power in harness or connectors.
5.CHECK FUEL PUMP POWER SUPPLY CIRCUIT-III
1. Turn ignition switch OFF.
2. Reconnect all harness connectors disconnected.
3. Disconnect “fuel level sensor unit and fuel pump” harness con- nector (1).
- Illustration shows the view with inspection hole cover removed.
4. Turn ignition switch ON.
5. Check voltage between “fuel level sensor unit and fuel pump”
terminal 1 and ground with CONSULT-III or tester.
OK or NG
OK >> GO TO 9.
NG >> GO TO 6.
6.CHECK 15 A FUSE
1. Turn ignition switch OFF.
2. Disconnect 15 A fuse.
3. Check 15 A fuse.
OK or NG
OK >> GO TO 7.
NG >> Replace fuse.
7.CHECK FUEL PUMP POWER SUPPLY CIRCUIT-IV
1. Disconnect IPDM E/R harness connector E45.
2. Check harness continuity between IPDM E/R terminal 36 and “fuel level sensor unit and fuel pump” termi-
nal 1. Refer to Wiring Diagram.
3. Also check harness for short to ground and short to power.
OK or NG
OK >> GO TO 11.
NG >> GO TO 8.
8.DETECT MALFUNCTIONING PART
Check the following.
• Harness connectors M69, E7
• Harness connectors M12, B101
BBIA0702E
Voltage: Battery voltage should exist for 1 second after ignition switch is turned ON.
PBIB0795E
Continuity should exist.
Revision: May 2010 2011 Versa
Page 2721 of 3787

HOW TO USE THIS MANUALGI-17
< SERVICE INFORMATION >
C
DE
F
G H
I
J
K L
M B
GI
N
O P
Harness Indication
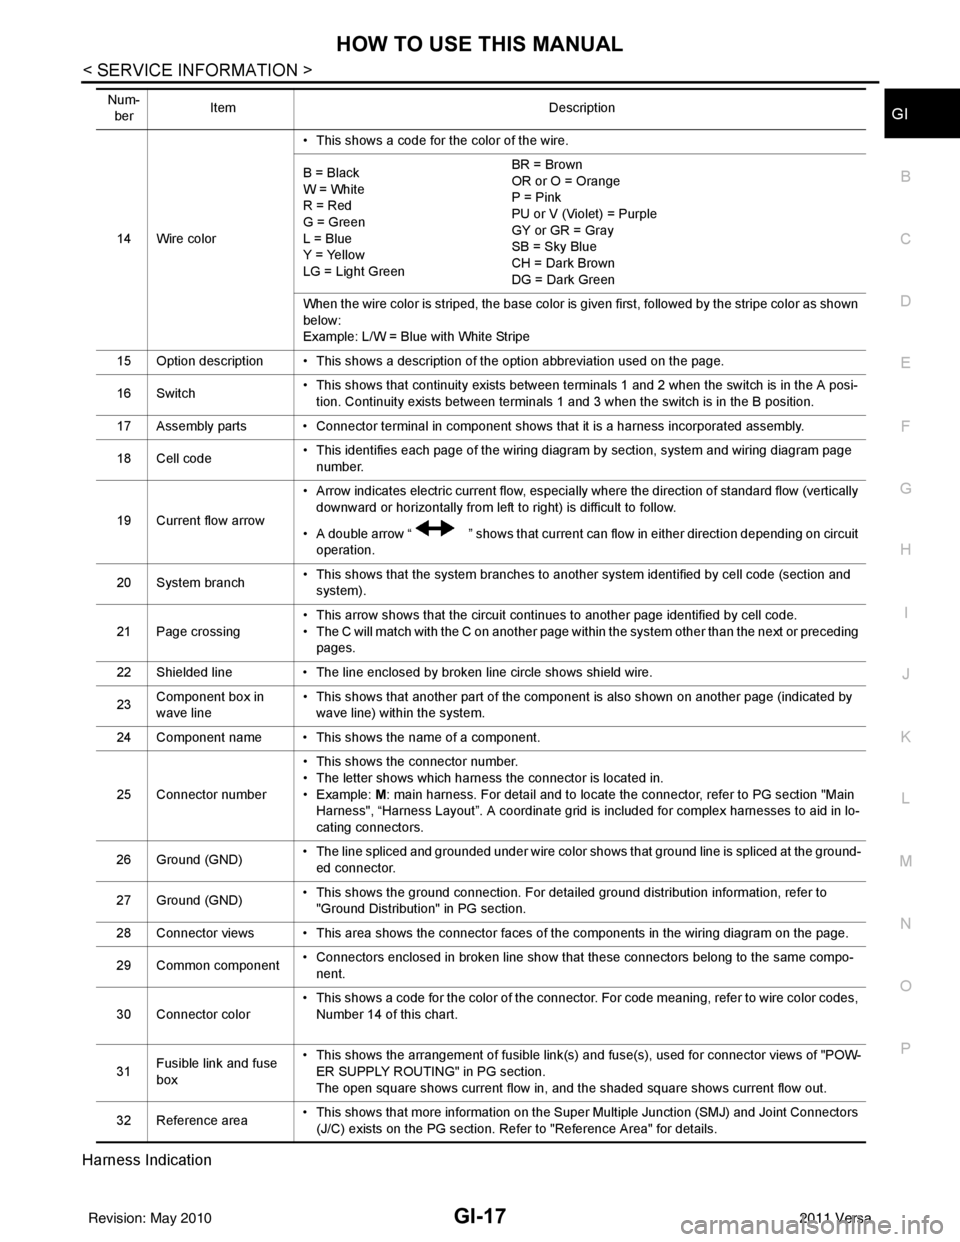
14 Wire color • This shows a code for the color of the wire.
B = Black
W = White
R = Red
G = Green
L = Blue
Y = Yellow
LG = Light Green BR = Brown
OR or O = Orange
P = Pink
PU or V (Violet) = Purple
GY or GR = Gray
SB = Sky Blue
CH = Dark Brown
DG = Dark Green
When the wire color is striped, the base color is given first, followed by the stripe color as shown
below:
Example: L/W = Blue with White Stripe
15 Option description • This shows a description of the option abbreviation used on the page.
16 Switch • This shows that continuity exists between terminals 1 and 2 when the switch is in the A posi-
tion. Continuity exists between terminals 1 and 3 when the switch is in the B position.
17 Assembly parts • Connector terminal in component shows that it is a harness incorporated assembly.
18 Cell code • This identifies each page of the wiring diagram by section, system and wiring diagram page
number.
19 Current flow arrow • Arrow indicates electric current flow, especially where the direction of standard flow (vertically
downward or horizontally from left to right) is difficult to follow.
• A double arrow “ ” shows that current can flow in either direction depending on circuit operation.
20 System branch • This shows that the system branches to another system identified by cell code (section and
system).
21 Page crossing • This arrow shows that the circuit continues to another page identified by cell code.
• The C will match with the C on another page within the system other than the next or preceding
pages.
22 Shielded line • The line enclosed by broken line circle shows shield wire.
23 Component box in
wave line • This shows that another part of the component is also shown on another page (indicated by
wave line) within the system.
24 Component name • This shows the name of a component.
25 Connector number • This shows the connector number.
• The letter shows which harness the connector is located in.
•Example:
M: main harness. For detail and to locate the connector, refer to PG section "Main
Harness", “Harness Layout”. A coordinate grid is included for complex harnesses to aid in lo-
cating connectors.
26 Ground (GND) • The line spliced and grounded under wire color shows that ground line is spliced at the ground-
ed connector.
27 Ground (GND) • This shows the ground connection. For detailed ground distribution information, refer to
"Ground Distribution" in PG section.
28 Connector views • This area shows the connector faces of the components in the wiring diagram on the page.
29 Common component • Connectors enclosed in broken line show that these connectors belong to the same compo-
nent.
30 Connector color • This shows a code for the color of the connector. For code meaning, refer to wire color codes,
Number 14 of this chart.
31 Fusible link and fuse
box • This shows the arrangement of fusible link(s) and fuse(s), used for connector views of "POW-
ER SUPPLY ROUTING" in PG section.
The open square shows current flow in, and the shaded square shows current flow out.
32 Reference area • This shows that more information on the Super Multiple Junction (SMJ) and Joint Connectors
(J/C) exists on the PG section. Refer to "Reference Area" for details.
Num-
ber Item
Description
Revision: May 2010 2011 Versa
Page 3421 of 3787

PG-1
ELECTRICAL
C
DE
F
G H
I
J
L
M
SECTION PG
A
B
PG
N
O P
CONTENTS
POWER SUPPLY, GROUND & CIRCUIT ELEMENTS
SERVICE INFORMATION .. ..........................2
PRECAUTIONS .............................................. .....2
Precaution for Supplemental Restraint System
(SRS) "AIR BAG" and "SEAT BELT PRE-TEN-
SIONER" ............................................................. ......
2
Precaution Necessary for Steering Wheel Rota-
tion After Battery Disconnect ............................... ......
2
POWER SUPPLY ROUTING CIRCUIT ...............4
Schematic ........................................................... ......4
Wiring Diagram - POWER - ......................................6
Fuse ........................................................................16
Fusible Link .............................................................16
Circuit Breaker (Built Into BCM) ..............................16
Circuit Breaker ........................................................16
IPDM E/R (INTELLIGENT POWER DISTRI-
BUTION MODULE ENGINE ROOM) .................
17
System Description ............................................. ....17
CAN Communication System Description ...............18
Function of Detecting Ignition Relay Malfunction ....18
CONSULT-III Function (IPDM E/R) ..................... ....18
Auto Active Test ......................................................20
IPDM E/R Terminal Arrangement - Type A .............23
IPDM E/R Terminal Arrangement - Type B .............24
Terminal and Reference Value for IPDM E/R .........25
IPDM E/R Power/Ground Circuit Inspection ...........27
Inspection with CONSULT-III (Self-Diagnosis) .......28
Removal and Installation of IPDM E/R ................ ....28
GROUND CIRCUIT ...........................................30
Ground Distribution .............................................. ....30
HARNESS .........................................................39
Harness Layout ................................................... ....39
Wiring Diagram Codes (Cell Codes) .......................58
ELECTRICAL UNITS LOCATION ....................61
Electrical Units Location ..........................................61
HARNESS CONNECTOR .................................65
Description ...............................................................65
ELECTRICAL UNITS ........................................68
Terminal Arrangement .............................................68
STANDARDIZED RELAY .................................69
Description ...............................................................69
SUPER MULTIPLE JUNCTION (SMJ) .............71
Terminal Arrangement .............................................71
FUSE BLOCK-JUNCTION BOX (J/B) ..............73
Terminal Arrangement .............................................73
FUSE AND FUSIBLE LINK BOX ......................74
Terminal Arrangement .............................................74
Revision: May 2010 2011 Versa
Page 3444 of 3787

PG-24
< SERVICE INFORMATION >
IPDM E/R (INTELLIGENT POWER DISTRIBUTION MODULE ENGINE ROOM)
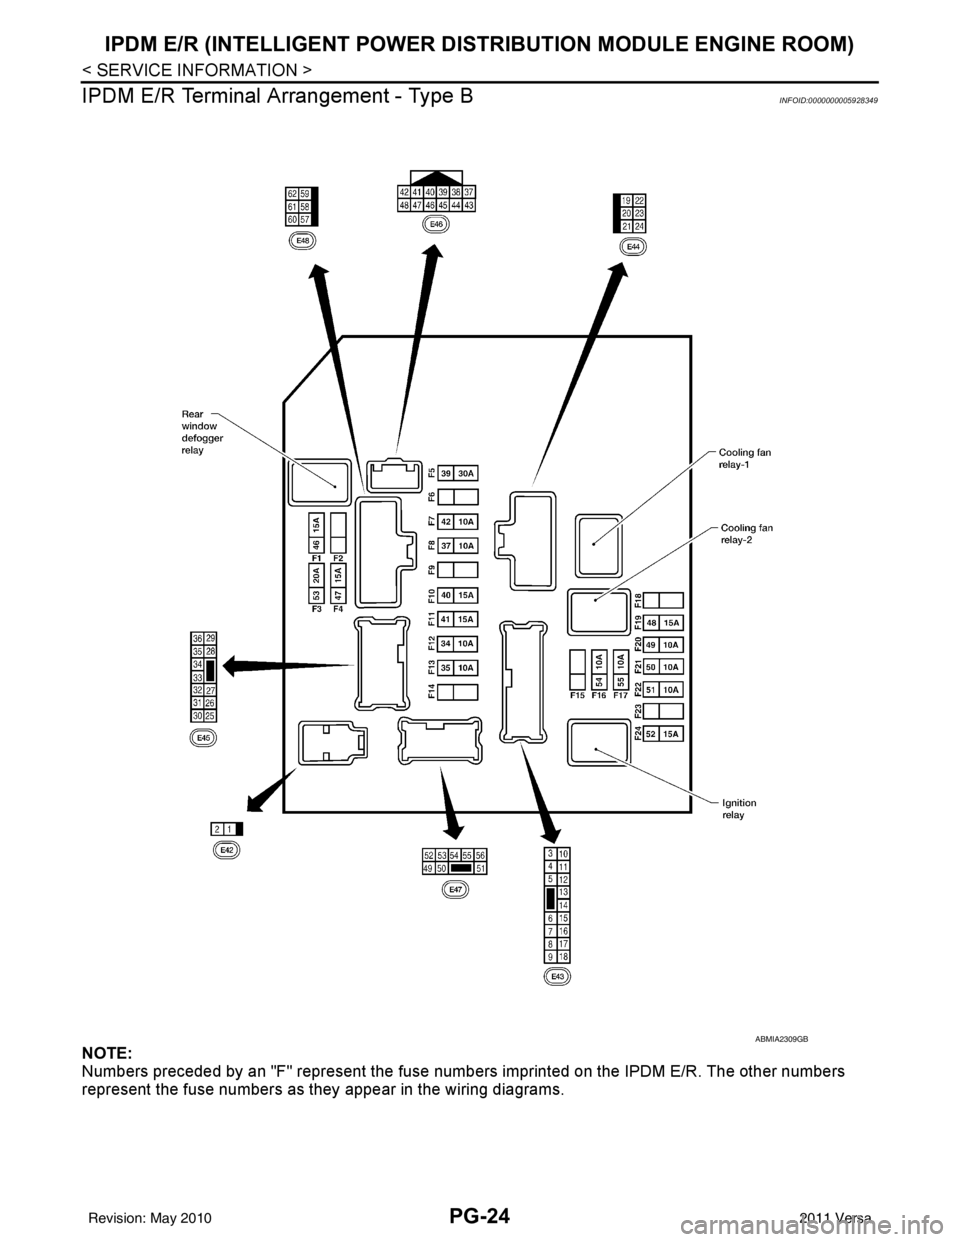
IPDM E/R Terminal Arrangement - Type B
INFOID:0000000005928349
NOTE:
Numbers preceded by an "F" represent the fuse numbers imprinted on the IPDM E/R. The other numbers
represent the fuse numbers as t hey appear in the wiring diagrams.
ABMIA2309GB
Revision: May 2010 2011 Versa
Page 3697 of 3787
![NISSAN TIIDA 2011 Service Repair Manual STC-10
< DTC/CIRCUIT DIAGNOSIS >[EPS]
C1601 BATTERY POWER SUPPLY
Is the inspection result normal?
YES >> GO TO 3.
NO >> Check the following. If any items are damaged, repair or replace damaged parts.
NISSAN TIIDA 2011 Service Repair Manual STC-10
< DTC/CIRCUIT DIAGNOSIS >[EPS]
C1601 BATTERY POWER SUPPLY
Is the inspection result normal?
YES >> GO TO 3.
NO >> Check the following. If any items are damaged, repair or replace damaged parts.](/manual-img/5/57396/w960_57396-3696.png)
STC-10
< DTC/CIRCUIT DIAGNOSIS >[EPS]
C1601 BATTERY POWER SUPPLY
Is the inspection result normal?
YES >> GO TO 3.
NO >> Check the following. If any items are damaged, repair or replace damaged parts.
• 10A fuse (#2) open
- Harness for short between 10A fuse (#2) and pow er steering control unit harness connector No.
10 terminal.
• 60A fusible link (M) open
- Harness for short between 60A fusible link (M) and power steering control unit harness connec-
tor No. 10 terminal.
• Harness for open between ignition switch and power steering control unit harness connector No. 17 terminal.
• Harness for open between battery and power steering control unit harness connector No. 17 ter-
minal.
• Battery or ignition switch.
3.CHECK BATTERY VOLTAGE SIGNAL (1)
With CONSULT-III
1. Connect EPS control unit harness connector.
2. Start the engine. CAUTION:
Stop the vehicle.
3. Select “EPS”, “DATA MONITOR” and “MOTOR VO LT”, and perform the battery voltage inspection.
Is the inspection result normal?
YES >> GO TO 4.
NO >> Replace EPS control unit. Refer to PS-10, "
Removal and Installation".
4.CHECK MOTOR VOLTAGE SIGNAL (2)
With CONSULT-III
Select “MOTOR VOLT” in “DATA MONITOR” of the EPS control unit. Check motor voltage with the steering
wheel fully turned leftward or rightward.
Is the value in
“DATA MONITOR”“between 9 V and 17.5 V”?
YES >> Check pin terminal and connection of each harness connector for damage or loose connection.
NO >> Check battery power supply and ignition power supply. Refer to STC-22, "
Wiring Diagram - ELEC-
TRONICALLY CONTROLLED POWER STEERING SYSTEM -".
EPS control unit
—Volt a ge
Connector Terminal
M53 10
Ground Battery voltage
M54 17
Monitor item ConditionDisplay value
MOTOR VOLT Engine runningBattery voltage
Revision: May 2010 2011 Versa
Page 3784 of 3787

WW-38
< SERVICE INFORMATION >
POWER SOCKET
POWER SOCKET
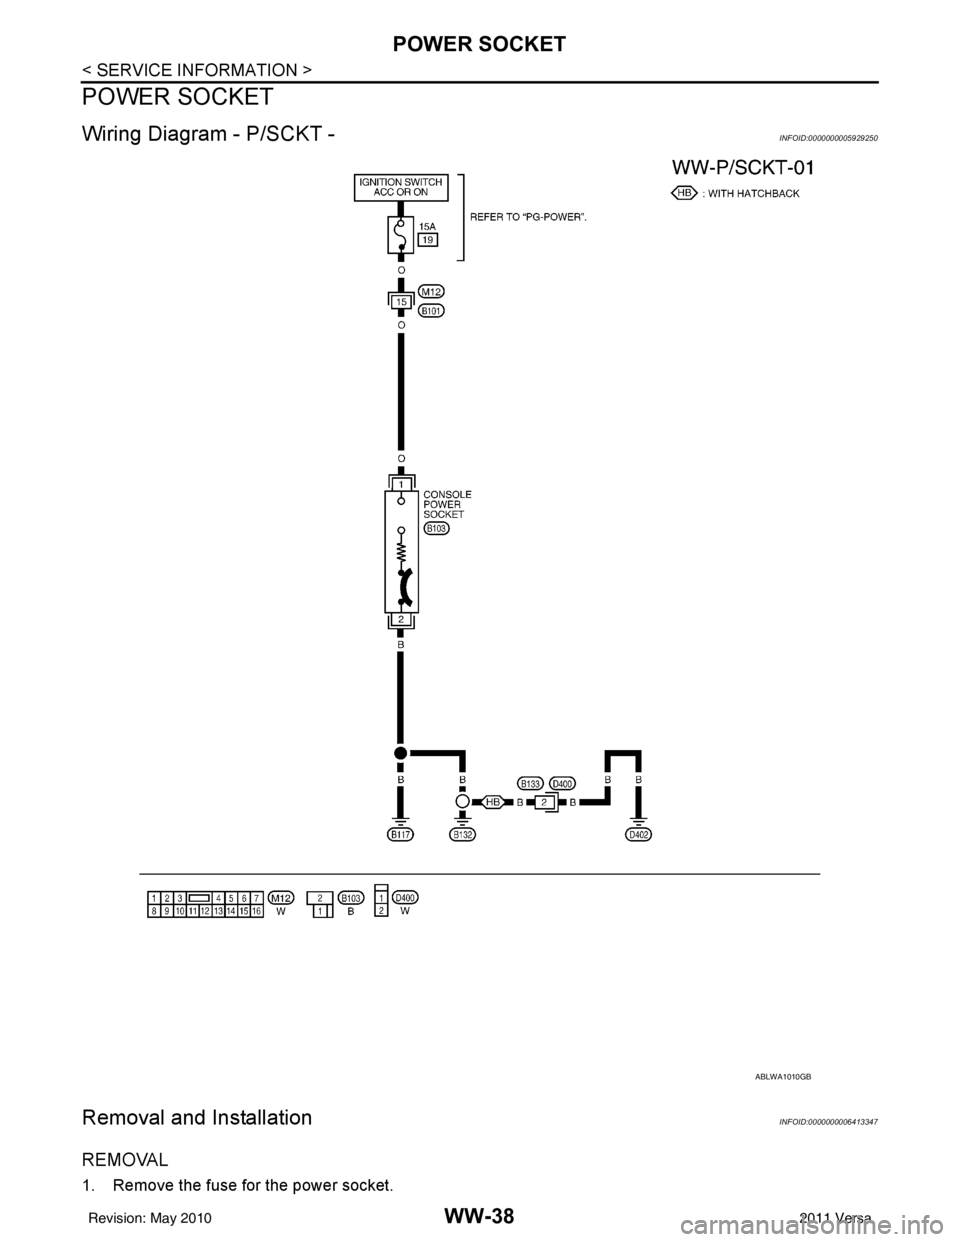
Wiring Diagram - P/SCKT -INFOID:0000000005929250
Removal and InstallationINFOID:0000000006413347
REMOVAL
1. Remove the fuse for the power socket.
ABLWA1010GB
Revision: May 20102011 Versa