2011 NISSAN NOTE rear parcel shelf
[x] Cancel search: rear parcel shelfPage 21 of 235

secured in the latched position. If they are not
completely secured, passengers may be in-
jured in an accident or sudden stop.
•Closely supervise children when they are
around the vehicle to prevent them from play-
ing and being locked in the luggage compart-
ment where they could be seriously injured.
Keep the vehicle locked with the rear seat-
back securely latched when not in use, and
prevent children from having access to the
vehicle’s keys.
•Head restraints should be adjusted properly
as they may provide significant protection
against whiplash injury. Always adjust them
properly when returning the seatbacks to the
upright position.
NOTE
The lowest head restraint position is a stowage
position to assist seat folding and rear vision.
The lowest position intended for use is with the
head restraint raised to its first notch position. It
should be further adjusted to suit the passenger
if necessary.
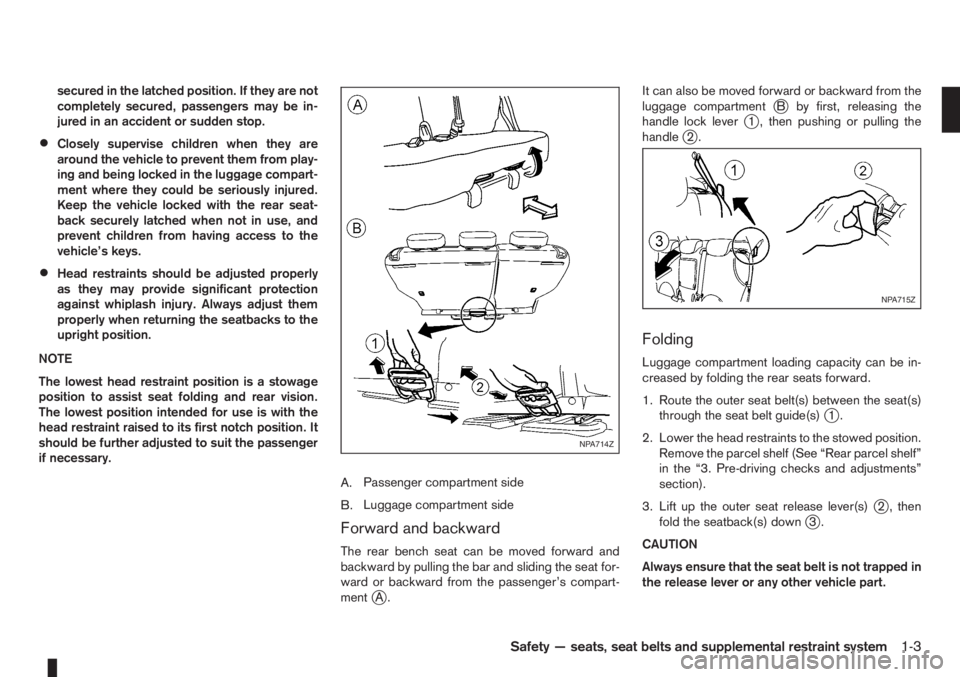
A.Passenger compartment side
B.Luggage compartment side
Forward and backward
The rear bench seat can be moved forward and
backward by pulling the bar and sliding the seat for-
ward or backward from the passenger’s compart-
ment
jA.It can also be moved forward or backward from the
luggage compartment
jB by first, releasing the
handle lock leverj1 , then pushing or pulling the
handlej2.
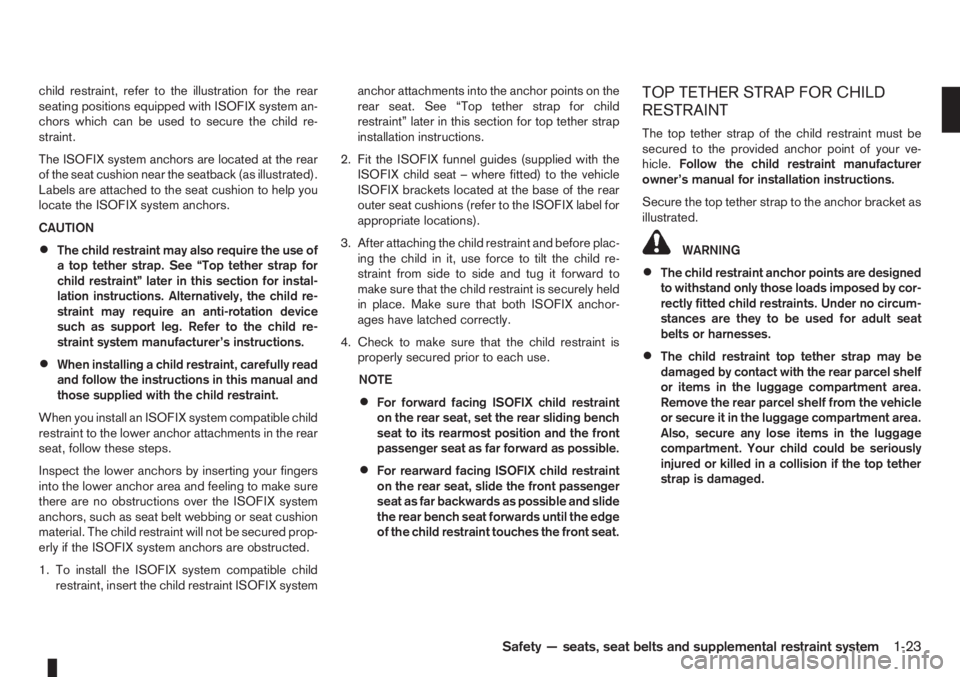
Folding
Luggage compartment loading capacity can be in-
creased by folding the rear seats forward.
1. Route the outer seat belt(s) between the seat(s)
through the seat belt guide(s)
j1.
2. Lower the head restraints to the stowed position.
Remove the parcel shelf (See “Rear parcel shelf”
in the “3. Pre-driving checks and adjustments”
section).
3. Lift up the outer seat release lever(s)
j2 , then
fold the seatback(s) downj3.
CAUTION
Always ensure that the seat belt is not trapped in
the release lever or any other vehicle part.
NPA714Z
NPA715Z
Safety — seats, seat belts and supplemental restraint system1-3
Page 41 of 235

child restraint, refer to the illustration for the rear
seating positions equipped with ISOFIX system an-
chors which can be used to secure the child re-
straint.
The ISOFIX system anchors are located at the rear
of the seat cushion near the seatback (as illustrated).
Labels are attached to the seat cushion to help you
locate the ISOFIX system anchors.
CAUTION
•The child restraint may also require the use of
a top tether strap. See “Top tether strap for
child restraint” later in this section for instal-
lation instructions. Alternatively, the child re-
straint may require an anti-rotation device
such as support leg. Refer to the child re-
straint system manufacturer’s instructions.
•When installing a child restraint, carefully read
and follow the instructions in this manual and
those supplied with the child restraint.
When you install an ISOFIX system compatible child
restraint to the lower anchor attachments in the rear
seat, follow these steps.
Inspect the lower anchors by inserting your fingers
into the lower anchor area and feeling to make sure
there are no obstructions over the ISOFIX system
anchors, such as seat belt webbing or seat cushion
material. The child restraint will not be secured prop-
erly if the ISOFIX system anchors are obstructed.
1. To install the ISOFIX system compatible child
restraint, insert the child restraint ISOFIX systemanchor attachments into the anchor points on the
rear seat. See “Top tether strap for child
restraint” later in this section for top tether strap
installation instructions.
2. Fit the ISOFIX funnel guides (supplied with the
ISOFIX child seat – where fitted) to the vehicle
ISOFIX brackets located at the base of the rear
outer seat cushions (refer to the ISOFIX label for
appropriate locations).
3. After attaching the child restraint and before plac-
ing the child in it, use force to tilt the child re-
straint from side to side and tug it forward to
make sure that the child restraint is securely held
in place. Make sure that both ISOFIX anchor-
ages have latched correctly.
4. Check to make sure that the child restraint is
properly secured prior to each use.
NOTE
•For forward facing ISOFIX child restraint
on the rear seat, set the rear sliding bench
seat to its rearmost position and the front
passenger seat as far forward as possible.
•For rearward facing ISOFIX child restraint
on the rear seat, slide the front passenger
seat as far backwards as possible and slide
the rear bench seat forwards until the edge
of the child restraint touches the front seat.
TOP TETHER STRAP FOR CHILD
RESTRAINT
The top tether strap of the child restraint must be
secured to the provided anchor point of your ve-
hicle.Follow the child restraint manufacturer
owner’s manual for installation instructions.
Secure the top tether strap to the anchor bracket as
illustrated.
WARNING
•The child restraint anchor points are designed
to withstand only those loads imposed by cor-
rectly fitted child restraints. Under no circum-
stances are they to be used for adult seat
belts or harnesses.
•The child restraint top tether strap may be
damaged by contact with the rear parcel shelf
or items in the luggage compartment area.
Remove the rear parcel shelf from the vehicle
or secure it in the luggage compartment area.
Also, secure any lose items in the luggage
compartment. Your child could be seriously
injured or killed in a collision if the top tether
strap is damaged.
Safety — seats, seat belts and supplemental restraint system1-23
Page 71 of 235

3Pre-driving checks and adjustmentsPre-driving checks and adjustments
Keys ........................................................................ 3-2
Integrated keyfob/remote control system .................. 3-3
Using the remote keyless entry system ................ 3-3
Locking the doors ............................................... 3-3
Unlocking the doors – convenience mode ........... 3-4
Unlocking the doors – anti-hijack mode ............... 3-4
Switching from convenience mode to
anti-hijack mode.................................................. 3-4
Keyfob operation failure ...................................... 3-4
Intelligent Key system (where fitted) ......................... 3-5
Locking/unlocking .............................................. 3-5
Starting the engine with the Intelligent Key .......... 3-6
Door locks ............................................................... 3-6
Super Lock System (Right-hand drive models) .... 3-6
Vehicle dead battery – left-hand side door
handle ................................................................ 3-7
Locking with power door lock switch .................. 3-7Child safety rear door lock .................................. 3-8
Back door lock ................................................... 3-8
Security system ....................................................... 3-9
NISSAN Anti-Theft System (NATS)..................... 3-9
Bonnet release ........................................................ 3-10
Fuel filler lid ............................................................. 3-11
Fuel filler lid opener lever .................................... 3-11
Fuel filler cap ...................................................... 3-11
Handbrake lever ...................................................... 3-11
Tilting steering wheel ............................................... 3-12
Mirrors..................................................................... 3-12
Inside rear-view mirror ........................................ 3-12
Outside rear-view mirrors.................................... 3-12
Vanity mirror ....................................................... 3-13
Rear parcel shelf...................................................... 3-14
Rear parcel shelf removal.................................... 3-14
Rear parcel shelf installation................................ 3-14
Page 84 of 235

WARNING
Never put anything on the rear parcel shelf, no
matter how small. Any object on it could cause
an injury in an accident or when the brakes are
applied suddenly.
CAUTION
The rear parcel shelf flap provides a hide-awayfacility to the luggage compartment whether the
rear seat is at its rearmost position or not. Do not
store objects onto the rear parcel shelf flap as it
may impair the sliding operation of the rear seat.
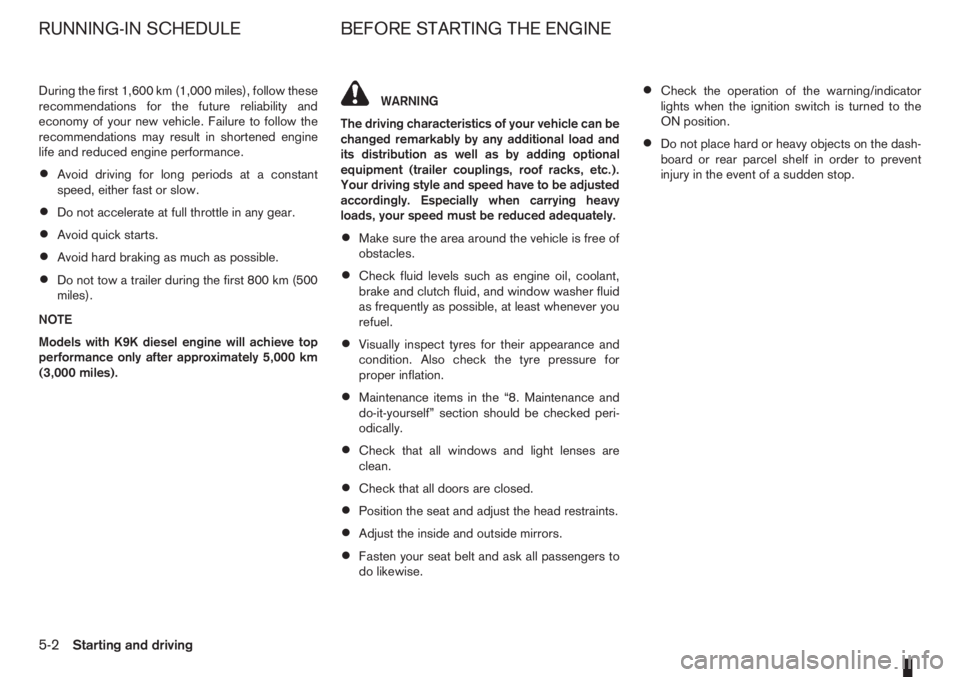
REAR PARCEL SHELF REMOVAL
1. Slide the rear bench seat forward through the
back door opening. See “Rear seat” in the
“1. Safety — seats, seat belts and supplemental
restraint system” section for further details.
2. Detach the flap from the rear seat back fasteners
j1 by carefully pulling the edge rearward.
3. Detach the ropes either side of the back door.
4. With the parcel shelf in horizontal position, pull
rearward until it stops
j2.
5. Lift the parcel shelf up and twist horizontally, then
remove through the back door opening.
CAUTION
Make sure the rear parcel shelf is carefully stored
when not in use in order to prevent any damage.
REAR PARCEL SHELF
INSTALLATION
1. Ensure the rear seat is in the forward position.
See “Rear seat” in the “1. Safety — seats, seat
belts and supplemental restraint system” section
for further details.
2. Twist and lower the parcel shelf onto its horizon-
tal side supports.3. With the parcel shelf in its rearmost position,
push forward until it “clicks” into place
j2.
4. Attach the ropes to each corresponding side of
the back door.
5. Attach the flap edges to the rear seat back fas-
teners
j1.
NPA731Z
REAR PARCEL SHELF
3-14Pre-driving checks and adjustments
Page 126 of 235

During the first 1,600 km (1,000 miles), follow these
recommendations for the future reliability and
economy of your new vehicle. Failure to follow the
recommendations may result in shortened engine
life and reduced engine performance.
•Avoid driving for long periods at a constant
speed, either fast or slow.
•Do not accelerate at full throttle in any gear.
•Avoid quick starts.
•Avoid hard braking as much as possible.
•Do not tow a trailer during the first 800 km (500
miles).
NOTE
Models with K9K diesel engine will achieve top
performance only after approximately 5,000 km
(3,000 miles).
WARNING
The driving characteristics of your vehicle can be
changed remarkably by any additional load and
its distribution as well as by adding optional
equipment (trailer couplings, roof racks, etc.).
Your driving style and speed have to be adjusted
accordingly. Especially when carrying heavy
loads, your speed must be reduced adequately.
•Make sure the area around the vehicle is free of
obstacles.
•Check fluid levels such as engine oil, coolant,
brake and clutch fluid, and window washer fluid
as frequently as possible, at least whenever you
refuel.
•Visually inspect tyres for their appearance and
condition. Also check the tyre pressure for
proper inflation.
•Maintenance items in the “8. Maintenance and
do-it-yourself” section should be checked peri-
odically.
•Check that all windows and light lenses are
clean.
•Check that all doors are closed.
•Position the seat and adjust the head restraints.
•Adjust the inside and outside mirrors.
•Fasten your seat belt and ask all passengers to
do likewise.
•Check the operation of the warning/indicator
lights when the ignition switch is turned to the
ON position.
•Do not place hard or heavy objects on the dash-
board or rear parcel shelf in order to prevent
injury in the event of a sudden stop.
RUNNING-IN SCHEDULE BEFORE STARTING THE ENGINE
5-2Starting and driving
Page 226 of 235

Precautions
– Audio operation precautions .......................................... 4-10
– Brake precautions ......................................................... 5-27
– Child restraint usage ..................................................... 1-16
– Maintenance precautions ................................................. 8-4
– Operating precautions (trailer) ....................................... 5-24
– Precautions on cruise control system ............................. 5-19
– Towing precautions ....................................................... 6-12
– When starting and driving ................................................ 5-3
Pregnant women ................................................................... 1-7
Protect
– Protect the environment ................................................. 8-12
– Protect your vehicle from corrosion .................................. 7-5
Push-starting ....................................................................... 6-11
R
Radio
– AM-FM radio with CD player and navigation .................. 4-34
– FM AM radio with CD player ......................................... 4-23
– LW-MW-FM radio with CD player ................................. 4-16
– NATS immobilizer radio approval number ......................... 9-8
Rear parcel shelf ................................................................. 3-14
– Installation ..................................................................... 3-14
– Removal ........................................................................ 3-14
Rear seat .............................................................................. 1-2
Rear window defogger ........................................................ 2-15
Recommended SAE viscosity number ................................... 9-4
Remote
– Steering wheel i switch .................................................... 2-3
Remote control system (integrated keyfob) ............................ 3-3
Repairing flat tyre .................................................................. 6-7
Running-in schedule .............................................................. 5-2S
Safety
– Active head restraints ...................................................... 1-5
– Child safety ..................................................................... 1-7
– Child safety rear door lock ............................................... 3-8
– ISOFIX system .............................................................. 1-22
– Safety chains (Trailer) .................................................... 5-25
– Top tether strap for child restraint .................................. 1-23
Seat
– Active head restraints ...................................................... 1-5
– Front seats – Adjustment ................................................. 1-2
– Head restraints ................................................................ 1-4
– Rear seat ......................................................................... 1-2
– Seat heating .................................................................. 2-19
– Seats .............................................................................. 1-2
Seat belt
– Child safety ..................................................................... 1-7
– Injured persons ............................................................... 1-7
– Pre-tensioner seat belt system ......................................... 1-9
– Precautions on seat belt usage ........................................ 1-6
– Pregnant women ............................................................. 1-7
– Seat belt maintenance ..................................................... 1-9
– Seat belt warning lights ................................................... 1-5
– Seat belts ................................................................. 1-5, 7-4
– Three-point type seat belts ............................................... 1-7
Security system ..................................................................... 3-9
– NISSAN Anti-Theft System (NATS) ................................. 3-9
Servicing air conditioner ........................................................ 4-7
Snow chains ....................................................................... 8-30
Spare tyre ............................................................................. 6-2
Spark plugs (Petrol engine models) ..................................... 8-18
Speed limiter ....................................................................... 5-15
Speed limiter operations ...................................................... 5-16
– Vehicles with diesel engine ............................................ 5-17
– Vehicles with petrol engine ............................................ 5-16
10-6Index