2011 NISSAN NOTE engine
[x] Cancel search: enginePage 190 of 235
•Brake and clutch fluids are poisonous and
should be stored carefully in marked contain-
ers out of the reach of children.
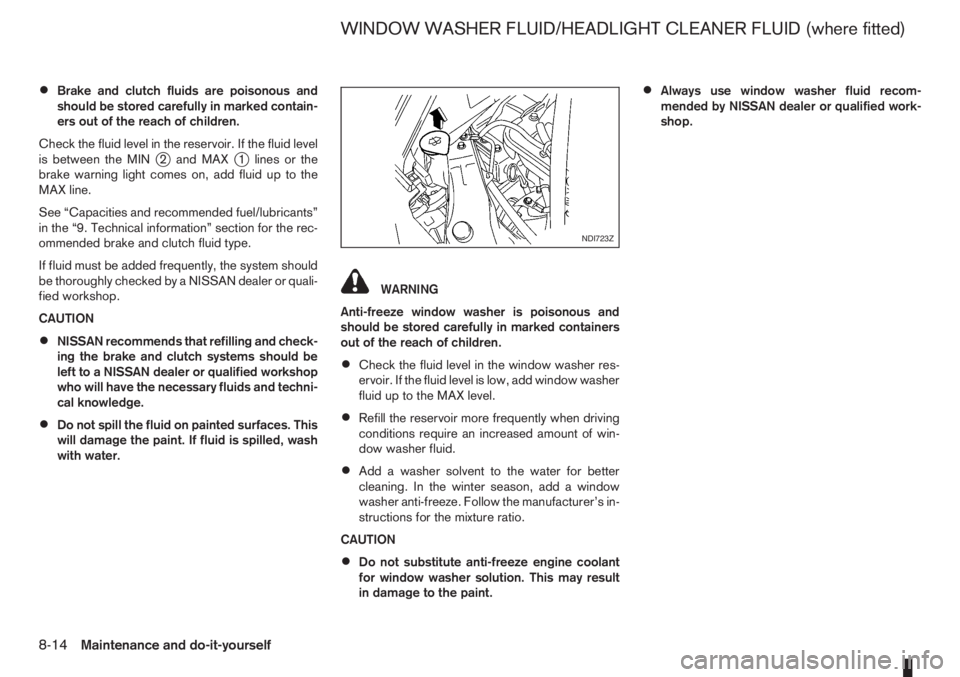
Check the fluid level in the reservoir. If the fluid level
is between the MIN
j2 and MAXj1 lines or the
brake warning light comes on, add fluid up to the
MAX line.
See “Capacities and recommended fuel/lubricants”
in the “9. Technical information” section for the rec-
ommended brake and clutch fluid type.
If fluid must be added frequently, the system should
be thoroughly checked by a NISSAN dealer or quali-
fied workshop.
CAUTION
•NISSAN recommends that refilling and check-
ing the brake and clutch systems should be
left to a NISSAN dealer or qualified workshop
who will have the necessary fluids and techni-
cal knowledge.
•Do not spill the fluid on painted surfaces. This
will damage the paint. If fluid is spilled, wash
with water.
WARNING
Anti-freeze window washer is poisonous and
should be stored carefully in marked containers
out of the reach of children.
•Check the fluid level in the window washer res-
ervoir. If the fluid level is low, add window washer
fluid up to the MAX level.
•Refill the reservoir more frequently when driving
conditions require an increased amount of win-
dow washer fluid.
•Add a washer solvent to the water for better
cleaning. In the winter season, add a window
washer anti-freeze. Follow the manufacturer’s in-
structions for the mixture ratio.
CAUTION
•Do not substitute anti-freeze engine coolant
for window washer solution. This may result
in damage to the paint.
•Always use window washer fluid recom-
mended by NISSAN dealer or qualified work-
shop.
NDI723Z
WINDOW WASHER FLUID/HEADLIGHT CLEANER FLUID (where fitted)
8-14Maintenance and do-it-yourself
Page 192 of 235
ommends to visually check the green indicatorjA status periodically. If it is not visible, replace
the battery as soon as possible.
•If battery replacement or check is required, con-
tact a NISSAN dealer or qualified workshop.
REINITIALISATION PROCEDURE
AFTER BATTERY RECONNECTION
Power window (Driver’s side —
where fitted)
When the vehicle battery has been connected, the
system must be reinitialised as follows:
1. Push down and hold the driver’s side window
switch until the window glass is completely low-
ered then release the switch.
2.In one continuous operation, pull up and hold
the driver’s side window switch until the window
glass is completely closed and continue holding
the switch for a further 5 seconds.
3. The system is now reinitialised.
Repeat the procedure every time the vehicle battery
is connected.
If the reinitialisation procedure cannot be performed
successfully, take your vehicle to a NISSAN dealer
or qualified workshop.
JUMP-STARTING
If jump-starting is necessary, see “Jump-starting” in
the “6. In case of emergency” section. If the engine
does not start by jump starting, the battery may have
to be replaced. Contact a NISSAN dealer or quali-
fied workshop.
8-16Maintenance and do-it-yourself
Page 194 of 235

2. Insert a flat blade screwdriver or a suitable tool
into the slit of the corner and twist it to open the
lid.
3. Replace the battery with a new one.
For models equipped with Integrated keyfob, use
the following battery type:
CR2016
For models equipped with Intelligent Key, use
the following battery type:
CR2032
•Do not touch the internal circuit and electric ter-
minals as doing so could cause a malfunction.
•Make sure that the + side faces the bottom of the
case, as illustrated.
4. Install the lid in the reverse order of removal.
5. Operate the buttons to check its operation.
Contact a NISSAN dealer or qualified workshop
if you need assistance for battery replacement.
WARNING
Be sure the ignition switch is in the “OFF” or
LOCK position. Otherwise the cooling fan or the
engine may start to operate suddenly.
1. Visually inspect each belt for signs of unusual
wear, cuts, fraying or looseness. If the belt is in
poor condition or loose, have it replaced or ad-
justed by a NISSAN dealer or qualified work-
shop.
2. Have the belts checked regularly for condition
and tension in accordance with the maintenance
schedule as shown in the separately provided
Warranty Information and Maintenance booklet.WARNING
Be sure the engine and ignition switch are off
and that the handbrake is engaged securely.
CAUTION
•Be sure to use the correct socket to remove
the spark plugs. An incorrect socket can
cause damage to the spark plugs.
•Always replace spark plugs with recom-
mended or equivalent ones.
Replace spark plugs according to the maintenance
schedule. For details, see the separately provided
Warranty Information & Maintenance Booklet.
If replacement is required, see a NISSAN dealer or
qualified workshop for servicing.
DRIVE BELTS SPARK PLUGS (Petrol engine
models)
8-18Maintenance and do-it-yourself
Page 195 of 235
WARNING
•Operating the engine without the air cleaner
filter, can cause you or others to be burned.
The air cleaner filter not only cleans the intake
air, it also stops flame if the engine backfires.
If the air cleaner filter is not installed and the
engine backfires, you could be burned.
•Do not drive without the air cleaner filter.
•Be careful when working on the engine with-
out the air cleaner filter.
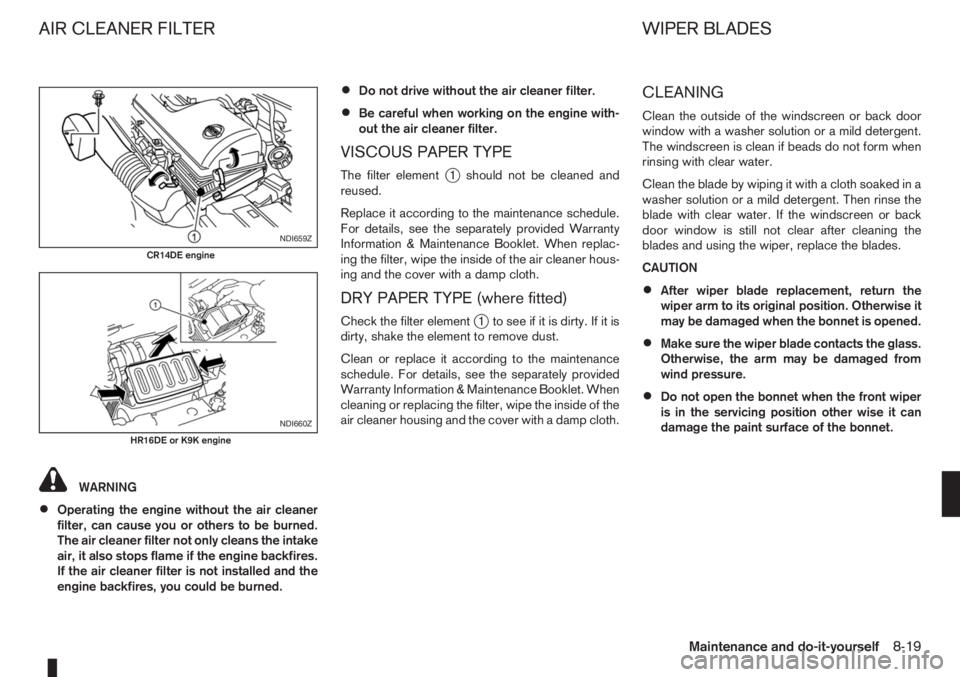
VISCOUS PAPER TYPE
The filter elementj1 should not be cleaned and
reused.
Replace it according to the maintenance schedule.
For details, see the separately provided Warranty
Information & Maintenance Booklet. When replac-
ing the filter, wipe the inside of the air cleaner hous-
ing and the cover with a damp cloth.
DRY PAPER TYPE (where fitted)
Check the filter elementj1 to see if it is dirty. If it is
dirty, shake the element to remove dust.
Clean or replace it according to the maintenance
schedule. For details, see the separately provided
Warranty Information & Maintenance Booklet. When
cleaning or replacing the filter, wipe the inside of the
air cleaner housing and the cover with a damp cloth.
CLEANING
Clean the outside of the windscreen or back door
window with a washer solution or a mild detergent.
The windscreen is clean if beads do not form when
rinsing with clear water.
Clean the blade by wiping it with a cloth soaked in a
washer solution or a mild detergent. Then rinse the
blade with clear water. If the windscreen or back
door window is still not clear after cleaning the
blades and using the wiper, replace the blades.
CAUTION
•After wiper blade replacement, return the
wiper arm to its original position. Otherwise it
may be damaged when the bonnet is opened.
•Make sure the wiper blade contacts the glass.
Otherwise, the arm may be damaged from
wind pressure.
•Do not open the bonnet when the front wiper
is in the servicing position other wise it can
damage the paint surface of the bonnet.
NDI659Z
CR14DE engine
NDI660Z
HR16DE or K9K engine
AIR CLEANER FILTER WIPER BLADES
Maintenance and do-it-yourself8-19
Page 196 of 235
FRONT WINDOW WIPER
REPLACEMENT
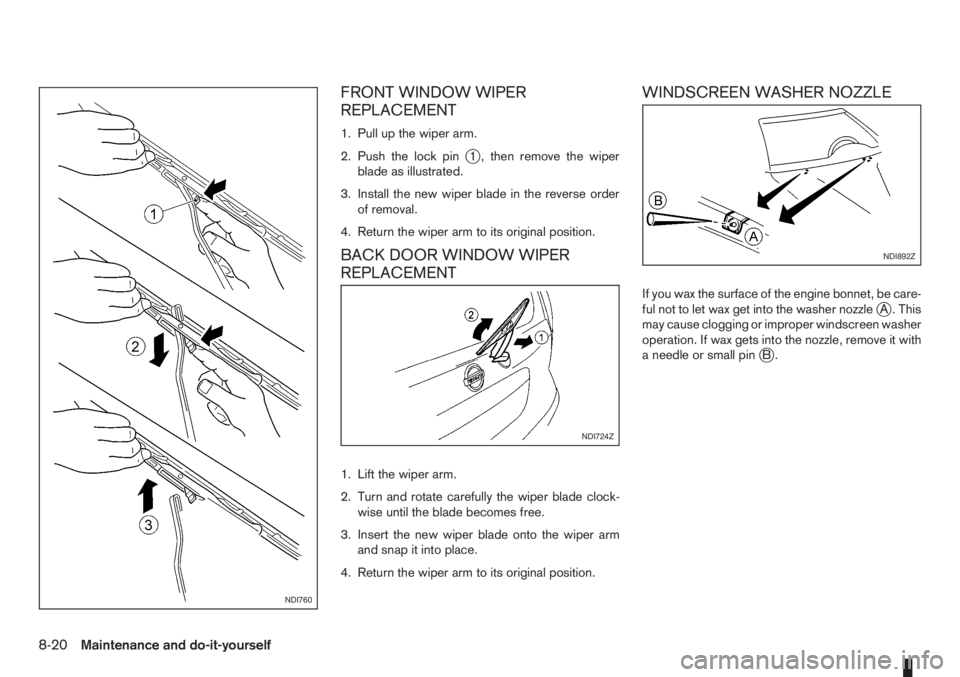
1. Pull up the wiper arm.
2. Push the lock pin
j1 , then remove the wiper
blade as illustrated.
3. Install the new wiper blade in the reverse order
of removal.
4. Return the wiper arm to its original position.
BACK DOOR WINDOW WIPER
REPLACEMENT
1. Lift the wiper arm.
2. Turn and rotate carefully the wiper blade clock-
wise until the blade becomes free.
3. Insert the new wiper blade onto the wiper arm
and snap it into place.
4. Return the wiper arm to its original position.
WINDSCREEN WASHER NOZZLE
If you wax the surface of the engine bonnet, be care-
ful not to let wax get into the washer nozzlejA . This
may cause clogging or improper windscreen washer
operation. If wax gets into the nozzle, remove it with
a needle or small pin
jB.
NDI760
NDI724Z
NDI892Z
8-20Maintenance and do-it-yourself
Page 198 of 235
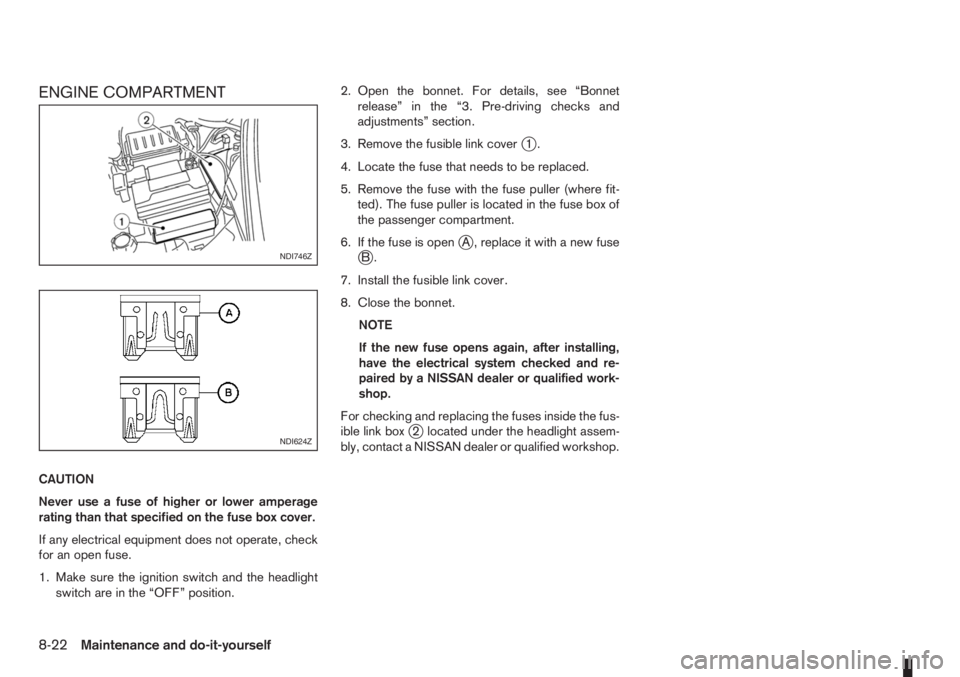
ENGINE COMPARTMENT
CAUTION
Never use a fuse of higher or lower amperage
rating than that specified on the fuse box cover.
If any electrical equipment does not operate, check
for an open fuse.
1. Make sure the ignition switch and the headlight
switch are in the “OFF” position.2. Open the bonnet. For details, see “Bonnet
release” in the “3. Pre-driving checks and
adjustments” section.
3. Remove the fusible link cover
j1.
4. Locate the fuse that needs to be replaced.
5. Remove the fuse with the fuse puller (where fit-
ted). The fuse puller is located in the fuse box of
the passenger compartment.
6. If the fuse is open
jA , replace it with a new fusejB.
7. Install the fusible link cover.
8. Close the bonnet.
NOTE
If the new fuse opens again, after installing,
have the electrical system checked and re-
paired by a NISSAN dealer or qualified work-
shop.
For checking and replacing the fuses inside the fus-
ible link box
j2 located under the headlight assem-
bly, contact a NISSAN dealer or qualified workshop.
NDI746Z
NDI624Z
8-22Maintenance and do-it-yourself
Page 199 of 235

HEADLIGHTS
Replacing the halogen headlight bulb
The headlight is a semi-sealed beam type which
uses a replaceable headlight (halogen) bulb. A bulb
can be replaced from inside the engine compart-
ment without removing the headlight assembly.
CAUTION
•High pressure halogen gas is sealed inside
the halogen bulb. The bulb may break if the
glass envelope is scratched or the bulb is
dropped.
•When handling the bulb, DO NOT TOUCH THE
GLASS ENVELOPE.
•Use the same number and wattage as origi-
nally installed.
•Aiming is usually not necessary after replac-
ing the bulb. When aiming adjustment is nec-
essary, contact a NISSAN dealer or qualified
workshop.
•Do not leave the bulb out of the headlight
reflector for a long period of time as dust,
moisture or smoke may enter the headlight
body and affect the performance of the head-
light.
1. Open the bonnet. For details, see “Bonnet
release” in the “3. Pre-driving checks and
adjustments” section.
2. Disconnect the negative (—) battery cable.
NDI725
LIGHTS
Maintenance and do-it-yourself8-23
Page 209 of 235
9Technical informationTechnical information
Capacities and recommended fuel/lubricants ........... 9-2
Fuel recommendation ......................................... 9-4
Recommended SAE viscosity number ................. 9-4
Air conditioning system refrigerant and
lubricant recommendations (where fitted) ............ 9-4
Engine ..................................................................... 9-5
Wheels and tyres ..................................................... 9-5
Dimensions .............................................................. 9-6
When travelling or transferring your registration to
another country........................................................ 9-6Vehicle identification ................................................ 9-6
Vehicle identification plate ................................... 9-6
Vehicle identification number (VIN) (chassis
number).............................................................. 9-6
Engine serial number .......................................... 9-7
Tyre placard ....................................................... 9-7
Air conditioner specification label (where
fitted).................................................................. 9-7
NATS immobilizer radio approval number ................. 9-8
Approval numbers.................................................... 9-8