2011 NISSAN MURANO belt
[x] Cancel search: beltPage 86 of 433

Black plate (84,1)
Model "Z51-D" EDITED: 2010/ 7/ 23
WARNING
.Your brake system may not be
working properly if the warning light
is on. Driving could be dangerous. If
you judge it to be safe, drive care-
fully to the nearest service station
for repairs. Otherwise, have your
vehicle towed because driving it
could be dangerous.
. Pressing the brake pedal with the
engine stopped and/or low brake
fluid level may increase your stop-
ping distance and braking will re-
quire greater pedal effort as well as
pedal travel.
. If the brake fluid level is below the
minimum or MIN mark on the brake
fluid reservoir, do not drive until the
brake system has been checked at a
NISSAN dealer.
Charge warning light
If the light comes on while the engine is running,
it may indicate the charging system is not
functioning properly. Turn the engine off and
check the alternator belt. If the belt is loose,
broken, missing or if the light remains on, see a NISSAN dealer immediately.
CAUTION
Do not continue driving if the alternator
belt is loose, broken or missing.
Engine oil pressure warning light
This light warns of low engine oil pressure. If the
light flickers or comes on during normal driving,
pull off the road in a safe area, stop the engine
immediately
and call a NISSAN dealer or other
authorized repair shop.
The engine oil pressure warning light is
not designed to indicate a low oil level.
Use the dipstick to check the oil level. (See
“ENGINE OIL” in the “8. Maintenance and do-it-
yourself” section.)
CAUTION
Running the engine with the engine oil
pressure warning light on could cause
serious damage to the engine almost
immediately. Such damage is not cov-
ered by warranty. Turn off the engine as
soon as it is safe to do so.
Intelligent Key warning light
After the ignition switch is pushed to the ON
position, this light comes on for about 2 seconds
and then turns off.
This light warns of a malfunction with the
Intelligent Key system.
If the light comes on while the engine is
stopped, it may be impossible to start the
engine. If the light comes on while the engine
is running, you can drive the vehicle. However in
these cases, contact a NISSAN dealer for repair
as soon as possible.
Low tire pressure warning light
Your vehicle is equipped with a Tire Pressure
Monitoring System (TPMS) that monitors the tire
pressure of all tires except the spare.
The low tire pressure warning light warns of low
tire pressure or indicates that the TPMS is not
functioning properly.
After the ignition switch is pushed ON, this light
illuminates for about 1 second and turns off.
2-12
Instruments and controls
Page 88 of 433

Black plate (86,1)
Model "Z51-D" EDITED: 2010/ 7/ 23
CAUTION
.The TPMS is not a substitute for the
regular tire pressure check. Be sure
to check the tire pressure regularly.
. If the vehicle is being driven at
speeds of less than 16 MPH (25
km/h) , the TPMS may not operate
correctly.
. Be sure to correctly install the
specified size of tires to the four
wheels.
Master warning light
When the ignition switch is in the ON position,
the master warning light illuminates if any of the
following are displayed on the dot matrix liquid
crystal display:
.No key warning
. Low fuel warning
. Low washer fluid warning
. Parking brake release warning
. Door/lift gate open warning
. Loose fuel cap warning
. Check tire pressure warning See “DOT MATRIX LIQUID CRYSTAL DIS-
PLAY” later in this section.
Seat belt warning light
The light and chime remind you to fasten seat
belts. The light illuminates whenever the ignition
switch is pushed to the ON position, and will
remain illuminated until the driver’s seat belt is
fastened.
The seat belt warning light for the front
passenger will illuminate if the seat belt is not
fastened when the front passenger’s seat is
occupied. For approximately 5 seconds after the
ignition switch is in the ON position, the system
does not activate the warning light for the front
passenger.
See “SEAT BELTS” in the “1. Safety — Seats,
seat belts and supplemental restraint system”
section for precautions on seat belt usage.
Supplemental air bag warning light
After pushing the ignition switch to the ON
position, the supplemental air bag warning light
will illuminate. The supplemental air bag warning
light will turn off after about 7 seconds if the
supplemental front air bag and supplemental
side air bag, curtain side-impact air bag systems
and/or pretensioner seat belt are operational.
If any of the following conditions occur, the front
air bag, side air bag, curtain and rollover air bag
and pretensioner systems needs servicing and
your vehicle must be taken to your nearest
NISSAN dealer.
.
The supplemental air bag warning light
remains on after approximately 7 seconds.
. The supplemental air bag warning light
flashes intermittently.
. The supplemental air bag warning light does
not come on at all.
Unless checked and repaired, the Supplemental
Restraint Systems (air bag systems) and/or the
pretensioners may not function properly.
For additional information, see “SUPPLEMEN-
TAL RESTRAINT SYSTEM” in the “1. Safety —
Seats, seat belts and supplemental restraint
system” section.
WARNING
If the supplemental air bag warning
light is on, it could mean that the front
air bag, side air bag, curtain and roll-
over air bag and/or pretensioner sys-
tems will not operate in an accident. To
help avoid injury to yourself or others,
have your vehicle checked by a NISSAN
2-14
Instruments and controls
Page 89 of 433

Black plate (87,1)
Model "Z51-D" EDITED: 2010/ 7/ 23
dealer as soon as possible.INDICATOR LIGHTS
All-Wheel Drive (AWD) LOCK
indicator light (AWD models)
This light illuminates when the ignition switch is
placed in the ON position, and turns off within 1
second.
When selecting the LOCK mode while the
engine is running, this light will illuminate. (See
“ALL-WHEEL DRIVE (AWD)” in the “5. Starting
and driving” section.)
Continuously Variable Transmis-
sion (CVT) position indicator light
When the ignition switch is pushed to the ON
position, the indicator shows the automatic
selector shift position. (See “CONTINUOUSLY
VARIABLE TRANSMISSION (CVT)” in the “5.
Starting and driving” section.)
Cruise indicator light
Cruise main switch indicator:
This light illuminates when the cruise control
main switch is pushed. The light turns off whenthe main switch is pushed again. When the
cruise main switch indicator light illuminates, the
cruise control system is operational. (See
“CRUISE CONTROL” in the “5. Starting and
driving” section.)
Cruise malfunction:
If the cruise indicator light blinks while the
engine is running, it may indicate the cruise
control system is not functioning properly. Have
the system checked by a NISSAN dealer. (See
“CRUISE CONTROL” in the “5. Starting and
driving” section.)
Front passenger air bag status
light
The front passenger air bag status lightwill be lit and the passenger front air bag will be
OFF depending on how the front passenger
seat is being used.
For front passenger air bag status light opera-
tion,see“NISSANADVANCEDAIRBAG
SYSTEM (front seats)” in the “1. Safety —
Seats, seat belts and supplemental restraint
system” section of this manual.
High beam indicator light
This light comes on when the headlight high
beam is on and goes out when the low beam isselected.
Low beam indicator light
The light comes on when the front park, side
marker, tail and license plate lights are on.
Malfunction Indicator Light (MIL)
If the malfunction indicator light comes on
steady or blinks while the engine is running, it
may indicate a potential emission control and/or
Continuously Variable Transmission (CVT) mal-
function.
The malfunction indicator light may also come on
steady if the fuel-filler cap is loose or missing, or
if the vehicle runs out of fuel. Check to make
sure the fuel-filler cap is installed and closed
tightly, and that the vehicle has at least 3 US
gallons (11.4 liters) of fuel in the fuel tank.
After a few driving trips, the
light should
turn off if no other potential emission control
system malfunction exists.
If this indicator light remains on for 20 seconds
and then blinks for 10 seconds when the engine
is not running, it indicates that the vehicle is not
ready for an emission control system inspection/
maintenance test. (See “READINESS FOR
INSPECTION/MAINTENANCE (I/M) TEST” in
the “9. Technical and consumer information”
Instruments and controls
2-15
Page 91 of 433

Black plate (89,1)
Model "Z51-D" EDITED: 2010/ 7/ 23
AUDIBLE REMINDERS
Key reminder chimeA chime will sound if the driver side door is
opened while the ignition switch is pushed to
the ACC position or pushed to the OFF or
LOCK position with the Intelligent Key left in the
Intelligent Key port. Make sure the ignition
switch is pushed to the OFF position, and take
the Intelligent Key with you when leaving the
vehicle.Light reminder chimeA chime will sound when the driver side door is
opened with the light switch in the
or
position and the ignition switch in the ACC
or OFF position.
Turn the light switch off when you leave the
vehicle.
Parking brake reminder chimeThe chime will sound if the vehicle is driven at
more than 4 MPH (7 km/h) with the parking
brake applied. Stop the vehicle and release the
parking brake.Seat belt warning chimeThe chime will sound for about 6 seconds
unless the driver’s seat belt is securely fastened.
Brake pad wear warningThe disc brake pads have audible wear warn-
ings. When a brake pad requires replacement, it
will make a high pitched scraping sound when
the vehicle is in motion. This scraping sound will
first occur only when the brake pedal is
depressed. After more wear of the brake pad,
the sound will always be heard even if the brake
pedal is not depresse d. Have the brakes
checked as soon as possible if the warning
sound is heard.
SIC3576
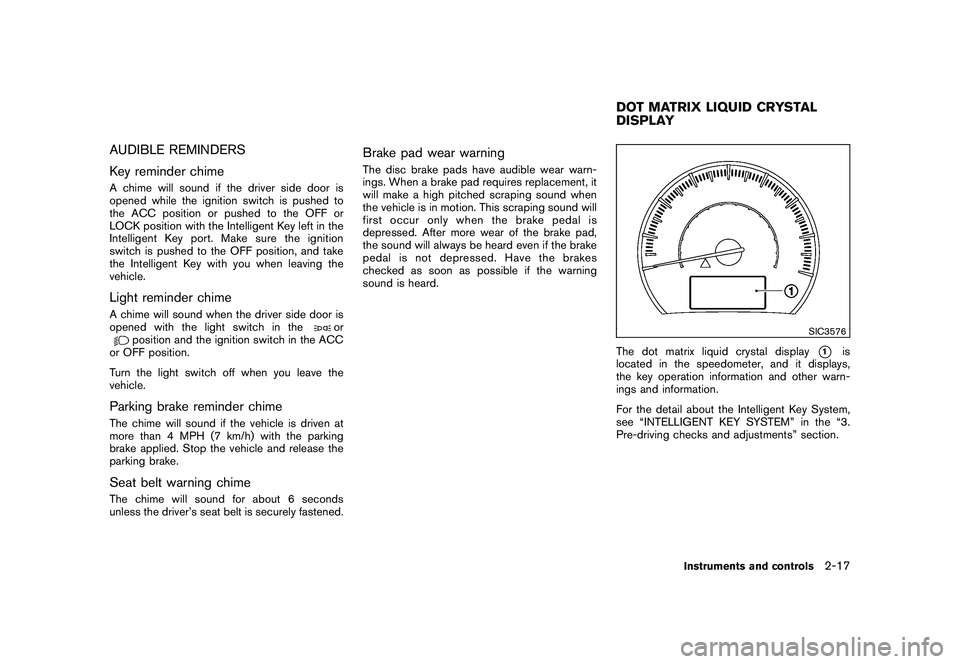
The dot matrix liquid crystal display
*1
is
located in the speedometer, and it displays,
the key operation information and other warn-
ings and information.
For the detail about the Intelligent Key System,
see “INTELLIGENT KEY SYSTEM” in the “3.
Pre-driving checks and adjustments” section.
DOT MATRIX LIQUID CRYSTAL
DISPLAY
Instruments and controls
2-17
Page 127 of 433

Black plate (125,1)
Model "Z51-D" EDITED: 2010/ 7/ 23
WARNING
.In an accident you could be thrown
from the vehicle through an open
moonroof. Always use seat belts
and child restraints.
. Do not allow anyone to stand up or
extend any portion of their body out
of the moonroof opening while the
vehicle is in motion or while the
moonroof is closing.
CAUTION
.Remove water drops, snow, ice or
sand from the moonroof before
opening.
. Do not place any heavy object on
the moonroof or surrounding area.
. Do not push or pull on the sun-
shade. Doing so can damage the
sunshade.
AUTOMATIC MOONROOF AND SUN-
SHADESThe moonroof and sunshades only operates
when the ignition switch is in the ON position.
The automatic moonroof and sunshades are
operational for about 45 seconds, even if the
ignition switch is pushed to the OFF position. If
the driver’s door or the passenger’s door is
opened during this period of about 45 seconds,
power to the moonroof and sunshades is
canceled.
SIC3598
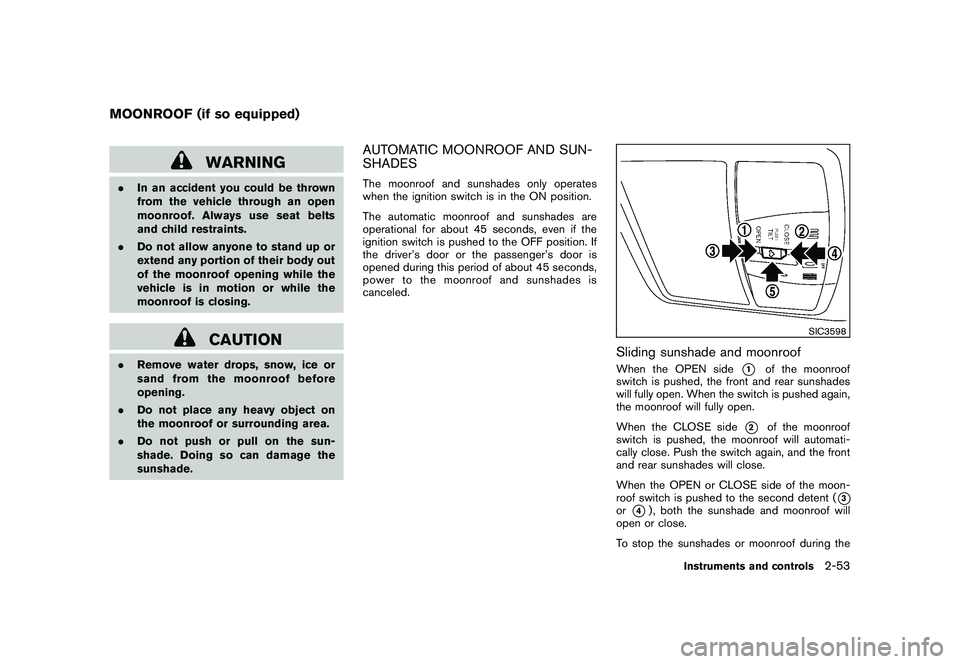
Sliding sunshade and moonroofWhen the OPEN side
*1
of the moonroof
switch is pushed, the front and rear sunshades
will fully open. When the switch is pushed again,
the moonroof will fully open.
When the CLOSE side
*2
of the moonroof
switch is pushed, the moonroof will automati-
cally close. Push the switch again, and the front
and rear sunshades will close.
When the OPEN or CLOSE side of the moon-
roof switch is pushed to the second detent (
*3
or
*4) , both the sunshade and moonroof will
open or close.
To stop the sunshades or moonroof during the
MOONROOF (if so equipped)
Instruments and controls
2-53
Page 140 of 433

Black plate (138,1)
Model "Z51-D" EDITED: 2010/ 7/ 23
SPA2033
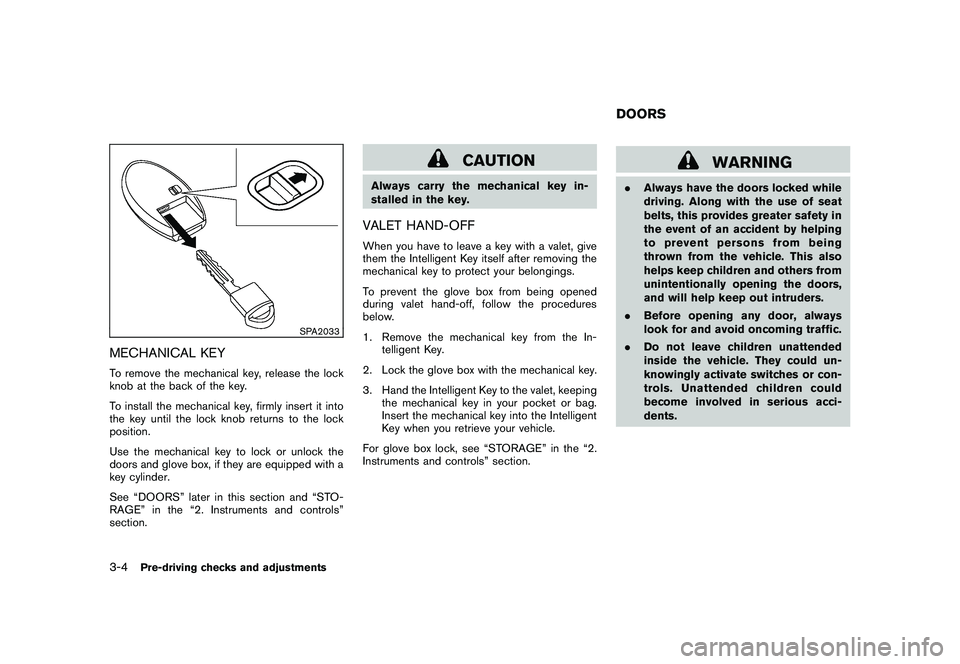
MECHANICAL KEYTo remove the mechanical key, release the lock
knob at the back of the key.
To install the mechanical key, firmly insert it into
the key until the lock knob returns to the lock
position.
Use the mechanical key to lock or unlock the
doors and glove box, if they are equipped with a
key cylinder.
See “DOORS” later in this section and “STO-
RAGE” in the “2. Instruments and controls”
section.
CAUTION
Always carry the mechanical key in-
stalled in the key.VALET HAND-OFFWhen you have to leave a key with a valet, give
them the Intelligent Key itself after removing the
mechanical key to protect your belongings.
To prevent the glove box from being opened
during valet hand-off, follow the procedures
below.
1. Remove the mechanical key from the In-telligent Key.
2. Lock the glove box with the mechanical key.
3. Hand the Intelligent Key to the valet, keeping the mechanical key in your pocket or bag.
Insert the mechanical key into the Intelligent
Key when you retrieve your vehicle.
For glove box lock, see “STORAGE” in the “2.
Instruments and controls” section.
WARNING
. Always have the doors locked while
driving. Along with the use of seat
belts, this provides greater safety in
the event of an accident by helping
to prevent persons from being
thrown from the vehicle. This also
helps keep children and others from
unintentionally opening the doors,
and will help keep out intruders.
. Before opening any door, always
look for and avoid oncoming traffic.
. Do not leave children unattended
inside the vehicle. They could un-
knowingly activate switches or con-
trols. Unattended children could
become involved in serious acci-
dents.DOORS
3-4
Pre-driving checks and adjustments
Page 162 of 433

Black plate (160,1)
Model "Z51-D" EDITED: 2010/ 7/ 23
SPA2833
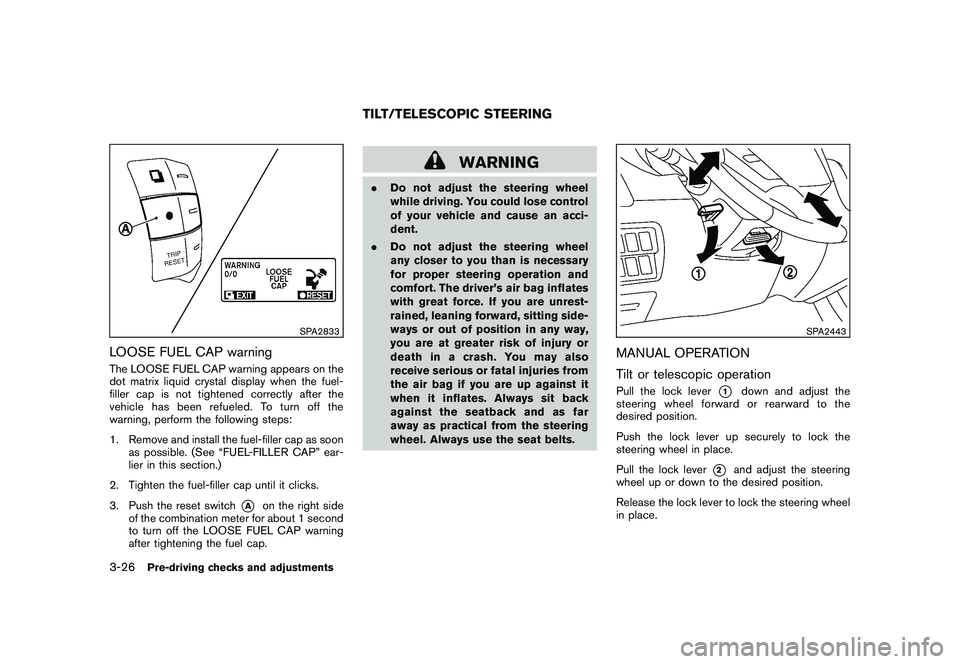
LOOSE FUEL CAP warningThe LOOSE FUEL CAP warning appears on the
dot matrix liquid crystal display when the fuel-
filler cap is not tightened correctly after the
vehicle has been refueled. To turn off the
warning, perform the following steps:
1. Remove and install the fuel-filler cap as soonas possible. (See “FUEL-FILLER CAP” ear-
lier in this section.)
2. Tighten the fuel-filler cap until it clicks.
3. Push the reset switch
*A
on the right side
of the combination meter for about 1 second
to turn off the LOOSE FUEL CAP warning
after tightening the fuel cap.
WARNING
. Do not adjust the steering wheel
while driving. You could lose control
of your vehicle and cause an acci-
dent.
. Do not adjust the steering wheel
any closer to you than is necessary
for proper steering operation and
comfort. The driver’s air bag inflates
with great force. If you are unrest-
rained, leaning forward, sitting side-
ways or out of position in any way,
you are at greater risk of injury or
death in a crash. You may also
receive serious or fatal injuries from
the air bag if you are up against it
when it inflates. Always sit back
against the seatback and as far
away as practical from the steering
wheel. Always use the seat belts.
SPA2443
MANUAL OPERATION
Tilt or telescopic operationPull the lock lever
*1
down and adjust the
steering wheel forward or rearward to the
desired position.
Push the lock lever up securely to lock the
steering wheel in place.
Pull the lock lever
*2
and adjust the steering
wheel up or down to the desired position.
Release the lock lever to lock the steering wheel
in place.
TILT/TELESCOPIC STEERING
3-26
Pre-driving checks and adjustments
Page 168 of 433

Black plate (166,1)
Model "Z51-D" EDITED: 2010/ 7/ 23
SPA2445
MEMORY STORAGETwo positions for the driver’s seat, steering
column and outside mirrors can be stored in the
automatic drive positioner memory. Follow these
procedures to use the memory system.
1. Move the selector lever to the P (Park)position.
2. Push the ignition switch to the ON position.
3. Adjust the driver’s seat, steering column and outside mirrors to the desired positions by
manually operating each adjusting switch.
For additional information, see “SEATS” in
the “1. Safety — Seats, seat belts and
supplemental restraint system” section and “TILT/TELESCOPIC STEERING” earlier in
this section and “OUTSIDE MIRRORS”
earlier in this section.
4. Push the SET switch and, within 5 seconds, push the memory switch (1 or 2) .
The indicator light for the pushed memory
switch will stay on for approximately 5
seconds after pushing the switch.
If memory is stored in the same memory
switch, the previous memory will be deleted.
Linking Intelligent Key to a stored mem-
ory positionThe Intelligent Key can be linked to a stored
memory position with the following procedure.
1. Follow one of the steps for storing a memoryposition.
. While the indicator light for the memory
switch being set is illuminated for 5 sec-
onds, push the
button on the Intelligent
Key.
. Push the ignition switch to the OFF position,
and then push the SET switch. Push the
button while pushing the memory
button while the indicator light stays on for
approximately 5 seconds.
If the indicator light blinks, the Intelligent Key is
linked to that memory setting. Push the ignition switch to the OFF position, and
then push the
button on the Intelligent Key.
The driver’s seat, steering wheel and outside
mirrors will move to the memorized position.
Confirming memory storage. Push the ignition switch to the ON position
and push the SET switch. If the main
memory has not been stored, the indicator
light will come on for approximately 0.5
second. When the memory has stored in
position, the indicator light will stay on for
approximately 5 seconds.
. If the battery cable is disconnected, or if the
fuse opens, the memory will be canceled. In
this case, reset the desired position using
the previous procedure.
. If optional keys are added to your vehicle,
the memory storage procedure to switch 1
or 2 and linking Intelligent Key procedure to
a stored memory position should be per-
formed again for each Intelligent Key. For
additional Intelligent Key information, see
“KEYS” earlier in this section.Selecting the memorized position1. Move the selector lever to the P (Park)
position.
2. Use one of the following methods to move the driver’s seat, the outside mirrors and the
steering wheel.
3-32
Pre-driving checks and adjustments