2011 NISSAN MURANO warning light
[x] Cancel search: warning lightPage 155 of 433

Black plate (153,1)
Model "Z51-D" EDITED: 2010/ 7/ 23
SPA2437
1. Pull the hood lock release handle
*1
located below the instrument panel; the
hood will then spring up slightly.
2. Pull the lever
*2
up at the front of the hood
with your fingertips and raise the hood.
3. When closing the hood, slowly close the hood down and make sure it locks into
place.
WARNING
.Make sure the hood is completely
closed and latched before driving.
Failure to do so could cause the
hood to fly open and result in an
accident.
. If you see steam or smoke coming
from the engine compartment, to
avoid injury do not open the hood.
WARNING
.Always be sure the lift gate has
been closed securely to prevent it
from opening while driving.
. Do not drive with the lift gate open.
This could allow dangerous exhaust
gases to be drawn into the vehicle.
See “EXHAUST GAS (carbon mon-
oxide)” in the “5. Starting and driv-
ing” section of this manual.
. Do not leave children unattended
inside the vehicle. They could un-
knowingly activate switches or con-
trols. Unattended children could
become involved in serious acci-
dents.
. Always be sure that hands and feet
are clear of the door frame to avoid
injury while closing the lift gate.
HOOD LIFT GATE
Pre-driving checks and adjustments
3-19
Page 160 of 433

Black plate (158,1)
Model "Z51-D" EDITED: 2010/ 7/ 23
SPA1915
LIFT GATE RELEASEIf the lift gate cannot be opened due to a
discharged battery, follow these steps.
1. Remove the cover inside of the lift gate witha suitable tool.
2. Move the lever toward the direction
*A
as
illustrated to open the lift gate.
Have the vehicle checked by a NISSAN dealer.
SPA2441
OPENING FUEL-FILLER DOORTo open the fuel-filler door, push the opener
switch located below the instrument panel. To
lock, close the fuel-filler door securely.
FUEL-FILLER CAP
WARNING
. Gasoline is extremely flammable
and highly explosive under certain
conditions. You could be burned or
seriously injured if it is misused or
mishandled. Always stop engine
and do not smoke or allow open
flames or sparks near the vehicle
when refueling.
. Do not attempt to top off the fuel
tank after the fuel pump nozzle
shuts off automatically. Continued
refueling may cause fuel overflow,
resulting in fuel spray and possibly
a fire.
. Use only an original equipment type
fuel-filler cap as a replacement. It
has a built-in safety valve needed
for proper operation of the fuel
system and emission control sys-
tem. An incorrect cap can result in a
serious malfunction and possible
injury. It could also cause the mal-
function indicator light to come on.
. Never pour fuel into the throttle
body to attempt to start your vehi-
FUEL-FILLER DOOR
3-24
Pre-driving checks and adjustments
Page 161 of 433

Black plate (159,1)
Model "Z51-D" EDITED: 2010/ 7/ 23
cle.
. Do not fill a portable fuel container
in the vehicle or trailer. Static elec-
tricity can cause an explosion of
flammable liquid, vapor or gas in
any vehicle or trailer. To reduce the
risk of serious injury or death when
filling portable fuel containers:
— Always place the container on
the ground when filling.
— Do not use electronic devices when filling.
— Keep the pump nozzle in contact with the container while you are
filling it.
— Use only approved portable fuel containers for flammable liquid.
CAUTION
. If fuel is spilled on the vehicle body,
flush it away with water to avoid
paint damage.
. Insert the cap straight into the fuel-
filler tube, then tighten until the
fuel-filler cap clicks. Failure to tight-
en the fuel-filler cap properly may
cause the
malfunction indicator light (MIL) to illuminate. If the
light illuminates because the fuel-
filler cap is loose or missing, tighten
or install the cap and continue to
drive the vehicle. The
light
should turn off after a few driving
trips. If the
light does not turn
off after a few driving trips, have the
vehicle inspected by a NISSAN deal-
er.
For additional information, see
“Malfunction Indicator Light (MIL)”
in the “2. Instruments and controls”
section.
. The LOOSE FUEL CAP warning will
appear if the fuel-filler cap is not
properly tightened. Failure to tight-
en the fuel-filler cap properly after
the LOOSE FUEL CAP warning ap-
pears may cause the
Malfunc-
tion Indicator Light (MIL) to
illuminate.
SPA2442
To remove the fuel-filler cap:
1. Turn the fuel-filler cap counterclockwise to remove.
2. Put the fuel-filler cap on the cap holder
*A
while refueling.
To install the fuel-filler cap:
1. Insert the fuel-filler cap straight into the fuel- filler tube.
2. Turn the fuel-filler cap clockwise until a single click is heard.Pre-driving checks and adjustments
3-25
Page 164 of 433

Black plate (162,1)
Model "Z51-D" EDITED: 2010/ 7/ 23
CAUTION
.Do not store the main sun visor
before storing the extension sun
visor.
. Do not pull the extension sun visor
forcedly downward.
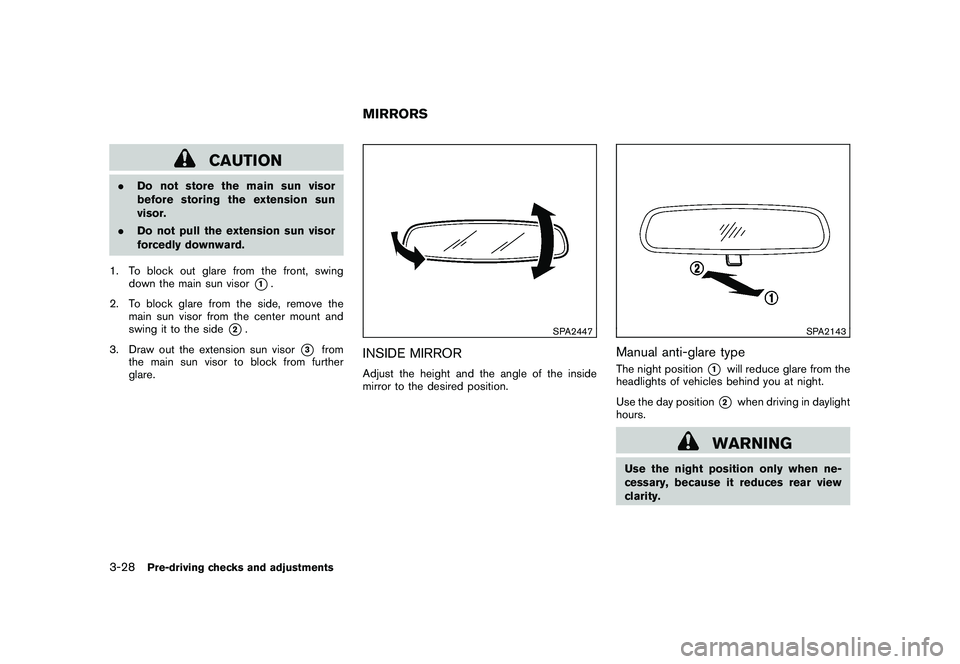
1. To block out glare from the front, swing down the main sun visor
*1.
2. To block glare from the side, remove the main sun visor from the center mount and
swing it to the side
*2.
3. Draw out the extension sun visor
*3
from
the main sun visor to block from further
glare.
SPA2447
INSIDE MIRRORAdjust the height and the angle of the inside
mirror to the desired position.
SPA2143
Manual anti-glare typeThe night position
*1
will reduce glare from the
headlights of vehicles behind you at night.
Use the day position*2
when driving in daylight
hours.
WARNING
Use the night position only when ne-
cessary, because it reduces rear view
clarity.
MIRRORS
3-28
Pre-driving checks and adjustments
Page 303 of 433

Black plate (16,1)
5 Starting and driving
Model "Z51-D" EDITED: 2010/ 7/ 23
Precautions when starting and driving..................... 5-2
Exhaust gas (carbon monoxide) ......................... 5-2
Three-way catalyst .......................................... 5-2
Tire Pressure Monitoring System (TPMS) ............. 5-3
Avoiding collision and rollover ........................... 5-5
On-pavement and off-road driving precautions ...... 5-6
Off-road recovery ........................................... 5-6
Rapid air pressure loss .................................... 5-6
Drinking alcohol/drugs and driving ...................... 5-7
Driving safety precautions ................................ 5-7
Push-button ignition switch .................................. 5-9
Intelligent Key system ...................................... 5-9
Push-button ignition switch operation. ............... 5-11
Push-button ignition switch positions ................ 5-11
Emergency engine shut off ............................. 5-12
Key port ..................................................... 5-12
Intelligent Key battery discharge ...................... 5-12
Before starting the engine .................................. 5-13
Starting the engine ........................................... 5-13
Driving the vehicle ............................................ 5-14
Continuously Variable Transmission (CVT) .......... 5-14
Parking brake .................................................. 5-18 Cruise control
................................................. 5-18
Precautions on cruise control .......................... 5-18
Cruise control operations ............................... 5-19
Break-in schedule ............................................ 5-20
Increasing fuel economy .................................... 5-21
All-Wheel Drive (AWD) (if so equipped) ................ 5-21
All-Wheel Drive (AWD) lock switch operations .... 5-22
AWD warning light ....................................... 5-23
Parking/parking on hills ...................................... 5-24
Power steering ................................................ 5-25
Brake system .................................................. 5-25
Braking precautions ...................................... 5-25
Parking brake break-in ................................... 5-26
Anti-lock Braking System (ABS) ...................... 5-26
Vehicle Dynamic Control (VDC) system ................. 5-27
Cold weather driving ......................................... 5-29
Freeing a frozen door lock .............................. 5-29
Anti-freeze .................................................. 5-29
Battery ...................................................... 5-29
Draining of coolant water ............................... 5-29
Tire equipment ............................................ 5-29
Special winter equipment ............................... 5-30
Driving on snow or ice .................................. 5-30
Engine block heater (if so equipped) ................. 5-30
Page 306 of 433

Black plate (304,1)
Model "Z51-D" EDITED: 2010/ 7/ 23
alternate tires and wheels allow the TPMS to
continue to function properly.Additional information.The TPMS does not monitor the tire
pressure of the spare tire.
. The TPMS will activate only when the
vehicle is driven at speeds above 16 MPH
(25 km/h) . Also, this system may not detect
a sudden drop in tire pressure (for example a
flat tire while driving) .
. The low tire pressure warning light does not
automatically turn off when the tire pressure
is adjusted. After the tire is inflated to the
recommended pressure, the vehicle must be
driven at speeds above 16 MPH (25 km/h)
to activate the TPMS and turn off the low tire
pressure warning light. Use a tire pressure
gauge to check the tire pressure.
. The CHECK TIRE PRESSURE warning also
appears on the dot matrix liquid crystal
display when the low tire pressure warning
light is illuminated and low tire pressure is
detected. The CHECK TIRE PRESSURE
warning turns off when the low tire pressure
warning light turns off.
The CHECK TIRE PRESSURE warning
does not appear if the low tire pressure
warning light illuminates to indicate a TPMS
malfunction. .
Tire pressure rises and falls depending on
the heat caused by the vehicle’s operation
and the outside temperature. Low outside
temperature can lower the temperature of
the air inside the tire which can cause a
lower tire inflation pressure. This may cause
the low tire pressure warning light to
illuminate. If the warning light illuminates in
low ambient temperature, check the tire
pressure for all four tires.
For additional information, see “Low tire pres-
sure warning light” in the “2. Instruments and
controls” section and “TIRE PRESSURE MON-
ITORING SYSTEM (TPMS)” in the “6. In case of
emergency” section.
WARNING
. If the low tire pressure warning light
illuminates while driving, avoid sud-
den steering maneuvers or abrupt
braking, reduce vehicle speed, pull
off the road to a safe location and
stop the vehicle as soon as possi-
ble. Driving with under-inflated tires
may permanently damage the tires
and increase the likelihood of tire
failure. Serious vehicle damage
could occur and may lead to an
accident and could result in serious personal injury. Check the tire pres-
sure for all four tires. Adjust the tire
pressure to the recommended COLD
tire pressure shown on the Tire and
Loading Information label to turn
the low tire pressure warning light
OFF. If the light still illuminates
while driving after adjusting the tire
pressure, a tire may be flat. If you
have a flat tire, replace it with a
spare tire as soon as possible. (See
“FLAT TIRE” in the “6. In case of
emergency” section for changing a
flat tire.)
. When a spare tire is mounted or a
wheel is replaced, the TPMS will not
function and the low tire pressure
warning light will flash for approxi-
mately 1 minute. The light will
remain on after 1 minute. Contact
your NISSAN dealer as soon as
possible for tire replacement and/
or system resetting.
. Replacing tires with those not ori-
ginally specified by NISSAN could
affect the proper operation of the
TPMS.
. Do not inject any tire liquid or
aerosol tire sealant into the tires,
5-4
Starting and driving
Page 307 of 433

Black plate (305,1)
Model "Z51-D" EDITED: 2010/ 7/ 23
as this may cause a malfunction of
the tire pressure sensors.
CAUTION
.The TPMS may not function properly
when the wheels are equipped with
tire chains or the wheels are buried
in snow.
. Do not place metalized film or any
metal parts (antenna, etc.) on the
windows. This may cause poor re-
ception of the signals from the tire
pressure sensors, and the TPMS will
not function properly.
Some devices and transmitters may temporarily
interfere with the operation of the TPMS and
cause the low tire pressure warning light to
illuminate. Some examples are:
. Facilities or electric devices using similar
radio frequencies are near the vehicle.
. If a transmitter set to similar frequencies is
being used in or near the vehicle.
. If a computer (or similar equipment) or a DC/
AC converter is being used in or near the
vehicle. FCC Notice:
For USA:
This device complies with Part 15 of the
FCC Rules. Operation is subject to the
following two conditions: (1) This device
may not cause harmful interference, and
(2) this device must accept any interfer-
ence received, including interference that
may cause undesired operation.
Note: Changes or modifications not ex-
pressly approved by the party responsible
for compliance could void the user’s
authority to operate the equipment.
For Canada:
This device complies with RSS-210 of
Industry Canada. Operation is subject to
the following two conditions: (1) this
device may not cause interference, and
(2) this device must accept any interfer-
ence, including interference that may
cause undesired operation of the device.
AVOIDING COLLISION AND ROLL-
OVER
WARNING
Failure to operate this vehicle in a safe
and prudent manner may result in loss of control or an accident.
Be alert and drive defensively at all times. Obey
all traffic regulations. Avoid excessive speed,
high speed cornering, or sudden steering
maneuvers, because these driving practices
could cause you to lose control of your vehicle.
As with any vehicle, a loss of control could
result in a collision with other vehicles or
objects, or cause the vehicle to rollover,
particularly if the loss of control causes the
vehicle to slide sideways. Be attentive at all
times, and avoid driving when tired. Never drive
when under the influence of alcohol or drugs
(including prescription or over-the-counter
drugs which may cause drowsiness) . Always
wear your seat belt as outlined in the “SEAT
BELTS” in the “1. Safety — Seats, seat belts and
supplemental restraint system” section of this
manual, and also instruct your passengers to do
so.
Seat belts help reduce the risk of injury in
collisions and rollovers. In a rollover crash, an
unbelted or improperly belted person is
significantly more likely to be injured or
killed than a person properly wearing a
seat belt.
Starting and driving
5-5
Page 309 of 433

Black plate (307,1)
Model "Z51-D" EDITED: 2010/ 7/ 23
may cause a collision and result in
personal injury.
.The vehicle generally moves or pulls
in the direction of the flat tire.
. Do not rapidly apply the brakes.
. Do not rapidly release the accelera-
tor pedal.
. Do not rapidly turn the steering
wheel.
1. Remain calm and do not overreact.
2. Maintain a firm grip on the steering wheel with both hands and try to hold a straight
course.
3. When appropriate, slowly release the accel- erator pedal to gradually slow the vehicle.
4. Gradually steer the vehicle to a safe location off the road and away from traffic if possible.
5. Lightly apply the brake pedal to gradually stop the vehicle.
6. Turn on the hazard warning flashers and either contact a roadside emergency service
to change the tire or see “CHANGING A
FLAT TIRE” in the “6. In case of emergency”
section of this Owner’s Manual.
DRINKING ALCOHOL/DRUGS AND
DRIVING
WARNING
Never drive under the influence of
alcohol or drugs. Alcohol in the blood-
stream reduces coordination, delays
reaction time and impairs judgement.
Driving after drinking alcohol increases
the likelihood of being involved in an
accident injuring yourself and others.
Additionally, if you are injured in an
accident, alcohol can increase the se-
verity of the injury.
NISSAN is committed to safe driving. However,
you must choose not to drive under the influence
of alcohol. Every year thousands of people are
injured or killed in alcohol-related accidents.
Although the local laws vary on what is
considered to be legally intoxicated, the fact is
that alcohol affects all people differently and
most people underestimate the effects of
alcohol.
Remember, drinking and driving don’t mix! And
that is true for drugs, too (over-the-counter,
prescription, and illegal drugs) . Don’t drive if
your ability to operate your vehicle is impaired by
alcohol, drugs, or some other physical condition.
DRIVING SAFETY PRECAUTIONSYour NISSAN is designed for both normal and
off-road use. However, avoid driving in deep
water or mud as your NISSAN is mainly
designed for leisure use, unlike a conventional
off-road vehicle.
Remember that Two-Wheel Drive (2WD) mod-
els are less capable than All-Wheel Drive
(AWD) models for rough road driving and
extrication when stuck in deep snow, mud, or
the like.
Please observe the following precautions:
WARNING
. Drive carefully when off the road
and avoid dangerous areas. Every
person who drives or rides in this
vehicle should be seated with their
seat belt fastened. This will keep
you and your passengers in position
when driving over rough terrain.
. Do not drive across steep slopes.
Instead drive either straight up or
straight down the slopes. Off-road
vehicles can tip over sideways much
more easily than they can forward or
backward.
. Many hills are too steep for any
Starting and driving
5-7