2011 NISSAN MURANO battery
[x] Cancel search: batteryPage 313 of 433
Black plate (311,1)
Model "Z51-D" EDITED: 2010/ 7/ 23
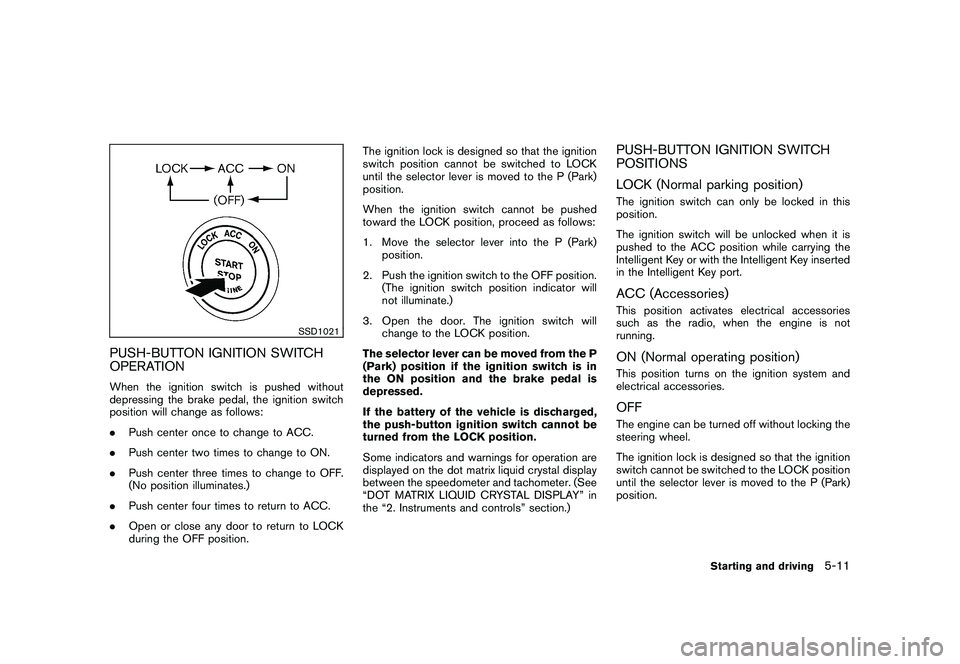
SSD1021
PUSH-BUTTON IGNITION SWITCH
OPERATIONWhen the ignition switch is pushed without
depressing the brake pedal, the ignition switch
position will change as follows:
.Push center once to change to ACC.
. Push center two times to change to ON.
. Push center three times to change to OFF.
(No position illuminates.)
. Push center four times to return to ACC.
. Open or close any door to return to LOCK
during the OFF position. The ignition lock is designed so that the ignition
switch position cannot be switched to LOCK
until the selector lever is moved to the P (Park)
position.
When the ignition switch cannot be pushed
toward the LOCK position, proceed as follows:
1. Move the selector lever into the P (Park)
position.
2. Push the ignition switch to the OFF position. (The ignition switch position indicator will
not illuminate.)
3. Open the door. The ignition switch will change to the LOCK position.
The selector lever can be moved from the P
(Park) position if the ignition switch is in
the ON position and the brake pedal is
depressed.
If the battery of the vehicle is discharged,
the push-button ignition switch cannot be
turned from the LOCK position.
Some indicators and warnings for operation are
displayed on the dot matrix liquid crystal display
between the speedometer and tachometer. (See
“DOT MATRIX LIQUID CRYSTAL DISPLAY” in
the “2. Instruments and controls” section.)
PUSH-BUTTON IGNITION SWITCH
POSITIONS
LOCK (Normal parking position)The ignition switch can only be locked in this
position.
The ignition switch will be unlocked when it is
pushed to the ACC position while carrying the
Intelligent Key or with the Intelligent Key inserted
in the Intelligent Key port.ACC (Accessories)This position activates electrical accessories
such as the radio, when the engine is not
running.ON (Normal operating position)This position turns on the ignition system and
electrical accessories.OFFThe engine can be turned off without locking the
steering wheel.
The ignition lock is designed so that the ignition
switch cannot be switched to the LOCK position
until the selector lever is moved to the P (Park)
position.
Starting and driving
5-11
Page 314 of 433

Black plate (312,1)
Model "Z51-D" EDITED: 2010/ 7/ 23
CAUTION
Do not leave the vehicle with the push-
button ignition switch in ACC or ON
positions when the engine is not run-
ning for an extended period. This can
discharge the battery.EMERGENCY ENGINE SHUT OFFTo shut off the engine in an emergency situation
while driving perform the following procedure:
.Rapidly push the push-button ignition switch
3 consecutive times, or
. Push and hold the push-button ignition
switch for more than 2 seconds.
SSD0837
KEY PORT INTELLIGENT KEY BATTERY DIS-
CHARGE
If the battery of the Intelligent Key is almost
discharged, the guide light
*B
of the key port
*A
blinks and the indicator appears on the dot
matrix liquid crystal display. (See “DOT MATRIX
LIQUID CRYSTAL DISPLAY” in the “2. Instru-
ments and controls” section.)
In this case, inserting the Intelligent Key into the
port*A
allows you to start the engine. Make
sure that the key ring side faces backward as
illustrated. Insert the Intelligent Key in the port
until it is latched and secured.
To remove the Intelligent Key from the port, push
the ignition switch to the OFF position and pull
the Intelligent Key out of the port.
NOTE:
The key port does not charge the key
battery. If you see the low battery indicator
in the dot matrix liquid crystal display,
replace the battery as soon as possible.
(See “INTELLIGENT KEY BATTERY REPLA-
CEMENT” in the “8. Maintenance and do-
it-yourself” section.)
CAUTION
. Never place anything except the
Intelligent Key in the key port. Doing
5-12
Starting and driving
Page 319 of 433
Black plate (317,1)
Model "Z51-D" EDITED: 2010/ 7/ 23
seconds. Then place the ignition switch
back in the ON position. The vehicle should
return to its normal operating condition. If
it does not return to its normal operating
condition, have a NISSAN dealer check the
transmission and repair if necessary.
WARNING
When the high fluid temperature pro-
tection mode or fail-safe operation
occurs, vehicle speed may be gradually
reduced. The reduced speed may be
lower than other traffic, which could
increase the chance of a collision. Be
especially careful when driving. If ne-
cessary, pull to the side of the road at a
safe place and allow the transmission
to return to normal operation, or have it
repaired if necessary.
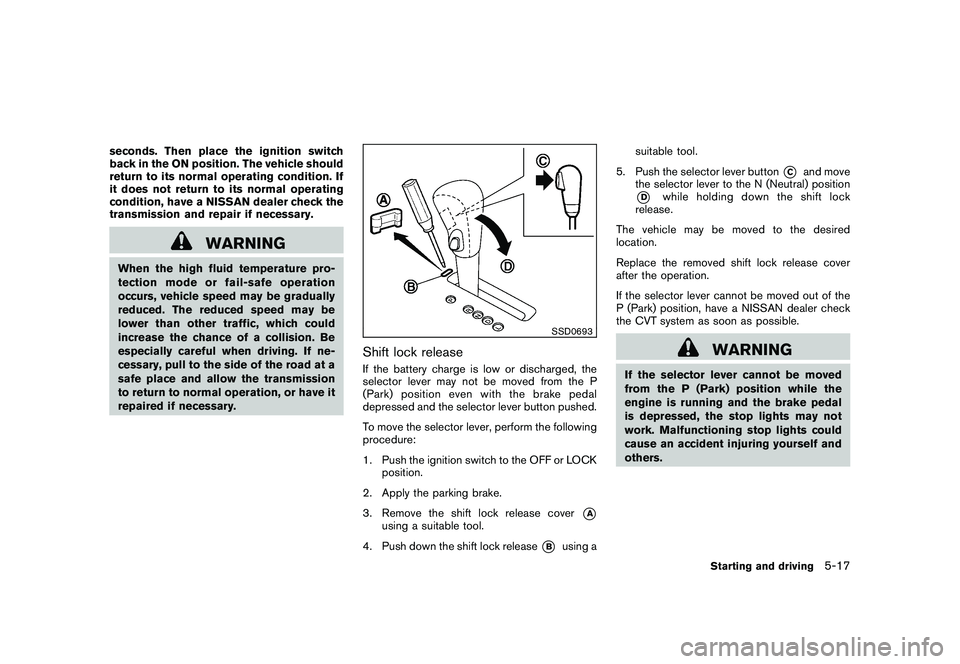
SSD0693
Shift lock releaseIf the battery charge is low or discharged, the
selector lever may not be moved from the P
(Park) position even with the brake pedal
depressed and the selector lever button pushed.
To move the selector lever, perform the following
procedure:
1. Push the ignition switch to the OFF or LOCKposition.
2. Apply the parking brake.
3. Remove the shift lock release cover
*A
using a suitable tool.
4. Push down the shift lock release
*B
using a suitable tool.
5. Push the selector lever button
*C
and move
the selector lever to the N (Neutral) position
*D
while holding down the shift lock
release.
The vehicle may be moved to the desired
location.
Replace the removed shift lock release cover
after the operation.
If the selector lever cannot be moved out of the
P (Park) position, have a NISSAN dealer check
the CVT system as soon as possible.
WARNING
If the selector lever cannot be moved
from the P (Park) position while the
engine is running and the brake pedal
is depressed, the stop lights may not
work. Malfunctioning stop lights could
cause an accident injuring yourself and
others.
Starting and driving
5-17
Page 331 of 433

Black plate (329,1)
Model "Z51-D" EDITED: 2010/ 7/ 23
surface.
. If wheels or tires other than the
NISSAN recommended ones are
used, the VDC system may not
operate properly and the
in-
dicator may flash or bothand
indicator lights may illuminate.
. The VDC system is not a substitute
for winter tires or tire chains on a
snow covered road.
FREEING A FROZEN DOOR LOCKTo prevent a door lock from freezing, apply
deicer through the key hole. If the lock becomes
frozen, heat the key before inserting it into the
key hole or use the remote keyless entry keyfob.ANTI-FREEZEIn the winter when it is anticipated that the
outside temperature will drop below 32 8F(0 8C) ,
check the anti-freeze to assure proper winter
protection. For additional information, see “EN-
GINE COOLING SYSTEM” in the “8. Main-
tenance and do-it-yourself” section.BATTERYIf the battery is not fully charged during
extremely cold weather conditions, the battery
fluid may freeze and damage the battery. To
maintain maximum efficiency, the battery should
be checked regularly. For additional information,
see “BATTERY” in the “8. Maintenance and do-
it-yourself” section.DRAINING OF COOLANT WATERIf the vehicle is to be left outside without anti-
freeze, drain the cooling system, including the
engine block. Refill before operating the vehicle.
For details, see “ENGINE COOLING SYSTEM”
in the “8. Maintenance and do-it-yourself”
section.
TIRE EQUIPMENTSUMMER tires have a tread designed to provide
superior performance on dry pavement. How-
ever, the performance of these tires will be
substantially reduced in snowy and icy condi-
tions. If you operate your vehicle on snowy or icy
roads, NISSAN recommends the use of MUD &
SNOW or ALL SEASON tires on all four wheels.
Consult a NISSAN dealer for the tire type, size,
speed rating and availability information.
For additional traction on icy roads, studded
tires may be used. However, some U.S. states
and Canadian provinces prohibit their use.
Check local, state and provincial laws before
installing studded tires.
Skid and traction capabilities of studded
snow tires, on wet or dry surfaces, may be
poorer than that of non-studded snow
tires.
Tire chains may be used. For details, see “TIRE
CHAINS” in the “8. Maintenance and do-it-
yourself” section of this manual.All-Wheel Drive (AWD) modelIf you install snow tires, they must also be the
same size, brand, construction and tread pattern
on all four wheels.
COLD WEATHER DRIVING
Starting and driving
5-29
Page 343 of 433
Black plate (341,1)
Model "Z51-D" EDITED: 2010/ 7/ 23
spare tire are designed for emer-
gency use. See specific instructions
under the heading “WHEELS AND
TIRES” in the “8. Maintenance and
do-it-yourself” section.To start your engine with a booster battery, the
instructions and precautions below must be
followed.
WARNING
.
If done incorrectly, jump starting
can lead to a battery explosion,
resulting in severe injury or death.
It could also damage your vehicle.
. Explosive hydrogen gas is always
present in the vicinity of the battery.
Keep all sparks and flames away
from the battery.
. Do not allow battery fluid to come
into contact with eyes, skin, clothing
or painted surfaces. Battery fluid is
a corrosive sulfuric acid solution
which can cause severe burns. If
the fluid should come into contact
with anything, immediately flush the
contacted area with water.
. Keep the battery out of the reach of
children.
. The booster battery must be rated at
12 volts. Use of an improperly rated
battery can damage your vehicle.
. Whenever working on or near a
battery, always wear suitable eye protectors (for example, goggles or
industrial safety
spectacles) and
remove rings, metal bands, or any
other jewelry. Do not lean over the
battery when jump starting.
. Do not attempt to jump start a
frozen battery. It could explode
and cause serious injury.
. Your vehicle has an automatic en-
gine cooling fan. It could come on at
any time. Keep hands and other
objects away from it.JUMP STARTING
In case of emergency
6-9
Page 344 of 433
Black plate (342,1)
Model "Z51-D" EDITED: 2010/ 7/ 23
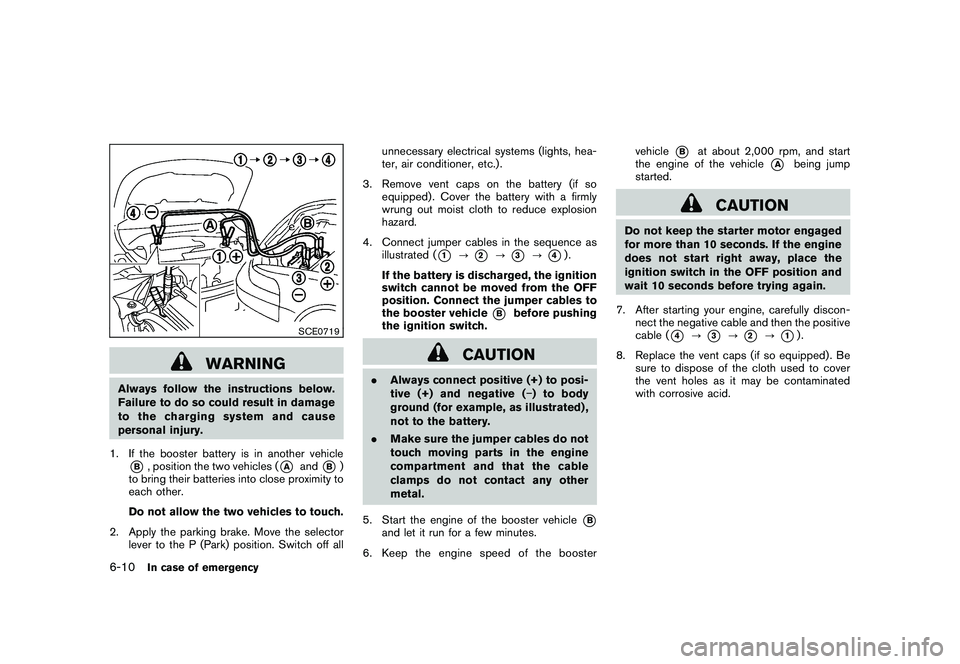
SCE0719
WARNING
Always follow the instructions below.
Failure to do so could result in damage
to the charging system and cause
personal injury.
1. If the booster battery is in another vehicle*B, position the two vehicles (
*A
and
*B)
to bring their batteries into close proximity to
each other.
Do not allow the two vehicles to touch.
2. Apply the parking brake. Move the selector lever to the P (Park) position. Switch off all unnecessary electrical systems (lights, hea-
ter, air conditioner, etc.) .
3. Remove vent caps on the battery (if so equipped) . Cover the battery with a firmly
wrung out moist cloth to reduce explosion
hazard.
4. Connect jumper cables in the sequence as illustrated (
*1
?
*2
?
*3
?
*4).
If the battery is discharged, the ignition
switch cannot be moved from the OFF
position. Connect the jumper cables to
the booster vehicle
*B
before pushing
the ignition switch.
CAUTION
. Always connect positive (+) to posi-
tive (+) and negative ( �) to body
ground (for example, as illustrated) ,
not to the battery.
. Make sure the jumper cables do not
touch moving parts in the engine
compartment and that the cable
clamps do not contact any other
metal.
5. Start the engine of the booster vehicle
*B
and let it run for a few minutes.
6. Keep the engine speed of the booster vehicle
*B
at about 2,000 rpm, and start
the engine of the vehicle
*A
being jump
started.
CAUTION
Do not keep the starter motor engaged
for more than 10 seconds. If the engine
does not start right away, place the
ignition switch in the OFF position and
wait 10 seconds before trying again.
7. After starting your engine, carefully discon- nect the negative cable and then the positive
cable (
*4
?
*3
?
*2
?
*1).
8. Replace the vent caps (if so equipped) . Be sure to dispose of the cloth used to cover
the vent holes as it may be contaminated
with corrosive acid.
6-10
In case of emergency
Page 357 of 433
Black plate (25,1)
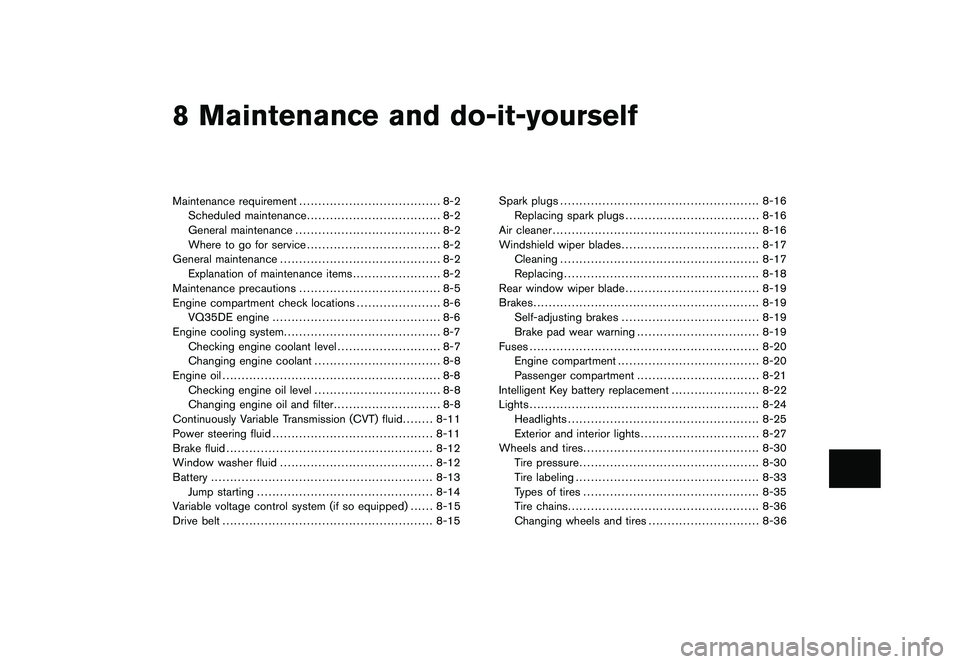
8 Maintenance and do-it-yourself
Model "Z51-D" EDITED: 2010/ 7/ 23
Maintenance requirement..................................... 8-2
Scheduled maintenance ................................... 8-2
General maintenance ...................................... 8-2
Where to go for service ................................... 8-2
General maintenance .......................................... 8-2
Explanation of maintenance items ....................... 8-2
Maintenance precautions ..................................... 8-5
Engine compartment check locations ...................... 8-6
VQ35DE engine ............................................ 8-6
Engine cooling system ......................................... 8-7
Checking engine coolant level ........................... 8-7
Changing engine coolant ................................. 8-8
Engine oil ......................................................... 8-8
Checking engine oil level ................................. 8-8
Changing engine oil and filter ............................ 8-8
Continuously Variable Transmission (CVT) fluid ........ 8-11
Power steering fluid .......................................... 8-11
Brake fluid ...................................................... 8-12
Window washer fluid ........................................ 8-12
Battery .......................................................... 8-13
Jump starting .............................................. 8-14
Variable voltage control system (if so equipped) ...... 8-15
Drive belt ....................................................... 8-15 Spark plugs
.................................................... 8-16
Replacing spark plugs ................................... 8-16
Air cleaner ...................................................... 8-16
Windshield wiper blades .................................... 8-17
Cleaning .................................................... 8-17
Replacing ................................................... 8-18
Rear window wiper blade ................................... 8-19
Brakes ........................................................... 8-19
Self-adjusting brakes .................................... 8-19
Brake pad wear warning ................................ 8-19
Fuses ............................................................ 8-20
Engine compartment ..................................... 8-20
Passenger compartment ................................ 8-21
Intelligent Key battery replacement ....................... 8-22
Lights ............................................................ 8-24
Headlights .................................................. 8-25
Exterior and interior lights ............................... 8-27
Wheels and tires .............................................. 8-30
Tire pressure ............................................... 8-30
Tire labeling ................................................ 8-33
Types of tires .............................................. 8-35
Tire chains .................................................. 8-36
Changing wheels and tires ............................. 8-36
Page 360 of 433
Black plate (362,1)
Model "Z51-D" EDITED: 2010/ 7/ 23
Windshield defroster:Check that the air
comes out of the defroster outlets properly and
in sufficient quantity when operating the heater
or air conditioner.
Windshield wiper and washer*: Check that
the wipers and washer operate properly and that
the wipers do not streak.Under the hood and vehicleThe maintenance items listed here should be
checked periodically (for example, each time you
check the engine oil or refuel) .
Battery*: Check the fluid level in each cell.
It should be between the MAX and MIN lines.
Vehicles operated in high temperatures or under
severe condition require frequent checks of the
battery fluid level.
Brake fluid level*: Make sure that the brake
fluid level is between the MAX and MIN lines on
the reservoir.
Engine coolant level*: Check the coolant level
when the engine is cold.
Engine drive belts*: Make sure that the drive
belts are not frayed, worn, cracked or oily.
Engine oil level*: Check the level after parking
the vehicle on a level surface and turning off the
engine. Wait more than 10 minutes for the oil to
drain back into the oil pan. Exhaust system:
Make sure there are no loose
supports, cracks or holes. If the sound of the
exhaust seems unusual or there is a smell of
exhaust fumes, immediately have the exhaust
system inspected by a NISSAN dealer. (See
“PRECAUTIONS WHEN STARTING AND
DRIVING” in the “5. St arting and driving”
section for exhaust gas (carbon monoxide) .)
Fluid leaks: Check under the vehicle for fuel,
oil, water or other fluid leaks after the vehicle has
been parked for a while. Water dripping from the
air conditioner after use is normal. If you should
notice any leaks or if gasoline fumes are evident,
check for the cause and have it corrected
immediately.
Power steering fluid level* and lines: Check
the level when the fluid is cold, with the engine
off. Check the lines for proper attachment, leaks,
cracks, etc.
Radiator and hoses: Check the front of the
radiator and clean off any dirt, insects, leaves,
etc., that may have accumulated. Make sure the
hoses have no cracks, deformation, rot or loose
connections.
Underbody: The underbody is frequently ex-
posed to corrosive substances such as those
used on icy roads or to control dust. It is very
important to remove these substances, other-
wise rust will form on the floor pan, frame, fuel
lines and around the exhaust system. At the end of winter, the underbody should be thoroughly
flushed with plain water, being careful to clean
those areas where mud and dirt may accumu-
late. For additional information, see “CLEANING
EXTERIOR” in the “7. Appearance and care”
section.
Windshield washer fluid*:
Check that there is
adequate fluid in the reservoir.8-4
Maintenance and do-it-yourself