2011 NISSAN MURANO reset
[x] Cancel search: resetPage 223 of 433
Black plate (221,1)
Model "Z51-D" EDITED: 2010/ 7/ 23
.CHECK ANTENNA (Antenna connection
error)
. LOADING (When the initial setting is
performed)
. UPDATING (When the satellite radio sub-
scription is not active)
SCAN tuning:
Push the SCAN tuning button to tune from low
to high frequencies and stop at each broad-
casting station/channel for 5 seconds. Pushing
the button again during this 5 seconds period
will stop SCAN tuning and the radio will remain
tuned to that station/channel.
If the SCAN tuning button is not pushed within 5
seconds, SCAN tuning moves to the next
station/channel.
*1
to
*6
Station memory operations:
12 stations/channels can be set for the FM band
(6 each for FM1 and FM2) , 18 for XM radio (6
each for XM1, XM2 and XM3) and 6 stations
can be set for the AM band.
1. Choose the radio band using the radio band select button.
2. Tune to the desired station/channel using the SEEK/TRACK, SCAN button or the
radio TUNE knob. 3. Push and hold the desired station preset
button
*1
to*6
until the radio mutes.
4. The station indicator will then come on and the sound will resume. Memorizing is now
complete.
5. Other buttons can be set in the same manner.
If the battery cable is disconnected, or if the fuse
opens, the radio memory will be erased. In that
case, reset the desired stations/channels.
List (AM and FM radio) (models with
navigation system):
When the “List” key on the display is selected
while the FM or AM radio is being played, the
preset station list will be displayed.
If 1 of the 6 preset stations listed is touched and
held, the current station will be stored as the
new preset.
Menu (XM Satellite Radio) (models with
navigation system):
When the “Menu” key on the display is selected
while the XM Satellite Radio is being played, the
menu list will be displayed.
The following items are available.
. Preset List Displays the preset channel list. If 1 of the 6
preset stations listed is touched and held,
the current station will be stored as the new
preset.
. Customize Channel List
Selects specific channels to skip while using
the TUNE, SEEK/CATEGORY or Menu-
Categories feature.
. Favorite Artists & Songs
Stores the current artist or song that is being
played. Touch the “Alert” key to be reminded
when the stored artist or song is playing on a
station while listening to XM.
. Categories
Selecting a category will go to the first
channel in that category as defined by XM
Radio.
. Direct Tune
Inputs the channel number by using a
keypad.
Text (models without navigation system):
When the “Text” key is selected with the multi-
function controller on the display and then the
ENTER button is pushed while the satellite radio
is being played, the text information listed below
will be displayed on the screen.
Center display, heater, air conditioner, audio, phone and voice recognition systems
4-53
Page 249 of 433
Black plate (247,1)
Model "Z51-D" EDITED: 2010/ 7/ 23
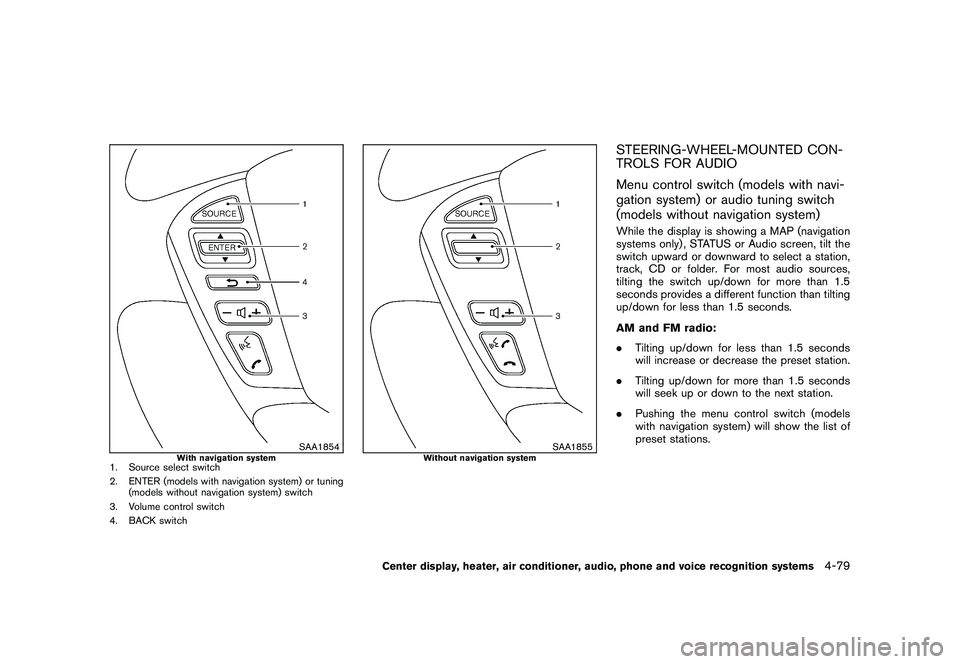
SAA1854
With navigation system
1. Source select switch
2. ENTER (models with navigation system) or tuning(models without navigation system) switch
3. Volume control switch
4. BACK switch
SAA1855
Without navigation system
STEERING-WHEEL-MOUNTED CON-
TROLS FOR AUDIO
Menu control switch (models with navi-
gation system) or audio tuning switch
(models without navigation system)While the display is showing a MAP (navigation
systems only) , STATUS or Audio screen, tilt the
switch upward or downward to select a station,
track, CD or folder. For most audio sources,
tilting the switch up/down for more than 1.5
seconds provides a different function than tilting
up/down for less than 1.5 seconds.
AM and FM radio:
. Tilting up/down for less than 1.5 seconds
will increase or decrease the preset station.
. Tilting up/down for more than 1.5 seconds
will seek up or down to the next station.
. Pushing the menu control switch (models
with navigation system) will show the list of
preset stations.
Center display, heater, air conditioner, audio, phone and voice recognition systems
4-79
Page 250 of 433
Black plate (248,1)
Model "Z51-D" EDITED: 2010/ 7/ 23
XM Satellite Radio:
.Tilting up/down for less than 1.5 seconds
will increase or decrease the preset channel.
. Tilting up/down for more than 1.5 seconds
will go to the next or previous category.
. Pushing the menu control switch (models
with navigation system) will show the XM
Menu.
iPod
®:
. Tilting up/down for less than 1.5 seconds
will increase or decrease the track number.
. Tilting up/down for more than 1.5 seconds
will skip to the next or previous index.
. Pushing the menu control switch will show
the iPod Menu.
CD:
. Tilting up/down for less than 1.5 seconds
will increase or decrease the track number.
. Tilting up/down for more than 1.5 seconds
will increase/decrease the folder number (if
playing compressed audio files) .
. Pushing the menu control switch (models
with navigation system) will show the CD
Menu. DVD (models with navigation system):
.
Tilting up/down for less than 1.5 seconds
will increase or decrease the track number.
. Tilting up/down for more than 1.5 seconds
will increase or decrease the title number.
. Pushing the menu control switch will select
an item from the DVD display.
. When the transparent operation menu ap-
pears, the switch will control the menu.
USB:
. Tilting up/down for less than 1.5 seconds
will increase or decrease the track number.
. Tilting up/down for more than 1.5 seconds
will increase/decrease the folder number
. Pushing the menu control switch will show
the USB Menu.
Music Box
®:
. Tilting up/down for less than 1.5 seconds
will increase or decrease the track number.
. Tilting up/down for more than 1.5 seconds
will increase/decrease the album (folder)
number (if playing compressed audio files) .
. Pushing the menu control switch will show
the Music Box
®Menu. Bluetooth
®Audio (models with navigation
system):
. Tilting up/down for less than 1.5 seconds
will increase or decrease the track number.
BACK switch (models with navi-
gation system)
Push this switch to go back to the previous
screen or cancel the selection if it is not
completed.Volume control switchesPush the upper (+) or lower ( �) side switch to
increase or decrease the volume.Source select switchPush the audio source switch to change the
mode as follows.
. Models with navigation system
AM ?FM ?SAT ?CD/DVD ?Music
Box
®? USB/iPod
®? Bluetooth
®Audio
. Models without navigation system
AM ?FM ?CD ?Music Box®?USB/
iPod
®? SAT
4-80
Center display, heater, air conditioner, audio, phone and voice recognition systems
Page 271 of 433
Black plate (269,1)
Model "Z51-D" EDITED: 2010/ 7/ 23
5. Once the call has ended, press the
button on the steering wheel.
RECEIVING A CALLWhen the ring tone is heard, press the button on
the steering wheel.
Once the call has ended, press the button on
the steering wheel.
NOTE:
To reject a call when the ring tone is heard,
press the button on the steering wheel.
SAA2581
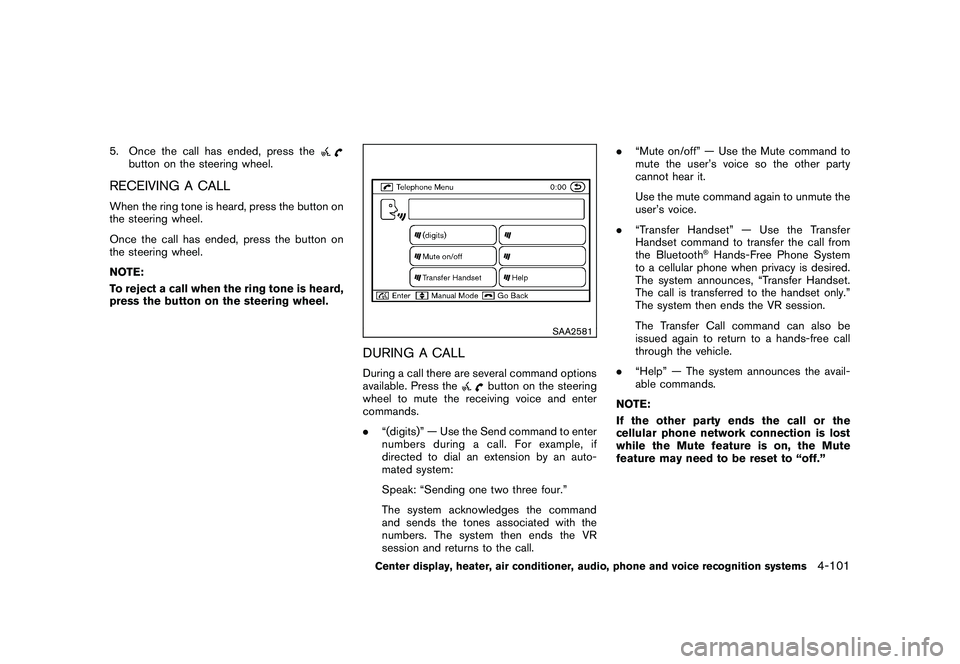
DURING A CALLDuring a call there are several command options
available. Press the
button on the steering
wheel to mute the receiving voice and enter
commands.
. “(digits)” — Use the Send command to enter
numbers during a call. For example, if
directed to dial an extension by an auto-
mated system:
Speak: “Sending one two three four.”
The system acknowledges the command
and sends the tones associated with the
numbers. The system then ends the VR
session and returns to the call. .
“Mute on/off” — Use the Mute command to
mute the user’s voice so the other party
cannot hear it.
Use the mute command again to unmute the
user’s voice.
. “Transfer Handset” — Use the Transfer
Handset command to transfer the call from
the Bluetooth
®Hands-Free Phone System
to a cellular phone when privacy is desired.
The system announces, “Transfer Handset.
The call is transferred to the handset only.”
The system then ends the VR session.
The Transfer Call command can also be
issued again to return to a hands-free call
through the vehicle.
. “Help” — The system announces the avail-
able commands.
NOTE:
If the other party ends the call or the
cellular phone network connection is lost
while the Mute feature is on, the Mute
feature may need to be reset to “off.”
Center display, heater, air conditioner, audio, phone and voice recognition systems
4-101
Page 299 of 433
Black plate (297,1)
Model "Z51-D" EDITED: 2010/ 7/ 23
SAA2552
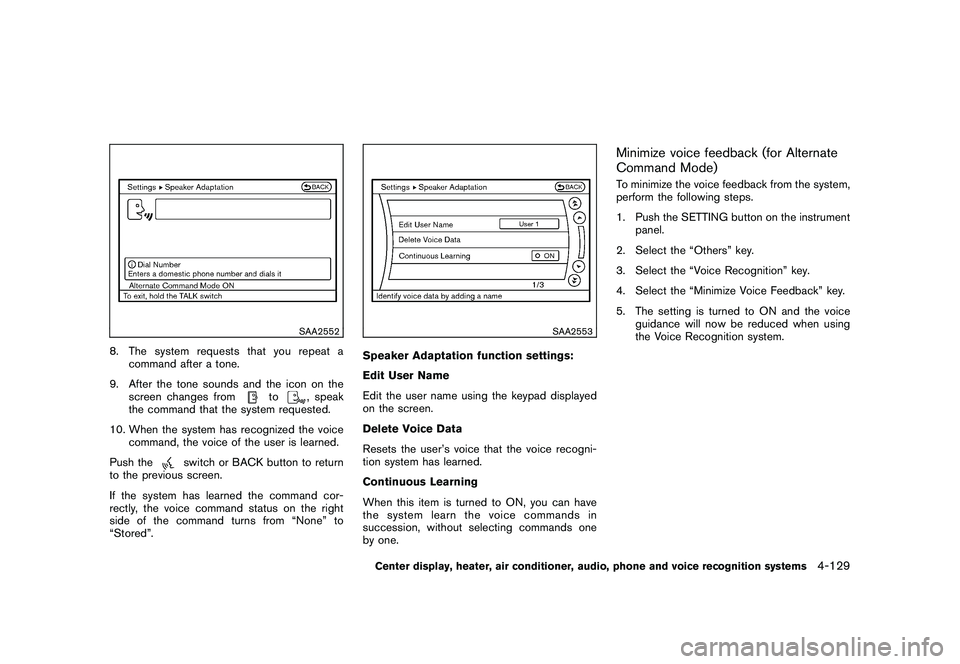
8. The system requests that you repeat acommand after a tone.
9. After the tone sounds and the icon on the screen changes from
to
, speak
the command that the system requested.
10. When the system has recognized the voice command, the voice of the user is learned.
Push the
switch or BACK button to return
to the previous screen.
If the system has learned the command cor-
rectly, the voice command status on the right
side of the command turns from “None” to
“Stored”.
SAA2553
Speaker Adaptation function settings:
Edit User Name
Edit the user name using the keypad displayed
on the screen.
Delete Voice Data
Resets the user’s voice that the voice recogni-
tion system has learned.
Continuous Learning
When this item is turned to ON, you can have
the system learn the voice commands in
succession, without selecting commands one
by one.
Minimize voice feedback (for Alternate
Command Mode)To minimize the voice feedback from the system,
perform the following steps.
1. Push the SETTING button on the instrument panel.
2. Select the “Others” key.
3. Select the “Voice Recognition” key.
4. Select the “Minimize Voice Feedback” key.
5. The setting is turned to ON and the voice guidance will now be reduced when using
the Voice Recognition system.
Center display, heater, air conditioner, audio, phone and voice recognition systems
4-129
Page 306 of 433
Black plate (304,1)
Model "Z51-D" EDITED: 2010/ 7/ 23
alternate tires and wheels allow the TPMS to
continue to function properly.Additional information.The TPMS does not monitor the tire
pressure of the spare tire.
. The TPMS will activate only when the
vehicle is driven at speeds above 16 MPH
(25 km/h) . Also, this system may not detect
a sudden drop in tire pressure (for example a
flat tire while driving) .
. The low tire pressure warning light does not
automatically turn off when the tire pressure
is adjusted. After the tire is inflated to the
recommended pressure, the vehicle must be
driven at speeds above 16 MPH (25 km/h)
to activate the TPMS and turn off the low tire
pressure warning light. Use a tire pressure
gauge to check the tire pressure.
. The CHECK TIRE PRESSURE warning also
appears on the dot matrix liquid crystal
display when the low tire pressure warning
light is illuminated and low tire pressure is
detected. The CHECK TIRE PRESSURE
warning turns off when the low tire pressure
warning light turns off.
The CHECK TIRE PRESSURE warning
does not appear if the low tire pressure
warning light illuminates to indicate a TPMS
malfunction. .
Tire pressure rises and falls depending on
the heat caused by the vehicle’s operation
and the outside temperature. Low outside
temperature can lower the temperature of
the air inside the tire which can cause a
lower tire inflation pressure. This may cause
the low tire pressure warning light to
illuminate. If the warning light illuminates in
low ambient temperature, check the tire
pressure for all four tires.
For additional information, see “Low tire pres-
sure warning light” in the “2. Instruments and
controls” section and “TIRE PRESSURE MON-
ITORING SYSTEM (TPMS)” in the “6. In case of
emergency” section.
WARNING
. If the low tire pressure warning light
illuminates while driving, avoid sud-
den steering maneuvers or abrupt
braking, reduce vehicle speed, pull
off the road to a safe location and
stop the vehicle as soon as possi-
ble. Driving with under-inflated tires
may permanently damage the tires
and increase the likelihood of tire
failure. Serious vehicle damage
could occur and may lead to an
accident and could result in serious personal injury. Check the tire pres-
sure for all four tires. Adjust the tire
pressure to the recommended COLD
tire pressure shown on the Tire and
Loading Information label to turn
the low tire pressure warning light
OFF. If the light still illuminates
while driving after adjusting the tire
pressure, a tire may be flat. If you
have a flat tire, replace it with a
spare tire as soon as possible. (See
“FLAT TIRE” in the “6. In case of
emergency” section for changing a
flat tire.)
. When a spare tire is mounted or a
wheel is replaced, the TPMS will not
function and the low tire pressure
warning light will flash for approxi-
mately 1 minute. The light will
remain on after 1 minute. Contact
your NISSAN dealer as soon as
possible for tire replacement and/
or system resetting.
. Replacing tires with those not ori-
ginally specified by NISSAN could
affect the proper operation of the
TPMS.
. Do not inject any tire liquid or
aerosol tire sealant into the tires,
5-4
Starting and driving
Page 321 of 433

Black plate (319,1)
Model "Z51-D" EDITED: 2010/ 7/ 23
.on slippery roads (rain, snow, ice,
etc.)
. in very windy areas
Doing so could cause a loss of vehicle
control and result in an accident.
SSD0694
1. RESUME/ACCELERATE switch
2. SET/COAST switch
3. CANCEL switch
4. MAIN (ON·OFF) switchCRUISE CONTROL OPERATIONSThe cruise control allows driving at a speed
between 25 to 89 MPH (40 to 144 km/h)
without keeping your foot on the accelerator
pedal.
To turn on the cruise control, push the MAIN
switch on. The CRUISE indicator light will
illuminate.
To set cruising speed, accelerate the vehicle
to the desired speed, push the SET/COAST switch and release it. Take your foot off the
accelerator pedal. Your vehicle will maintain the
set speed.
.
To pass another vehicle, depress the
accelerator pedal. When you release the
pedal, the vehicle will return to the previously
set speed.
. The vehicle may not maintain the set speed
on winding or hilly roads. If this happens,
drive without the cruise control.
To cancel the preset speed, use one of the
following methods:
a) Push the CANCEL switch.
b) Tap the brake pedal.
c) Turn the MAIN switch off. The CRUISE light will turn off.
. If you depress the brake pedal while pushing
the RESUME/ACCELERATE or SET/
COAST switch and reset at the cruising
speed, the cruise control will disengage.
Turn the MAIN switch off once and then turn
it on again.
. The cruise control will automatically cancel if
the vehicle slows more than 8 MPH (13
km/h) below the set speed.
. If you move the selector lever to the N
(Neutral) position, the cruise control will be
Starting and driving
5-19
Page 322 of 433
Black plate (320,1)
Model "Z51-D" EDITED: 2010/ 7/ 23
canceled.
To reset at a faster cruising speed, use one
of the following methods:
. Depress the accelerator pedal. When the
vehicle attains the desired speed, push and
release the SET/COAST switch.
. Push and hold the RESUME/ACCELERATE
switch. When the vehicle attains the desired
speed, release the switch.
. Push, then quickly release the RESUME/
ACCELERATE switch. Each time you do
this, the set speed will increase by about 1
MPH (1.6 km/h) .
To reset at a slower cruising speed, use one
of the following methods:
. Lightly tap the brake pedal. When the
vehicle attains the desired speed, push the
SET/COAST switch and release it.
. Push and hold the SET/COAST switch.
Release the switch when the vehicle slows
down to the desired speed.
. Push, then quickly release the SET/COAST
switch. Each time you do this, the set speed
will decrease by about 1 MPH (1.6 km/h) . To resume the preset speed,
push and
release the RESUME/ACCELERATE switch.
The vehicle will resume the last set cruising
speed when the vehicle speed is over 25 MPH
(40 km/h) .
CAUTION
During the first 1,200 miles (2,000 km) ,
follow these recommendations to ob-
tain maximum engine performance and
ensure the future reliability and econo-
my of your new vehicle. Failure to
follow these recommendations may
result in shortened engine life and
reduced engine performance.
. Avoid driving for long periods at constant
speed, either fast or slow. Do not run the
engine over 4,000 rpm.
. Do not accelerate at full throttle in any gear.
. Avoid quick starts.
. Avoid hard braking as much as possible.
. Do not tow a trailer for the first 500 miles
(800 km) . Your engine, axle or other parts
could be damaged.BREAK-IN SCHEDULE
5-20
Starting and driving