Page 137 of 377

WARNING
●Properly secure all cargo with ropes or
straps to help prevent it from sliding or
shifting. In a sudden stop or collision,
unsecured cargo could cause personal
injury.
● The cargo restrained in the under-seat
storage bins must not exceed the
weight limits listed below or the bins
may not stay secured. In a sudden stop
or collision, the unsecured bins could
cause personal inury.
King cab model: 16 lb (7.25 kg)
Crew cab model Driver’s side: 16 lb (7.25 kg)
Passenger’s side: 25 lb (11.33 kg)
● If the under-seat storage bins are re-
moved for any reason, they should be
securely stored to prevent them from
causing injury to passengers or damage
to the vehicle in case of sudden braking
or an accident.
● Do not place sharp objects in the under-
seat storage bins. Such objects may
become dangerous projectiles and
cause injury when the vehicle is moving
or if the vehicle is involved in a collision. To access the under-seat storage bins:
For King cab model, lift up the jump seat. Refer to
“Jump seat (King cab)” in the “Safety—Seats,
seat belts and supplemental restraint system”
section earlier in this manual.
For Crew cab model, lift up the rear bench seat.
Refer to “Folding the rear bench seat down” in
the “Safety—Seats, seat belts and supplemental
restraint system” section earlier in this manual.
To remove the under-seat storage bins:1. Remove the storage net.
2. Remove the tray by lifting it out of the stor- age bin (King cab model) .
3. Turn the knobs to the UNLOCK position
�2.
To install the under-seat storage bins: 1. Position the under-seat storage bin so the holes line up with the holes in the floorboard.
2. Insert the knobs and turn them to the LOCK position
�1.
LIC0822
2-40Instruments and controls
Page 143 of 377

WARNING
●Drive extra carefully when the vehicle is
loaded at or near the cargo carrying
capacity, especially if the significant
portion of that load is carried on the
roof rack.
● Heavy loading of the roof rack has the
potential to affect the vehicle stability
and handling during sudden or abnor-
mal handling maneuvers.
● Roof rack load should be evenly
distributed.
● Do not exceed maximum roof rack load
weight capacity.
● Properly secure all cargo with ropes or
straps to help prevent it from sliding or
shifting. In a sudden stop or collision,
unsecured cargo could cause personal
injury.
CAUTION
Use care when placing or removing items
from the roof rack. If you cannot comfort-
ably lift the items onto the roof rack from
the ground, use a ladder or stool. Always evenly distribute the cargo on the tubular
roof rack.
The maximum total load is 125 lb
(56 kg) evenly distributed. Be careful that your
vehicle does not exceed the Gross Vehicle
Weight Rating (GVWR) or the Gross Axle
Weight Ratings (GAWR front and rear) . The
GVWR and GAWR are located on the F.M.V.S.S.
label (located on the driver’s side door jamb
pillar) . For more information regarding GVWR
and GAWR, refer to “Vehicle loading information”
in the “Technical and consumer information” sec-
tion later in this manual.
The front crossbar can be adjusted or removed.
Use the Torxdriver provided in the tool kit to
loosen both crossbar adjusting screws.
To adjust:
1. Loosen the adjusting screws with the Torxdriver
�1by turning counterclockwise
�A.
2. When the clamp is loosened, move the crossbar so the cargo can be positioned on
the crossbar
�B.
3. Tighten the crossbar adjusting screws with the Torxdriver by turning clockwise.
4. Secure the cargo with rope.
5. Always check the tightness of the crossbar adjusting screws. To remove:
1. Loosen the adjusting screws with the Torxdriver
�1by turning counterclockwise
�A.
2. Rotate the clamps
�C.
3. Remove the crossbar.
4. Reverse to install.
5. Always check the tightness of the crossbar adjusting screws.
If you hear wind noise coming from the roof rack
while driving, adjust the roof rack crossbar to the
neutral position, rearward of �on the side rails.
2-46Instruments and controls
Page 150 of 377

To turn the map lights on, press the lenses. To
turn them off, press the lenses of the lights again.
CAUTION
Do not use for extended periods of time
with the engine stopped. This could result
in a discharged battery.The HomeLink�
Universal Transceiver provides a
convenient way to consolidate the functions of up
to three individual hand-held transmitters into
one built-in device.
HomeLink� Universal Transceiver:
● Will operate most Radio Frequency (RF)
devices such as garage doors, gates, home
and office lighting, entry door locks and se-
curity systems.
● Is powered by your vehicle’s battery. No
separate batteries are required. If the vehi-
cle’s battery is discharged or is discon-
nected, HomeLink� will retain all program-
ming.
Once the HomeLink� Universal Transceiver
is programmed, retain the original trans-
mitter for future programming procedures
(Example: new vehicle purchases) . Upon
sale of the vehicle, the programmed
HomeLink� Universal Transceiver buttons
should be erased for security purposes. For
additional information, refer to “Program-
ming HomeLink�” later in this section.
WARNING
● Do not use the HomeLink� Universal
Transceiver with any garage door
opener that lacks safety stop and re-
verse features as required by federal
safety standards. (These standards be-
came effective for opener models
manufactured after April 1, 1982) . A ga-
rage door opener which cannot detect
an object in the path of a closing garage
door and then automatically stop and
reverse, does not meet current federal
safety standards. Using a garage door
opener without these features in-
creases the risk of serious injury or
death.
● During the programming procedure
your garage door or security gate will
open and close (if the transmitter is
within range) . Make sure that people or
objects are clear of the garage door,
gate, etc. that you are programming.
● Your vehicle’s engine should be turned
off while programming the HomeLink�
Universal Transceiver.
LIC0791
MAP LIGHTS (if so equipped) HOMELINK�UNIVERSAL
TRANSCEIVER (if so equipped)
Instruments and controls2-53
Page 169 of 377

The outside mirror remote control will operate
only when the ignition switch is placed in the
ACC or ON position.
Move the small switch
�1to select the right or")
Electric control type (if so equipped)
The outside mirror remote control will operate
only when the ignition switch is placed in the
ACC or ON position.
Move the small switch
�1to select the right or left
mirror. Adjust each mirror to the desired position
using the large switch
�2.
Heated mirrors (if so equipped)
Some outside mirrors can be heated to defrost,
defog, or de-ice for improved visibility. For addi-
tional information, see “Rear window and outside
mirror defroster switch” in the “Instruments and
controls” section of this manual.
Foldable outside mirrors
Pull the outside mirror toward the door to fold it.
TAILGATE
Opening the tailgate
Pull the tailgate handle upward and lower the
tailgate. The support cables hold the tailgate
open.
When closing the tailgate, make sure the latches
are securely locked.
Do not drive the vehicle with the tailgate
down, unless equipped with NISSAN’s Bed
Extender (accessory) or equivalent in the
extended position.
LPD0237LPD0259LPD0270
TRUCK BOX
3-16Pre-driving checks and adjustments
Page 170 of 377

For proper truck box loading see “Vehicle loading
information” in the “Technical and consumer in-
formation” section of this manual.
WARNING
●It is extremely dangerous to ride in a
cargo area inside a vehicle. In a colli-
sion, people riding in these areas are
more likely to be seriously injured or
killed.
● Do not allow people to ride in any area
of your vehicle that is not equipped with
seats and seat belts.
● Be sure everyone in your vehicle is in a
seat and using a seat belt properly.
Removing the tailgate
1. Release the tailgate support cables.
CAUTION
● The tailgate is heavy. Two people
should remove or install it. Be careful
not to drop it during removal.
● After releasing the support cables, do
not let the tailgate rest on the bumper.
2. Hold the tailgate at a 45 degree angle.
3. Pull the tailgate out from the right side hinge.
4. Slide the tailgate out of the left side hinge.
Installing the tailgate
1. Insert the tailgate into the left side hinge.
2. Hold the tailgate at a 45 degree angle and insert into the right side hinge.
3. Continue to hold the tailgate at a 45 degree angle and attach the tailgate support cables.
4. Close the tailgate securely.
LPD0271
Pre-driving checks and adjustments3-17
Page 171 of 377
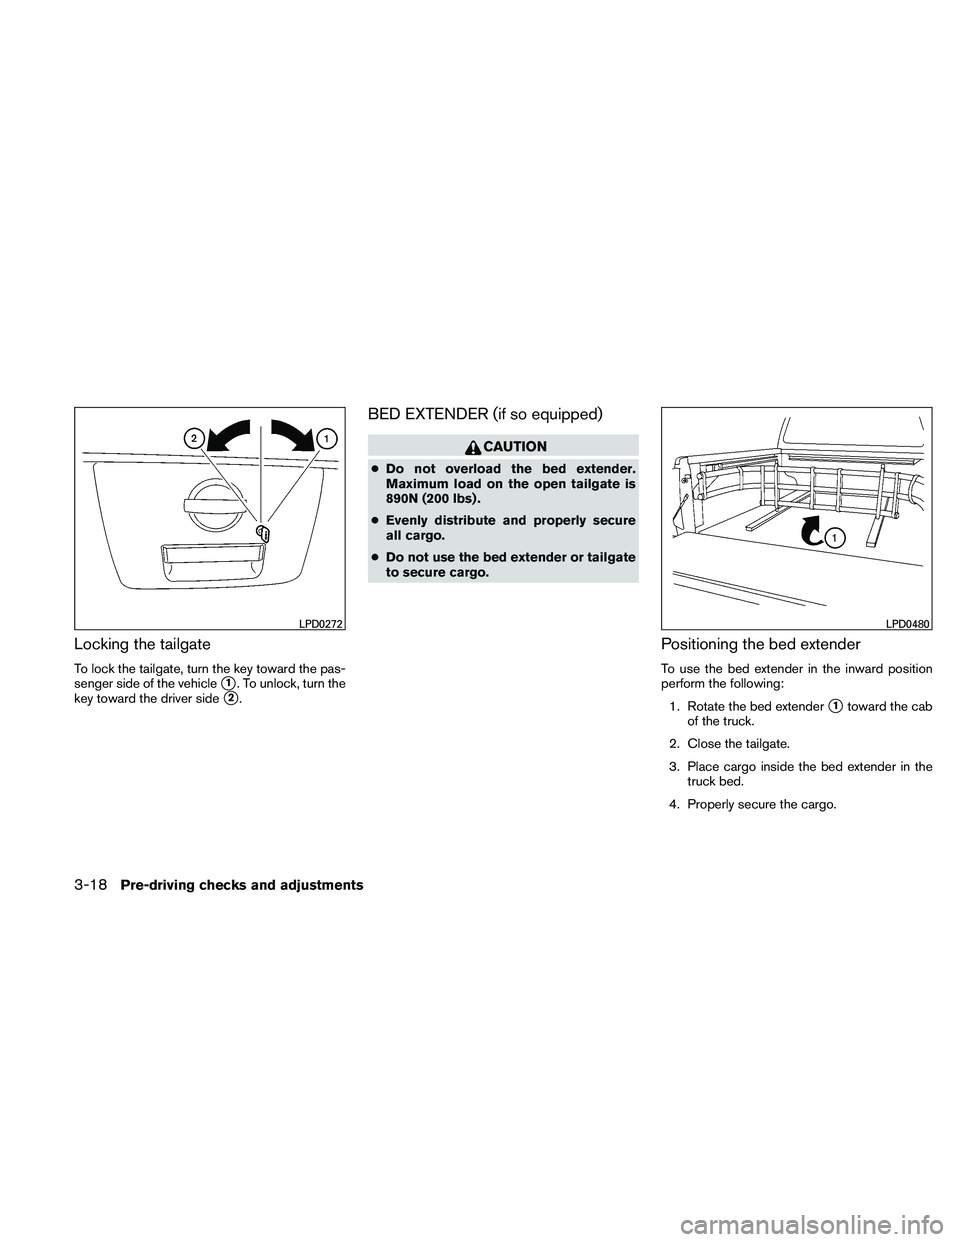
Locking the tailgate
To lock the tailgate, turn the key toward the pas-
senger side of the vehicle
�1. To unlock, turn the
key toward the driver side
�2.
BED EXTENDER (if so equipped)
CAUTION
● Do not overload the bed extender.
Maximum load on the open tailgate is
890N (200 lbs) .
● Evenly distribute and properly secure
all cargo.
● Do not use the bed extender or tailgate
to secure cargo.
Positioning the bed extender
To use the bed extender in the inward position
perform the following:
1. Rotate the bed extender
�1toward the cab
of the truck.
2. Close the tailgate.
3. Place cargo inside the bed extender in the truck bed.
4. Properly secure the cargo.
LPD0272LPD0480
3-18Pre-driving checks and adjustments
Page 172 of 377

To use the bed extender in the outward position
perform the following:1. Open the tailgate.
2. Rotate the bed extender
�2away from the
cab of the truck until the extender sits on the
tailgate.
3. Lock the buckles
�3into the tailgate latch.
The bed extender can be adjusted in the outward
position by moving the extender along the rail. NOTE:
Use care when rotating extender, buckles
may come in contact with the truck bed
railing.
Removing and installing the bed
extender
To remove or install the bed extender perform the
following:
1. Open the tailgate.
2. Rotate the bed extender into a vertical posi- tion and lift straight up (to remove) or lower
straight down (to install) .
To store the bed extender in the front of the truck
when not in use perform the following: 1. Position the sliding brackets past the center of the wheel well.
2. Re-install the extender into the brackets (see above) .
3. Rotate the extender to the inward position.
4. Push the brackets forward until the extender comes in contact with the front wall of the
truck box.
TIE DOWN HOOKS (if so equipped)
For your convenience, tie down hooks are placed
at each corner of the truck box. These may be
used to help secure cargo loaded into the truck
box.
● The weight of the cargo load must be evenly
distributed over both the front and the rear
axles.
● All cargo should be securely fastened with
ropes or straps to prevent it from shifting or
sliding within the vehicle.
LPD0479LTI0102
Pre-driving checks and adjustments3-19
Page 173 of 377
WARNING
●Properly secure all cargo with ropes or
straps to help prevent it from sliding or
shifting. In a sudden stop or collision,
unsecured cargo could cause personal
injury.
3-20Pre-driving checks and adjustments