2011 NISSAN CUBE instrument panel
[x] Cancel search: instrument panelPage 145 of 345
Black plate (143,1)
Model "Z12-D" EDITED: 2010/ 9/ 27
SPA2447
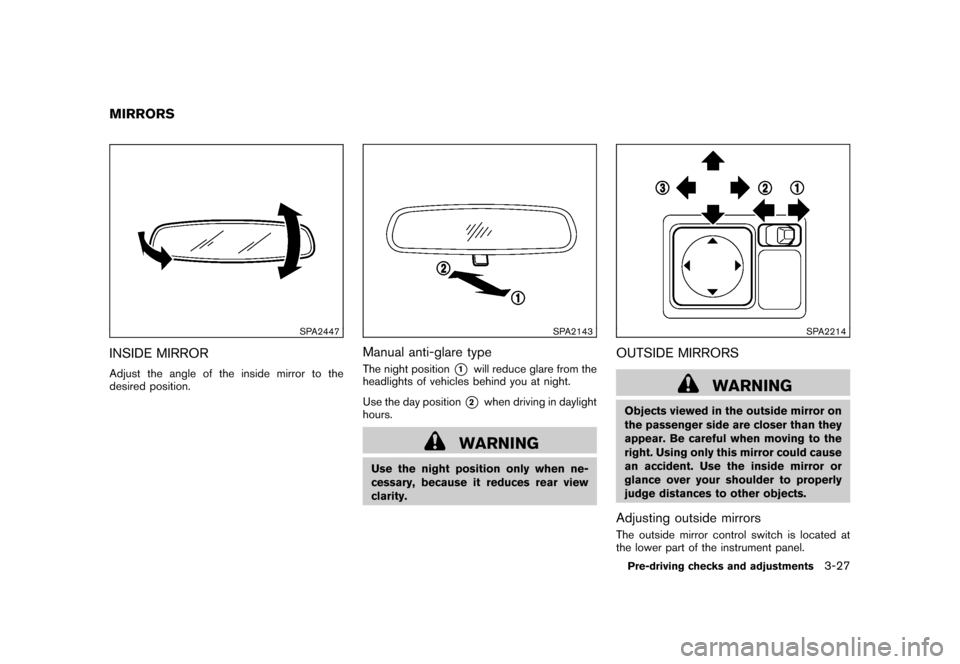
INSIDE MIRRORAdjust the angle of the inside mirror to the
desired position.
SPA2143
Manual anti-glare typeThe night position
*1
will reduce glare from the
headlights of vehicles behind you at night.
Use the day position*2
when driving in daylight
hours.
WARNING
Use the night position only when ne-
cessary, because it reduces rear view
clarity.
SPA2214
OUTSIDE MIRRORS
WARNING
Objects viewed in the outside mirror on
the passenger side are closer than they
appear. Be careful when moving to the
right. Using only this mirror could cause
an accident. Use the inside mirror or
glance over your shoulder to properly
judge distances to other objects.Adjusting outside mirrorsThe outside mirror control switch is located at
the lower part of the instrument panel.
MIRRORS
Pre-driving checks and adjustments
3-27
Page 167 of 345
Black plate (165,1)
Model "Z12-D" EDITED: 2010/ 9/ 27
The temperature range is between 608F (188C)
and 90 8F (32 8C) .
Air recirculation:
Push the air recirculation
button to change
the air circulation mode. When the indicator light
illuminates, the flowing air is recirculated inside
the vehicle.
Outside air circulation:
Push the outside air circulation
button to
change the air circulation mode. When the
indicator light illuminates, the flowing air is
drawn from outside the vehicle.
Automatic air intake control:
To set the automatic control mode, perform one
of the following operations.
. When the outside air circulation mode is on,
push and hold the outside air circulation
button for more than 1.5 seconds.
. When the air recirculation mode is on, push
and hold the air recirculation
button for
more than 1.5 seconds.
When setting the automatic control mode, both
indicator lights will blink twice indicating that the
system is in the automatic control mode.
SAA2368SAA2369
OPERATING TIPS. When the engine coolant temperature and
outside air temperature are low, the air flow
from the foot outlets may not operate for a
maximum of 150 seconds. This is not a
malfunction. After the coolant temperature
warms up, air will flow normally from the foot
outlets.
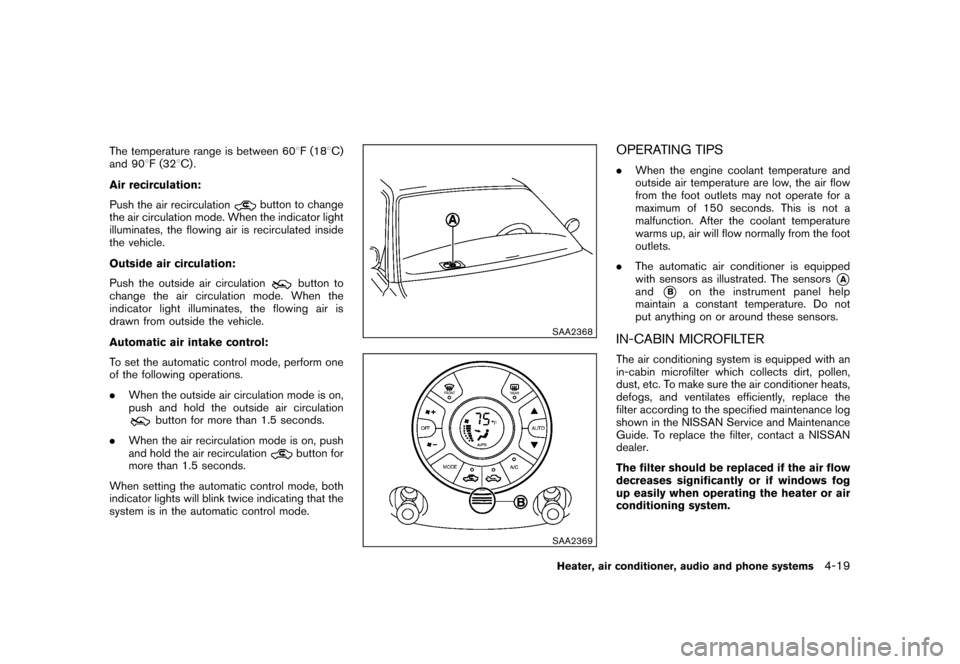
. The automatic air conditioner is equipped
with sensors as illustrated. The sensors
*A
and
*B
on the instrument panel help
maintain a constant temperature. Do not
put anything on or around these sensors.
IN-CABIN MICROFILTERThe air conditioning system is equipped with an
in-cabin microfilter which collects dirt, pollen,
dust, etc. To make sure the air conditioner heats,
defogs, and ventilates efficiently, replace the
filter according to the specified maintenance log
shown in the NISSAN Service and Maintenance
Guide. To replace the filter, contact a NISSAN
dealer.
The filter should be replaced if the air flow
decreases significantly or if windows fog
up easily when operating the heater or air
conditioning system.
Heater, air conditioner, audio and phone systems
4-19
Page 190 of 345
Black plate (188,1)
Model "Z12-D" EDITED: 2010/ 9/ 27
SAA2352
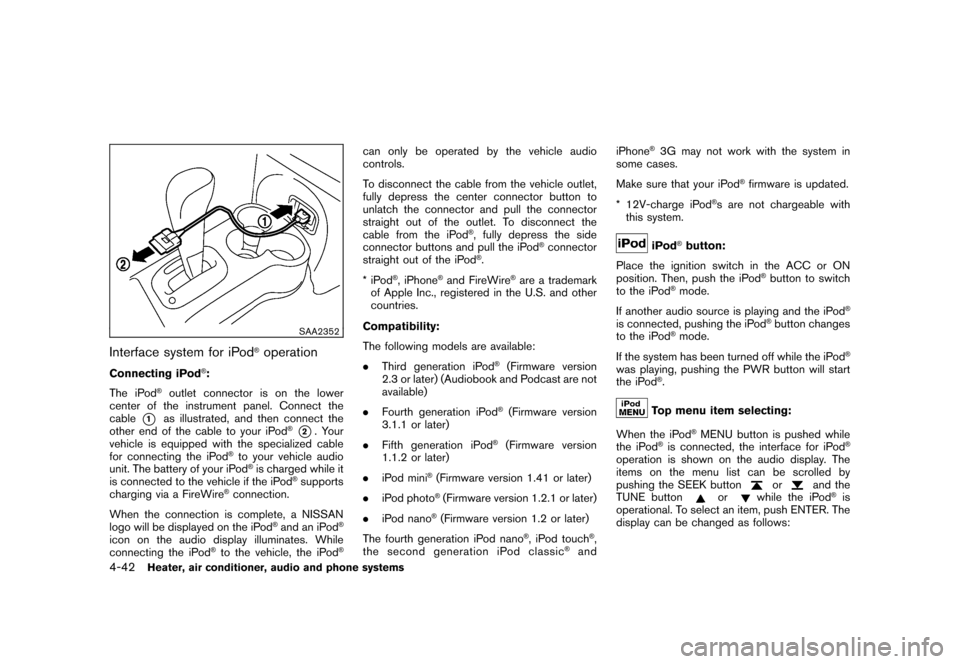
Interface system for iPod
®operation
Connecting iPod
®:
The iPod
®outlet connector is on the lower
center of the instrument panel. Connect the
cable
*1
as illustrated, and then connect the
other end of the cable to your iPod
®*2. Your
vehicle is equipped with the specialized cable
for connecting the iPod
®to your vehicle audio
unit. The battery of your iPod®is charged while it
is connected to the vehicle if the iPod
®supports
charging via a FireWire
®connection.
When the connection is complete, a NISSAN
logo will be displayed on the iPod
®and an iPod
®
icon on the audio display illuminates. While
connecting the iPod
®to the vehicle, the iPod
®
can only be operated by the vehicle audio
controls.
To disconnect the cable from the vehicle outlet,
fully depress the center connector button to
unlatch the connector and pull the connector
straight out of the outlet. To disconnect the
cable from the iPod
®, fully depress the side
connector buttons and pull the iPod
®connector
straight out of the iPod
®.
*iPod
®, iPhone
®and FireWire
®are a trademark
of Apple Inc., registered in the U.S. and other
countries.
Compatibility:
The following models are available:
. Third generation iPod
®(Firmware version
2.3 or later) (Audiobook and Podcast are not
available)
. Fourth generation iPod®(Firmware version
3.1.1 or later)
. Fifth generation iPod
®(Firmware version
1.1.2 or later)
. iPod mini
®(Firmware version 1.41 or later)
. iPod photo®(Firmware version 1.2.1 or later)
. iPod nano®(Firmware version 1.2 or later)
The fourth generation iPod nano
®, iPod touch
®,
the second generation iPod classic
®and iPhone
®3G may not work with the system in
some cases.
Make sure that your iPod
®firmware is updated.
* 12V-charge iPod
®s are not chargeable with
this system.
iPod
®button:
Place the ignition switch in the ACC or ON
position. Then, push the iPod
®button to switch
to the iPod
®mode.
If another audio source is playing and the iPod
®
is connected, pushing the iPod
®button changes
to the iPod
®mode.
If the system has been turned off while the iPod
®
was playing, pushing the PWR button will start
the iPod
®.Top menu item selecting:
When the iPod
®MENU button is pushed while
the iPod
®is connected, the interface for iPod
®
operation is shown on the audio display. The
items on the menu list can be scrolled by
pushing the SEEK button
or
and the
TUNE button
or
while the iPod
®is
operational. To select an item, push ENTER. The
display can be changed as follows:
4-42
Heater, air conditioner, audio and phone systems
Page 196 of 345
Black plate (194,1)
Model "Z12-D" EDITED: 2010/ 9/ 27
SAA3402
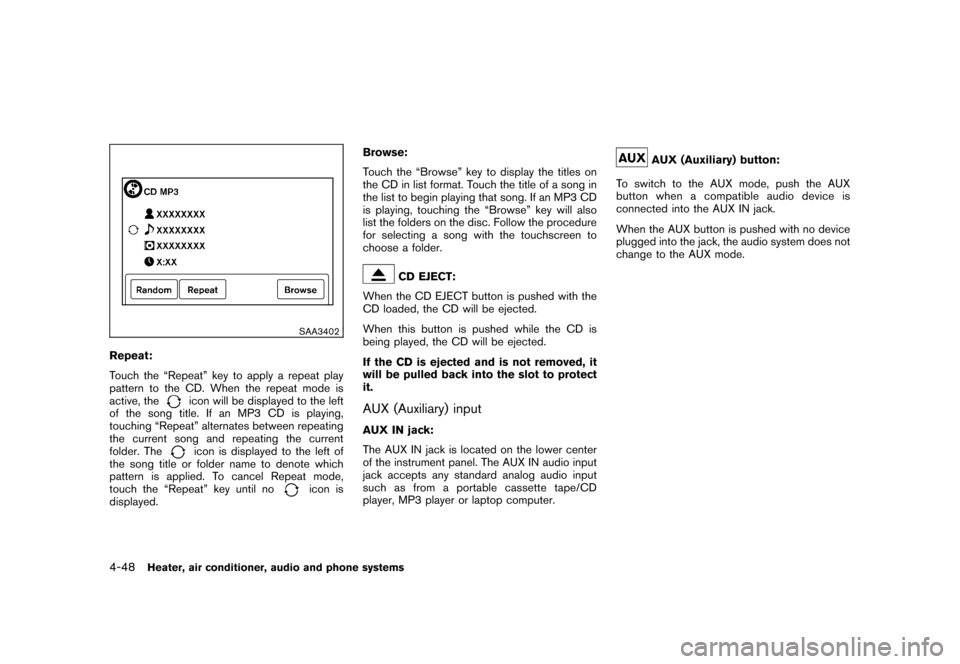
Repeat:
Touch the “Repeat” key to apply a repeat play
pattern to the CD. When the repeat mode is
active, the
icon will be displayed to the left
of the song title. If an MP3 CD is playing,
touching “Repeat” alternates between repeating
the current song and repeating the current
folder. Theicon is displayed to the left of
the song title or folder name to denote which
pattern is applied. To cancel Repeat mode,
touch the “Repeat” key until no
icon is
displayed. Browse:
Touch the “Browse” key to display the titles on
the CD in list format. Touch the title of a song in
the list to begin playing that song. If an MP3 CD
is playing, touching the “Browse” key will also
list the folders on the disc. Follow the procedure
for selecting a song with the touchscreen to
choose a folder.
CD EJECT:
When the CD EJECT button is pushed with the
CD loaded, the CD will be ejected.
When this button is pushed while the CD is
being played, the CD will be ejected.
If the CD is ejected and is not removed, it
will be pulled back into the slot to protect
it.
AUX (Auxiliary) inputAUX IN jack:
The AUX IN jack is located on the lower center
of the instrument panel. The AUX IN audio input
jack accepts any standard analog audio input
such as from a portable cassette tape/CD
player, MP3 player or laptop computer.
AUX (Auxiliary) button:
To switch to the AUX mode, push the AUX
button when a compatible audio device is
connected into the AUX IN jack.
When the AUX button is pushed with no device
plugged into the jack, the audio system does not
change to the AUX mode.
4-48
Heater, air conditioner, audio and phone systems
Page 197 of 345
Black plate (195,1)
Model "Z12-D" EDITED: 2010/ 9/ 27
SAA3647
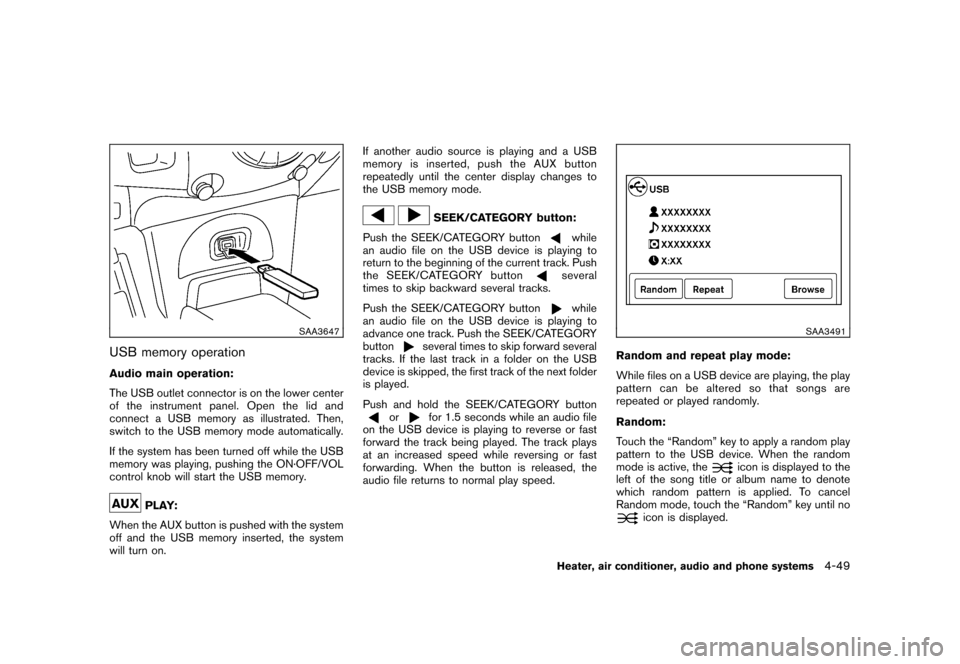
USB memory operationAudio main operation:
The USB outlet connector is on the lower center
of the instrument panel. Open the lid and
connect a USB memory as illustrated. Then,
switch to the USB memory mode automatically.
If the system has been turned off while the USB
memory was playing, pushing the ON·OFF/VOL
control knob will start the USB memory.
PLAY:
When the AUX button is pushed with the system
off and the USB memory inserted, the system
will turn on. If another audio source is playing and a USB
memory is inserted, push the AUX button
repeatedly until the center display changes to
the USB memory mode.
SEEK/CATEGORY button:
Push the SEEK/CATEGORY button
while
an audio file on the USB device is playing to
return to the beginning of the current track. Push
the SEEK/CATEGORY buttonseveral
times to skip backward several tracks.
Push the SEEK/CATEGORY buttonwhile
an audio file on the USB device is playing to
advance one track. Push the SEEK/CATEGORY
button
several times to skip forward several
tracks. If the last track in a folder on the USB
device is skipped, the first track of the next folder
is played.
Push and hold the SEEK/CATEGORY button
or
for 1.5 seconds while an audio file
on the USB device is playing to reverse or fast
forward the track being played. The track plays
at an increased speed while reversing or fast
forwarding. When the button is released, the
audio file returns to normal play speed.
SAA3491
Random and repeat play mode:
While files on a USB device are playing, the play
pattern can be altered so that songs are
repeated or played randomly.
Random:
Touch the “Random” key to apply a random play
pattern to the USB device. When the random
mode is active, the
icon is displayed to the
left of the song title or album name to denote
which random pattern is applied. To cancel
Random mode, touch the “Random” key until no
icon is displayed.
Heater, air conditioner, audio and phone systems
4-49
Page 225 of 345
Black plate (223,1)
Model "Z12-D" EDITED: 2010/ 9/ 27
WARNING
Do not operate the push-button ignition
switch while driving the vehicle except
in an emergency. (The engine will stop
when the ignition switch is pushed 3
consecutive times or the ignition switch
is pushed and held for more than 2
seconds.) If the engine stops while the
vehicle is being driven, this could lead
to a crash and serious injury.
Before operating the push-button ignition
switch, be sure to move the selector lever to
the P (Park) position.
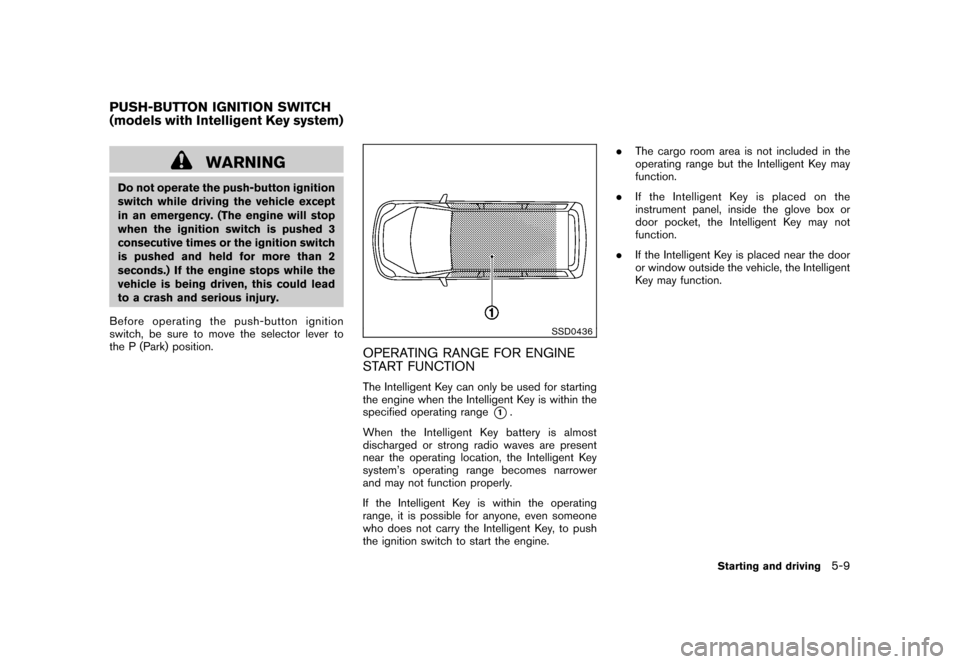
SSD0436
OPERATING RANGE FOR ENGINE
START FUNCTIONThe Intelligent Key can only be used for starting
the engine when the Intelligent Key is within the
specified operating range
*1.
When the Intelligent Key battery is almost
discharged or strong radio waves are present
near the operating location, the Intelligent Key
system’s operating range becomes narrower
and may not function properly.
If the Intelligent Key is within the operating
range, it is possible for anyone, even someone
who does not carry the Intelligent Key, to push
the ignition switch to start the engine. .
The cargo room area is not included in the
operating range but the Intelligent Key may
function.
. If the Intelligent Key is placed on the
instrument panel, inside the glove box or
door pocket, the Intelligent Key may not
function.
. If the Intelligent Key is placed near the door
or window outside the vehicle, the Intelligent
Key may function.
PUSH-BUTTON IGNITION SWITCH
(models with Intelligent Key system)
Starting and driving
5-9
Page 232 of 345
Black plate (230,1)
Model "Z12-D" EDITED: 2010/ 9/ 27
position.
CAUTION
To prevent transmission damage, move
the selector lever to the P (Park) or R
(Reverse) position only when the vehi-
cle is completely stopped.
P (Park):
Use this selector position when the vehicle is
parked or when starting the engine. Make sure
the vehicle is completely stopped. The brake
pedal must be depressed and the selector
lever button pushed in to move the selec-
tor lever from N (Neutral) or any drive
position to P (Park) . Apply the parking brake.
When parking on a hill, apply the parking brake
first, then move the selector lever to the P (Park)
position.
R (Reverse):
Use this position to back up. Make sure the
vehicle is completely stopped before selecting
the R (Reverse) position. The brake pedal
must be depressed and the selector lever
button pushed in to move the selector
lever from P (Park) , N (Neutral) or any
driving position to R (Reverse) . N (Neutral):
Neither forward nor reverse gear is engaged.
The engine can be started in this position. You
may shift to N (Neutral) and restart a stalled
engine while the vehicle is moving.
D (Drive):
Use this position for all normal forward driving.
L (Low):
Use this position for maximum engine braking on
steep downhill gradients/climbing steep slopes
and whenever approaching sharp bends. Do not
use the L (Low) position in any other circum-
stances.
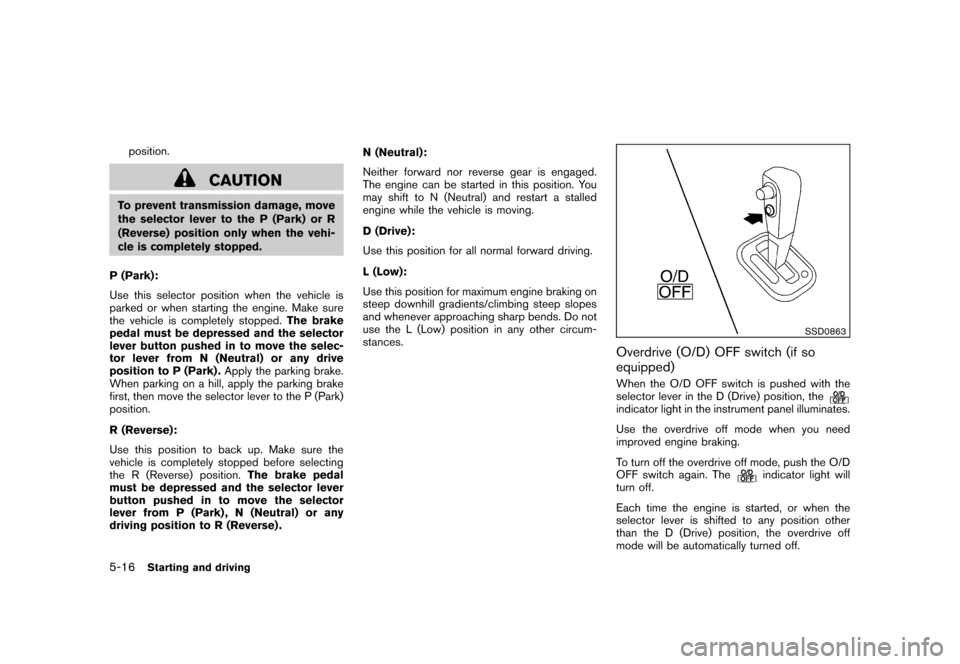
SSD0863
Overdrive (O/D) OFF switch (if so
equipped)When the O/D OFF switch is pushed with the
selector lever in the D (Drive) position, theindicator light in the instrument panel illuminates.
Use the overdrive off mode when you need
improved engine braking.
To turn off the overdrive off mode, push the O/D
OFF switch again. The
indicator light will
turn off.
Each time the engine is started, or when the
selector lever is shifted to any position other
than the D (Drive) position, the overdrive off
mode will be automatically turned off.
5-16
Starting and driving
Page 243 of 345
Black plate (241,1)
Model "Z12-D" EDITED: 2010/ 9/ 27
Tire and Loading Information
label. See “TIRE AND LOADING
INFORMATION LABEL” in the “9.
Technical and consumer infor-
mation” section of this manual.
— For detailed information, see “WHEELS AND TIRES” in the
“8. Maintenance and do-it-your-
self” section of this manual.
The Anti-lock Braking System (ABS) controls
the brakes so the wheels do not lock during hard
braking or when braking on slippery surfaces.
The system detects the rotation speed at each
wheel and varies the brake fluid pressure to
prevent each wheel from locking and sliding. By
preventing each wheel from locking, the system
helps the driver maintain steering control and
helps to minimize swerving and spinning on
slippery surfaces.
Using the systemDepress the brake pedal and hold it down.
Depress the brake pedal with firm steady
pressure, but do not pump the brakes. The
ABS will operate to prevent the wheels from
locking up. Steer the vehicle to avoid obstacles.
WARNING
Do not pump the brake pedal. Doing so
may result in increased stopping dis-
tances.Self-test featureThe ABS includes electronic sensors, electric
pumps, hydraulic solenoids and a computer. The
computer has a built-in diagnostic feature that
tests the system each time you start the engine
and move the vehicle at a low speed in forward
or reverse. When the self-test occurs, you may
hear a “clunk” noise and/or feel a pulsation in the
brake pedal. This is normal and does not
indicate a malfunction. If the computer senses
a malfunction, it switches the ABS off and
illuminates the ABS warning light on the
instrument panel. The brake system then oper-
ates normally, but without anti-lock assistance.
If the ABS warning light illuminates during the
self-test or while driving, have the vehicle
checked by a NISSAN dealer.Normal operationThe ABS operates at speeds above 3 to 6 MPH
(5 to 10 km/h) . The speed varies according to
road conditions.
When the ABS senses that one or more wheels
are close to locking up, the actuator rapidly applies and releases hydraulic pressure. This
action is similar to pumping the brakes very
quickly. You may feel a pulsation in the brake
pedal and hear a noise from under the hood or
feel a vibration from the actuator when it is
operating. This is normal and indicates that the
ABS is operating properly. However, the pulsa-
tion may indicate that road conditions are
hazardous and extra care is required while
driving.
Starting and driving
5-27