2011 NISSAN CUBE clock
[x] Cancel search: clockPage 155 of 345
Black plate (153,1)
Model "Z12-D" EDITED: 2010/ 9/ 27
SAA3392
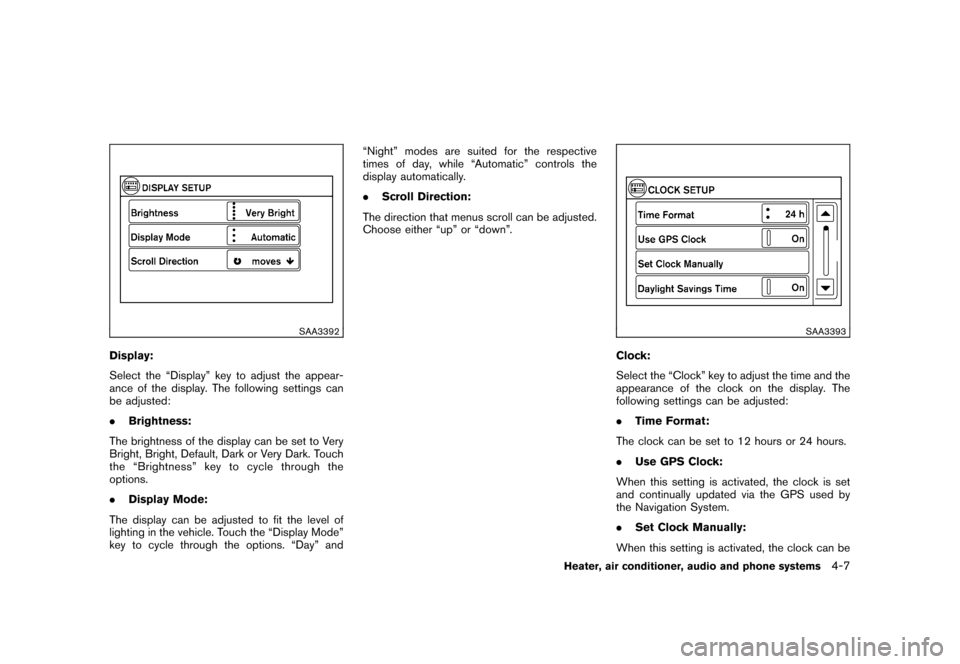
Display:
Select the “Display” key to adjust the appear-
ance of the display. The following settings can
be adjusted:
.Brightness:
The brightness of the display can be set to Very
Bright, Bright, Default, Dark or Very Dark. Touch
the “Brightness” key to cycle through the
options.
. Display Mode:
The display can be adjusted to fit the level of
lighting in the vehicle. Touch the “Display Mode”
key to cycle through the options. “Day” and “Night” modes are suited for the respective
times of day, while “Automatic” controls the
display automatically.
.
Scroll Direction:
The direction that menus scroll can be adjusted.
Choose either “up” or “down”.
SAA3393
Clock:
Select the “Clock” key to adjust the time and the
appearance of the clock on the display. The
following settings can be adjusted:
. Time Format:
The clock can be set to 12 hours or 24 hours.
. Use GPS Clock:
When this setting is activated, the clock is set
and continually updated via the GPS used by
the Navigation System.
. Set Clock Manually:
When this setting is activated, the clock can be
Heater, air conditioner, audio and phone systems
4-7
Page 163 of 345
Black plate (161,1)
Model "Z12-D" EDITED: 2010/ 9/ 27
Fan speed control:
Turn the fan speed control
dial clockwise to
increase the fan speed.
Turn the fan speed control
dial counter-
clockwise to decrease the fan speed.
A/C (Air Conditioner) operation:
Push the A/C button to turn on or off the air
conditioner. When the air conditioner is on, the
A/C indicator light on the button illuminates.
Temperature control:
Turn the temperature control dial to set the
desired temperature. Turn the dial between the
middle and the right position (in red) to select
the hot temperature. Turn the dial between the
middle and the left position (in blue) to select the
cool temperature.
Heater operationHeating:
This mode is used to direct heated air to the foot
outlets.
1. Push the air recirculation
button to
switch to the outside air circulation mode.
(The indicator light turns off.)
2. Turn the air flow control dial to the
position. 3. Turn the fan speed control
dial to the
desired position.
4. Turn the temperature control dial to the desired position between the middle and the
hot (right) position.
Ventilation:
This mode directs outside air to the side and
center ventilators.
1. Push the air recirculationbutton to
switch to the outside air circulation mode.
(The indicator light turns off.)
2. Turn the air flow control dial to the
position.
3. Turn the fan speed control
dial to the
desired position.
Defrosting or defogging:
This mode directs the air to the defroster outlets
to defrost/defog the windows.
1. Turn the air flow control dial to the
position.
2. Turn the fan speed control
dial to the
desired position.
3. Turn the temperature control dial to the desired position between the middle and the
hot (right) position. .
To remove frost from the outside surface of
the windshield quickly, turn the temperature
control dial to the maximum hot position and
the fan speed control
dial to maximum
(IIII) position.
. When the
position is selected, the air
conditioner will automatically turn on. This
will dehumidify the air and help to defog the
windows. The A/C indicator light will illumi-
nate when the air conditioner automatically
turns on. The air conditioner and A/C
indicator light will remain on in all flow
control modes until the A/C button is
pressed or the fan control dial is turned to
off.
Bi-level heating:
This mode directs cool air from the side and
center vents and warm air from the foot outlets.
When the temperature control dial is turned to
the maximum hot or cool position, the air
between the ventilators and the foot outlets is
the same temperature.
1. Push the air recirculation
button to
switch to the outside air circulation mode.
(The indicator light turns off.)
2. Turn the air flow control dial to the
position.
3. Turn the fan speed control
dial to the
desired position.
Heater, air conditioner, audio and phone systems
4-15
Page 183 of 345
Black plate (181,1)
Model "Z12-D" EDITED: 2010/ 9/ 27
Push the TUNE
or
or SEEK
or
button to adjust Bass, Treble, Fade and
Balance to the desired level. Fade adjusts the
sound level between the front and rear speakers
and Balance adjusts the sound between the
right and left speakers.
Once you have adjusted the sound quality to the
desired level, push the MENU button repeatedly
until the radio or CD display reappears (normal
mode) . Otherwise, the radio or CD display will
automatically reappear after approximately 10
seconds.
For information about adjusting the clock dis-
play, see “CLOCK” in the “2. Instruments and
controls” section.
FM-AM radio operation
Radio (FM/AM) band select:
Pushing the radio band select button will
change the band as follows:
AM ?FM1 ?FM2 ?AM
When the radio band select button is pushed
while the ignition switch is in the ACC or ON
position, the radio will come on at the station last
played. The last station played will also come on when
the PWR button is pushed to ON.
If another audio source is playing when the radio
band select button is pushed, the audio source
will automatically be turned off and the last radio
station played will come on.
When the stereo broadcast signal is weak, the
radio will automatically change from stereo to
monaural reception.
TUNE (Tuning):
Push the TUNE button
or
for manual
tuning.
SEEK tuning:
Push the SEEK button
or
to tune from
low to high or high to low frequencies and to
stop at the next broadcasting station.
SCAN tuning:
Push the SCAN tuning button to tune from low
to high frequencies and stops at each broad-
casting station for 5 seconds. Pushing the
button again during this 5 seconds period will
stop SCAN tuning and the radio will remain
tuned to that station.
If the SCAN tuning button is not pushed within 5
seconds, SCAN tuning moves to the next station.
to
Station memory operations:
Twelve stations can be set for the FM band (6
each for FM1 and FM2) and 6 stations can be
set for the AM band.
1. Choose the radio band AM, FM1 or FM2 using the radio band select button.
2. Tune to the desired station using the SEEK, SCAN or TUNE button.
3. Select the desired station and push and hold the desired station preset buttons 1 to
6 until a beep sound is heard. (The radio
mutes when the select button is pushed.)
4. The station indicator will then come on and the sound will resume. Memorizing is now
complete.
5. Other buttons can be set in the same manner.
If the battery cable is disconnected, or if the fuse
blows, the radio memory will be erased. In that
case, reset the desired stations.
Compact Disc (CD) player operationPlace the ignition switch in the ACC or ON
position, and insert the CD into the slot with the
label side facing up. The CD will be guided
automatically into the slot and start playing.
Heater, air conditioner, audio and phone systems
4-35
Page 186 of 345
Black plate (184,1)
Model "Z12-D" EDITED: 2010/ 9/ 27
SAA2782
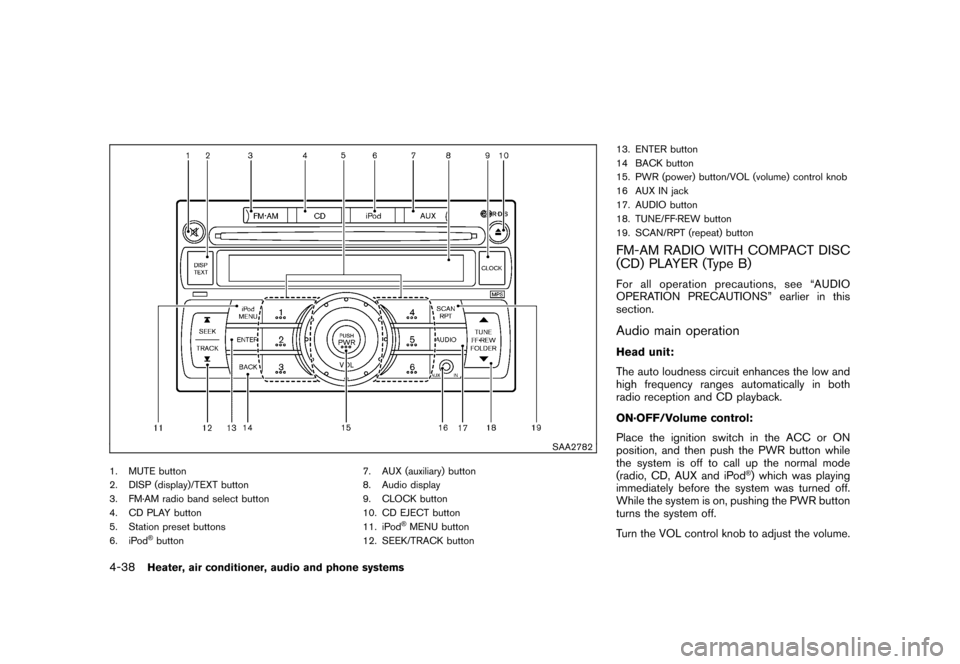
1. MUTE button
2. DISP (display)/TEXT button
3. FM·AM radio band select button
4. CD PLAY button
5. Station preset buttons
6. iPod
®button7. AUX (auxiliary) button
8. Audio display
9. CLOCK button
10. CD EJECT button
11. iPod
®MENU button
12. SEEK/TRACK button 13. ENTER button
14 BACK button
15. PWR (power) button/VOL (volume) control knob
16 AUX IN jack
17. AUDIO button
18. TUNE/FF·REW button
19. SCAN/RPT (repeat) button
FM-AM RADIO WITH COMPACT DISC
(CD) PLAYER (Type B)For all operation precautions, see “AUDIO
OPERATION PRECAUTIONS” earlier in this
section.Audio main operationHead unit:
The auto loudness circuit enhances the low and
high frequency ranges automatically in both
radio reception and CD playback.
ON·OFF/Volume control:
Place the ignition switch in the ACC or ON
position, and then push the PWR button while
the system is off to call up the normal mode
(radio, CD, AUX and iPod
®) which was playing
immediately before the system was turned off.
While the system is on, pushing the PWR button
turns the system off.
Turn the VOL control knob to adjust the volume.
4-38
Heater, air conditioner, audio and phone systems
Page 187 of 345
Black plate (185,1)
Model "Z12-D" EDITED: 2010/ 9/ 27
MUTE button:
Push the
button to mute the audio sound.
Push thebutton again to release the mute
setting.
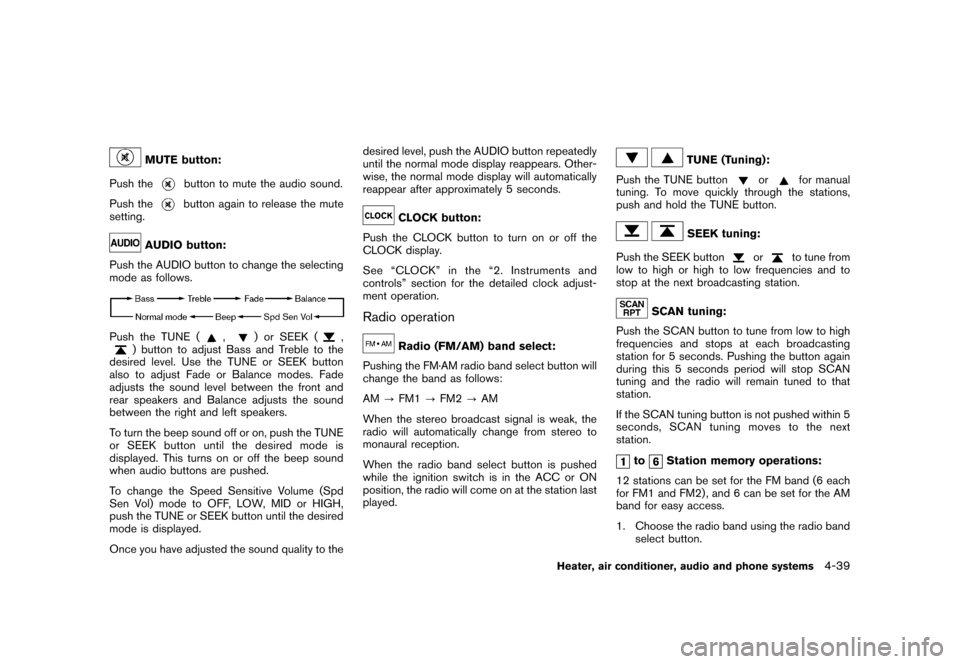
AUDIO button:
Push the AUDIO button to change the selecting
mode as follows.
Push the TUNE (
,
) or SEEK (
,
) button to adjust Bass and Treble to the
desired level. Use the TUNE or SEEK button
also to adjust Fade or Balance modes. Fade
adjusts the sound level between the front and
rear speakers and Balance adjusts the sound
between the right and left speakers.
To turn the beep sound off or on, push the TUNE
or SEEK button until the desired mode is
displayed. This turns on or off the beep sound
when audio buttons are pushed.
To change the Speed Sensitive Volume (Spd
Sen Vol) mode to OFF, LOW, MID or HIGH,
push the TUNE or SEEK button until the desired
mode is displayed.
Once you have adjusted the sound quality to the desired level, push the AUDIO button repeatedly
until the normal mode display reappears. Other-
wise, the normal mode display will automatically
reappear after approximately 5 seconds.
CLOCK button:
Push the CLOCK button to turn on or off the
CLOCK display.
See “CLOCK” in the “2. Instruments and
controls” section for the detailed clock adjust-
ment operation.
Radio operation
Radio (FM/AM) band select:
Pushing the FM·AM radio band select button will
change the band as follows:
AM ?FM1 ?FM2 ?AM
When the stereo broadcast signal is weak, the
radio will automatically change from stereo to
monaural reception.
When the radio band select button is pushed
while the ignition switch is in the ACC or ON
position, the radio will come on at the station last
played.
TUNE (Tuning):
Push the TUNE button
or
for manual
tuning. To move quickly through the stations,
push and hold the TUNE button.
SEEK tuning:
Push the SEEK button
or
to tune from
low to high or high to low frequencies and to
stop at the next broadcasting station.
SCAN tuning:
Push the SCAN button to tune from low to high
frequencies and stops at each broadcasting
station for 5 seconds. Pushing the button again
during this 5 seconds period will stop SCAN
tuning and the radio will remain tuned to that
station.
If the SCAN tuning button is not pushed within 5
seconds, SCAN tuning moves to the next
station.
to
Station memory operations:
12 stations can be set for the FM band (6 each
for FM1 and FM2) , and 6 can be set for the AM
band for easy access.
1. Choose the radio band using the radio band select button.
Heater, air conditioner, audio and phone systems
4-39
Page 202 of 345
Black plate (200,1)
Model "Z12-D" EDITED: 2010/ 9/ 27
SAA2102
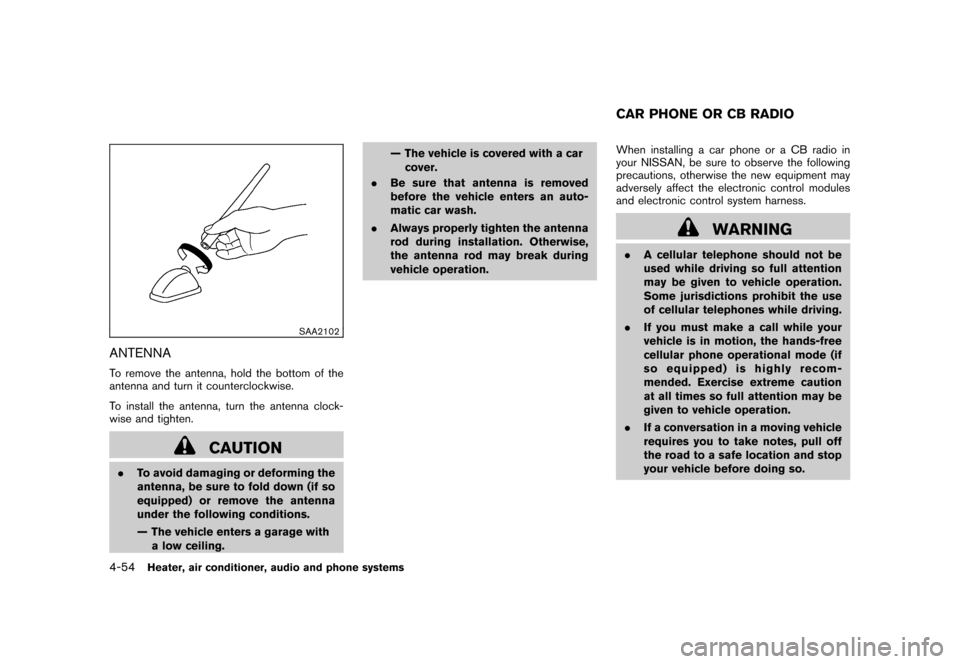
ANTENNATo remove the antenna, hold the bottom of the
antenna and turn it counterclockwise.
To install the antenna, turn the antenna clock-
wise and tighten.
CAUTION
.To avoid damaging or deforming the
antenna, be sure to fold down (if so
equipped) or remove the antenna
under the following conditions.
— The vehicle enters a garage with
a low ceiling. — The vehicle is covered with a car
cover.
. Be sure that antenna is removed
before the vehicle enters an auto-
matic car wash.
. Always properly tighten the antenna
rod during installation. Otherwise,
the antenna rod may break during
vehicle operation. When installing a car phone or a CB radio in
your NISSAN, be sure to observe the following
precautions, otherwise the new equipment may
adversely affect the electronic control modules
and electronic control system harness.
WARNING
.
A cellular telephone should not be
used while driving so full attention
may be given to vehicle operation.
Some jurisdictions prohibit the use
of cellular telephones while driving.
. If you must make a call while your
vehicle is in motion, the hands-free
cellular phone operational mode (if
so equipped) is highly recom-
mended. Exercise extreme caution
at all times so full attention may be
given to vehicle operation.
. If a conversation in a moving vehicle
requires you to take notes, pull off
the road to a safe location and stop
your vehicle before doing so.CAR PHONE OR CB RADIO
4-54
Heater, air conditioner, audio and phone systems
Page 252 of 345
Black plate (250,1)
Model "Z12-D" EDITED: 2010/ 9/ 27
SCE0810
Jacking tools
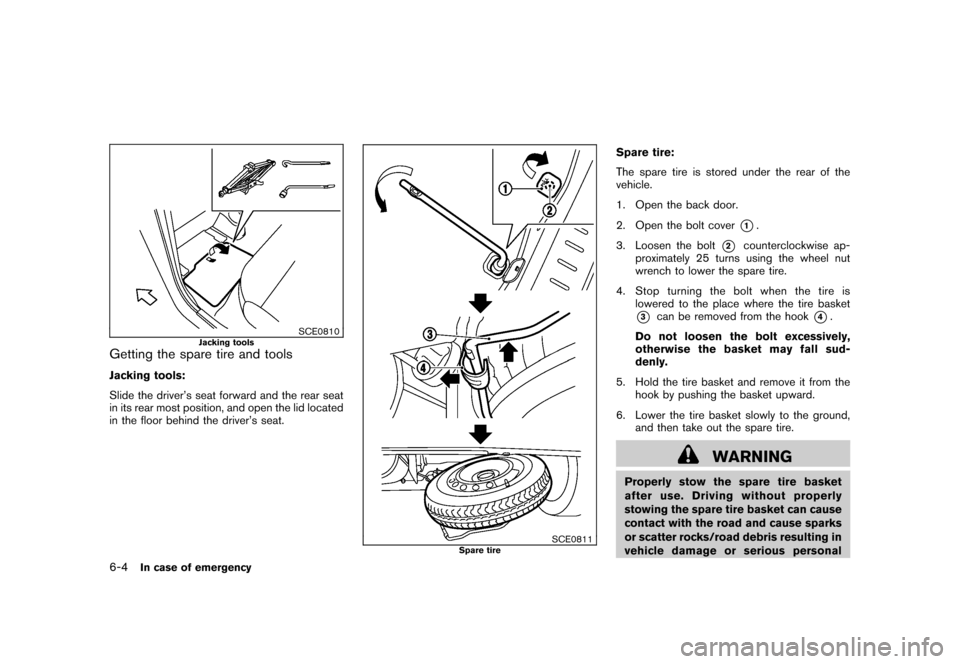
Getting the spare tire and toolsJacking tools:
Slide the driver’s seat forward and the rear seat
in its rear most position, and open the lid located
in the floor behind the driver’s seat.
SCE0811
Spare tire
Spare tire:
The spare tire is stored under the rear of the
vehicle.
1. Open the back door.
2. Open the bolt cover
*1.
3. Loosen the bolt
*2
counterclockwise ap-
proximately 25 turns using the wheel nut
wrench to lower the spare tire.
4. Stop turning the bolt when the tire is lowered to the place where the tire basket
*3
can be removed from the hook
*4.
Do not loosen the bolt excessively,
otherwise the basket may fall sud-
denly.
5. Hold the tire basket and remove it from the hook by pushing the basket upward.
6. Lower the tire basket slowly to the ground, and then take out the spare tire.
WARNING
Properly stow the spare tire basket
after use. Driving without properly
stowing the spare tire basket can cause
contact with the road and cause sparks
or scatter rocks/road debris resulting in
vehicle damage or serious personal
6-4
In case of emergency
Page 255 of 345
Black plate (253,1)
Model "Z12-D" EDITED: 2010/ 9/ 27
SCE0504
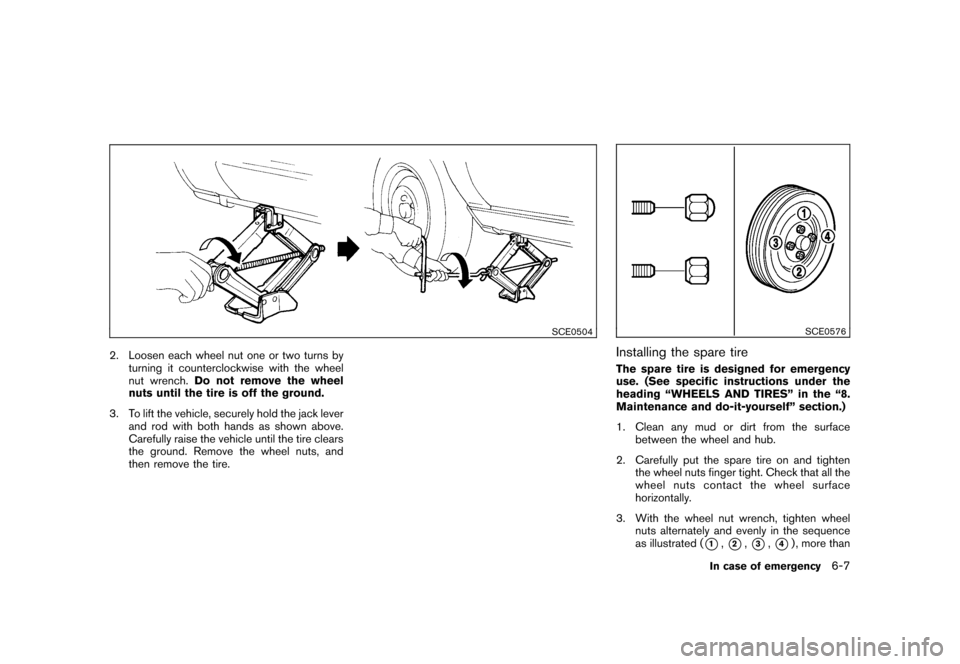
2. Loosen each wheel nut one or two turns byturning it counterclockwise with the wheel
nut wrench. Do not remove the wheel
nuts until the tire is off the ground.
3. To lift the vehicle, securely hold the jack lever and rod with both hands as shown above.
Carefully raise the vehicle until the tire clears
the ground. Remove the wheel nuts, and
then remove the tire.
SCE0576
Installing the spare tireThe spare tire is designed for emergency
use. (See specific instructions under the
heading “WHEELS AND TIRES” in the “8.
Maintenance and do-it-yourself” section.)
1. Clean any mud or dirt from the surfacebetween the wheel and hub.
2. Carefully put the spare tire on and tighten the wheel nuts finger tight. Check that all the
wheel nuts contact the wheel surface
horizontally.
3. With the wheel nut wrench, tighten wheel nuts alternately and evenly in the sequence
as illustrated (
*1,*2,*3,*4) , more than
In case of emergency
6-7