Page 61 of 489
1. Top tether strap
2. Anchor pointTop tether anchor point locations
Anchor points are located in the following loca-
tions:● 2nd row bench (if so equipped) on the floor
behind the outboard seating positions as
shown.
● 2nd row captain’s chairs (if so equipped) on
the floor behind the seats as shown.
● 3rd row bench seat on the floor of the cargo
area behind the center seat position as
shown.
REAR-FACING CHILD RESTRAINT
INSTALLATION USING LATCH
Refer to all Warnings and Cautions in the “Child
Safety” and “Child Restraint” sections before in-
stalling a child restraint.
Follow these steps to install a rear-facing child
restraint in the 2nd row seats using the LATCH
system:
1. Position the child restraint on the seat. Al- ways follow the child restraint manufactur-
er’s instructions.
Page 64 of 489

WARNING
●The three-point seat belt with Auto-
matic Locking Retractor (ALR) must be
used when installing a child restraint.
Failure to use the ALR mode will result
in the child restraint not being properly
secured. The restraint could tip over or
be loose and cause injury to a child in a
sudden stop or collision. Also, it can
change the operation of the front pas-
senger air bag. See “Front passenger
air bag and status light” later in this
section.
● When installing a child restraint system
in the rear center position, both the
center seat belt connector tongue and
buckle tongue must be secured. See
“Attaching the 3rd row center seat belt”
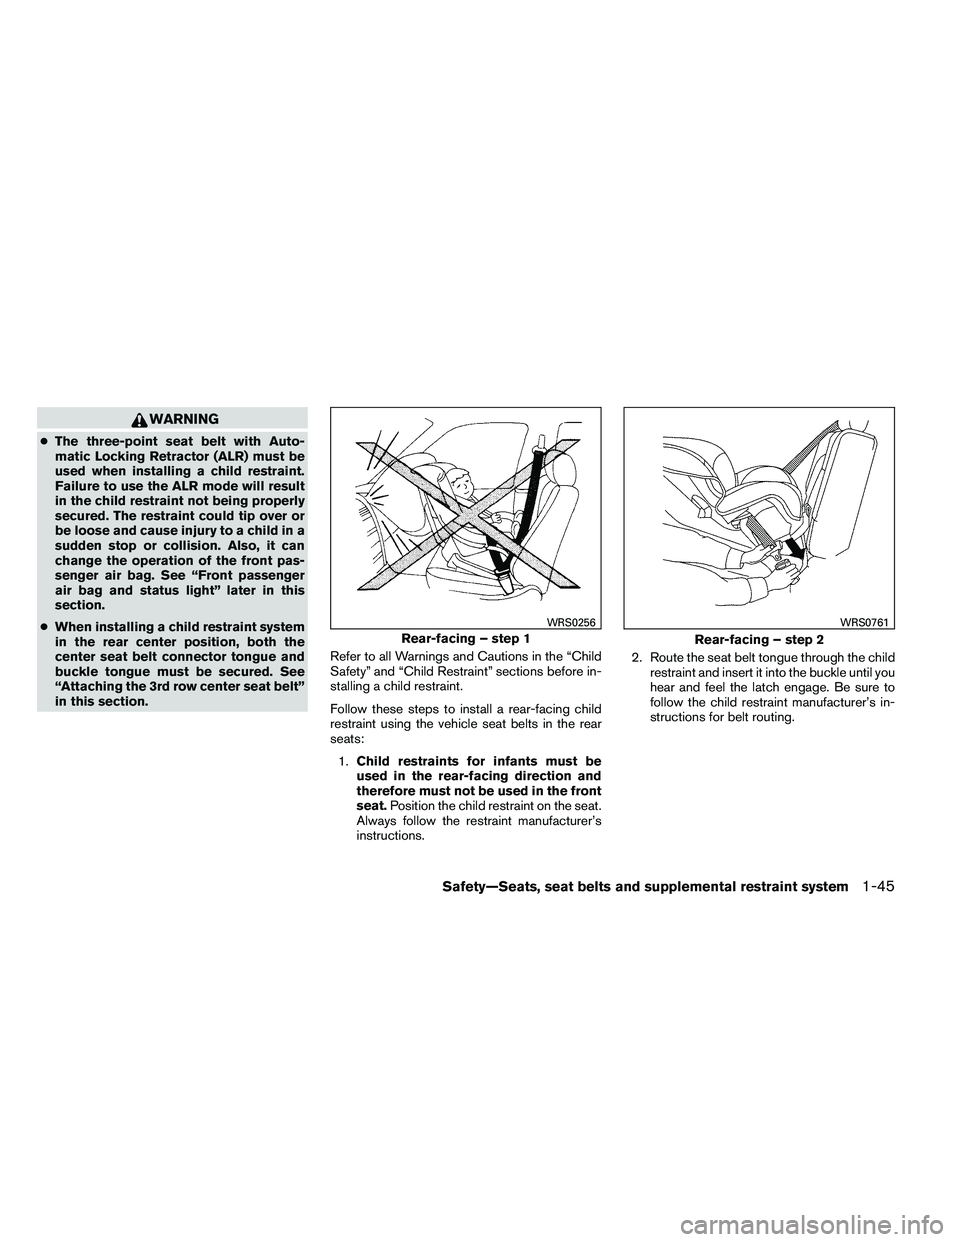
in this section. Refer to all Warnings and Cautions in the “Child
Safety” and “Child Restraint” sections before in-
stalling a child restraint.
Follow these steps to install a rear-facing child
restraint using the vehicle seat belts in the rear
seats:
1. Child restraints for infants must be
used in the rear-facing direction and
therefore must not be used in the front
seat. Position the child restraint on the seat.
Always follow the restraint manufacturer’s
instructions. 2. Route the seat belt tongue through the child
restraint and insert it into the buckle until you
hear and feel the latch engage. Be sure to
follow the child restraint manufacturer’s in-
structions for belt routing.
Page 66 of 489

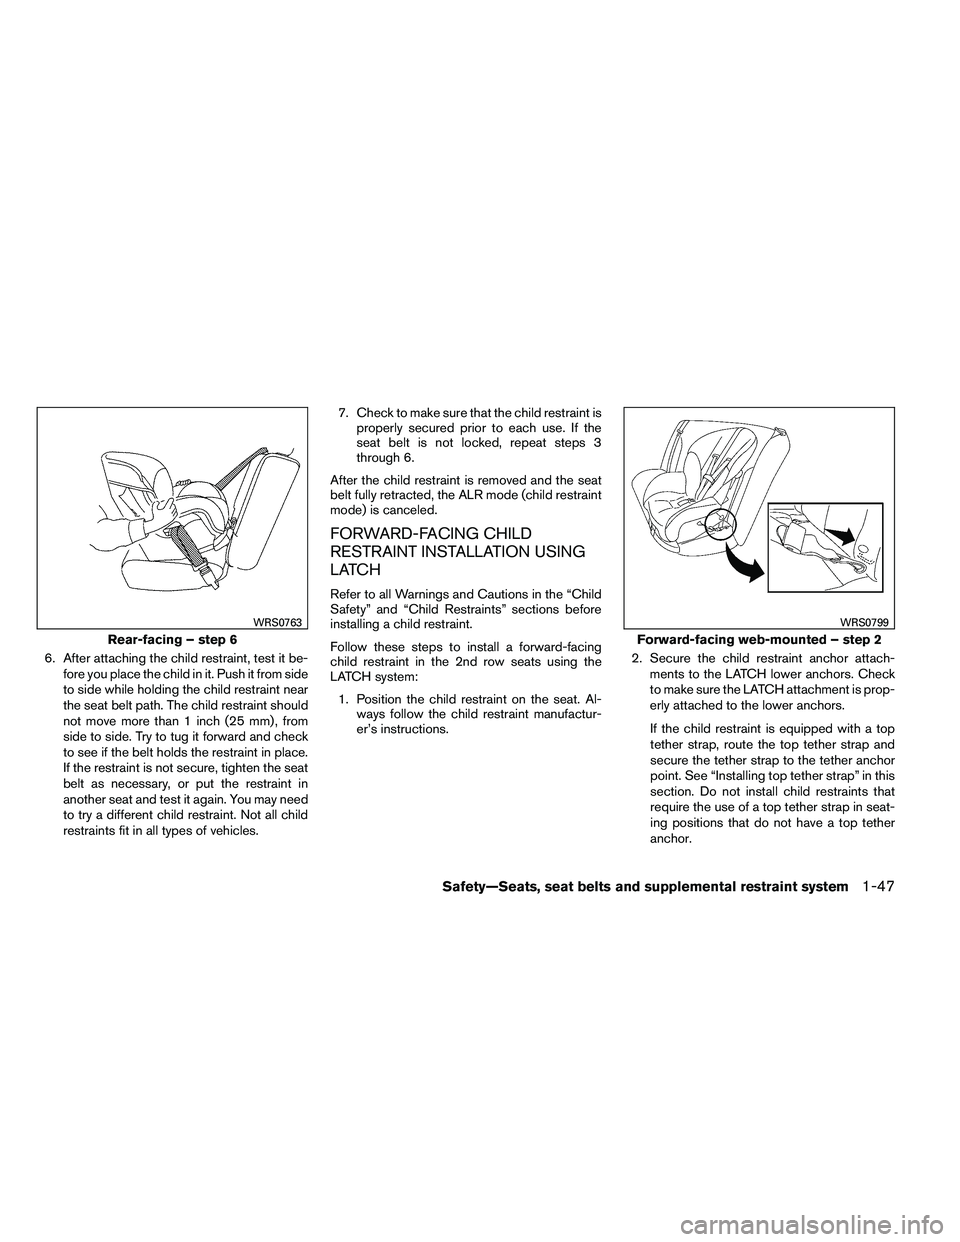
6. After attaching the child restraint, test it be-fore you place the child in it. Push it from side
to side while holding the child restraint near
the seat belt path. The child restraint should
not move more than 1 inch (25 mm) , from
side to side. Try to tug it forward and check
to see if the belt holds the restraint in place.
If the restraint is not secure, tighten the seat
belt as necessary, or put the restraint in
another seat and test it again. You may need
to try a different child restraint. Not all child
restraints fit in all types of vehicles. 7. Check to make sure that the child restraint is
properly secured prior to each use. If the
seat belt is not locked, repeat steps 3
through 6.
After the child restraint is removed and the seat
belt fully retracted, the ALR mode (child restraint
mode) is canceled.
FORWARD-FACING CHILD
RESTRAINT INSTALLATION USING
LATCH
Refer to all Warnings and Cautions in the “Child
Safety” and “Child Restraints” sections before
installing a child restraint.
Follow these steps to install a forward-facing
child restraint in the 2nd row seats using the
LATCH system: 1. Position the child restraint on the seat. Al- ways follow the child restraint manufactur-
er’s instructions. 2. Secure the child restraint anchor attach-
ments to the LATCH lower anchors. Check
to make sure the LATCH attachment is prop-
erly attached to the lower anchors.
If the child restraint is equipped with a top
tether strap, route the top tether strap and
secure the tether strap to the tether anchor
point. See “Installing top tether strap” in this
section. Do not install child restraints that
require the use of a top tether strap in seat-
ing positions that do not have a top tether
anchor.
Page 73 of 489
BOOSTER SEATS
Precautions on booster seats
Page 74 of 489

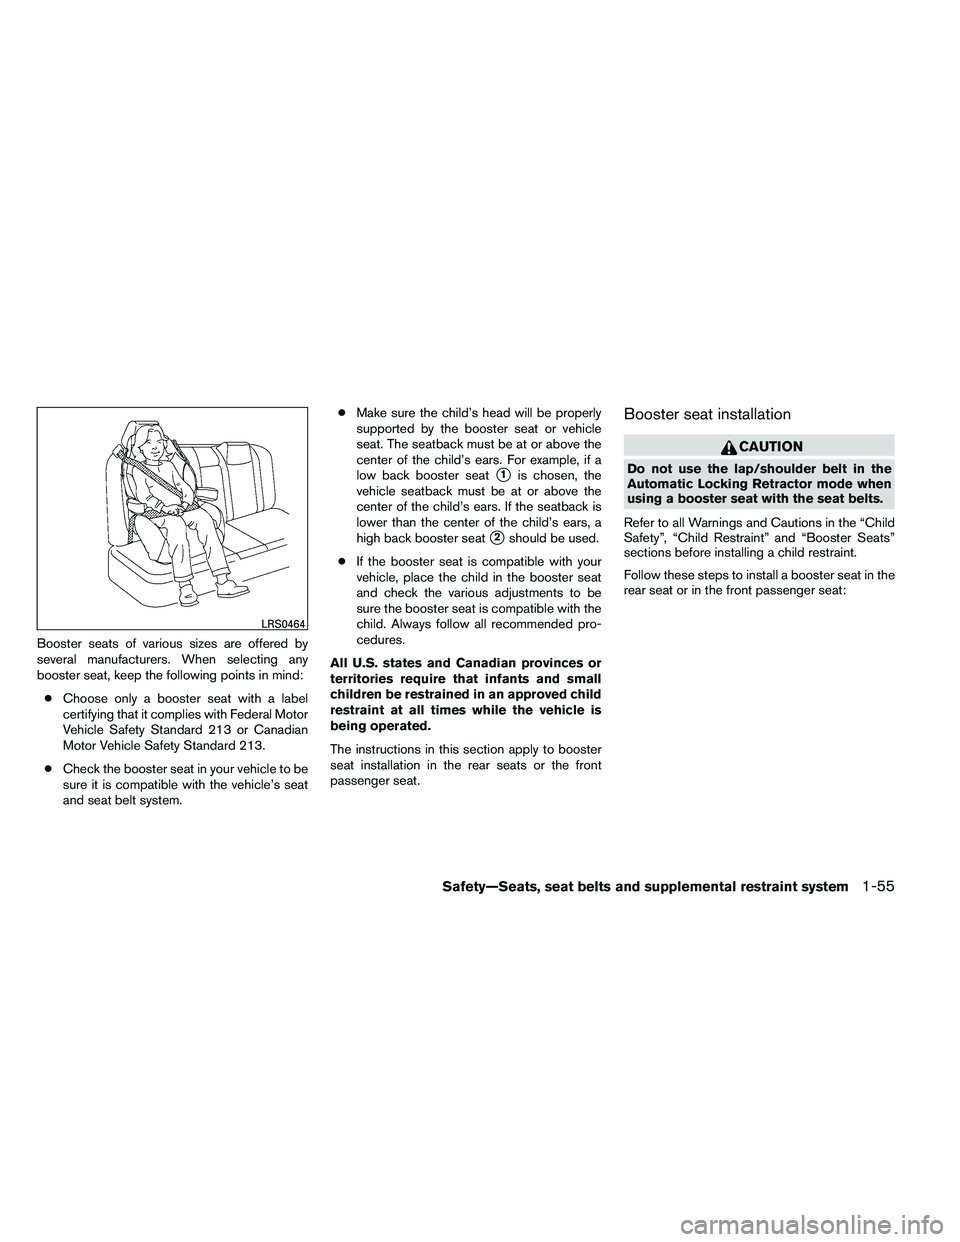
Booster seats of various sizes are offered by
several manufacturers. When selecting any
booster seat, keep the following points in mind:● Choose only a booster seat with a label
certifying that it complies with Federal Motor
Vehicle Safety Standard 213 or Canadian
Motor Vehicle Safety Standard 213.
● Check the booster seat in your vehicle to be
sure it is compatible with the vehicle’s seat
and seat belt system. ●
Make sure the child’s head will be properly
supported by the booster seat or vehicle
seat. The seatback must be at or above the
center of the child’s ears. For example, if a
low back booster seat
�1is chosen, the
vehicle seatback must be at or above the
center of the child’s ears. If the seatback is
lower than the center of the child’s ears, a
high back booster seat
�2should be used.
● If the booster seat is compatible with your
vehicle, place the child in the booster seat
and check the various adjustments to be
sure the booster seat is compatible with the
child. Always follow all recommended pro-
cedures.
All U.S. states and Canadian provinces or
territories require that infants and small
children be restrained in an approved child
restraint at all times while the vehicle is
being operated.
The instructions in this section apply to booster
seat installation in the rear seats or the front
passenger seat.
Booster seat installation
Page 81 of 489
WARNING
●The seat belts, the side air bags and
curtain and rollover air bags are most
effective when you are sitting well back
and upright in the seat. The side air bag
and curtain and rollover air bag inflate
with great force. Do not allow anyone to
place their hand, leg or face near the
side air bag on the side of the seatback
of the front seat or near the side roof
rails. Do not allow anyone sitting in the
front seats or rear outboard seats to
extend their hand out of the window or
lean against the door. Some examples
of dangerous riding positions are
shown in the previous illustrations.
Page 83 of 489
1. Roof-mounted curtain side-impactsupplemental air bag inflators
2. Roof-mounted curtain side-impact and
rollover supplemental air bags
3. Air bag Control Unit (ACU)
4. Supplemental front-impact air bag
modules
5. Crash zone sensor
6. Occupant classification system control
unit
7. Occupant classification sensor
(pressure sensor)
8. Seat belt buckle switches
9. Seat belt with pretensioner
10. Satellite sensors
11. Front seat-mounted side-impact
supplemental air bag modules
NISSAN Advanced Air Bag System
(front seats)
This vehicle is equipped with the NISSAN Ad-
vanced Air Bag System for the driver and front
passenger seats. This system is designed to
meet certification requirements under U.S. regu-
lations. It is also permitted in Canada. However,
all of the information, cautions and warn-
ings in this manual still apply and must be
followed.
Page 84 of 489

The driver supplemental front-impact air bag is
located in the center of the steering wheel. The
passenger supplemental front-impact air bag is
mounted in the dashboard above the glove box.
The front air bags are designed to inflate in higher
severity frontal collisions, although they may in-
flate if the forces in another type of collision are
similar to those of a higher severity frontal impact.
They may not inflate in certain frontal collisions.
Vehicle damage (or lack of it) is not always an
indication of proper front air bag system opera-
tion.
The NISSAN Advanced Air Bag System has dual
stage inflators. It also monitors information from
the crash zone sensor, the Air bag Control Unit
(ACU) , seat belt buckle sensors, occupant clas-
sification sensor (pressure sensor) and passen-
ger seat belt tension sensor. Inflator operation is
based on the severity of a collision and seat belt
usage for the driver. For the front passenger, it
additionally monitors the weight of an occupant
or object on the seat and seat belt tension. Based
on information from the sensors, only one front air
bag may inflate in a crash, depending on the
crash severity and whether the front occupants
are belted or unbelted. Additionally, the front
passenger air bag may be automatically turned
OFF under some conditions, depending on the
weight detected on the passenger seat and how
the seat belt is used. If the front passenger air bagis OFF, the passenger air bag status light will be
illuminated (if the seat is unoccupied, the light will
not be illuminated, but the air bag will be off) . See
“Front passenger air bag and status light” later in
this section for further details. One front air bag
inflating does not indicate improper performance
of the system.
If you have any questions about your air bag
system, please contact NISSAN or your NISSAN
dealer. If you are considering modification of your
vehicle due to a disability, you may also contact
NISSAN. Contact information is contained in the
front of this Owner’s Manual.
When a front air bag inflates, a fairly loud noise
may be heard, followed by the release of smoke.
This smoke is not harmful and does not indicate a
fire. Care should be taken to not inhale it, as it may
cause irritation and choking. Those with a history
of a breathing condition should get fresh air
promptly.
Front air bags, along with the use of seat belts,
help to cushion the impact force on the face and
chest of the front occupants. They can help save
lives and reduce serious injuries. However, an
inflating front air bag may cause facial abrasions
or other injuries. Front air bags do not provide
restraint to the lower body.
Even with NISSAN Advanced Air Bags, seat
belts should be correctly worn and the driver andpassenger seated upright as far as practical
away from the steering wheel or instrument
panel. The front air bags inflate quickly in order to
help protect the front occupants. Because of this,
the force of the front air bag inflating can increase
the risk of injury if the occupant is too close to, or
is against, the front air bag module during infla-
tion.
The front air bags deflate quickly after a collision.
The front air bags operate only when the
ignition switch is placed in the ON or
START position.
After placing the ignition switch in the ON
position, the supplemental air bag warning
light illuminates. The supplemental air bag
warning light will turn off after about 7
seconds if the system is operational.
Safety—Seats, seat belts and supplemental restraint system1-65