Page 321 of 446
WARNING
Apply the parking brake if the shift selec-
tor is in any position while the engine is
not running. Failure to do so could cause
the vehicle to move unexpectedly or roll
away and result in serious personal injury
or property damage.
P (Park):
Page 323 of 446

●In the manual shift mode, the transmis-
sion may shift up automatically to a
higher range than selected if the en-
gine speed is too high. When the ve-
hicle speed decreases, the transmis-
sion automatically shifts down and
shifts to 1st gear before the vehicle
comes to a stop.
● CVT operation is limited to automatic drive
mode when CVT fluid temperature is ex-
tremely low even if manual shift mode is
selected. This is not a malfunction. When
CVT fluid warms up, manual mode can be
selected.
● When the CVT fluid temperature is high, the
shift range may upshift in lower rpm than
usual. This is not a malfunction.
Shift lock release
If the battery charge is low or discharged, the
shift selector may not be moved from the P (Park)
position even with the brake pedal depressed
and the shift selector button pushed.
It will be necessary to jump start or have your
battery charged, see “Jump starting” in the “In
case of emergency” section. Contact your
NISSAN dealer or a professional towing service.
To move the shift selector, complete the following
procedure:
1. Push the ignition switch to the LOCK posi- tion. 2. Apply the parking brake.
3. Using a protective cloth on the tip ofa3mm
screwdriver, remove the shift lock release
cover.
● If available, a plastic trim tool can also be
used.
4. Insert the small screwdriver in the shift lock release slot and push down.
5. Move the shift selector to the N (Neutral) position while holding down the shift lock
release.
If the shift selector cannot be moved out of P
(Park) , have a NISSAN dealer check the trans-
mission as soon as possible.
Page 327 of 446
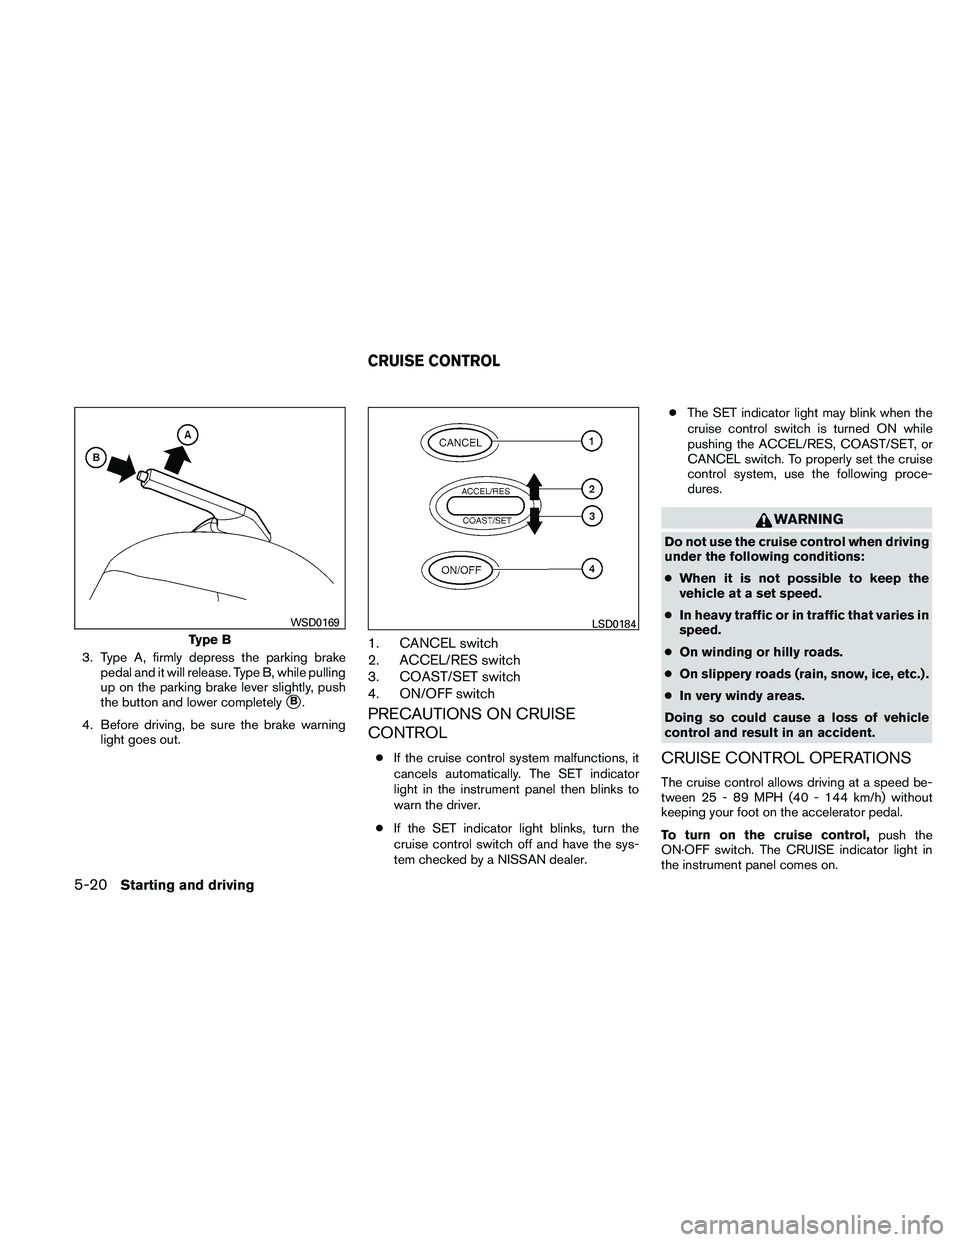
3. Type A, firmly depress the parking brakepedal and it will release. Type B, while pulling
up on the parking brake lever slightly, push
the button and lower completely
�B.
4. Before driving, be sure the brake warning light goes out.
1. CANCEL switch
2. ACCEL/RES switch
3. COAST/SET switch
4. ON/OFF switch
PRECAUTIONS ON CRUISE
CONTROL
●If the cruise control system malfunctions, it
cancels automatically. The SET indicator
light in the instrument panel then blinks to
warn the driver.
● If the SET indicator light blinks, turn the
cruise control switch off and have the sys-
tem checked by a NISSAN dealer. ●
The SET indicator light may blink when the
cruise control switch is turned ON while
pushing the ACCEL/RES, COAST/SET, or
CANCEL switch. To properly set the cruise
control system, use the following proce-
dures.
Page 328 of 446

To set cruising speed,accelerate the vehicle to
the desired speed, push the COAST/SET switch
and release it. The SET indicator light in the
instrument panel comes on. Take your foot off the
accelerator pedal. Your vehicle maintains the set
speed.
● To pass another vehicle, depress the ac-
celerator pedal. When you release the
pedal, the vehicle returns to the previously
set speed.
● The vehicle may not maintain the set speed
when going up or down steep hills. If this
happens, drive without the cruise control.
To cancel the preset speed, use one of the
following three methods.
● Push the CANCEL button; the SET indicator
light in the instrument panel goes out.
● Tap the brake pedal; the SET indicator light
goes out.
● Push the ON·OFF switch off. Both the
CRUISE indicator light and SET indicator
light in the instrument panel go out. The cruise control is automatically canceled and
the SET light in the instrument panel goes out if:
● you depress the brake or clutch pedal while
pushing the ACCEL/RES or SET/COAST
switch. The preset speed is deleted from
memory.
● the vehicle slows down more than 8 MPH
(13 km/h) below the set speed.
● you depress the clutch pedal (manual trans-
mission) , or move the shift selector to N
(Neutral) (CVT) .
To reset at a faster cruising speed, use one
of the following three methods.
● Depress the accelerator pedal. When the
vehicle attains the desired speed, push and
release the COAST/SET switch.
● Push and hold the ACCEL/RES switch.
When the vehicle attains the speed you de-
sire, release the switch.
● Push and release the ACCEL/RES switch.
Each time you do this, the set speed in-
creases by about 1 MPH (1.6 km/h) . To reset at a slower cruising speed,
use one
of the following three methods.
● Lightly tap the brake pedal. When the ve-
hicle attains the desired speed, push the
COAST/SET switch and release it.
● Push and hold the COAST/SET switch. Re-
lease the switch when the vehicle slows to
the desired speed.
● Push and release the COAST/SET switch.
Each time you do this, the set speed de-
creases by about 1 MPH (1.6 km/h) .
To resume the preset speed, push and re-
lease the ACCEL/RES switch. The vehicle re-
turns to the last set cruising speed when the
vehicle speed is over 25 MPH (40 km/h) .
Starting and driving5-21
Page 330 of 446

WARNING
●Do not stop or park the vehicle over
flammable materials such as dry grass,
waste paper or rags. They may ignite
and cause a fire.
●
Safe parking procedures require that
both the parking brake be set and the
transmission placed into P (Park) for CVT
models or in an appropriate gear for
manual transmission models. Failure to
do so could cause the vehicle to move
unexpectedly or roll away and result in an
accident. Make sure the shift selector
has been pushed as far forward as it can
go and cannot be moved without de-
pressing the foot brake pedal.
● Never leave the engine running while
the vehicle is unattended.
● Do not leave children unattended inside
the vehicle. They could unknowingly ac-
tivate switches or controls. Unattended
children could become involved in seri-
ous accidents.
1. Firmly apply the parking brake. 2.
Manual transmission models:
Place the shift selector in the R (Reverse)
position. When parking on an uphill grade,
place the shift selector in 1st gear.
Continuously Variable Transmission
(CVT) models:
Move the shift selector to the P (Park) position.
3. To help prevent the vehicle from rolling into traffic when parked on an incline, it is a good
practice to turn the wheels as illustrated.
● HEADED DOWNHILL WITH CURB:
�1
Turn the wheels into the curb and move the
vehicle forward until the curb side wheel
gently touches the curb.
● HEADED UPHILL WITH CURB:
�2
Turn the wheels away from the curb and
move the vehicle back until the curb side
wheel gently touches the curb.
● HEADED UPHILL OR DOWNHILL, NO
CURB:
�3
Turn the wheels toward the side of the road
so the vehicle will move away from the cen-
ter of the road if it moves.
4. Place the ignition switch in the LOCK posi- tion and remove the key.
Page 333 of 446
 . The speed varies according to road
conditions.
When the ABS senses that 1 or more wheels are
close to locking up, the actuator ra")
Normal operation
The ABS operates at speeds above3-6MPH(5
- 10 km/h) . The speed varies according to road
conditions.
When the ABS senses that 1 or more wheels are
close to locking up, the actuator rapidly applies
and releases hydraulic pressure. This action is
similar to pumping the brakes very quickly. You
may feel a pulsation in the brake pedal and hear a
noise from under the hood or feel a vibration from
the actuator when it is operating. This is normal
and indicates that the ABS is operating properly.
However, the pulsation may indicate that road
conditions are hazardous and extra care is re-
quired while driving.The Vehicle Dynamic Control (VDC) system uses
various sensors to monitor driver inputs and ve-
hicle motion. Under certain driving conditions,
the VDC System helps to perform the following
functions:
● Controls brake pressure to reduce wheel
slip on one slipping drive wheel so power is
transferred to a non slipping drive wheel on
the same axle.
● Controls brake pressure and engine output
to reduce drive wheel slip based on vehicle
speed (traction control function) .
● Controls brake pressure at individual wheels
and engine output to help the driver maintain
control of the vehicle in the following condi-
tions:
– understeer (vehicle tends to not follow the steered path despite increased steer-
ing input)
– oversteer (vehicle tends to spin due to certain road or driving conditions)
The VDC system can help the driver to maintain
control of the vehicle, but it cannot prevent loss of
vehicle control in all driving situations. When the VDC system operates, the
Page 336 of 446
●Whatever the condition, drive with cau-
tion. Accelerate and slow down with
care. If accelerating or downshifting too
fast, the drive wheels will lose even
more traction.
● Allow more stopping distance under
these conditions. Braking should be
started sooner than on dry pavement.
● Allow greater following distances on
slippery roads.
● Watch for slippery spots (glare ice) .
These may appear on an otherwise
clear road in shaded areas. If a patch of
ice is seen ahead, brake before reach-
ing it. Try not to brake while on the ice,
and avoid any sudden steering
maneuvers.
● Do not use the cruise control on slip-
pery roads.
● Snow can trap dangerous exhaust
gases under your vehicle. Keep snow
clear of the exhaust pipe and from
around your vehicle.ENGINE BLOCK HEATER (if so
equipped)
Page 340 of 446
●Replacing tires with those not originally
specified by NISSAN could affect the
proper operation of the TPMS.
● Do not inject any tire liquid or aerosol
tire sealant into the tires, as this may
cause a malfunction of the tire pressure
sensors.
CHANGING A FLAT TIRE
If you have a flat tire, follow the instructions be-
low:
Stopping the vehicle
1. Safely move the vehicle off the road and
away from traffic.
2. Turn on the hazard warning flashers.
3. Park on a level surface and apply the parking brake. Shift the manual transmission into R
(Reverse) , or the CVT into P (Park) .
4. Turn off the engine.
5. Raise the hood to warn other traffic and to signal professional road assistance person-
nel that you need assistance.
6. Have all passengers get out of the vehicle and stand in a safe place, away from traffic
and clear of the vehicle.