Page 390 of 446
Coupe
1. Mirror-mounted turn signal light(if so equipped)
2. Interior light
3. Map light
4. Headlamp assembly
5. Fog light (if so equipped)
6. Step light
7. High-mount stoplight
8. Trunk light
9. License plate light
10. Rear combination light
Page 391 of 446
Sedan
1. Rear map light
2. Front map light
3. Step light
4. Headlamp assembly
5. Fog light (if so equipped)
6. High-mount stoplight (if so equipped)
7. Trunk light
8. Spoiler mounted stoplight(if so equipped)
9. Rear combination light
10. License plate light
11. Mirror-mounted turn signal light
(if so equipped)
Page 392 of 446
Replacement procedures
All other lights are either type A, B, C or D. When
replacing a bulb, first remove the lens, light
and/or cover.
Page 394 of 446
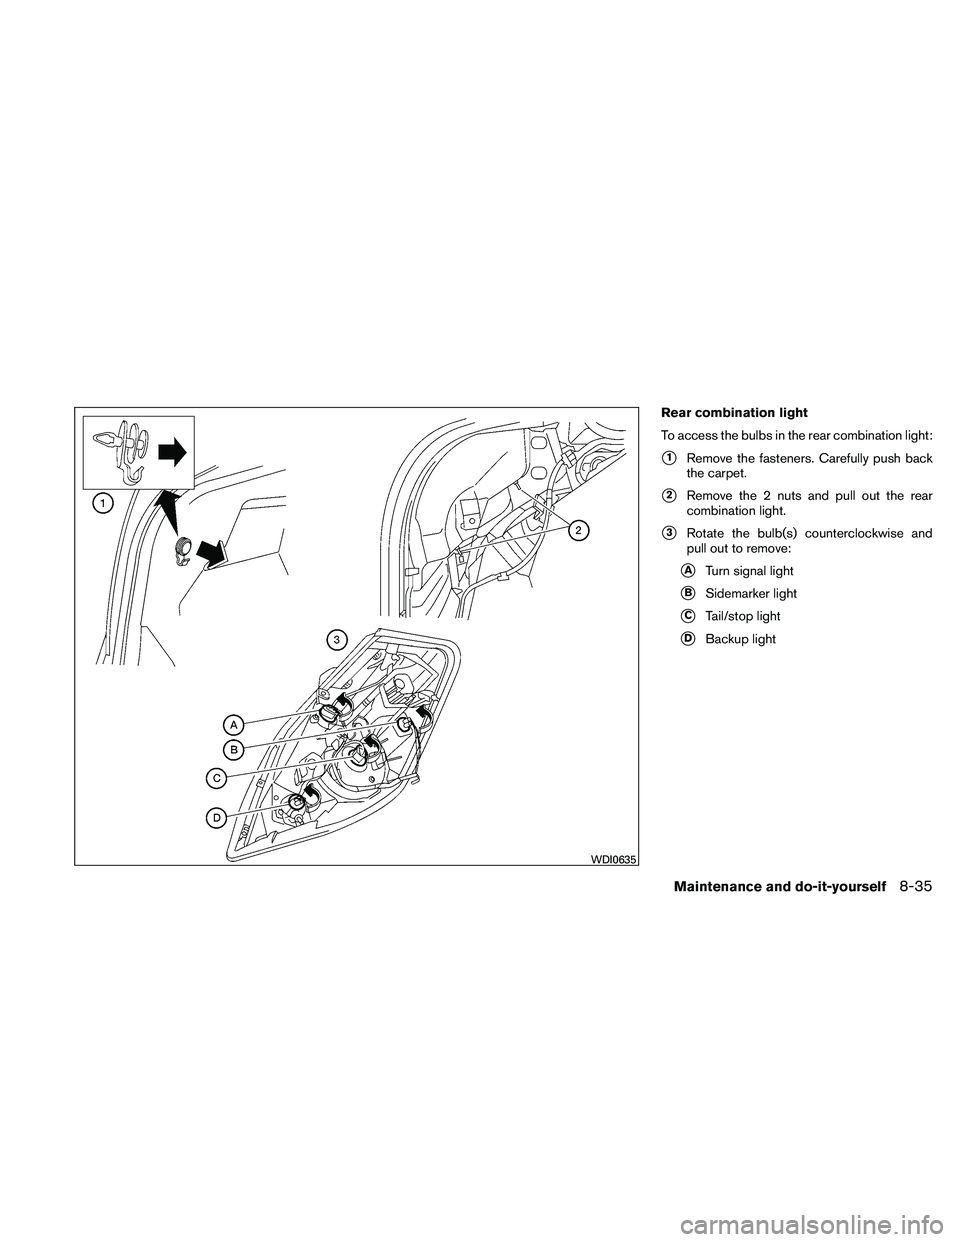
Rear combination light
To access the bulbs in the rear combination light:
�1Remove the fasteners. Carefully push back
the carpet.
�2Remove the 2 nuts and pull out the rear
combination light.
�3Rotate the bulb(s) counterclockwise and
pull out to remove:
�ATurn signal light
�BSidemarker light
�CTail/stop light
�DBackup light
Page 397 of 446

2. With the first pin in position�2, align the
second pin with its hinge slot
�1and push
down on the cover to completely engage it.
A snap sound will be heard. 3. Close the cover. If you have a flat tire, see “Flat tire” in the
“In case of emergency” section of this
manual.
TIRE PRESSURE
Tire Pressure Monitoring System
(TPMS)
This vehicle is equipped with the Tire
Pressure Monitoring System (TPMS) . It
monitors tire pressure of all tires except
the spare. When the low tire pressure
warning light is lit and the CHECK TIRE
PRESSURE warning appears in the ve-
hicle information display, one or more of
your tires is significantly under-inflated.
The TPMS will activate only when the
vehicle is driven at speeds above 16 MPH
(25 km/h) . Also, this system may not de-
tect a sudden drop in tire pressure (for
example a flat tire while driving) .
For more details, refer to “Low tire pres-
sure warning light” in the “Instruments and
controls” section, “Tire Pressure Monitor-
ing System (TPMS)” in the “Starting and
driving” section, and “Flat tire” in the “In
case of emergency” section.
Page 411 of 446
The following are approximate capacities. The actual refill capacities may be slightly different. When refilling, follow the procedure
described in the “Maintenance and do-it-yourself” section to determine the proper refill capacity.
Page 413 of 446
 . Do
not use E-85 in your vehicle. U.S. governmen")
E–85 fuel
E-85 fuel is a mixture of approximately 85% fuel
ethanol and 15% unleaded gasoline. E-85 can
only be used in a Flexible Fuel Vehicle (FFV) . Do
not use E-85 in your vehicle. U.S. government
regulations require fuel ethanol dispensing
pumps to be identified by a small, square, orange
and black label with the common abbreviation or
the appropriate percentage for that region.
Aftermarket fuel additives
NISSAN does not recommend the use of any
aftermarket fuel additives (for example, fuel injec-
tor cleaner, octane booster, intake valve deposit
removers, etc.) which are sold commercially.
Many of these additives intended for gum, varnish
or deposit removal may contain active solvents or
similar ingredients that can be harmful to the fuel
system and engine.
Octane rating tips
Using unleaded gasoline with an octane
rating lower than recommended can cause
persistent, heavy “spark knock.” (“Spark
knock” is a metallic rapping noise.) If se-
vere, this can lead to engine damage. If you
detect a persistent heavy spark knock even
when using gasoline of the stated octane
rating, or if you hear steady spark knock
while holding a steady speed on levelroads, have a NISSAN dealer correct the
condition. Failure to correct the condition
is misuse of the vehicle, for which NISSAN
is not responsible.
Incorrect ignition timing may result in spark
knock, after-run and/or overheating, which may
cause excessive fuel consumption or engine
damage. If any of the above symptoms are en-
countered, have your vehicle checked at a
NISSAN dealer.
However, now and then you may notice
light spark knock for a short time while
accelerating or driving up hills. This is not a
cause for concern, because you get the
greatest fuel benefit when there is light
spark knock for a short time under heavy
engine load.
Page 421 of 446
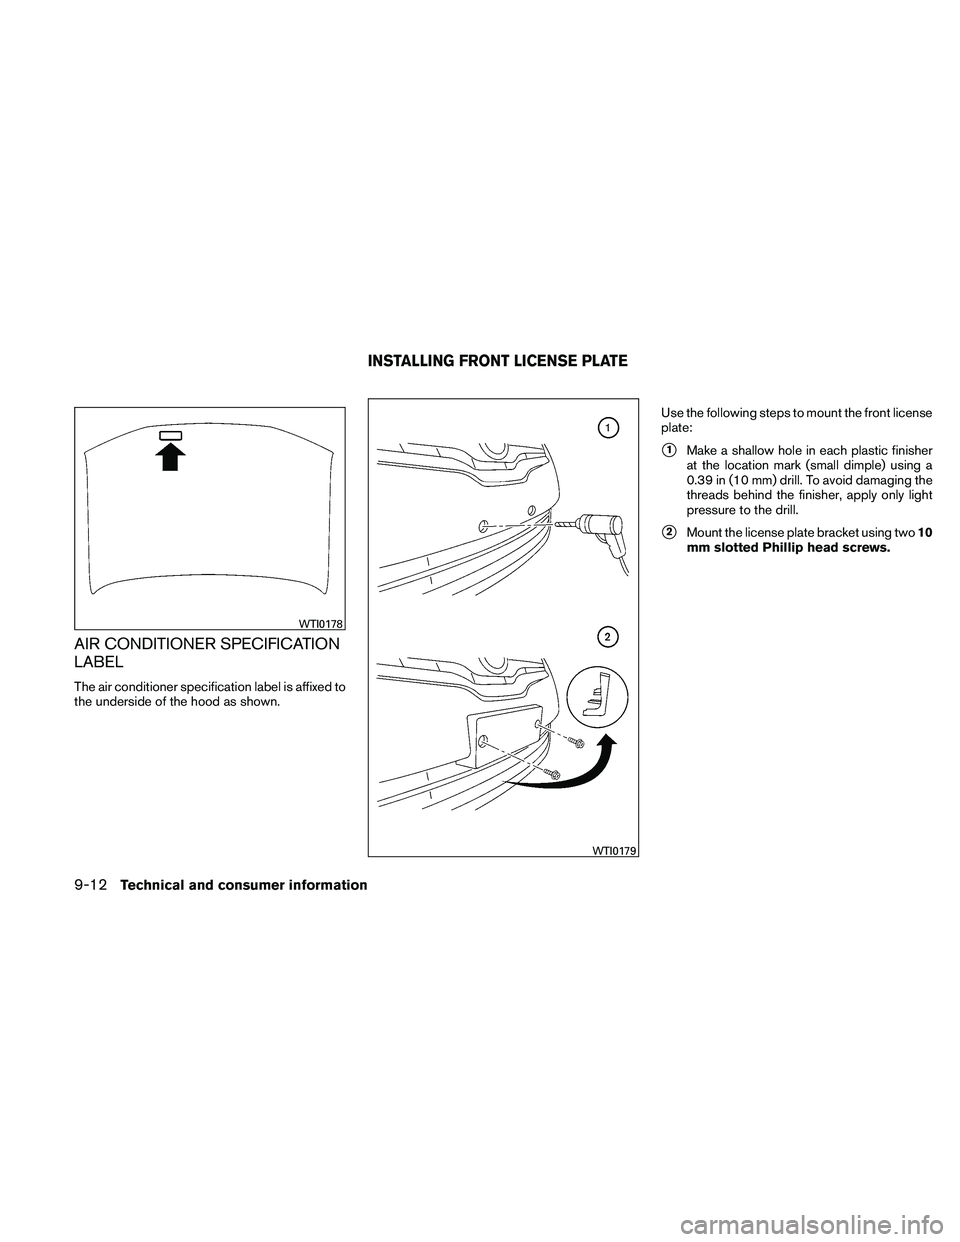
AIR CONDITIONER SPECIFICATION
LABEL
The air conditioner specification label is affixed to
the underside of the hood as shown.Use the following steps to mount the front license
plate:
�1Make a shallow hole in each plastic finisher
at the location mark (small dimple) using a
0.39 in (10 mm) drill. To avoid damaging the
threads behind the finisher, apply only light
pressure to the drill.
�2Mount the license plate bracket using two 10
mm slotted Phillip head screws.

2. Interior light
3. Map light
4. Headlamp assembly
5. Fog light (if so equipped)
6. Step light
7. High-mount stoplight
8. Trunk light
9. Lice")

6. High-mount stoplight (if so equipped)
7. Trunk light
8. Spoiler mounted stoplight(if so e")