Page 232 of 422

Playing recorded songs
Select the Music Box audio system by using one
of the following methods:● Press the SOURCE select switch on the
steering wheel.
For information, see “Steering wheel switch
for audio control” in this section.
● Press the DISC·AUX button repeatedly until
the center display changes to the Music Box
mode. ●
Give voice commands.
For information, see “NISSAN Voice Recog-
nition system” in this section.
Stopping playback:
The system stops playing when: ● Another mode (radio, CD, USB, Bluetooth�
Audio or AUX) is selected.
● The audio system is turned off.
● The ignition switch is placed in the OFF
position.
Seeking button:
Press the
side of the seeking button while
a track is playing to return to the beginning of the
current track. Press the
side of the seeking
button while a track is playing to skip to the
beginning of the next track.
If you press and hold the
side of the seek-
ing button or the
side of the seeking button
for more than approximately 1.5 seconds; the
track will play while rewinding or fast forwarding.
When the
side of the seeking button or
the
side of the seeking button is released,
the track will return to the normal playing speed. TUNE/FOLDER knob:
The TUNE/FOLDER knob skips from album to
album unless it is playing “All Songs” from the
Music Library menu. When playing “All Songs”,
the TUNE/FOLDER knob changes the track in-
stead of the album. The upper right corner of the
screen indicates if the TUNE/FOLDER knob is
changing by track or album.
LHA1283
Monitor, climate, audio, phone and voice recognition systems4-71
Page 238 of 422
BLUETOOTH�STREAMING AUDIO
(if so equipped)
If you have a compatible Bluetooth� audio device
that is capable of playing audio files, the device
can be connected to the vehicle’s audio system
so that the audio files on the device play through
the vehicle’s speakers.
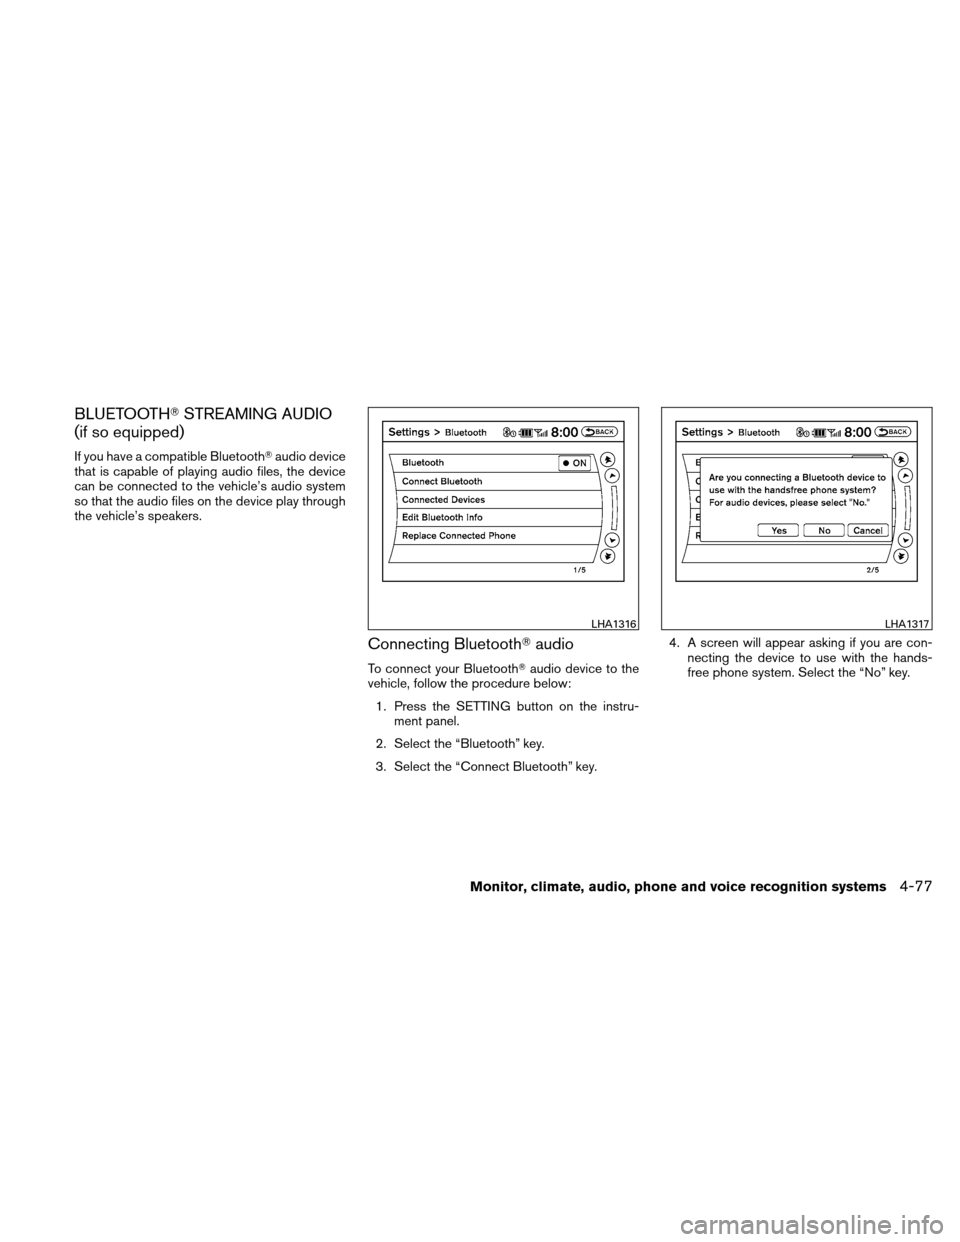
Connecting Bluetooth� audio
To connect your Bluetooth� audio device to the
vehicle, follow the procedure below:
1. Press the SETTING button on the instru- ment panel.
2. Select the “Bluetooth” key.
3. Select the “Connect Bluetooth” key. 4. A screen will appear asking if you are con-
necting the device to use with the hands-
free phone system. Select the “No” key.
LHA1316LHA1317
Monitor, climate, audio, phone and voice recognition systems4-77
Page 239 of 422
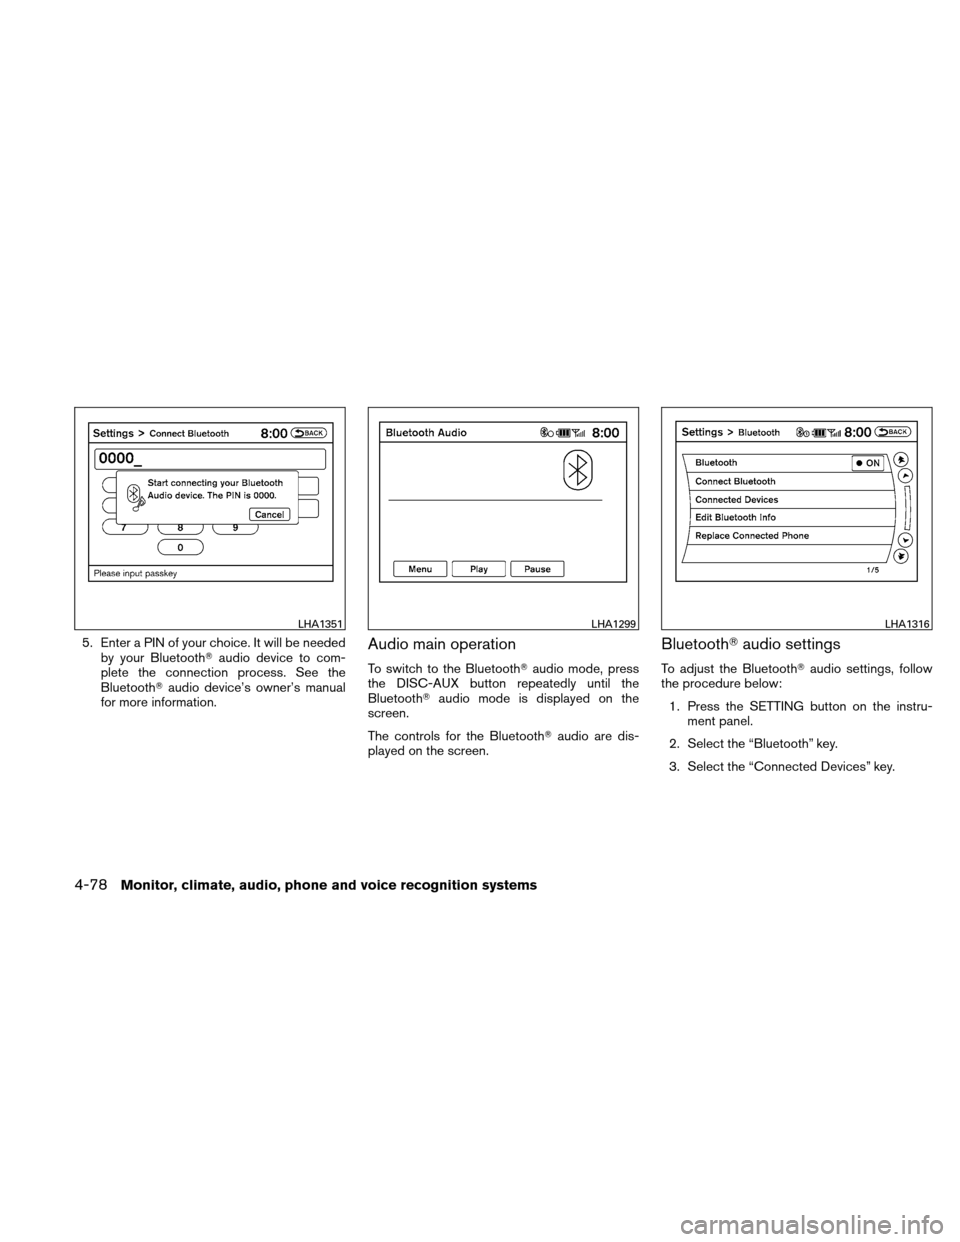
5. Enter a PIN of your choice. It will be neededby your Bluetooth� audio device to com-
plete the connection process. See the
Bluetooth� audio device’s owner’s manual
for more information.Audio main operation
To switch to the Bluetooth� audio mode, press
the DISC-AUX button repeatedly until the
Bluetooth� audio mode is displayed on the
screen.
The controls for the Bluetooth� audio are dis-
played on the screen.
Bluetooth� audio settings
To adjust the Bluetooth� audio settings, follow
the procedure below:
1. Press the SETTING button on the instru- ment panel.
2. Select the “Bluetooth” key.
3. Select the “Connected Devices” key.
LHA1351LHA1299LHA1316
4-78Monitor, climate, audio, phone and voice recognition systems
Page 240 of 422
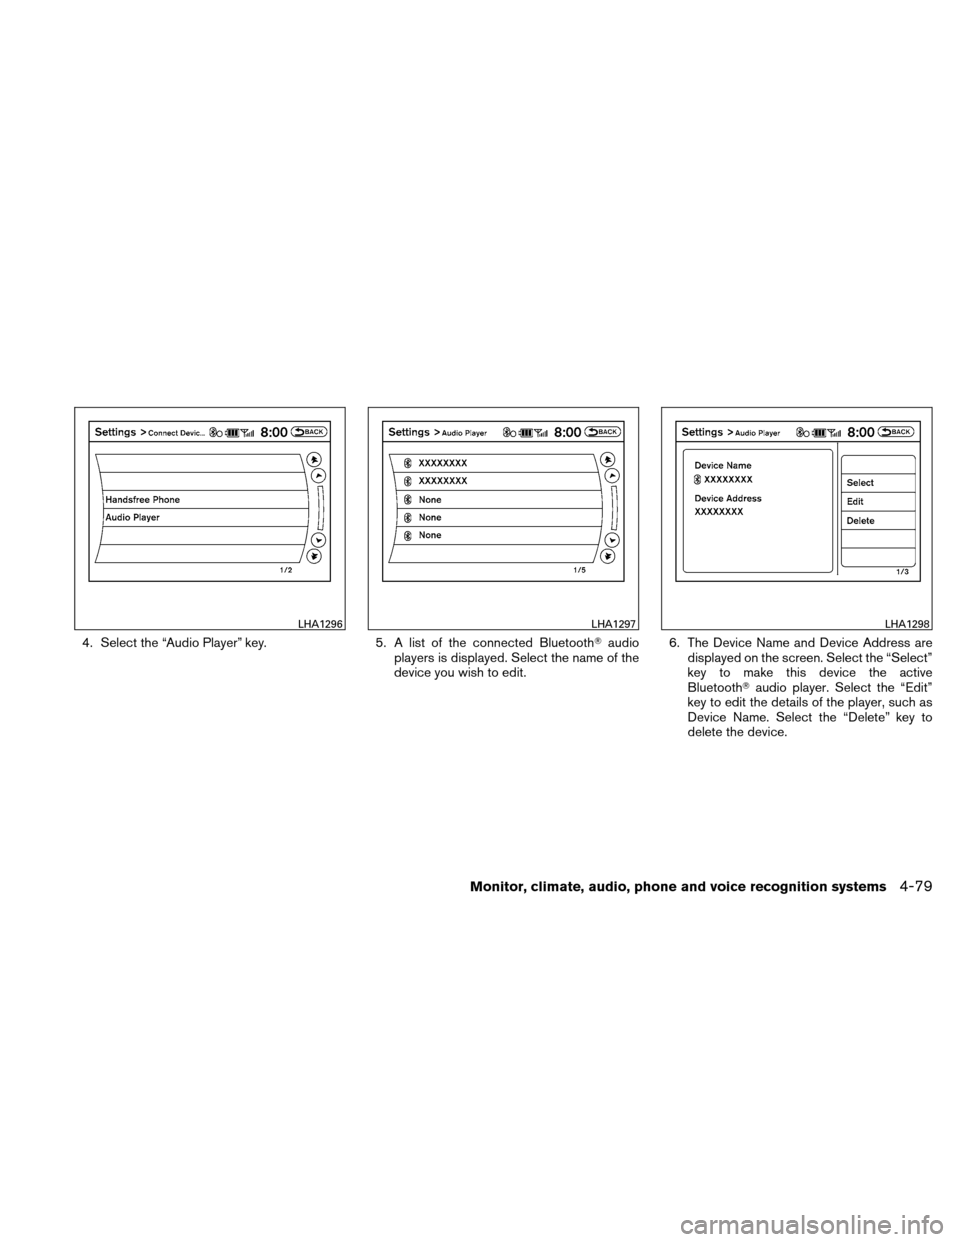
4. Select the “Audio Player” key.5. A list of the connected Bluetooth�audio
players is displayed. Select the name of the
device you wish to edit. 6. The Device Name and Device Address are
displayed on the screen. Select the “Select”
key to make this device the active
Bluetooth� audio player. Select the “Edit”
key to edit the details of the player, such as
Device Name. Select the “Delete” key to
delete the device.
LHA1296LHA1297LHA1298
Monitor, climate, audio, phone and voice recognition systems4-79
Page 243 of 422
 →CD/DVD*→
Music Box** →USB/iPod�* →Bluetooth� Au-
dio* →AUX* →AM.
* These modes are only available whe")
Type C Switch:
AM→FM1 →FM2 →XM1 →XM2 →XM3
(satellite radio, if so equipped) →CD/DVD*→
Music Box** →USB/iPod�* →Bluetooth� Au-
dio* →AUX* →AM.
* These modes are only available when compat-
ible media storage is inserted into the device.
** This mode is only available when music has
been downloaded into the Music Box system.
Volume control switch
Push the volume control switch to increase or
decrease the volume.
Tuning (Type A and Type B switches only)
Memory change (radio):
While in one of the preset radio station banks,
push the tuning switch
orfor less
than 1.5 seconds to change to the next preset
station in memory.
Seek tuning (radio):
Push the tuning switch
orfor more
than 1.5 seconds to seek the next or previous
radio station. Next/Previous track (CD):
Push the tuning switch
orfor less
than 1.5 seconds to return to the beginning of the
present track or skip to the next track. Push
several times to skip back or skip through tracks.
Menu control
switch/ENTER button
(Type C switch only)
While the display is showing a map or audio
screen, tilt the Menu Control switch upward or
downward to select a station, track, CD or folder.
For most audio sources, tilting the switch
up/down for more than 1.5 seconds provides a
different function than a tilting up/down for less
than 1.5 seconds.
AM and FM:
● Tilt up/down for less than 1.5 seconds to
increase or decrease the preset station.
● Tilt up/down for more than 1.5 seconds to
seek up or down to the next station.
● Press the ENTER button to show the list of
preset stations. XM (if so equipped):
● Tilt up/down for less than 1.5 seconds to
increase or decrease the preset station.
● Tilt up/down for more than 1.5 seconds to
go to the next or previous category.
● Press the ENTER button to show the XM
Menu.
iPod�: ● Tilt up/down for less than 1.5 seconds to
increase or decrease the track number.
● Press the ENTER button to show the iPod
Menu.
CD: ● Tilt up/down for less than 1.5 seconds to
increase or decrease the track number.
● Tilt up/down for more than 1.5 seconds to
increase or decrease the folder number (if
playing compressed audio files) .
● Press the ENTER button to show the CD
Menu.
4-82Monitor, climate, audio, phone and voice recognition systems
Page 244 of 422

DVD:● Tilt up/down for less than 1.5 seconds to
increase or decrease the track number.
● Tilt up/down for more than 1.5 seconds to
increase or decrease the title number.
● Press the ENTER button to select an item
from the DVD display.
● When the transparent operation menu ap-
pears, the switch will control the menu.
USB: ● Tilt up/down for less than 1.5 seconds to
increase or decrease the track number.
● Tilt up/down for more than 1.5 seconds to
increase or decrease the folder number.
● Press the ENTER button to show the USB
Menu.
Music Box: ● Tilt up/down for less than 1.5 seconds to
increase or decrease the track number.
● Tilt up/down for more than 1.5 seconds to
increase or decrease the album (folder)
number (if playing compressed audio files) .
● Press the ENTER button to show the Music
Box Menu. Bluetooth�
Audio:
● Tilt up/down for less than 1.5 seconds to
increase or decrease the track number.
AUX: ● Press the ENTER button to show the AUX
Menu.
ANTENNA
The antenna cannot be shortened, but can be
removed. When you need to remove the antenna,
turn the antenna rod counterclockwise
�B.
To install the antenna rod, turn the antenna rod
clockwise
�Aand hand tighten.
CAUTION
Always properly tighten the antenna rod
during installation or the antenna rod may
break during vehicle operation.
WHA0790
Monitor, climate, audio, phone and voice recognition systems4-83
Page 246 of 422

WARNING
●Use a phone after stopping your vehicle
in a safe location. If you have to use a
phone while driving, exercise extreme
caution at all times so full attention may
be given to vehicle operation.
● If you are unable to devote full attention
to vehicle operation while talking on
the phone, pull off the road to a safe
location and stop your vehicle.
CAUTION
To avoid discharging the 12-volt battery,
use a phone when the Hybrid System is in
the READY mode.
Your NISSAN is equipped with the Bluetooth�
Hands-Free Phone System. If you have an ap-
proved Bluetooth�enabled cellular phone, you
can set up the wireless connection between your
cellular phone and the in-vehicle phone module.
With Bluetooth� wireless technology, you can make or receive a hands-free telephone call with
your cellular phone in the vehicle.
Once your cellular phone is connected to the
in-vehicle phone module, no other phone con-
necting procedure is required. Your phone is
automatically connected with the in-vehicle
WHA1042
BLUETOOTH�
HANDS-FREE PHONE
SYSTEM WITHOUT NAVIGATION
SYSTEM (if so equipped)
Monitor, climate, audio, phone and voice recognition systems4-85
Page 247 of 422

phone module when the ignition switch is pushed
to the ON position with the previously connected
cellular phone turned on and carried in the ve-
hicle.
You can connect up to 5 different Bluetooth�
cellular phones to the in-vehicle phone module.
However, you can talk on only one cellular phone
at a time.
Before using the Bluetooth� Hands-Free Phone
System, refer to the following notes.
● Set up the wireless connection between a
cellular phone and the in-vehicle phone
module before using the hands-free phone
system.
● Some Bluetooth� enabled cellular phones
may not be recognized by the in-vehicle
phone module. Please visit
www.nissanusa.com/bluetooth for a recom-
mended phone list and connecting instruc-
tions.
● You will not be able to use a hands-free
phone under the following conditions:
– Your vehicle is outside of the cellular ser- vice area. – Your vehicle is in an area where it is
difficult to receive cellular signal; such as
in a tunnel, in an underground parking
garage, near a tall building or in a moun-
tainous area.
– Your cellular phone is locked to prevent it from being dialed.
● When the radio wave condition is not ideal
or ambient sound is too loud, it may be
difficult to hear the other person’s voice dur-
ing a call.
● Do not place the cellular phone in an area
surrounded by metal or far away from the
in-vehicle phone module to prevent tone
quality degradation and wireless connection
disruption.
● While a cellular phone is connected through
the Bluetooth� wireless connection, the bat-
tery power of the cellular phone may dis-
charge quicker than usual. The Bluetooth�
Hands-Free Phone System cannot charge
cellular phones.
● If the hands-free phone system seems to be
malfunctioning, see “Troubleshooting guide”
later in this section. You can also visit
www.nissanusa.com/bluetooth for trouble-
shooting help. ●
Some cellular phones or other devices may
cause interference or a buzzing noise to
come from the audio system speakers. Stor-
ing the device in a different location may
reduce or eliminate the noise.
● Refer to the cellular phone Owner’s Manual
regarding the telephone charges, cellular
phone antenna and body, etc.
REGULATORY INFORMATION
FCC Regulatory information
– CAUTION: To maintain compliance with FCC’s RF exposure guidelines, use only the
supplied antenna. Unauthorized antenna,
modification, or attachments could damage
the transmitter and may violate FCC regula-
tions.
– Operation is subject to the following two con- ditions:
1. This device may not cause interference and
2. this device must accept any interference, including interference that may cause unde-
sired operation of the device.
4-86Monitor, climate, audio, phone and voice recognition systems