2011 NISSAN 370Z ROADSTER clock
[x] Cancel search: clockPage 180 of 419
Black plate (176,1)
Model "Z34-D" EDITED: 2010/ 7/ 27
Heating (A/C OFF):
The air conditioner does not activate. When you
need to heat only, use this mode.
1. Turn the “
” fan speed control dial and
air flow control dial to the “AUTO” position.
(The air conditioner will turn on.)
2. Push the “A/C” button to turn off the air conditioner. (The “A/C” button indicator light
will turn off.)
3. Turn the temperature control dial to set the desired temperature.
.The temperature of the passenger com-
partment will be maintained automati-
cally. Air flow distribution and fan speed
are also controlled automatically.
. Do not set the temperature lower than
the outside air temperature. Otherwise
the system may not work properly.
. Not recommended if windows fog up.
Dehumidified defrosting or defogging:
1. Turn the “” fan speed control dial to the
desired position.
2. Turn the air flow control dial to the “
”
position.
3. Turn the temperature control dial to set the desired temperature. .
To quickly remove ice from the outside
of the windows, turn the “
” fan
speed control dial to the maximum
position.
. As soon as possible after the windshield
is clean, turn the air flow control dial to
the “AUTO” position to return to the auto
mode.
. When the air flow control dial is turned
to the “
”or“
” position, the air
conditioner will automatically be turned
on at outside temperatures above 23 8F
( � 58C) to defog the windshield, and the
air recirculation mode will automatically
be turned off.
Outside air is drawn into the passenger
compartment to improve the defogging
performance.
Manual operationFan speed control:
Turn the “
” fan speed control dial clockwise
(+) or counterclockwise ( �) to manually control
the fan speed.
Turn the dial to the “AUTO” position to return to
automatic control of the fan speed. Air recirculation:
Push the “
” intake air control button to
recirculate interior air inside the vehicle. The
indicator light on the “
” side will come on.
The air recirculation mode cannot be activated
when the air conditioner is in the front defrosting
mode “
”.
Outside air circulation:
Push the “
” intake air control button to
draw outside air into the passenger compart-
ment. The indicator light on the “
” side will
come on.
Automatic intake air control:
In the AUTO mode, the intake air will be
controlled automatically. To manually control
the intake air, push the “” intake air
control button. To return to the automatic control
mode, push the “
” intake air control
button for approximately 2 seconds. The indi-
cator lights (both air recirculation and outside air
circulation sides) will flash twice, and then the
intake air will be controlled automatically.
4-26
Center display, heater, air conditioner, audio, phone and voice recognition systems
Page 197 of 419
Black plate (193,1)
Model "Z34-D" EDITED: 2010/ 7/ 27
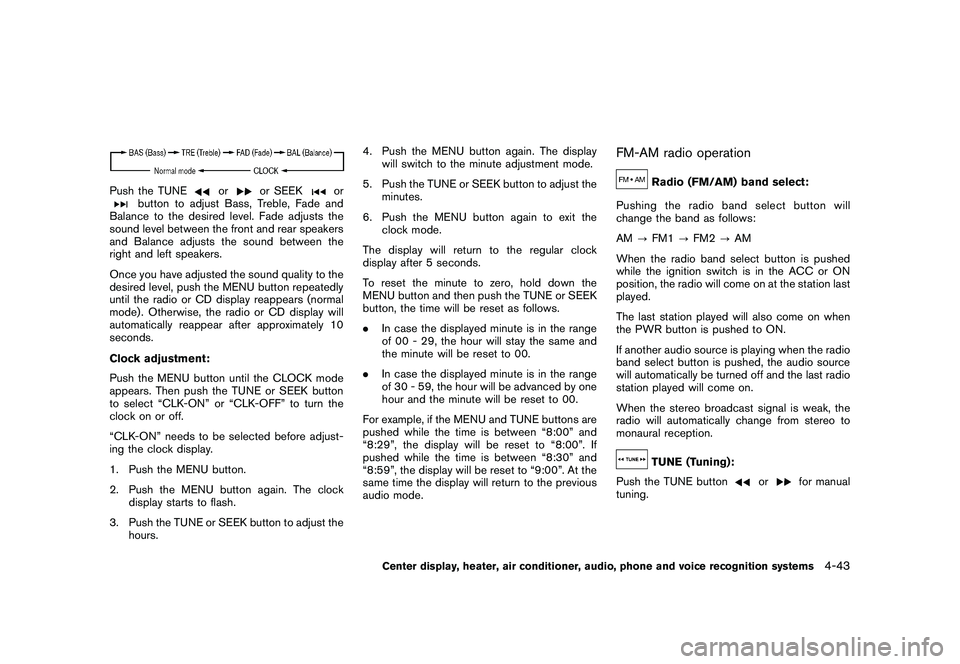
Push the TUNE
or
or SEEK
or
button to adjust Bass, Treble, Fade and
Balance to the desired level. Fade adjusts the
sound level between the front and rear speakers
and Balance adjusts the sound between the
right and left speakers.
Once you have adjusted the sound quality to the
desired level, push the MENU button repeatedly
until the radio or CD display reappears (normal
mode) . Otherwise, the radio or CD display will
automatically reappear after approximately 10
seconds.
Clock adjustment:
Push the MENU button until the CLOCK mode
appears. Then push the TUNE or SEEK button
to select “CLK-ON” or “CLK-OFF” to turn the
clock on or off.
“CLK-ON” needs to be selected before adjust-
ing the clock display.
1. Push the MENU button.
2. Push the MENU button again. The clock
display starts to flash.
3. Push the TUNE or SEEK button to adjust the hours. 4. Push the MENU button again. The display
will switch to the minute adjustment mode.
5. Push the TUNE or SEEK button to adjust the minutes.
6. Push the MENU button again to exit the clock mode.
The display will return to the regular clock
display after 5 seconds.
To reset the minute to zero, hold down the
MENU button and then push the TUNE or SEEK
button, the time will be reset as follows.
. In case the displayed minute is in the range
of 00 - 29, the hour will stay the same and
the minute will be reset to 00.
. In case the displayed minute is in the range
of 30 - 59, the hour will be advanced by one
hour and the minute will be reset to 00.
For example, if the MENU and TUNE buttons are
pushed while the time is between “8:00” and
“8:29”, the display will be reset to “8:00”. If
pushed while the time is between “8:30” and
“8:59”, the display will be reset to “9:00”. At the
same time the display will return to the previous
audio mode.
FM-AM radio operation
Radio (FM/AM) band select:
Pushing the radio band select button will
change the band as follows:
AM ?FM1 ?FM2 ?AM
When the radio band select button is pushed
while the ignition switch is in the ACC or ON
position, the radio will come on at the station last
played.
The last station played will also come on when
the PWR button is pushed to ON.
If another audio source is playing when the radio
band select button is pushed, the audio source
will automatically be turned off and the last radio
station played will come on.
When the stereo broadcast signal is weak, the
radio will automatically change from stereo to
monaural reception.TUNE (Tuning):
Push the TUNE button
or
for manual
tuning.
Center display, heater, air conditioner, audio, phone and voice recognition systems
4-43
Page 233 of 419
Black plate (229,1)
Model "Z34-D" EDITED: 2010/ 7/ 27
.Models with navigation system
AM ?FM ?SAT ?CD/DVD ?Music
Box
®? USB/iPod
®?Bluetooth
®Audio ?
AUX
. Models without navigation system
AM ?FM ?CD ?AUX ?SAT*
*: if so equipped
ANTENNA
Window antenna (for Coupe models)The antenna pattern is printed inside the rear
window.
CAUTION
. Do not place metalized film near the
rear window glass or attach any
metal parts to it. This may cause
poor reception or noise.
. When cleaning the inside of the rear
window, be careful not to scratch or
damage the rear window antenna.
Lightly wipe along the antenna with
a dampened soft cloth.
SAA2374
Trunk mounted antenna (for Roadster
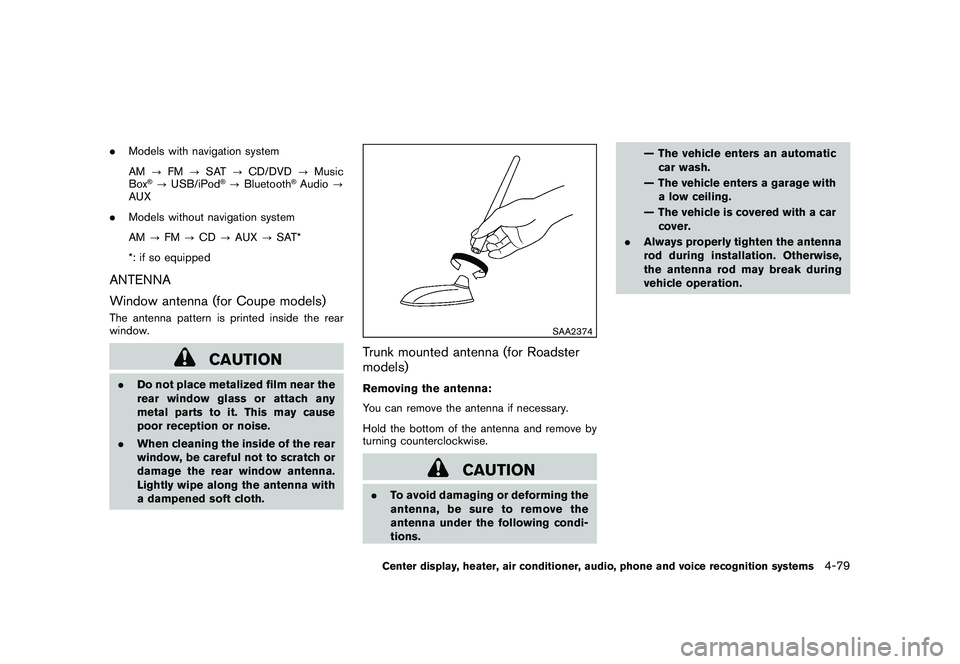
models)Removing the antenna:
You can remove the antenna if necessary.
Hold the bottom of the antenna and remove by
turning counterclockwise.
CAUTION
.To avoid damaging or deforming the
antenna,besuretoremovethe
antenna under the following condi-
tions. — The vehicle enters an automatic
car wash.
— The vehicle enters a garage with a low ceiling.
— The vehicle is covered with a car cover.
. Always properly tighten the antenna
rod during installation. Otherwise,
the antenna rod may break during
vehicle operation.Center display, heater, air conditioner, audio, phone and voice recognition systems
4-79
Page 318 of 419
Black plate (316,1)
Model "Z34-D" EDITED: 2010/ 7/ 27
SCE0844
Without subwoofer
SCE0807
With subwoofer
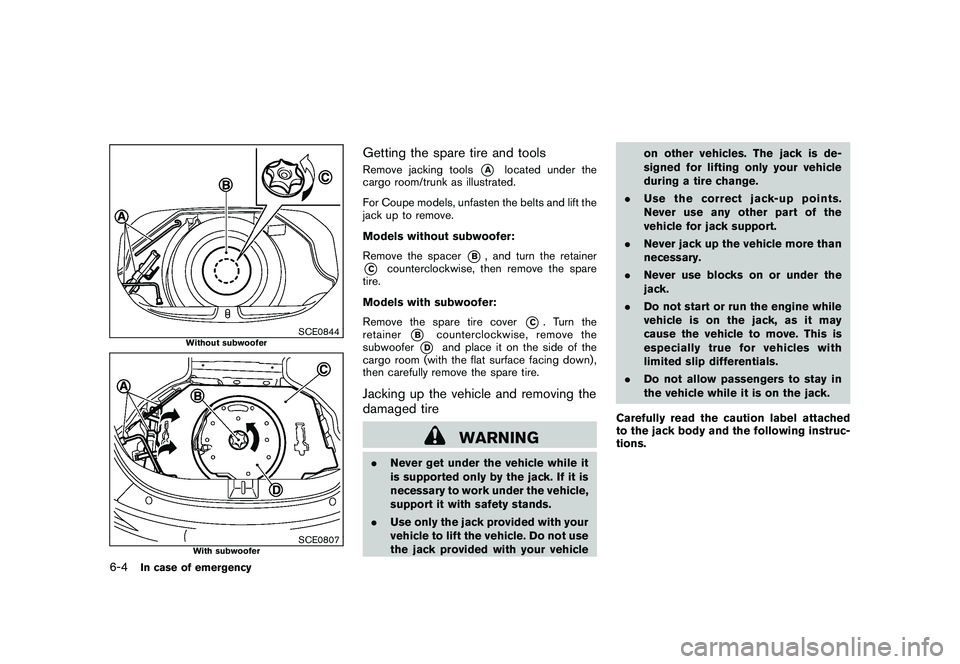
Getting the spare tire and toolsRemove jacking tools
*A
located under the
cargo room/trunk as illustrated.
For Coupe models, unfasten the belts and lift the
jack up to remove.
Models without subwoofer:
Remove the spacer
*B, and turn the retainer
*C
counterclockwise, then remove the spare
tire.
Models with subwoofer:
Remove the spare tire cover
*C. Turn the
retainer
*B
counterclockwise, remove the
subwoofer
*D
and place it on the side of the
cargo room (with the flat surface facing down) ,
then carefully remove the spare tire.
Jacking up the vehicle and removing the
damaged tire
WARNING
. Never get under the vehicle while it
is supported only by the jack. If it is
necessary to work under the vehicle,
support it with safety stands.
. Use only the jack provided with your
vehicle to lift the vehicle. Do not use
the jack provided with your vehicle on other vehicles. The jack is de-
signed for lifting only your vehicle
during a tire change.
. Use the correct jack-up points.
Never use any other part of the
vehicle for jack support.
. Never jack up the vehicle more than
necessary.
. Never use blocks on or under the
jack.
. Do not start or run the engine while
vehicle is on the jack, as it may
cause the vehicle to move. This is
especially true for vehicles with
limited slip differentials.
. Do not allow passengers to stay in
the vehicle while it is on the jack.
Carefully read the caution label attached
to the jack body and the following instruc-
tions.
6-4
In case of emergency
Page 319 of 419
Black plate (317,1)
Model "Z34-D" EDITED: 2010/ 7/ 27
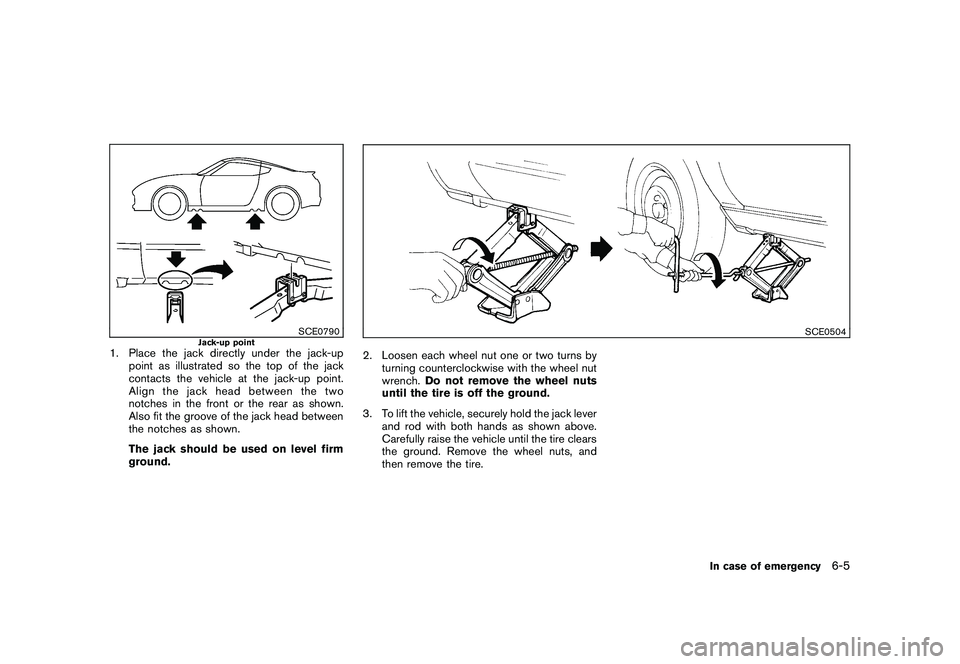
SCE0790
Jack-up point
1. Place the jack directly under the jack-uppoint as illustrated so the top of the jack
contacts the vehicle at the jack-up point.
Align the jack head between the two
notches in the front or the rear as shown.
Also fit the groove of the jack head between
the notches as shown.
The jack should be used on level firm
ground.
SCE0504
2. Loosen each wheel nut one or two turns byturning counterclockwise with the wheel nut
wrench. Do not remove the wheel nuts
until the tire is off the ground.
3. To lift the vehicle, securely hold the jack lever and rod with both hands as shown above.
Carefully raise the vehicle until the tire clears
the ground. Remove the wheel nuts, and
then remove the tire.
In case of emergency
6-5
Page 324 of 419
Black plate (322,1)
Model "Z34-D" EDITED: 2010/ 7/ 27
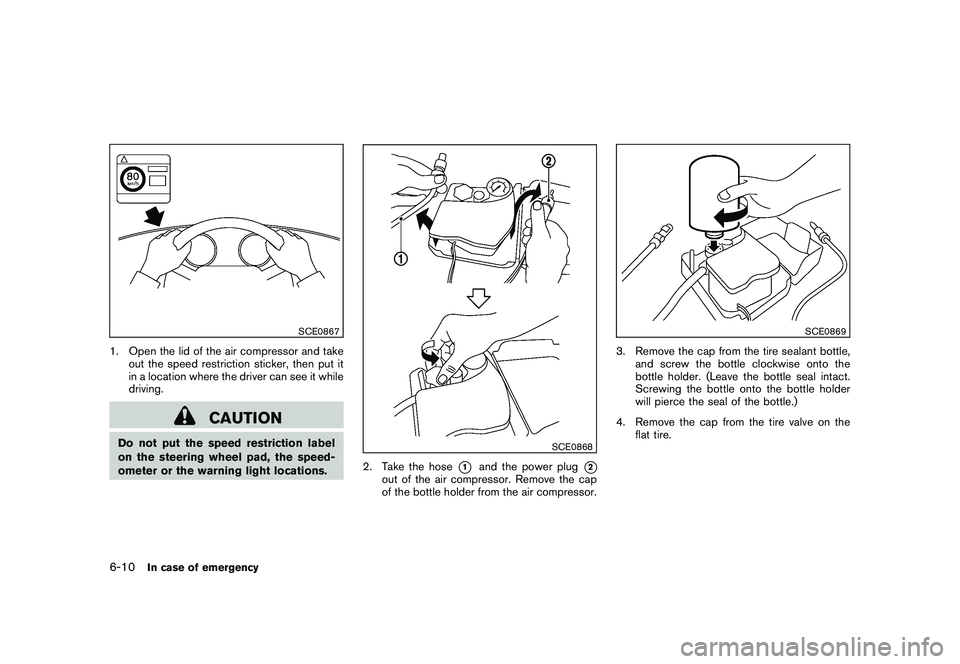
SCE0867
1. Open the lid of the air compressor and takeout the speed restriction sticker, then put it
in a location where the driver can see it while
driving.
CAUTION
Do not put the speed restriction label
on the steering wheel pad, the speed-
ometer or the warning light locations.
SCE0868
2. Take the hose
*1
and the power plug
*2
out of the air compressor. Remove the cap
of the bottle holder from the air compressor.
SCE0869
3. Remove the cap from the tire sealant bottle,and screw the bottle clockwise onto the
bottle holder. (Leave the bottle seal intact.
Screwing the bottle onto the bottle holder
will pierce the seal of the bottle.)
4. Remove the cap from the tire valve on the flat tire.
6-10
In case of emergency
Page 355 of 419
Black plate (355,1)
Model "Z34-D" EDITED: 2010/ 7/ 27
(Perform steps 4 to 7 only when the engine
oil filter change is needed.)
4. Loosen the oil filter
*2
with an oil filter
wrench. Remove the oil filter by turning it by
hand.
5. Wipe the engine oil filter mounting surface with a clean rag.
CAUTION
Be sure to remove any old rubber
gasket remaining on the mounting sur-
face of the engine. Failure to do so
could lead to engine damage.
6. Coat the gasket on the new filter with clean engine oil.
7. Screw in the oil filter clockwise until a slight resistance is felt, then tighten additionally
more than 2/3 turn.
Oil filter tightening torque:11 to 15 ft-lb
(14.7 to 20.5 N·m)
8. Clean and re-install the drain plug with a new washer. Securely tighten the drain plug
with a wrench.
Drain plug tightening torque:22 to 29 ft-lb
(29 to 39 N·m) Do not use excessive force.
9. Refill engine with recommended oil through the oil filler opening, and install the oil filler
cap securely.
See “CAPACITIES AND RECOMMENDED
FUEL/LUBRICANTS” in the “9. Technical
and consumer information” section for drain
and refill capacity. The drain and refill
capacity depends on the oil temperature
and drain time. Use these specifications for
reference only. Always use the dipstick to
determine the proper amount of oil in the
engine.
10. Start the engine and check for leakage around the drain plug and the oil filter.
Correct as required.
11. Turn the engine off and wait more than 15 minutes. Check the oil level with the dipstick.
Add engine oil if necessary.
After the operation1. Install the engine undercover into position as
the following steps.
a. Pull the center of the small plastic clipout.
b. Hold the engine undercover into posi- tion. c. Insert the clip through the undercover
into the hole in the frame, then push the
center of the clip in to lock the clip in
place.
d. Install the bolts that hold the undercover in place. Be careful not to strip the bolts
or over-tighten them.
2. Lower the vehicle carefully to the ground.
3. Dispose of waste oil and filter properly.
WARNING
. Prolonged and repeated contact
with used engine oil may cause skin
cancer.
. Try to avoid direct skin contact with
used oil. If skin contact is made,
wash thoroughly with soap or hand
cleaner as soon as possible.
. Keep used engine oil out of reach of
children.
Maintenance and do-it-yourself
8-11
Page 411 of 419
Black plate (1,1)
10 Index
A
ABS (Anti-lock Braking System) .................. 5-26
Advanced air bag system ......................... 1-32
Air bag system Advanced air bag system ..................... 1-32
Front passenger air bag and status light .... 1-33
Front-seat mounted side-impact
supplemental air bag system .................. 1-36
Roof-mounted curtain side-impact
supplemental air bag system .................. 1-36
Air bag warning labels ............................. 1-38
Air bag warning light ....................... 1-38, 2-12
Air cleaner housing filter .......................... 8-18
Air conditioner Air conditioner operation ...................... 4-24
Air conditioner service ......................... 4-30
Air conditioner specification label ............ 9-13
Air conditioning system refrigerant and
lubricant recommendations .............. 4-30, 9-7
In-cabin microfilter ............................. 4-29
Air deflectors ....................................... 9-17
Alarm, How to stop alarm
(see vehicle security system) ..................... 2-26
Alcohol, drugs and driving .......................... 5-7
Antenna ............................................. 4-79
Anti-lock Braking System (ABS) .................. 5-26
Anti-lock braking system (ABS) warning light ..... 2-9
Appearance care Exterior appearance care ........................ 7-2
Interior appearance care ........................ 7-5
Audible reminders ................................. 2-15
Audio operation precautions ...................... 4-30 Audio system
....................................... 4-30
Steering wheel audio controls ................ 4-77
Autochanger Compact Disc (CD) ........................... 4-48
Autolight system ................................... 2-30
Automatic Air conditioner (Type A) ....................... 4-25
Air conditioner (Type B) ....................... 4-27
Automatic adjusting function
(front windows) ................................ 2-43
Automatic transmission fluid (ATF) ........... 8-12
Door locks ........................................ 3-5
Driving with automatic transmission .......... 5-12
AUX (Auxiliary) button ...................... 4-45, 4-50
Auxiliary input jacks ................................ 4-75
Avoiding collision and rollover ...................... 5-5
B
Battery .............................................. 8-14
Battery saver system .......................... 2-31
Intelligent Key .................................. 8-23
Variable voltage control system ............... 8-16
Before starting the engine ........................ 5-10
Belts (See drive belts) ............................. 8-17
Bluetooth
®hands-free phone system
(models with navigation system) .................. 4-80
Bluetooth®hands-free phone system
(models without navigation system) .............. 4-91
Bluetooth®streaming audio ....................... 4-62
Booster seats ...................................... 1-23
Brake Anti-lock Braking System (ABS) .............. 5-26Brake and clutch fluid
......................... 8-13
Brake fluid ...................................... 8-13
Brake system ................................... 5-25
Parking brake operation ....................... 5-20
Warning light ..................................... 2-9
Break-in schedule .................................. 5-23
Brightness control Display ON/OFF button ......................... 4-6
Instrument panel ............................... 2-32
Bulb check/instrument panel ........................ 2-8
Bulb replacement .................................. 8-25
C
Cabin air filter ...................................... 4-29
Capacities and recommended fuel/lubricants ..... 9-2
Car phone or CB radio ............................ 4-80
Cargo cover ........................................ 2-41
Catalytic converter, Three way catalyst ............ 5-2
CD/CF/USB memory care and cleaning ......... 4-76
Center multi-function control panel
(models with navigation system) .................... 4-2
Child restraints ..................................... 1-17
Booster seats .................................. 1-23
Precautions on child restraints ................ 1-17
Top tether strap ................................ 1-18
Child safety ......................................... 1-15
Chimes Audible reminders ............................. 2-15
Seat belt warning light and chime ............ 2-11
Circuit breaker, Fusible link ....................... 8-21
Cleaning exterior and interior ................. 7-2, 7-5
Clock .......................................... 2-7, 2-23
Model "Z34-D" EDITED: 2010/ 7/ 28