2011 NISSAN 370Z ROADSTER audio
[x] Cancel search: audioPage 118 of 419
Black plate (114,1)
Model "Z34-D" EDITED: 2010/ 7/ 27
WARNING
.Always have the doors locked while
driving. Along with the use of seat
belts, this provides greater safety in
the event of an accident by helping
to prevent persons from being
thrown from the vehicle. This also
helps keep children and others from
unintentionally opening the doors,
and will help keep out intruders.
. Before opening any door, always
look for and avoid oncoming traffic.
. Do not leave children unattended
inside the vehicle. They could un-
knowingly activate switches or con-
trols. Unattended children could
become involved in serious acci-
dents.
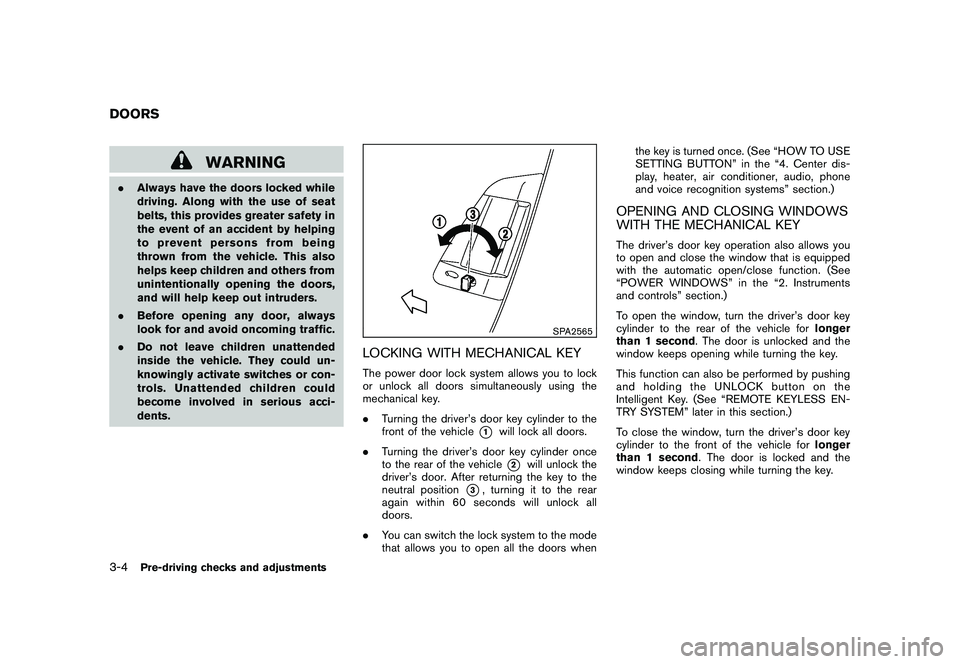
SPA2565
LOCKING WITH MECHANICAL KEYThe power door lock system allows you to lock
or unlock all doors simultaneously using the
mechanical key.
.Turning the driver’s door key cylinder to the
front of the vehicle
*1
will lock all doors.
. Turning the driver’s door key cylinder once
to the rear of the vehicle*2
will unlock the
driver’s door. After returning the key to the
neutral position
*3, turning it to the rear
again within 60 seconds will unlock all
doors.
. You can switch the lock system to the mode
that allows you to open all the doors when the key is turned once. (See “HOW TO USE
SETTING BUTTON” in the “4. Center dis-
play, heater, air conditioner, audio, phone
and voice recognition systems” section.)
OPENING AND CLOSING WINDOWS
WITH THE MECHANICAL KEYThe driver’s door key operation also allows you
to open and close the window that is equipped
with the automatic open/close function. (See
“POWER WINDOWS” in the “2. Instruments
and controls” section.)
To open the window, turn the driver’s door key
cylinder to the rear of the vehicle for
longer
than 1 second . The door is unlocked and the
window keeps opening while turning the key.
This function can also be performed by pushing
and holding the UNLOCK button on the
Intelligent Key. (See “REMOTE KEYLESS EN-
TRY SYSTEM” later in this section.)
To close the window, turn the driver’s door key
cylinder to the front of the vehicle for longer
than 1 second . The door is locked and the
window keeps closing while turning the key.
DOORS3-4
Pre-driving checks and adjustments
Page 121 of 419
Black plate (117,1)
Model "Z34-D" EDITED: 2010/ 7/ 27
computer.
. When the vehicle is parked near a parking
meter.
In such cases, correct the operating conditions
before using the Intelligent Key function or use
the mechanical key.
Although the life of the battery varies depending
on the operating conditions, the battery’s life is
approximately 2 years. If the battery is dis-
charged, replace it with a new one.
When the Intelligent Key battery is almost
discharged, insert the Intelligent Key into the
Intelligent Key port to start the engine. Replace
the discharged battery with a new one as soon
as possible. For more details, see “PUSH-
BUTTON IGNITION SWITCH” in the “5. Start-
ing and driving” section.
Since the Intelligent Key is continuously receiv-
ing radio waves, if the key is left near equipment
which transmits strong radio waves, such as
signals from a TV and personal computer, the
battery life may become shorter.
For information regarding replacement of a
battery, see “INTELLIGENT KEY BATTERY
REPLACEMENT” in the “8. Maintenance and
do-it-yourself” section.
For models with a steering wheel lock mechan-
ism: Because the steering wheel is locked electrically, unlocking the steering wheel with
the ignition switch in the LOCK position is
impossible when the vehicle battery is comple-
tely discharged. Pay special attention that the
vehicle battery is not completely discharged.
As many as 4 Intelligent Keys can be registered
and used with one vehicle. For information about
the purchase and use of additional Intelligent
Keys, contact a NISSAN dealer.
CAUTION
.
Do not allow the Intelligent Key,
which contains electrical compo-
nents, to come into contact with
water or salt water. This could affect
the system function.
. Do not drop the Intelligent Key.
. Do not strike the Intelligent Key
sharply against another object.
. Do not change or modify the Intel-
ligent Key.
. Wetting may damage the Intelligent
Key. If the Intelligent Key gets wet,
immediately wipe until it is comple-
tely dry.
. If the outside temperature is below
148F( �108 C) , the battery of the Intelligent Key may not function
properly.
. Do not place the Intelligent Key for
an extended period in an area where
temperatures exceed 140 8F (60 8C) .
. Do not attach the Intelligent Key
with a key holder that contains a
magnet.
. Do not place the Intelligent Key near
equipment that produces a mag-
netic field, such as a TV, audio
equipment, personal computer or
cellular phone.
If an Intelligent Key is lost or stolen, NISSAN
recommends erasing the ID code of that
Intelligent Key from the vehicle. This may prevent
the unauthorized use of the Intelligent Key to
operate the vehicle. For information regarding
the erasing procedure, contact a NISSAN deal-
er.
The Intelligent Key function can be disabled. For
information about disabling the Intelligent Key
function, contact a NISSAN dealer.
Pre-driving checks and adjustments
3-7
Page 123 of 419
Black plate (119,1)
Model "Z34-D" EDITED: 2010/ 7/ 27
.Do not pull the door handle before pushing
the door handle request switch. The door
will be unlocked but will not open. Release
the door handle once and pull it again to
open the door.
. The Intelligent Key system (opening/closing
doors with the door handle request switch)
can be set to remain inactive. (See “VEHI-
CLE INFORMATION AND SETTINGS
(models with navigation system)” in the “4.
Center display, heater, air conditioner, audio,
phone and voice recognition systems” sec-
tion.)
SPA2569
Coupe models
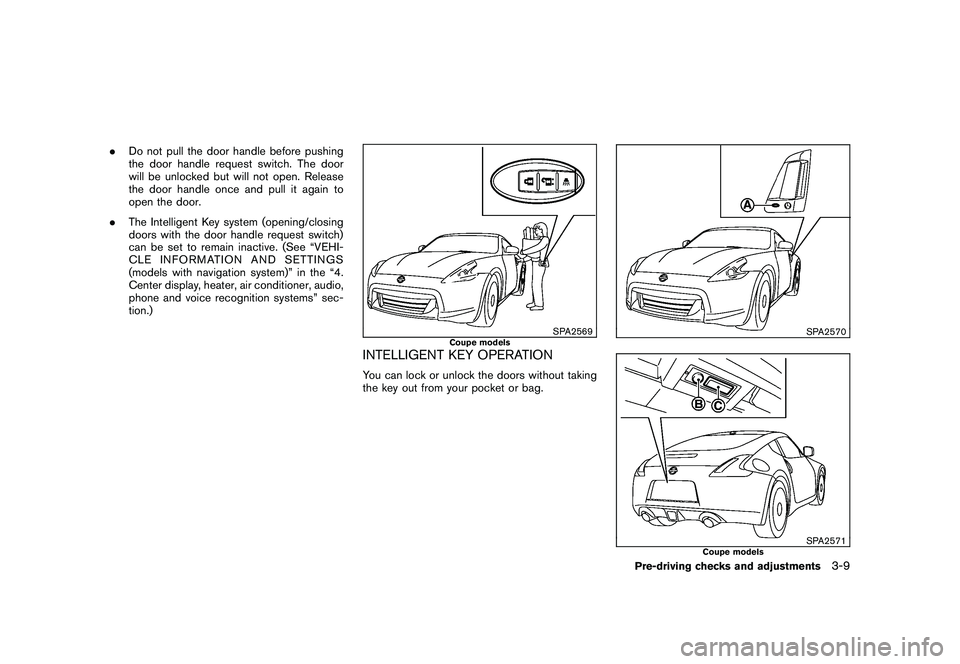
INTELLIGENT KEY OPERATIONYou can lock or unlock the doors without taking
the key out from your pocket or bag.
SPA2570SPA2571
Coupe models
Pre-driving checks and adjustments
3-9
Page 154 of 419
Black plate (13,1)
4
Center display, heater, air conditioner,
audio, phone and voice recognition systems
Model "Z34-D" EDITED: 2010/ 7/ 28
Safety note....................................................... 4-2
Center multi-function control panel
(models with navigation system) ............................ 4-2
How to use multi-function controller ................... 4-3
How to use touch screen ................................. 4-3
Menu options ................................................ 4-5
How to select menus on the screen ................... 4-6
Vehicle information and settings
(models with navigation system) ............................ 4-6
How to use STATUS button .............................. 4-6
How to use brightness control and display ON/
OFF button ................................................... 4-6
How to use INFO button. ................................. 4-6
How to use SETTING button .......................... 4-10
RearView monitor (models with navigation
system) .......................................................... 4-17
How to read displayed lines ............................ 4-18
How to park with predicted course lines ............ 4-18
Difference between predicted and actual
distances ................................................... 4-20
How to adjust screen .................................... 4-22
Operating tips ............................................. 4-22
Ventilators ...................................................... 4-23
Center ventilators ......................................... 4-23
Side ventilators ............................................ 4-23
Heater and air conditioner .................................. 4-24
Automatic air conditioner (Type A) .................... 4-25Automatic air conditioner (Type B)
.................... 4-27
Operating tips ............................................. 4-29
In-cabin microfilter ........................................ 4-29
Servicing air conditioner ................................ 4-30
Audio system .................................................. 4-30
Audio operation precautions ........................... 4-30
FM-AM radio with Compact Disc (CD) player . .... 4-42
FM-AM-SAT radio with Compact Disc (CD)
changer (models without navigation system) . . . .... 4-47
FM-AM-SAT radio with Compact Disc (CD)
player (models with navigation system) .............. 4-51
DVD (Digital Versatile Disc) player operation
(models with navigation system) ...................... 4-55
USB memory operation
(models with navigation system) ...................... 4-58
Bluetooth
®streaming audio
(models with navigation system) ...................... 4-62
iPod
®player operation
(models with navigation system) ...................... 4-67
Music Box
®(models with navigation system) . . . .... 4-69
Auxiliary input jacks
(models with navigation system) ...................... 4-75
CD/DVD/USB memory care and cleaning .......... 4-76
Steering-wheel-mounted controls for audio ........ 4-77
Antenna ..................................................... 4-79
Car phone or CB radio ...................................... 4-80
Page 156 of 419
Black plate (152,1)
Model "Z34-D" EDITED: 2010/ 7/ 27
WARNING
.Do not disassemble or modify this
system. If you do, it may result in
accidents, fire, or electric shock.
. Do not use this system if you notice
any abnormality, such as a frozen
screen or lack of sound. Continued
use of the system may result in
accident, fire or electric shock.
. In case you notice any foreign
object in the system hardware, spill
liquid on it, or notice smoke or smell
coming from it, stop using the
system immediately and contact
your nearest NISSAN dealer. Ignor-
ing such conditions may lead to
accidents, fire, or electric shock.
. Park the vehicle in a safe location
and apply the parking brake to view
the images on the front center dis-
play screen using devices connected
to the auxiliary input jacks.
Do not attempt to operate the system in
extreme temperature conditions [below
� 48F( �208 C) and above 158 8F(70 8C)].
Operating this system under these condi-
tions may result in system malfunctions.
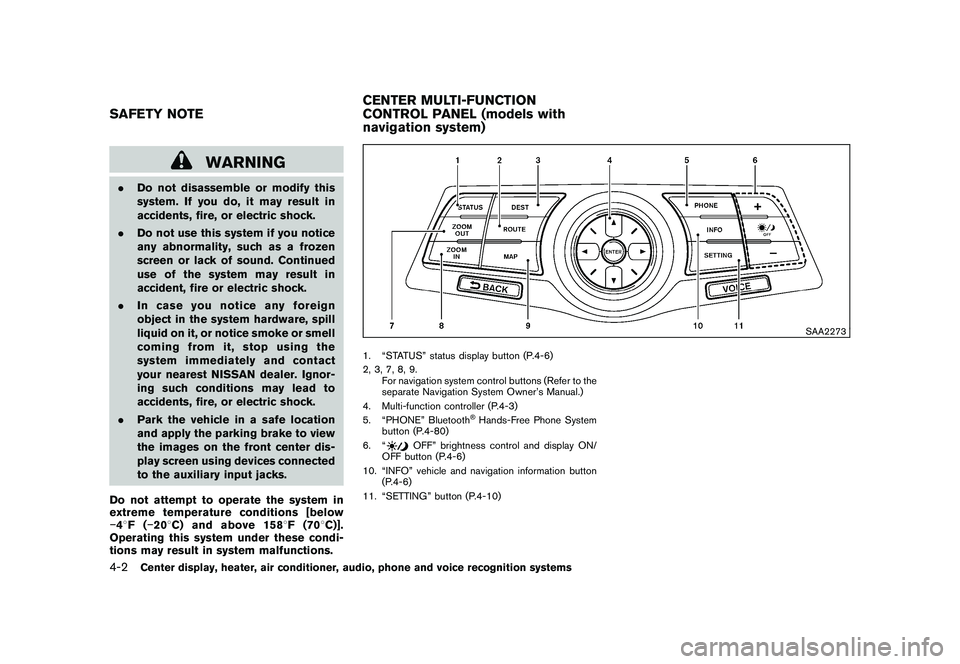
SAA2273
1. “STATUS” status display button (P.4-6)
2, 3, 7, 8, 9.
For navigation system control buttons (Refer to the
separate Navigation System Owner’s Manual.)
4. Multi-function controller (P.4-3)
5. “PHONE” Bluetooth
®Hands-Free Phone System
button (P.4-80)
6. “
OFF” brightness control and display ON/
OFF button (P.4-6)
10. “INFO” vehicle and navigation information button (P.4-6)
11. “SETTING” button (P.4-10)
SAFETY NOTE CENTER MULTI-FUNCTION
CONTROL PANEL (models with
navigation system)4-2
Center display, heater, air conditioner, audio, phone and voice recognition systems
Page 157 of 419
Black plate (153,1)
Model "Z34-D" EDITED: 2010/ 7/ 27
SAA2274
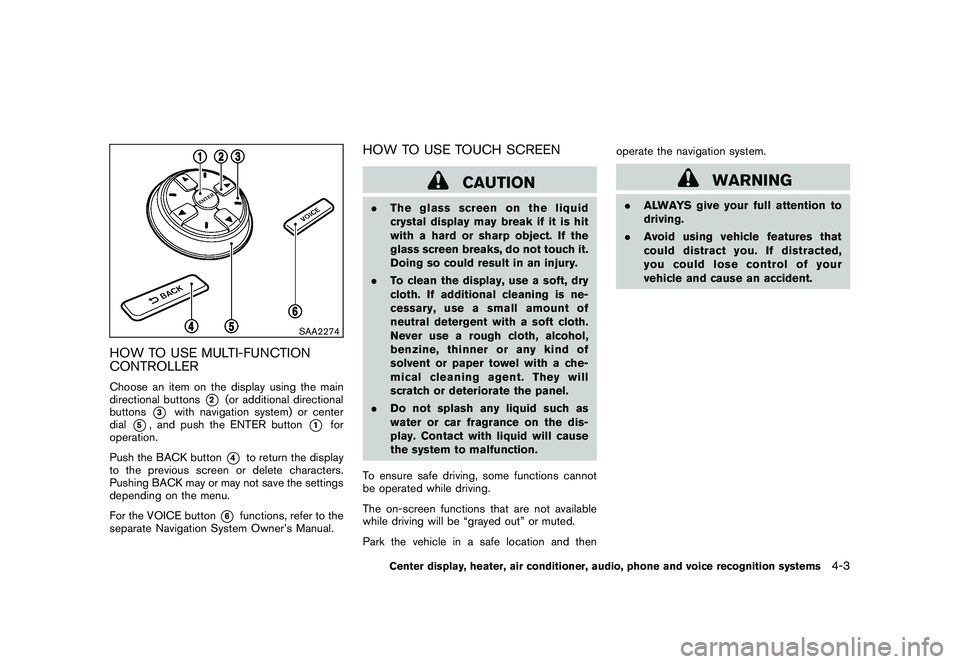
HOW TO USE MULTI-FUNCTION
CONTROLLERChoose an item on the display using the main
directional buttons
*2
(or additional directional
buttons
*3
with navigation system) or center
dial
*5, and push the ENTER button
*1
for
operation.
Push the BACK button
*4
to return the display
to the previous screen or delete characters.
Pushing BACK may or may not save the settings
depending on the menu.
For the VOICE button
*6
functions, refer to the
separate Navigation System Owner’s Manual.
HOW TO USE TOUCH SCREEN
CAUTION
. The glass screen on the liquid
crystal display may break if it is hit
with a hard or sharp object. If the
glass screen breaks, do not touch it.
Doing so could result in an injury.
. To clean the display, use a soft, dry
cloth. If additional cleaning is ne-
cessary, use a small amount of
neutral detergent with a soft cloth.
Never use a rough cloth, alcohol,
benzine, thinner or any kind of
solvent or paper towel with a che-
mical cleaning agent. They will
scratch or deteriorate the panel.
. Do not splash any liquid such as
water or car fragrance on the dis-
play. Contact with liquid will cause
the system to malfunction.
To ensure safe driving, some functions cannot
be operated while driving.
The on-screen functions that are not available
while driving will be “grayed out” or muted.
Park the vehicle in a safe location and then operate the navigation system.
WARNING
.
ALWAYS give your full attention to
driving.
. Avoid using vehicle features that
coulddistractyou.Ifdistracted,
you could lose control of your
vehicle and cause an accident.
Center display, heater, air conditioner, audio, phone and voice recognition systems
4-3
Page 158 of 419
Black plate (154,1)
Model "Z34-D" EDITED: 2010/ 7/ 27
SAA2473
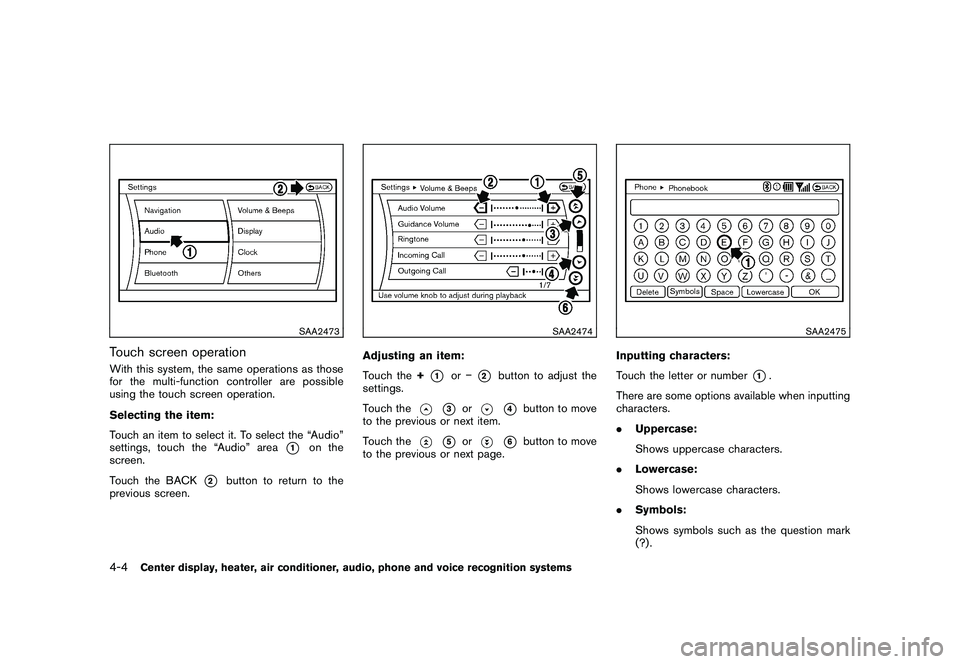
Touch screen operationWith this system, the same operations as those
for the multi-function controller are possible
using the touch screen operation.
Selecting the item:
Touch an item to select it. To select the “Audio”
settings, touch the “Audio” area
*1
on the
screen.
Touch the BACK
*2
button to return to the
previous screen.
SAA2474
Adjusting an item:
Touch the +
*1
or�
*2
button to adjust the
settings.
Touch the
*3
or
*4
button to move
to the previous or next item.
Touch the
*5
or
*6
button to move
to the previous or next page.
SAA2475
Inputting characters:
Touch the letter or number
*1.
There are some options available when inputting
characters.
. Uppercase:
Shows uppercase characters.
. Lowercase:
Shows lowercase characters.
. Symbols:
Shows symbols such as the question mark
(?) .
4-4
Center display, heater, air conditioner, audio, phone and voice recognition systems
Page 159 of 419
Black plate (155,1)
Model "Z34-D" EDITED: 2010/ 7/ 27
.Space:
Inserts a space.
. Delete:
Deletes the last character that has been
input with one touch. Push and hold the
button to delete all of the characters.
. OK:
Completes character inputs.Touch screen maintenanceIf you clean the display screen, use a dry, soft
cloth. If additional cleaning is necessary, use a
small amount of neutral detergent with a soft
cloth. Never spray the screen with water or
detergent. Dampen the cloth first, and then wipe
the screen.
SAA2143
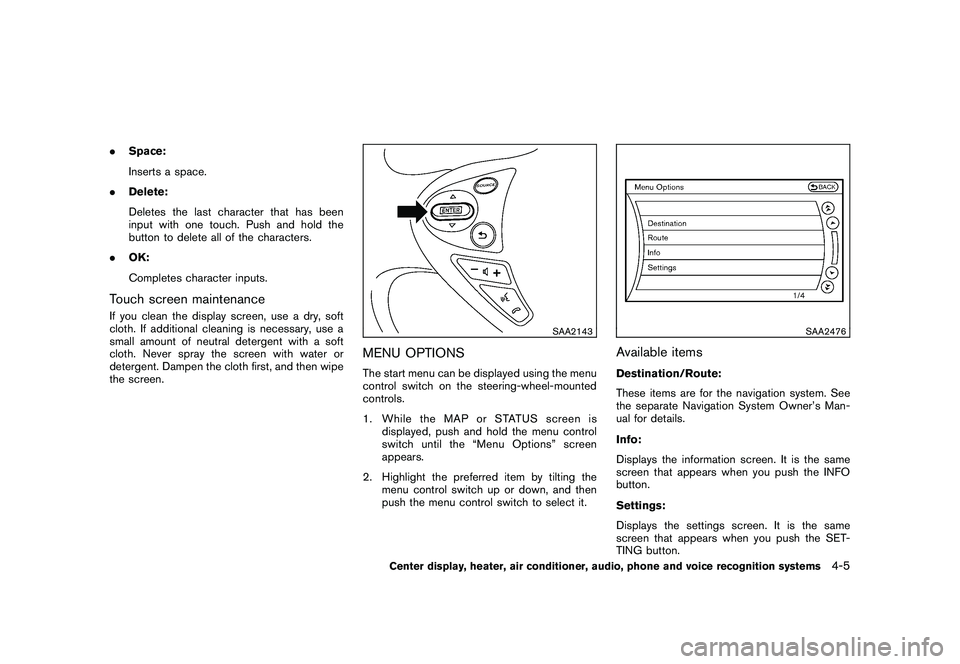
MENU OPTIONSThe start menu can be displayed using the menu
control switch on the steering-wheel-mounted
controls.
1. While the MAP or STATUS screen is
displayed, push and hold the menu control
switch until the “Menu Options” screen
appears.
2. Highlight the preferred item by tilting the menu control switch up or down, and then
push the menu control switch to select it.
SAA2476
Available itemsDestination/Route:
These items are for the navigation system. See
the separate Navigation System Owner’s Man-
ual for details.
Info:
Displays the information screen. It is the same
screen that appears when you push the INFO
button.
Settings:
Displays the settings screen. It is the same
screen that appears when you push the SET-
TING button.
Center display, heater, air conditioner, audio, phone and voice recognition systems
4-5