2011 NISSAN 370Z COUPE open hood
[x] Cancel search: open hoodPage 73 of 419
Black plate (69,1)
Model "Z34-D" EDITED: 2010/ 7/ 27
minute. Have the system checked by a NISSAN
dealer.
For additional information, see “TIRE PRES-
SURE MONITORING SYSTEM (TPMS)” in the
“5. Starting and driving” section.
WARNING
.If the light does not illuminate with
the ignition switch pushed ON, have
the vehicle checked by a NISSAN
dealer as soon as possible.
. If the light illuminates while driving,
avoid sudden steering maneuvers or
abrupt braking, reduce vehicle
speed, pull off the road to a safe
location and stop the vehicle as
soon as possible. Driving with un-
der-inflated tires may permanently
damage the tires and increase the
likelihood of tire failure. Serious
vehicle damage could occur and
may lead to an accident and could
result in serious personal injury.
Check the tire pressure for all four
tires. Adjust the tire pressure to the
recommended COLD tire pressure
shownontheTireandLoading
Information label to turn the low tire pressure warning light OFF. If
the light still illuminates while driv-
ing after adjusting the tire pressure,
a tire may be flat. If you have a flat
tire, replace it with a spare tire as
soon as possible.
. When a spare tire is mounted or a
wheel is replaced, the TPMS will not
function and the low tire pressure
warning light will flash for approxi-
mately 1 minute. The light will
remain on after the 1 minute. Con-
tact your NISSAN dealer as soon as
possible for tire replacement and/or
system resetting.
. Replacing tires with those not ori-
ginally specified by NISSAN could
affect the proper operation of the
TPMS.
CAUTION
.The TPMS is not a substitute for the
regular tire pressure check. Be sure
to check the tire pressure regularly.
. If the vehicle is being driven at
speeds of less than 16 MPH (25
km/h) , the TPMS may not operate correctly.
. Be sure to install the specified size
of tires to the four wheels correctly.
Master warning light
When the ignition switch is in the ON position,
the master warning light illuminates if any of the
following are displayed on the vehicle informa-
tion display:
.No key warning
. Low fuel warning
. Low washer fluid warning
. Parking brake release warning
. Door/rear hatch open warning
. Loose fuel cap warning
See “VEHICLE INFORMATION DISPLAY” later
in this section.
Seat belt warning light and chime
The light and chime remind you to fasten seat
belts. The light illuminates whenever the ignition
switch is pushed to the ON position, and will
remain illuminated until the driver’s seat belt is
fastened. At the same time, the chime will sound
for about 6 seconds unless the driver’s seat belt
Instruments and controls
2-11
Page 87 of 419
Black plate (83,1)
Model "Z34-D" EDITED: 2010/ 7/ 27
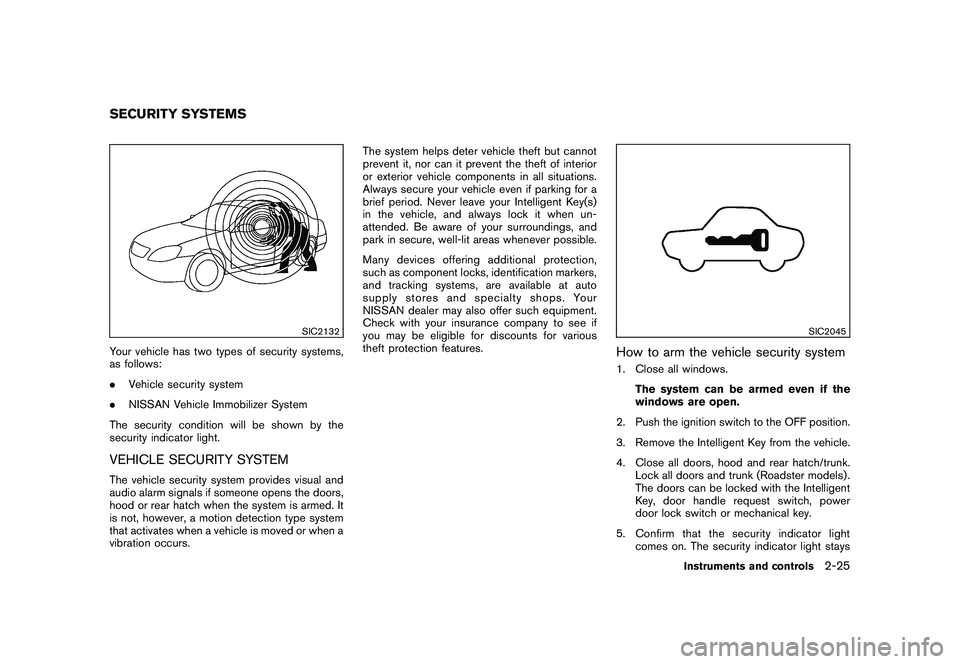
SIC2132
Your vehicle has two types of security systems,
as follows:
.Vehicle security system
. NISSAN Vehicle Immobilizer System
The security condition will be shown by the
security indicator light.VEHICLE SECURITY SYSTEMThe vehicle security system provides visual and
audio alarm signals if someone opens the doors,
hood or rear hatch when the system is armed. It
is not, however, a motion detection type system
that activates when a vehicle is moved or when a
vibration occurs. The system helps deter vehicle theft but cannot
prevent it, nor can it prevent the theft of interior
or exterior vehicle components in all situations.
Always secure your vehicle even if parking for a
brief period. Never leave your Intelligent Key(s)
in the vehicle, and always lock it when un-
attended. Be aware of your surroundings, and
park in secure, well-lit areas whenever possible.
Many devices offering additional protection,
such as component locks, identification markers,
and tracking systems, are available at auto
supply stores and specialty shops. Your
NISSAN dealer may also offer such equipment.
Check with your insurance company to see if
you may be eligible for discounts for various
theft protection features.
SIC2045
How to arm the vehicle security system1. Close all windows.
The system can be armed even if the
windows are open.
2. Push the ignition switch to the OFF position.
3. Remove the Intelligent Key from the vehicle.
4. Close all doors, hood and rear hatch/trunk. Lock all doors and trunk (Roadster models) .
The doors can be locked with the Intelligent
Key, door handle request switch, power
door lock switch or mechanical key.
5. Confirm that the security indicator light comes on. The security indicator light stays
SECURITY SYSTEMS
Instruments and controls
2-25
Page 88 of 419
Black plate (84,1)
Model "Z34-D" EDITED: 2010/ 7/ 27
on for about 30 seconds. The vehicle
security system is now pre-armed. After
about 30 seconds the vehicle security
system automatically shifts into the armed
phase. The security light begins to flash
once every approximately 3 seconds. If,
during this 30-second pre-arm time period,
the door is unlocked, or the ignition switch is
pushed to ACC or ON, the system will not
arm.
Even when the driver and/or passengers
are in the vehicle, the system will activate
with all doors, hood and rear hatch locked
withtheignitionswitchintheLOCK
position. When pushing the ignition switch
to the ACC or ON position, the system will
be released.
Vehicle security system activationThe vehicle security system will give the follow-
ing alarm:
. The headlights blink and the horn sounds
intermittently.
. The alarm automatica lly turns off after
approximately 1 minute. However, the alarm
reactivates if the vehicle is tampered with
again.
The alarm is activated by:
. Unlocking the door or opening the rear hatch without using the button on the
Intelligent Key, the door handle request
switch or the mechanical key. (Even if the
door is opened by releasing the door inside
lock knob, the alarm will activate.)
. Opening the hood.
How to stop an activated alarmThe alarm will stop by unlocking a door by
pushing the unlock button on the Intelligent Key,
the door handle request switch or using the
mechanical key. The alarm will not stop if the
ignition switch is pushed to the ACC or ON
position.
If the system does not operate as de-
scribed above, have it checked by a
NISSAN dealer.NISSAN VEHICLE IMMOBILIZER SYS-
TEMThe NISSAN Vehicle Immobilizer System will not
allow the engine to start without the use of the
registered Intelligent Key. Never leave these
keys in the vehicle.
For USA:
This device complies with Part 15 of the
FCC Rules. Operation is subject to the
following two conditions:
(1) This device may not cause harmful interference, and (2) this device must
accept any interference received, including
interference that may cause undesired
operation.
Note: Changes or modifications not ex-
pressly approved by the party responsible
for compliance could void the user’s
authority to operate the equipment.
For Canada:
This device complies with RSS-210 of
Industry Canada. Operation is subject to
the following two conditions:
(1) this device may not cause interference,
and (2) this device must accept any inter-
ference, including interference that may
cause undesired operation of the device.
2-26
Instruments and controls
Page 115 of 419
Black plate (10,1)
3 Pre-driving checks and adjustments
Model "Z34-D" EDITED: 2010/ 7/ 28
Keys ............................................................... 3-2Intelligent Key ................................................ 3-2
Valet hand-off ................................................ 3-3
Doors .............................................................. 3-4
Locking with mechanical key ............................. 3-4
Opening and closing windows with the
mechanical key .............................................. 3-4
Locking with inside lock knob ........................... 3-5
Locking with power door lock switch .................. 3-5
Automatic door locks ...................................... 3-5
Intelligent Key system .......................................... 3-6
Intelligent Key operating range .......................... 3-8
Door locks/unlocks precaution .......................... 3-8
Intelligent Key operation ................................... 3-9
Battery saver system ..................................... 3-11
Warning signals ........................................... 3-11
Troubleshooting guide ................................... 3-12
Remote keyless entry system .............................. 3-13
How to use remote keyless entry system ........... 3-13
Hood ............................................................ 3-16
Rear hatch (Coupe models) ................................ 3-17
Rear hatch opener switch .............................. 3-17
Secondary rear hatch release .......................... 3-18
Trunk lid (Roadster models) ................................ 3-19
Trunk lid opener switch .................................. 3-19 Trunk release power cancel switch
................... 3-19
Interior trunk lid release ................................. 3-20
Secondary trunk lid release ............................ 3-21
Soft top (Roadster models) ................................ 3-21
Before operating the top ................................ 3-21
When operating the top ................................. 3-23
Opening the top .......................................... 3-25
Closing the top ............................................ 3-26
Opening the top using the Intelligent Key ........... 3-26
Troubleshooting guide ................................... 3-27
If the top does not open or close electrically . . .... 3-28
Care of the soft top and the vehicle body .......... 3-32
Front, side and rear unique parts (NISMO
models) ......................................................... 3-32
Fuel-filler door ................................................. 3-34
Opening the fuel-filler door ............................. 3-34
Fuel-filler cap .............................................. 3-34
Tilt steering ..................................................... 3-36
Manual operation ......................................... 3-36
Sun visors ...................................................... 3-36
Mirrors ........................................................... 3-37
Inside mirror ................................................ 3-37
Outside mirrors ............................................ 3-38
Vanity mirror ................................................ 3-39
Page 130 of 419
Black plate (126,1)
Model "Z34-D" EDITED: 2010/ 7/ 27
Switching procedure:
To switch the hazard indicator and horn (chime)
operation, push the LOCK
*1
and UN-
LOCK
*2
buttons on the Intelligent Key
simultaneously for more than 2 seconds.
. When the hazard indicator mode is set, the
hazard indicator flashes 3 times.
. When the hazard indicator and horn mode is
set, the hazard indicator flashes once and
the horn chirps once.
SPA2572
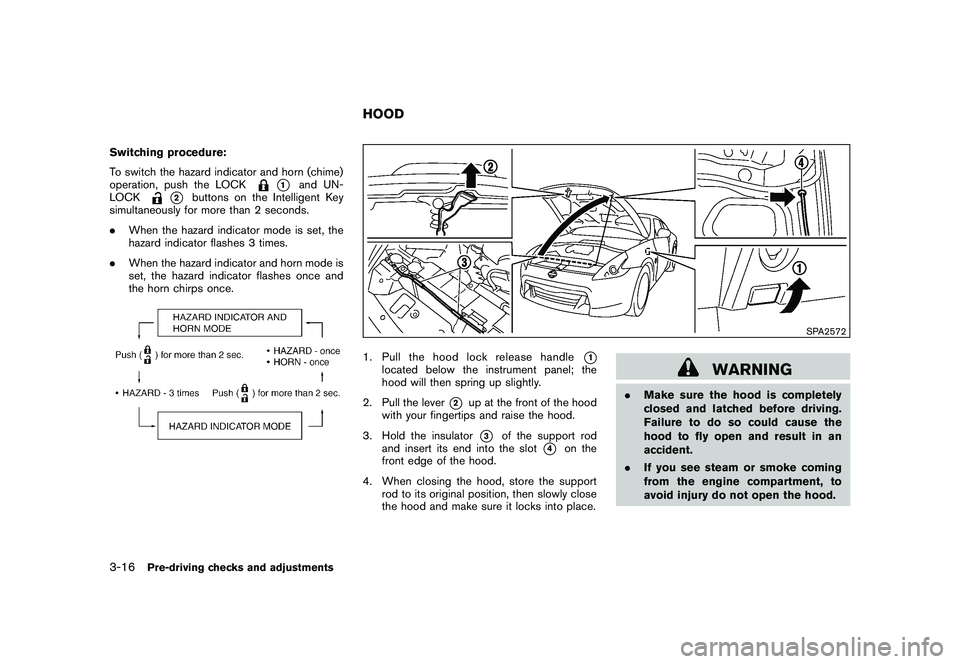
1. Pull the hood lock release handle
*1
located below the instrument panel; the
hood will then spring up slightly.
2. Pull the lever
*2
up at the front of the hood
with your fingertips and raise the hood.
3. Hold the insulator*3
of the support rod
and insert its end into the slot
*4
on the
front edge of the hood.
4. When closing the hood, store the support rod to its original position, then slowly close
the hood and make sure it locks into place.
WARNING
.Make sure the hood is completely
closed and latched before driving.
Failure to do so could cause the
hood to fly open and result in an
accident.
. If you see steam or smoke coming
from the engine compartment, to
avoid injury do not open the hood.
HOOD
3-16
Pre-driving checks and adjustments
Page 314 of 419
Black plate (310,1)
Model "Z34-D" EDITED: 2010/ 7/ 27
.Watch for slippery spots (glare ice) .
These may appear on an otherwise
clear road in shaded areas. If a
patch of ice is seen ahead, brake
before reaching it. Try not to brake
while on the ice, and avoid any
sudden steering maneuvers.
. Do not use the cruise control on
slippery roads.
. Snow can trap dangerous exhaust
gases under your vehicle. Keep
snow clear of the exhaust pipe and
from around your vehicle.
ENGINE BLOCK HEATER (if so
equipped)Engine block heaters are used to assist with
cold temperature starting.
The engine block heater should be used when
the outside temperature is 20 8F( �7 8C) or lower.To use the engine block heater1. Turn the engine off.
2. Open the hood and unwrap the engine
block heater cord.
3. Plug the engine block heater cord into a grounded 3-wire, 3-pronged extension cord.
4. Plug the extension cord into a Ground Fault Interrupt (GFI) protected, grounded 110-
volt AC (VAC) outlet.
5. The engine block heater must be plugged in for at least 2 - 4 hours, depending on
outside temperatures, to properly warm the
engine coolant. Use an appropriate timer to
turn the engine block heater on.
6. Before starting the engine, unplug and properly store the cord to keep it away from
moving parts.
WARNING
.Do not use your engine block heater
with an ungrounded electrical sys-
tem or a 2-pronged adapter. You can
be seriously injured by an electrical
shock if you use an ungrounded
connection.
. Disconnect and properly store the
engine block heater cord before
starting the engine. Damage to the
cord could result in an electrical
shock and can cause serious injury.
. Use a heavy-duty 3-wire, 3-pronged
extension cord rated for at least
10A. Plug the extension cord into a
Ground Fault Interrupt (GFI) pro-
tected, grounded 110-VAC outlet.
Failure to use the proper extension
cord or a grounded outlet can result
in a fire or electrical shock and
cause serious personal injury.
5-32
Starting and driving
Page 329 of 419
Black plate (327,1)
Model "Z34-D" EDITED: 2010/ 7/ 27
again.
7. After starting your engine, carefully discon- nect the negative cable and then the positive
cable (
*4
?
*3
?
*2
?
*1).
8. Replace the vent caps (if so equipped) . Be sure to dispose of the cloth used to cover
the vent holes as it may be contaminated
with corrosive acid.
9. Put the battery cover on. Do not attempt to start the engine by pushing.
CAUTION
.
Automatic transmission models
cannot be push-started or tow-
started. Attempting to do so may
cause transmission damage.
. Three way catalyst equipped models
should not be started by pushing
since the three way catalyst may be
damaged.
. Never try to start the vehicle by
towing it; when the engine starts,
the forward surge could cause the
vehicle to collide with the tow
vehicle.
CAUTION
.Do not continue to drive if your
vehicle overheats. Doing so could
cause engine damage or a vehicle
fire.
. To avoid the danger of being
scalded, never remove the radiator
cap while the engine is still hot.
When the radiator cap is removed,
pressurized hot water will spurt out,
possibly causing serious injury.
. Do not open the hood if steam is
coming out.
If your vehicle is overheating (indicated by an
extremely high temperature gauge reading) , or if
you feel a lack of engine power, detect abnormal
noise, etc., take the following steps:
1. Move the vehicle safely off the road, apply the parking brake and move the selector
lever to the P (Park) position (Automatic
transmission models) . Move the shift lever to
the N (Neutral) position (Manual transmis-
sion models) .
Do not stop the engine.
2. Turn off the air conditioner. Open all the windows, move the heater or air conditioner
PUSH STARTING IF YOUR VEHICLE OVERHEATS
In case of emergency
6-15
Page 330 of 419

Black plate (328,1)
Model "Z34-D" EDITED: 2010/ 7/ 27
temperature control to maximum hot and fan
control to high speed.
3. If engine overheating is caused by climbing a long hill on a hot day, run the engine at a
fast idle (approximately 1,500 rpm) until the
temperature gauge indication returns to
normal.
4. Get out of the vehicle. Look and listen for steam or coolant escaping from the radiator
before opening the hood. (If steam or
coolant is escaping, turn off the engine.)
Do not open the hood further until no steam
or coolant can be seen.
5. Open the engine hood.
WARNING
If steam or water is coming from the
engine, stand clear to prevent getting
burned.
6. Visually check if the cooling fan is running. The radiator hoses and radiator should not
leak water. If coolant is leaking or the cooling
fan does not run, stop the engine.
WARNING
Be careful not to allow your hands, hair,
jewelry or clothing to come into contact with, or get caught in, engine belts or
the engine cooling fan. The engine
cooling fan can start at any time.
7. After the engine cools down, check the coolant level in the reservoir with the engine
running. Add coolant to the reservoir if
necessary. Have your vehicle repaired at
the nearest NISSAN dealer. When towing your vehicle, all State (Provincial in
Canada) and local regulations for towing must
be followed. Incorrect towing equipment could
damage your vehicle. Towing instructions are
available from a NISSAN dealer. Local service
operators are familiar with the applicable laws
and procedures for towing. To assure proper
towing and to prevent accidental damage to
your vehicle, NISSAN recommends that you
have a service operator tow your vehicle. It is
advisable to have the service operator carefully
read the following precautions.
WARNING
.
Never ride in a vehicle that is being
towed.
. Never get under your vehicle after it
has been lifted by a tow truck.
CAUTION
.When towing, make sure that the
transmission, axles, steering system
and drivetrain are in working condi-
tion. If any unit is damaged, dollies
must be used.
. Always attach safety chains before
towing.TOWING YOUR VEHICLE
6-16
In case of emergency