2011 NISSAN 370Z COUPE mirror controls
[x] Cancel search: mirror controlsPage 62 of 419
Black plate (7,1)
2 Instruments and controls
Model "Z34-D" EDITED: 2010/ 7/ 28
Cockpit............................................................ 2-2
Instrument panel ................................................ 2-3
Meters and gauges ............................................. 2-4
Speedometer and odometer ............................. 2-5
Tachometer ................................................... 2-5
Engine coolant temperature gauge ..................... 2-6
Fuel gauge ................................................... 2-6
Triple meter .................................................. 2-7
Warning/indicator lights and audible reminders ......... 2-8
Checking bulbs ............................................. 2-8
Warning lights ............................................... 2-9
Indicator lights ............................................. 2-12
Audible reminders ........................................ 2-15
Vehicle information display .................................. 2-16
Indicators for operation .................................. 2-16
Warnings and alerts ...................................... 2-18
Indicators for maintenance .............................. 2-19
Trip computer .............................................. 2-20
Security systems .............................................. 2-25
Vehicle Security System. ................................ 2-25
NISSAN Vehicle Immobilizer System ................. 2-26
Windshield wiper and washer switch .................... 2-27
Rear window defroster switch ............................. 2-29
Headlight and turn signal switch .......................... 2-29
Xenon headlights ......................................... 2-29
Headlight switch .......................................... 2-30 Turn signal switch
........................................ 2-33
Fog light switch (if so equipped) ...................... 2-33
Hazard warning flasher switch ............................. 2-33
Horn ............................................................. 2-34
Heated seats (if so equipped) ............................. 2-34
Climate controlled seats (if so equipped) ............... 2-36
Vehicle Dynamic Control (VDC) OFF switch ........... 2-37
Power outlet ................................................... 2-37
Storage ......................................................... 2-38
Instrument pocket (except for navigation system
equipped models) ........................................ 2-38
Cup holders ................................................ 2-38
Glove box .................................................. 2-39
Console box ............................................... 2-40
Rear parcel box ........................................... 2-40
Cargo cover (if so equipped) .......................... 2-41
Windows ....................................................... 2-42
Power windows ........................................... 2-42
Interior lights ................................................... 2-44
Map lights .................................................. 2-44
Interior light control switch ............................. 2-44
Vanity mirror lights ............................................ 2-45
Cargo area courtesy light (Roadster models) .......... 2-46
Cargo light (Coupe models) ............................... 2-46
Trunk light (Roadster models) .............................. 2-46
Page 91 of 419
Black plate (87,1)
Model "Z34-D" EDITED: 2010/ 7/ 27
SIC3980
Type A
SIC3979
Type B
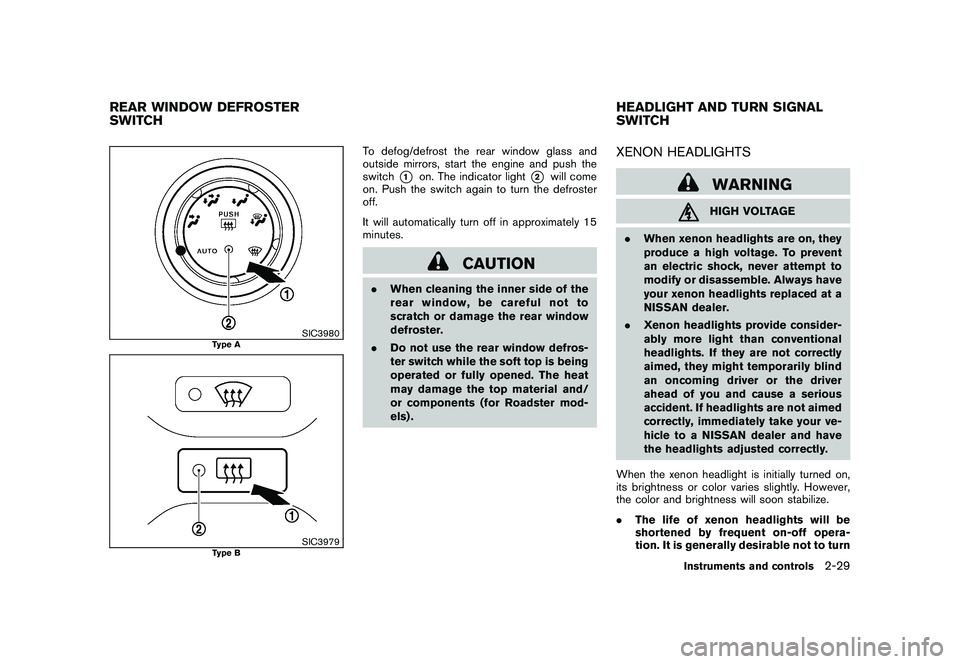
To defog/defrost the rear window glass and
outside mirrors, start the engine and push the
switch
*1
on. The indicator light
*2
will come
on. Push the switch again to turn the defroster
off.
It will automatically turn off in approximately 15
minutes.
CAUTION
. When cleaning the inner side of the
rear window, be careful not to
scratch or damage the rear window
defroster.
. Do not use the rear window defros-
ter switch while the soft top is being
operated or fully opened. The heat
may damage the top material and/
or components (for Roadster mod-
els) .
XENON HEADLIGHTS
WARNINGHIGH VOLTAGE
. When xenon headlights are on, they
produce a high voltage. To prevent
an electric shock, never attempt to
modify or disassemble. Always have
your xenon headlights replaced at a
NISSAN dealer.
. Xenon headlights provide consider-
ably more light than conventional
headlights. If they are not correctly
aimed, they might temporarily blind
an oncoming driver or the driver
ahead of you and cause a serious
accident. If headlights are not aimed
correctly, immediately take your ve-
hicle to a NISSAN dealer and have
the headlights adjusted correctly.
When the xenon headlight is initially turned on,
its brightness or color varies slightly. However,
the color and brightness will soon stabilize.
. The life of xenon headlights will be
shortened by frequent on-off opera-
tion. It is generally desirable not to turn
REAR WINDOW DEFROSTER
SWITCH HEADLIGHT AND TURN SIGNAL
SWITCH
Instruments and controls
2-29
Page 107 of 419
Black plate (103,1)
Model "Z34-D" EDITED: 2010/ 7/ 27
.doors are unlocked by pushing the UN-
LOCK button on the Intelligent Key or door
handle request switch with the ignition
switch in the LOCK position
— remain on for about 15 seconds.
. any door is opened and then closed with the
ignition switch in the LOCK position
— remain on for about 15 seconds.
. any door is opened with the ignition switch
in the ACC or ON position
— remain on while the door is opened. When the door is closed, the lights go off.
The lights will also turn off after 15
minutes when the lights remain illumi-
nated after the ignition switch has been
pushed to the OFF or LOCK position to
prevent the battery from becoming dis-
charged.
When the auto interior illumination is set to the
OFF position (see “VEHICLE INFORMATION
AND SETTINGS (models with navigation sys-
tem)” in the “4. Center display, heater, air
conditioner, audio, phone and voice recognition
systems” section) , the lights will illuminate under
the following condition:
. any door is opened with the ignition switch
in any position — remain on while the door is opened.
When the door is closed, the lights go off.
OFF positionWhen the switch is in the OFF position
*3, the
lights will not illuminate, regardless of the
condition.
CAUTION
Do not use for extended periods of time
with the engine stopped. This could
result in a discharged battery.
SIC3869
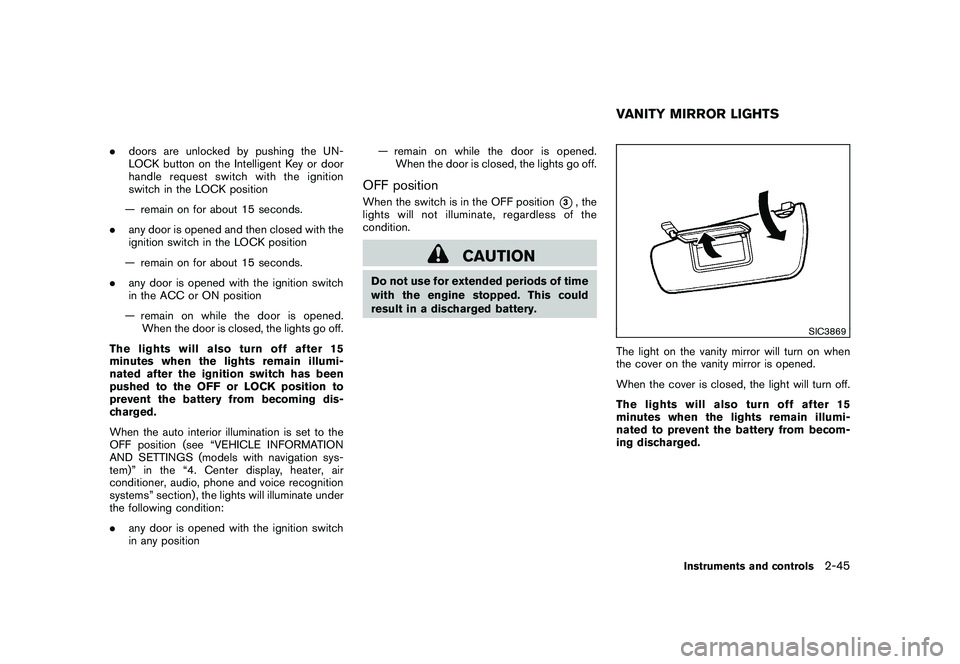
The light on the vanity mirror will turn on when
the cover on the vanity mirror is opened.
When the cover is closed, the light will turn off.
The lights will also turn off after 15
minutes when the lights remain illumi-
nated to prevent the battery from becom-
ing discharged.VANITY MIRROR LIGHTS
Instruments and controls
2-45
Page 152 of 419
Black plate (148,1)
Model "Z34-D" EDITED: 2010/ 7/ 27
light will turn off. Push the “I” switch
*D
to turn
the system on.
Do not allow any object to cover the
sensors
*E
or apply glass cleaner on
them. Doing so will reduce the sensitivity
of the sensor, resulting in improper opera-
tion.
For the HomeLink®Universal Transceiver opera-
tion, see “HomeLink®UNIVERSAL TRANSCEI-
VER” in the “2. Instruments and controls”
section.
SPA2319
OUTSIDE MIRRORS
WARNING
Objects viewed in the outside mirror on
the passenger side are closer than they
appear. Be careful when moving to the
right. Using only this mirror could cause
an accident. Use the inside mirror or
glance over your shoulder to properly
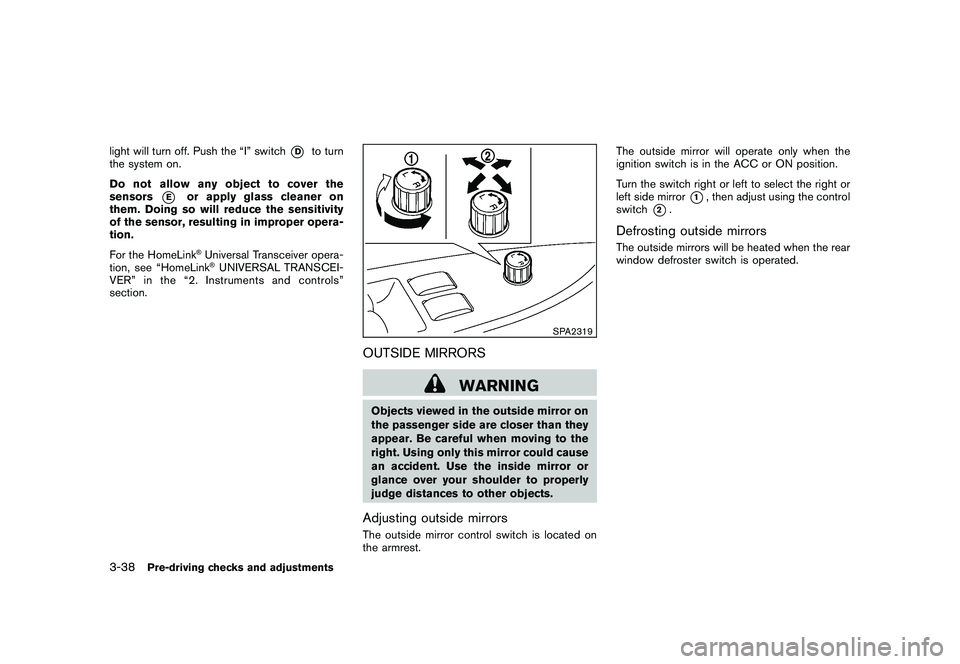
judge distances to other objects.Adjusting outside mirrorsThe outside mirror control switch is located on
the armrest. The outside mirror will operate only when the
ignition switch is in the ACC or ON position.
Turn the switch right or left to select the right or
left side mirror
*1, then adjust using the control
switch
*2.
Defrosting outside mirrorsThe outside mirrors will be heated when the rear
window defroster switch is operated.
3-38
Pre-driving checks and adjustments
Page 292 of 419
Black plate (288,1)
Model "Z34-D" EDITED: 2010/ 7/ 27
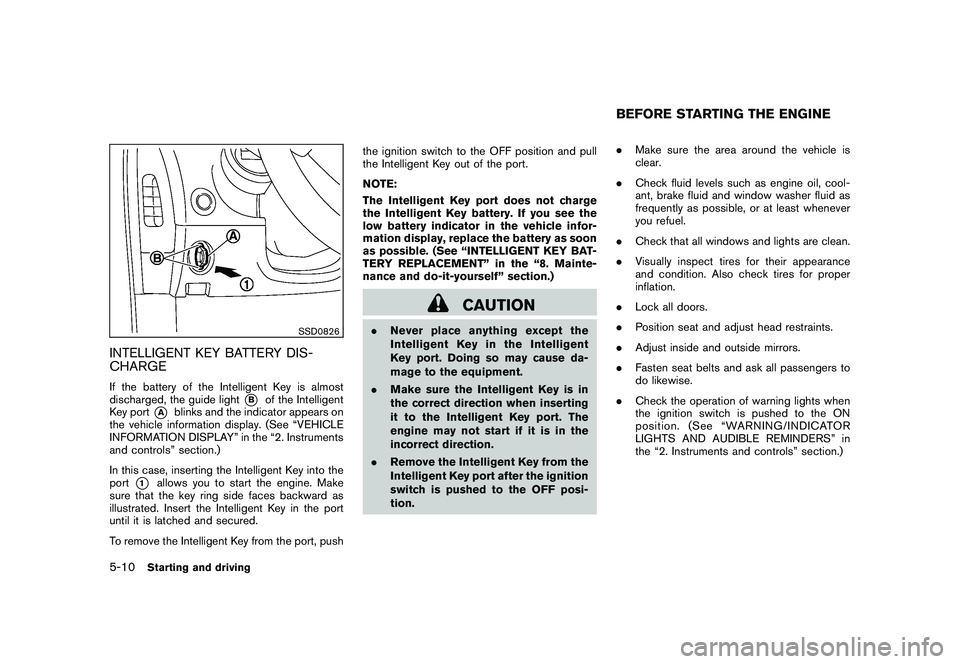
SSD0826
INTELLIGENT KEY BATTERY DIS-
CHARGEIf the battery of the Intelligent Key is almost
discharged, the guide light
*B
of the Intelligent
Key port
*A
blinks and the indicator appears on
the vehicle information display. (See “VEHICLE
INFORMATION DISPLAY” in the “2. Instruments
and controls” section.)
In this case, inserting the Intelligent Key into the
port
*1
allows you to start the engine. Make
sure that the key ring side faces backward as
illustrated. Insert the Intelligent Key in the port
until it is latched and secured.
To remove the Intelligent Key from the port, push the ignition switch to the OFF position and pull
the Intelligent Key out of the port.
NOTE:
The Intelligent Key port does not charge
the Intelligent Key battery. If you see the
low battery indicator in the vehicle infor-
mation display, replace the battery as soon
as possible. (See “INTELLIGENT KEY BAT-
TERY REPLACEMENT” in the “8. Mainte-
nance and do-it-yourself” section.)
CAUTION
.
Never place anything except the
Intelligent Key in the Intelligent
Key port. Doing so may cause da-
mage to the equipment.
. Make sure the Intelligent Key is in
the correct direction when inserting
it to the Intelligent Key port. The
engine may not start if it is in the
incorrect direction.
. Remove the Intelligent Key from the
Intelligent Key port after the ignition
switch is pushed to the OFF posi-
tion. .
Make sure the area around the vehicle is
clear.
. Check fluid levels such as engine oil, cool-
ant, brake fluid and window washer fluid as
frequently as possible, or at least whenever
you refuel.
. Check that all windows and lights are clean.
. Visually inspect tires for their appearance
and condition. Also check tires for proper
inflation.
. Lock all doors.
. Position seat and adjust head restraints.
. Adjust inside and outside mirrors.
. Fasten seat belts and ask all passengers to
do likewise.
. Check the operation of warning lights when
the ignition switch is pushed to the ON
position. (See “WARNING/INDICATOR
LIGHTS AND AUDIBLE REMINDERS” in
the “2. Instruments and controls” section.)
BEFORE STARTING THE ENGINE
5-10
Starting and driving
Page 371 of 419
Black plate (371,1)
Model "Z34-D" EDITED: 2010/ 7/ 27
HEADLIGHTSFog may temporarily form inside the lens of the
exterior lights in the rain or in a car wash. A
temperature difference between the inside and
the outside of the lens causes the fog. This is
not a malfunction. If large drops of water collect
inside the lens, contact a NISSAN dealer.Replacing
WARNINGHIGH VOLTAGE
When xenon headlights are on, they
produce a high voltage. To prevent an
electric shock, never attempt to modify
or disassemble. Always have your xe-
non headlights replaced at a NISSAN
dealer. For additional information, see
“HEADLIGHT AND TURN SIGNAL
SWITCH” in the “2. Instruments and
controls” section.
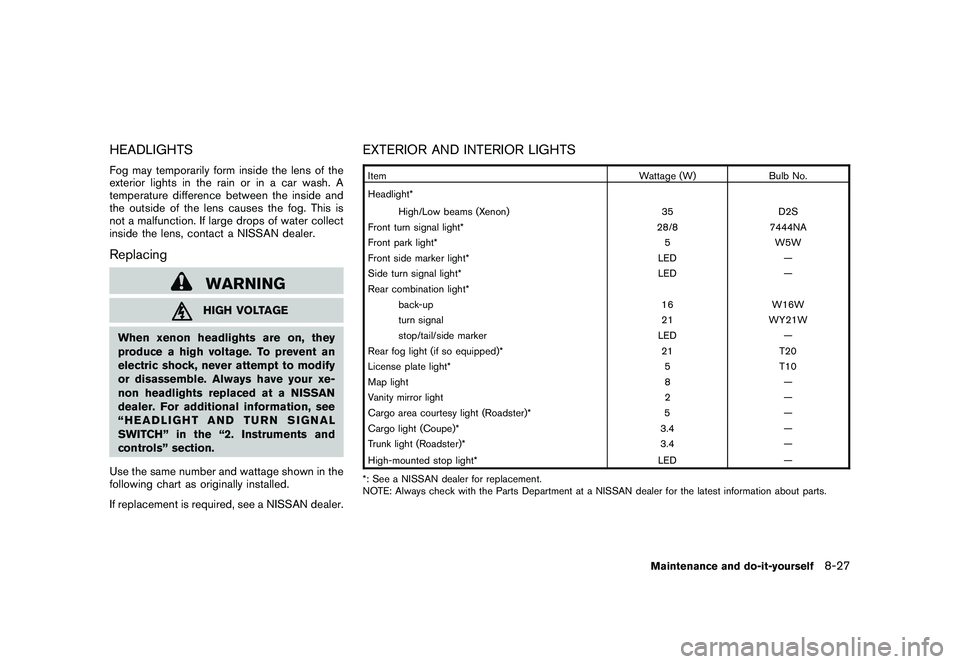
Use the same number and wattage shown in the
following chart as originally installed.
If replacement is required, see a NISSAN dealer.
EXTERIOR AND INTERIOR LIGHTSItem Wattage (W)Bulb No.
Headlight* High/Low beams (Xenon) 35D2S
Front turn signal light* 28/87444NA
Front park light* 5W5W
Front side marker light* LED—
Side turn signal light* LED—
Rear combination light* back-up 16W16W
turn signal 21WY21W
stop/tail/side marker LED—
Rear fog light (if so equipped)* 21T20
License plate light* 5T10
Map light 8—
Vanity mirror light 2—
Cargo area courtesy light (Roadster)* 5—
Cargo light (Coupe)* 3.4—
Trunk light (Roadster)* 3.4—
High-mounted stop light* LED
—
*: See a NISSAN dealer for replacement.
NOTE: Always check with the Parts Department at a NISSAN dealer for the latest information about parts.
Maintenance and do-it-yourself
8-27