2011 MITSUBISHI TRITON wheel
[x] Cancel search: wheelPage 184 of 369

Ventilators
.................................................................................... 5-02
Heater/Manual air conditioning* ..................................................5-03
Automatic air conditioning* ......................................................... 5-08
Important operation tips for the air conditioning..........................5-12 Air purifier*.................................................................................. 5-12
LW/MW/FM electronic tuning radio with CD player* ................5-13
To play tracks from USB device* ................................................5-27
To play tracks from a Bluetooth ®
device (vehicles with
Bluetooth ®
2.0 interface).......................................................... 5-36
To use the external audio input function* ....................................5-39
Steering wheel remote control switch* ........................................5-40
Error codes
.................................................................................... 5-42
Error codes (iPod)......................................................................... 5-44
Error codes (USB memory device) ..............................................5-46
Audio system anti-theft feature .................................................... 5-48
Handling of compact discs ........................................................... 5-48
Antenna......................................................................................... 5-50
Link System* ................................................................................ 5-51
Bluetooth ®
2.0 interface* ............................................................. 5-51
USB input terminal* ..................................................................... 5-67
Sun visors..................................................................................... 5-69
Vanity mirror* .............................................................................. 5-70
Ashtray.......................................................................................... 5-70
Cigarette lighter ............................................................................ 5-71
Accessory socket*........................................................................ 5-72
Digital clock* ............................................................................... 5-73
Interior lamps ................................................................................5-73
Storage spaces............................................................................... 5-75
Cup holder*.................................................................................. 5-78
Bottle holder ................................................................................. 5-79 Convenient hook
........................................................................... 5-80
Coat hook*.................................................................................... 5-80
First-aid kit and warning triangle securing bands* ......................5-80 For pleasant driving
5
OCRE12E1
Presented by http://mmc-manuals.ru/ \251
Page 223 of 369

CAUTION
l
Do not operate the connected audio equip-
ment while driving.
This could distract you and an accident
might occur.
NOTE l The
connected audio equipment cannot
be op-
erated with the vehicle’s audio system.
l Depending on the connected audio equip-
ment, it may produce noise from the speakers.
l Use the connected audio equipment’s own
power source, such as its battery.
Noise may be produced from the speakers if
the connected audio equipment is used while
charging it using the accessory socket of the
vehicle.
l Do not activate the external audio input
mode when no audio equipment is connected.
Otherwise, noise may be produced from the
speakers.
l Connect audio equipment when the external
audio input mode is deactivated or lower the
vehicle’s speaker volume before connecting it.
Noise may be produced from the speakers if
audio equipment is connected after the exter-
nal audio input mode is activated.
l For information on how to connect and oper-
ate the audio equipment, refer to the owner’s
manual for the equipment. Steering wheel remote control
switch* E00710000955
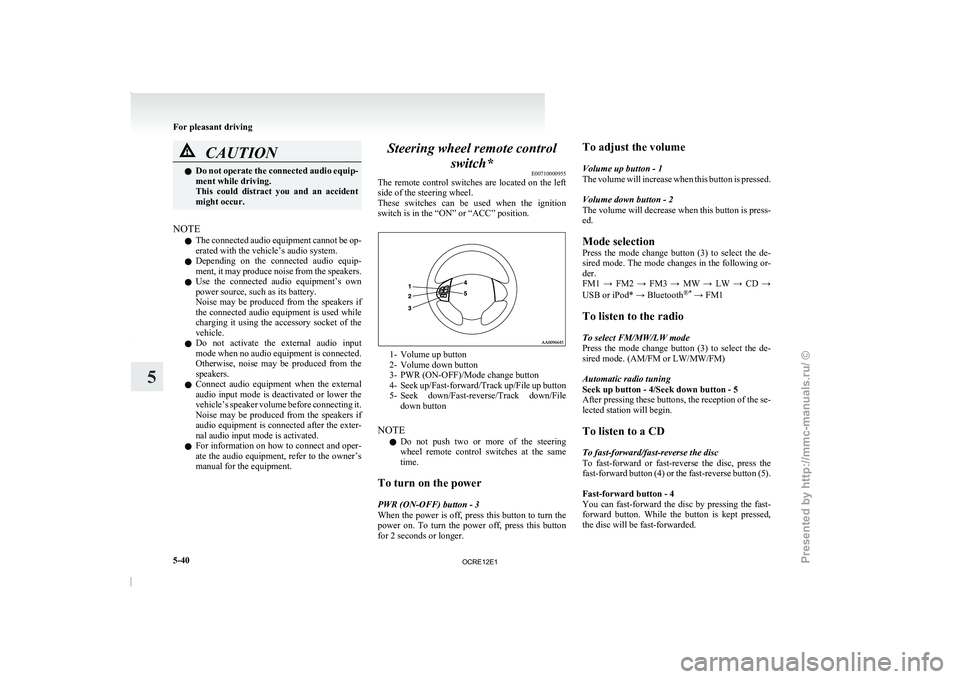
The remote control switches are
located on the left
side of the steering wheel.
These switches can be used when the ignition
switch is in the “ON” or “ACC” position. 1- Volume up button
2-
Volume down button
3- PWR (ON-OFF)/Mode change button
4- Seek up/Fast-forward/Track
up/File up button
5- Seek down/Fast-reverse/Track down/File down button
NOTE l Do not push two or more of the steering
wheel remote control switches at the same
time.
To turn on the power
PWR (ON-OFF) button - 3
When the power is off, press this button to turn the
power on. To turn the power off, press this button
for 2 seconds or longer. To adjust the volume
Volume up button - 1
The volume will increase
when
this button is pressed.
Volume down button - 2
The volume will decrease when this button is press-
ed.
Mode selection
Press the mode change button (3) to select the de-
sired mode. The mode changes in the following or-
der.
FM1 → FM2 → FM3 → MW → LW → CD →
USB or iPod* → Bluetooth ®*
→ FM1
To listen to the radio
To select FM/MW/LW mode
Press the mode change button (3) to select the de-
sired mode. (AM/FM or LW/MW/FM)
Automatic radio tuning
Seek up button - 4/Seek down button - 5
After pressing these buttons, the reception of the se-
lected station will begin.
To listen to a CD
To fast-forward/fast-reverse the disc
To fast-forward or fast-reverse the disc, press the
fast-forward button (4) or the fast-reverse button (5).
Fast-forward button - 4
You can fast-forward the disc by pressing the fast-
forward button. While the button is kept pressed,
the disc will be fast-forwarded.
For pleasant driving
5-40
5
OCRE12E1
Presented by http://mmc-manuals.ru/ \251
Page 243 of 369

l
If the name you
selected has matching data
in the mobile phone book but no telephone
number is registered under the selected loca-
tion, the voice guide will say “{home/work/
mobile/other} not found for
you like to try again?”
Answer “Yes,” and the system will return to
Step 3.
Answer “No,” and the call will be cancelled.
Start over again from Step 1.
6. The voice guide will say “Calling
telephone number.
NOTE l When the confirmation function is on, the sys-
tem will ask if the name and location of the
receiver are correct.
If the name is correct, answer “Yes.”
To change the name or location to call, an-
swer “No.” The system will return to Step 3.
Redialing
You can redial the last number called, based on the
history of dialed calls in the paired cellular phone.
Use the following procedure to redial. 1. Press the SPEECH button.
2. Say “Redial.”
SEND function E00761300035
During a call, press the SPEECH button to enter
voice recognition mode, then say
“
SEND” to generate DTMF tones. For example, if during a call you need to simulate
the press of a
phone
button as a response to an auto-
mated system, press the SPEECH button and speak
“1 2 3 4 pound SEND” and the 1234# will be sent
on your cellular phone.
Receiving calls E00761600012
If an incoming phone call is received while the ig-
nition switch is in the “ACC” or “ON” position, the
audio system will be automatically
turned on and
switched to the incoming call, even when the audio
system was originally off.
The voice guide announcement for the incoming
call will be output from the front passenger’s seat
speaker.
If the CD player or radio was playing when the in-
coming call was received, the audio system will
mute the sound from the CD player or radio and out-
put only the incoming call.
To receive the call, press the PICK-UP button on
the steering wheel control switch.
When the call is over, the audio system will return
to its previous state.
MUTE function E00760300041
At any time during a call, you can mute the vehicle
microphone.
Pressing the SPEECH button and
then saying
“Mute” during a call will turn ON the MUTE func-
tion and mute the microphone.
Saying “Mute off” in the same way will turn off
the MUTE function and cancel the mute on the mi-
crophone. Switching between hands-free mode and private
mode
E00761400036
The Bluetooth ®
2.0 interface can
switch between
Hands-free mode (Hands-free calls) and private
mode (calls using cellular phone).
If you press the SPEECH button and say “Transfer
call” during a Hands-free call, you can stop the
Hands-free mode and talk in private mode.
To return to Hands-free mode, press the SPEECH
button again and say “Transfer call”.
Phone book function E00763700017
The Bluetooth ®
2.0 interface has 2
types of unique
phone books that are different from the phone book
stored in the cellular phone. They are the vehicle
phone book and the mobile phone book.
These phone books are used to register telephone
numbers and to make calls to desired numbers via
the voice recognition function.
NOTE
l Disconnecting the battery cable will not de-
lete information registered in the phone book.
Vehicle phone book E00763800177
This phone book is used when making calls with
the voice recognition function.
Up to 32 names can
be registered in the vehicle
phone book per language.
Also, each entry has 4 locations associated with:
home, work, mobile and other. You can register
one telephone number for each location.
You can register a desired name as a name for any
phone book entry registered in the vehicle phone
book. For pleasant driving
5-60
5
OCRE12E1
Presented by http://mmc-manuals.ru/ \251
Page 266 of 369

If the vehicle breaks down
............................................................ 6-02
Emergency starting ....................................................................... 6-02
Engine overheating ....................................................................... 6-04
Bleeding the fuel system...............................................................6-05 Removal of water from the fuel filter ...........................................6-06
Tools, jack and jack handle .......................................................... 6-07
Jacking up the vehicle...................................................................6-13
Spare wheel................................................................................... 6-16
How to change a tyre .................................................................... 6-17
Towing .......................................................................................... 6-20
Operation under adverse driving conditions .................................6-24For emergencies
6
OCRE12E1
Presented by http://mmc-manuals.ru/ \251
Page 267 of 369

If the vehicle breaks down
E00800101166
If the vehicle breaks down
on the road, move it to
the shoulder and use the hazard warning flashers and/
or the warning triangle etc.
Refer to “Hazard warning flasher switch” on page
3-34.
If the engine stops/fails
Vehicle operation and control are affected if the en-
gine stops.
Before moving the vehicle to a safe area, be aware
of the following:
l The brake booster becomes inoperative and
the pedal effort will increase. Press down the
brake pedal harder than usual.
l Since the power steering pump is no longer
operative, the steering wheel feels heavy
when turning it. Emergency starting
E00800502112
If the engine cannot be
started because the battery
is weak or dead, the battery from another vehicle
can be used with jumper cables to start the engine. WARNING
l To start the engine
using
jumper cables
connected from another vehicle, perform
the correct procedures according to the in-
struction manual. Incorrect procedures
could result in a fire or explosion or dam-
age to the vehicles.
1. Get the vehicles close enough so the jumper
cables can
reach, but
be sure the vehicles
aren’t touching each other.
If they are, it could cause a ground connec-
tion you don’t want. The vehicle will not
start, and the bad grounding could damage
the electrical systems. CAUTION
l
Check the other vehicle.
It
must have a 12-
volt battery.
If the other system isn’t 12-volt, shorting
can damage both vehicles.
2. You could be injured if the vehicles move.
Set the
parking brake
firmly on each vehicle.
Put an automatic transmission in “P”
(PARK) or a manual transmission in “N”
(Neutral). Turn off the ignition switch. WARNING
l Turn off the ignition on
both vehicles be-
forehand.
Make sure that the cables or your clothes
cannot be caught by the fan or drive belt.
Personal injury could result.
NOTE l Turn
off all lamps, heater
and other electrical
loads. This will avoid sparks and help save
both batteries.
3. Make sure battery electrolyte is at the proper level.
Refer to “Battery” on page 8-10. WARNING
l If electrolyte fluid is
not
visible, or ap-
pears to be frozen, Do Not Attempt Jump
Starting!
A battery might rupture or explode if the
temperature is below the freezing point
or if it is not filled to the proper level.
4. Connect one end of one jumper cable to the
positive (+)
terminal of
the discharged bat-
tery (A), and the other end to the positive (+)
terminal of the booster battery (B).
For emergencies
6-02
6
OCRE12E1
Presented by http://mmc-manuals.ru/ \251
Page 272 of 369

2. Operate the hand pump (B) slowly 6 or 7
times in order to force the water out through
the drain plug (A). 3. Tighten the drain plug (A) when water no lon-
ger comes out.
4. Bleed the air in the fuel system. (Refer to “Bleeding
the fuel system” on page
6-05.)
5. Check to be sure that the fuel filter indication lamp illuminates when the ignition switch is
turned to “ON”, and that it goes off when the
engine is started. If in doubt, we recommend
you to consult a specialist for necessary infor-
mation. CAUTION
l
Do not smoke or
have
any other open
flame near the vehicle while bleeding the
fuel system.
l Be sure to carefully clean away any water
drained out because any fuel mixed with
the water could ignite and cause a fire. Type 3
Take your vehicle to a MITSUBISHI MOTORS Au-
thorized Service Point to
remove the water from
the fuel filter. Tools, jack and jack handle
E00800900819
Storage
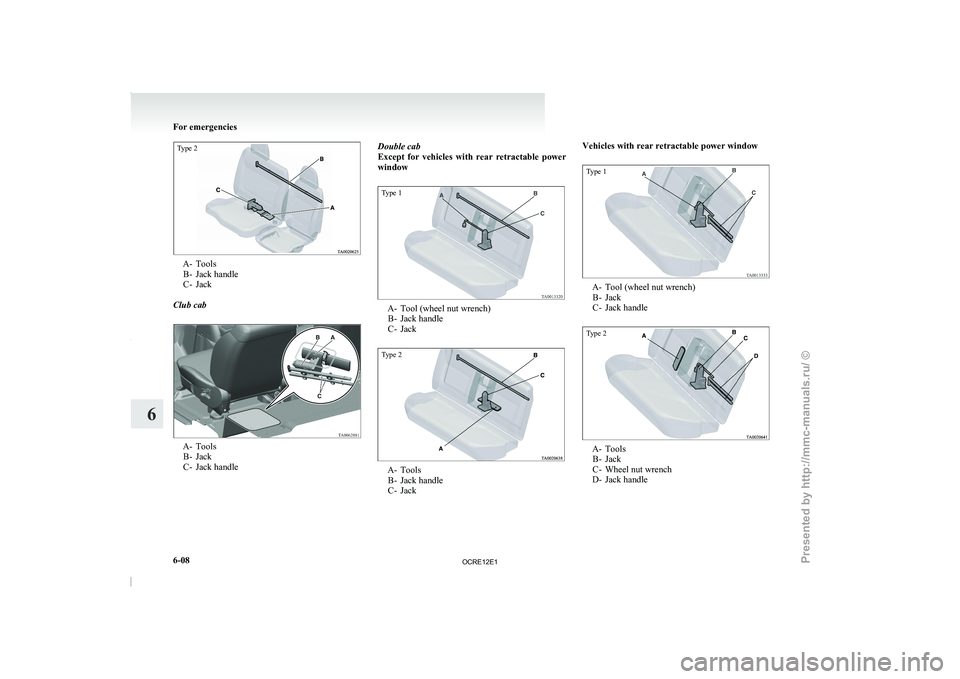
The storage location of the
tools, jack and jack han-
dle should be remembered in case of an emergency.
Single cab
Type 1 A- Tool (wheel nut wrench)
B- Jack handle
C- Jack For emergencies
6-07 6
OCRE12E1
Presented by http://mmc-manuals.ru/ \251
Page 273 of 369

Type 2A- Tools
B- Jack handle
C- Jack
Club cab A- Tools
B- Jack
C- Jack handle Double cab
Except for vehicles
with rear
retractable power
window
Type 1 A- Tool (wheel nut wrench)
B- Jack handleC- Jack
Type 2 A- Tools
B- Jack handleC- Jack Vehicles with rear retractable power window
Type 1
A- Tool (wheel nut wrench)
B- Jack
C- Jack handle
Type 2 A- Tools
B- Jack
C- Wheel nut wrench
D- Jack handle For emergencies
6-08
6
OCRE12E1
Presented by http://mmc-manuals.ru/ \251
Page 274 of 369

Tools
E00801900382
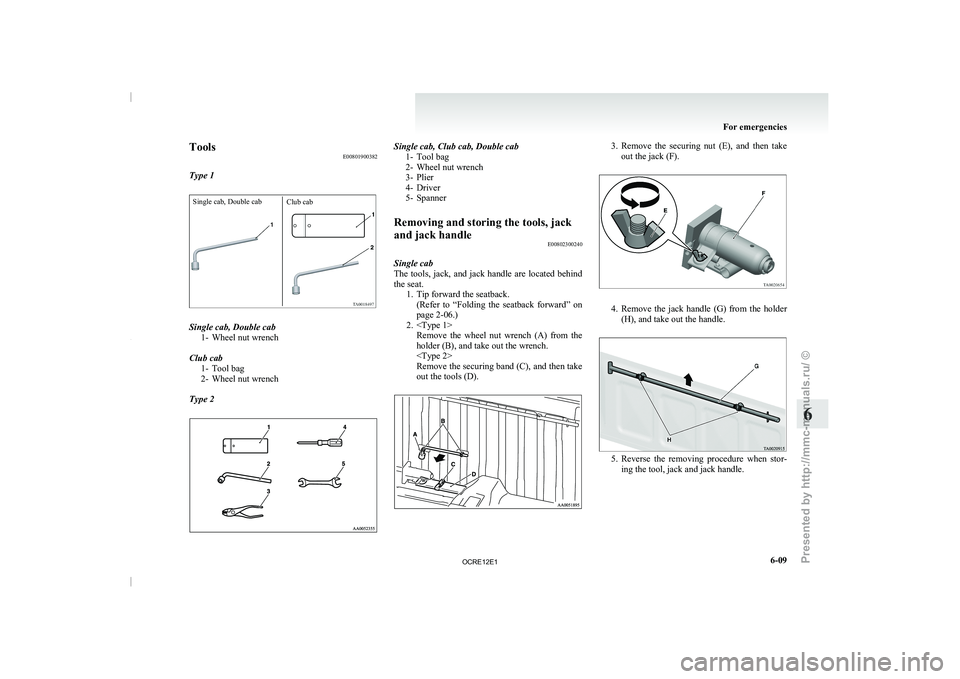
Type 1Single cab, Double cab Club cabSingle cab, Double cab
1- Wheel nut wrench
Club cab 1- Tool bag
2- Wheel nut wrench
Type 2 Single cab, Club cab, Double cab
1- Tool bag
2- Wheel nut wrench
3- Plier
4- Driver
5-
Spanner
Removing and storing the tools, jack
and jack handle E00802300240
Single cab
The tools, jack,
and jack
handle are located behind
the seat. 1. Tip forward the seatback.(Refer to “Folding the seatback forward” on
page 2-06.)
2.
holder (B), and take out the wrench.
Remove the securing band (C), and then take
out the tools (D). 3. Remove the securing nut (E), and then take
out the jack (F). 4. Remove the jack handle (G) from the holder
(H), and take out the handle. 5. Reverse the removing procedure when stor-
ing the tool, jack and jack handle. For emergencies
6-09 6
OCRE12E1
Presented by http://mmc-manuals.ru/ \251