2011 MITSUBISHI TRITON automatic transmission
[x] Cancel search: automatic transmissionPage 155 of 369

“4H” ↔ “4L”
Transfer shift lever posi-
tion 2WD/4WD operation
indication lamp
4H
Drive mode switching
in progress
4L
: Illuminate
: Remain off NOTE
l The
2WD/4WD operation indication lamp
will go out momentarily during shifting proc-
ess
from “4H” to “4L” or vice versa, as the
transfer shift lever passes through the neutral
position.
Be sure to operate the transfer shift lever un-
til the 2WD/4WD operation indication lamp
illuminates again.
l If, after a “4H” ↔ “4L” selection has been
made, the 2WD/4WD operation indication
lamp remains off and the desired range is not
actually selected, return the transfer shift lev-
er to its previous position. Place the steering
wheel in the straight ahead position, drive
the vehicle forward, and release the accelera-
tor pedal. Next, hold down the clutch pedal
(with manual transmission) or place the selec-
tor lever in the “N” (NEUTRAL) position
(with automatic transmission) and make the
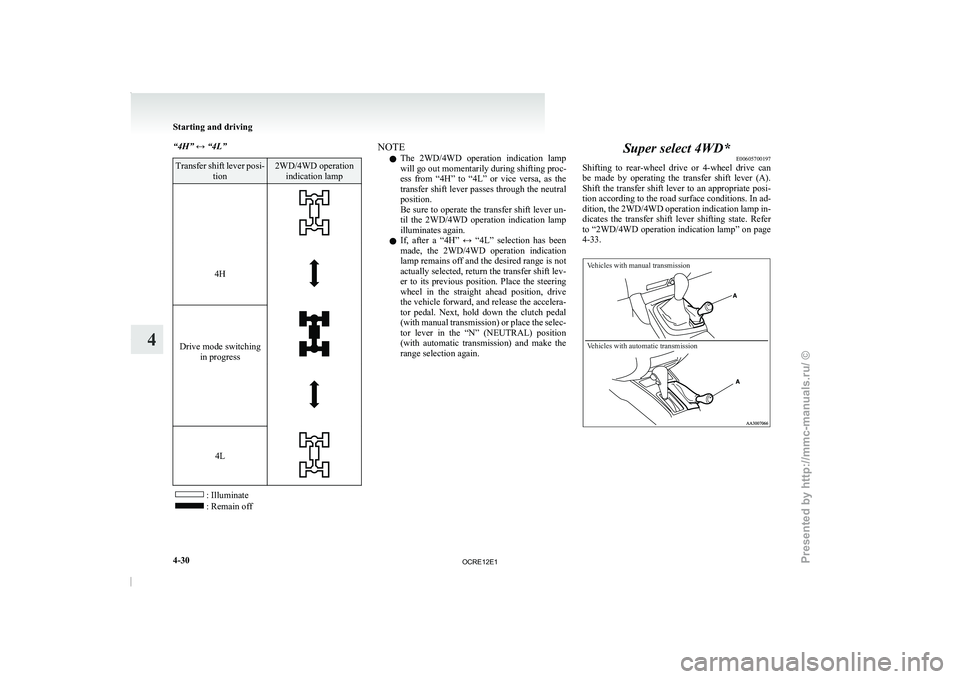
range selection again. Super select 4WD*
E00605700197
Shifting to rear-wheel drive
or
4-wheel drive can
be made by operating the transfer shift lever (A).
Shift the transfer shift lever to an appropriate posi-
tion according to the road surface conditions. In ad-
dition, the 2WD/4WD operation indication lamp in-
dicates the transfer shift lever shifting state. Refer
to “2WD/4WD operation indication lamp” on page
4-33.
Vehicles with manual transmission
Vehicles with automatic transmission Starting and driving
4-30
4
OCRE12E1
Presented by http://mmc-manuals.ru/ \251
Page 156 of 369

Transfer shift lever position and 2WD/
4WD operation indication lamp
E00605800228Transfer shift lever
position 2WD/4WD
operation in- dicationlamp Driving con-
ditions
2H Rear-wheel
drive When driv-
ing on dry
paved road.
4H Full-time 4-
wheel drive The basic
position for
super select
4WD.
When driv-
ing
on
dry
paved or
slippery
roads.
4HLc Centre dif-
ferential
lock engag- ed 4-wheel drive When driv-
ing on
rough, sand
or snow
cov-
ered roads.
4LLc Low range
centre
differ-
ential lock
engaged 4-
wheel drive When driv-
ing up or
down steep
hills,
on
rough
or
muddy
roads (espe-
cially when
increased
torque is re-
quired). : Illuminate
: Remain off
NOTE l On
vehicles with automatic transmission,
when the transfer shift lever is in “4LLc”, the
transmission
will not shift into the overdrive
gear. CAUTION
l
The “4LLc” range gives
maximum
tor-
que for low-speed driving on steep slopes,
as well as sandy, muddy, and other diffi-
cult surfaces. On vehicles with automatic
transmission, do not exceed speeds of ap-
proximately 70 km/h (43 mph) in “4LLc”
range.
l Do not drive your vehicle in the “4HLc”
or “4LLc” on dry paved roads and high-
ways. Doing so may result in excessive
tyre wear, increased fuel consumption,
and possible noise generation. It may also
increase the differential oil temperature,
which may damage the drive system. Fur-
ther, the drive train will be subjected to
excessive loading, resulting in oil leakage,
component seizure, or other serious prob-
lems. On dry paved roads and highways,
drive the vehicle in “2H” or “4H” only. Transfer shift lever operation
E00605900173
The shift pattern is shown
on the transfer shift lev-
er knob. The transfer shift lever should be positioned in ac-
cordance with the following operating conditions:
: Not push down the transfer shift lever
: Push down the transfer shift lever Starting and driving
4-31 4
OCRE12E1
Presented by http://mmc-manuals.ru/ \251
Page 157 of 369

To shift from To Procedure
Vehicles with manual transmission Vehicles with automatic transmission
2H 4H
The transfer shift lever can be operated while the vehicle is
either moving or stationary.
When the vehicle is not in motion, shift the gearshift lever
to the “N” (Neutral) position before operating the transfer
shift lever.
When the vehicle is moving, and only while it can be
steered straight ahead, and release the accelerator pedal be-
fore operating the transfer shift lever. The transfer shift lever can be operated while the vehicle
is either moving or stationary.
When the vehicle is not in motion, shift the selector lever
to the “N” (NEUTRAL) position before operating the
transfer shift lever.
When the vehicle is moving, and only while it can be
steered straight ahead, shift the selector lever to the “D”
(DRIVE) position, and release the accelerator pedal be-
fore operating the transfer shift lever.
4H
2H or 4HLc
4HLc 4H
4HLc 4LLc
Stop the vehicle, depress the clutch pedal to the floor and
operate the transfer shift lever while keeping the transfer
shift lever pushed down.
Keep depressing the clutch pedal while the 2WD/4WD op-
eration indication lamp continues to blink. Stop the vehicle, shift the selector lever to the “N” (NEU-
TRAL) position, and operate the transfer shift lever
while keeping the transfer shift lever pushed down.
If operation is made with the selector lever placed in any
other position than “N” (NEUTRAL) position, a gear
noise may be generated, with
a possible failure to shift in-
to a proper gear.
4LLc
4HLcNOTE
l Shifting
of the transfer shift
lever between
“2H” ↔ “4H” should only be done at speeds
below 100 km/h (62 mph).
l During driving, never attempt to shift from
“4HLc” to “4LLc”.
l When shifting from “2H” to “4H” in cold
weather while the vehicle is in motion, the
transmission gear may make some noise. In
cold weather, try to shift the gear while the
vehicle is stopped. l
When
the transfer shift
lever is shifted from
“4H” to “4HLc” while the vehicle is stopped,
the 2WD/4WD operation indication lamp
blinks while the selection is in process. Drive
slowly and normally after confirming that
the lamp is illuminated. (Refer to “2WD/
4WD operation indication lamp” on page
4-33.)
l Do not move the selector lever while the 2WD/
4WD operation indication lamp is blinking.
l The 2WD/4WD operation indication lamp
will go out momentarily during shifting proc-
ess from “4HLc” to “4LLc” or vice versa, as
the transfer shift lever passes through the neu-
tral position.
Be sure to operate the transfer shift lever un-
til the 2WD/4WD operation indication lamp
illuminates again. l
There may be a case that the transfer shift lev-
er feels heavy when it is moved from “2H”
to “4H” with the steering wheel in turned po-
sition.
This is normal and not any indication of trou-
ble. CAUTION
l
Do not operate the
transfer
shift lever
while the rear wheels of the vehicle are
slipping on snow or ice. Starting and driving
4-32
4
OCRE12E1
Presented by http://mmc-manuals.ru/ \251
Page 164 of 369

4-wheel drive operation
E00606600920
By selecting 4-wheel drive, both
axles of the vehi-
cle are rigidly connected with each other. This im-
proves the traction characteristics. When turning
sharp corners or moving forward and backward re-
peatedly, however, the drive line is stressed, which
is felt as a braking effect. A 4-wheel drive vehicle
can accelerate more quickly and smoothly.
However, note that the braking distance is not short-
er than that of a rear-wheel drive vehicle.
When using 4-wheel drive on rough roads (snow,
mud, sand, etc.), it is important to operate the vehi-
cle correctly.
NOTE
l The driving posture should be more upright
and closer to the wheel than usual; adjust the
seat to a good position for easy steering and
pedal operation. Be sure to wear the seat belt.
l After driving on rough roads, check each
part of the vehicle and wash it thoroughly
with water. Refer to the “Vehicle care” sec-
tion and “Inspection and maintenance follow-
ing rough road operation” on page 4-41.
Driving on dry paved road and highway
Select “2H” position (easy select 4WD), “2H” or
“4H” position (super select 4WD) to drive on the
dry paved road. Especially on dry highway, never
select the “4H” or “4L” position (easy select
4WD), “4HLc” or “4LLc” position (super select
4WD). CAUTION
l
Selecting “4H” or “4L” position
(easy se-
lect 4WD), “4HLc” or “4LLc” position (su-
per select 4WD) to drive on dry paved
road will increase the fuel consumption
with possible noise generation and early
tyre wear.
It may also increase the differential oil
temperature, resulting in possible dam-
age to the driving system.
Further, the drive train will be subjected
to excessive loading, possibly leading to
oil leakage, component seizure, or other
serious faults.
Driving on snowy or icy roads
Set the transfer shift lever
to “4H” or “4L” position
(easy select 4WD), “4H” or “4HLc” position (su-
per select 4WD) in accordance with the road condi-
tions, and then gradually depress the accelerator ped-
al for a smooth start.
NOTE
l The use of snow tyres and/or tyre chains is
recommended.
l Maintain a safe distance between vehicles,
avoid sudden braking, and use engine brak-
ing (downshifting). CAUTION
l
Avoid sudden braking, sudden accelera-
tion,
and sharp turning; such operations
could cause skidding and spinouts. Driving on sandy or muddy roads
Set the transfer shift
lever
to “4H” or “4L” position
(easy select 4WD), “4HLc” or “4LLc” position (su-
per select 4WD) and then gradually depress the ac-
celerator pedal for a smooth start. Keep the pres-
sure on the accelerator pedal as constant as possi-
ble, and drive at low speed. CAUTION
l
Do not force the
vehicle
or drive reckless-
ly on sandy surfaces. In comparison with
normal road surfaces, the engine and oth-
er drive-system components are put un-
der excessive strain when driving on such
a surface, and this could lead to accidents.
l If any of following conditions occur while
the vehicle is being driven, immediately
park your vehicle in a safe place and fol-
low these procedures:
• The needle in the temperature gaugeapproaches the overheating zone.
Refer to “Engine overheating” on
page 6-04.
• Automatic transmission fluid temper- ature warning lamp comes on.
Refer to “When the A/T (automatic
transmission) fluid temperature warn-
ing lamp comes on” on pages 4-19,
4-24. Starting and driving
4-39 4
OCRE12E1
Presented by http://mmc-manuals.ru/ \251
Page 175 of 369

Cruise control*
E00609100779
Cruise control is an automatic
speed control system
that keeps a set speed. It can be activated at about
40 km/h (25 mph) or more. CAUTION
l
When you do not
wish
to drive at a set
speed, turn off the cruise control for safety.
l Do not use cruise control when driving
conditions will not allow you to stay at
the same speed, such as in heavy traffic
or on roads that are winding, icy, snow-
covered, wet, slippery, on a steep down-
hill slope.
l On vehicles with manual transmission, do
not move the gearshift lever to the “N”
(Neutral) position while driving at a set
speed without depressing the clutch ped-
al. The engine will run too fast and might
be damaged.
NOTE l Cruise
control may not be
able to keep your
speed on uphills or downhills.
l Your speed may decrease on a steep uphill.
You may use the accelerator pedal if you
want to stay at your set speed.
l Your speed may increase to more than the
set speed on a steep downhill. You must use
the brake to control your speed. As a result,
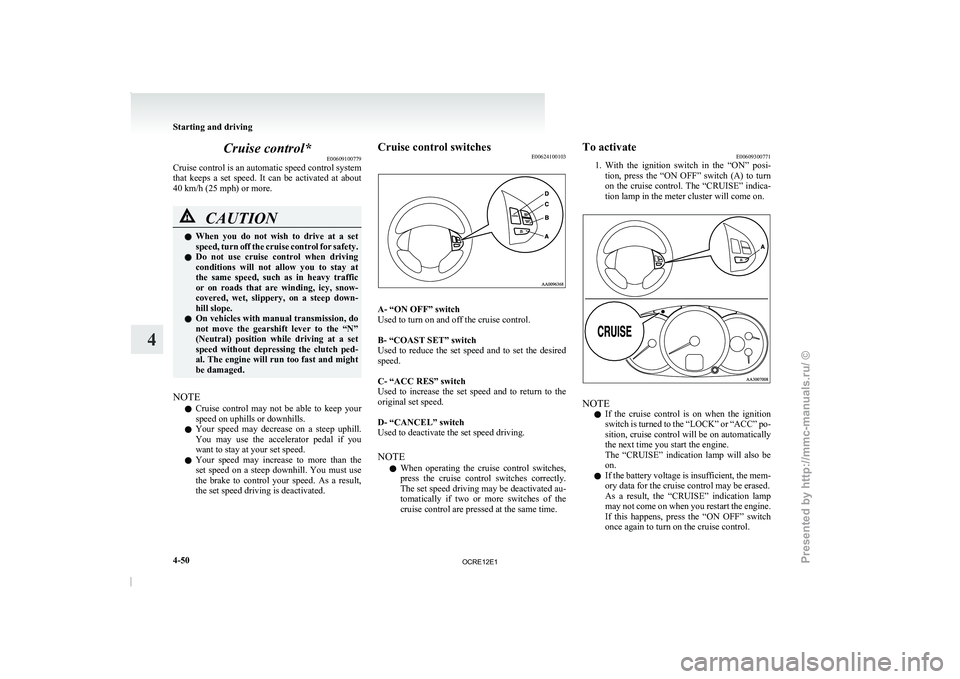
the set speed driving is deactivated. Cruise control switches
E00624100103 A- “ON OFF” switch
Used to turn on and off the cruise control.
B- “COAST SET” switch
Used to reduce the
set
speed and to set the desired
speed.
C- “ACC RES” switch
Used to increase the set speed and to return to the
original set speed.
D- “CANCEL” switch
Used to deactivate the set speed driving.
NOTE
l When operating the cruise control switches,
press the cruise control switches correctly.
The set speed driving may be deactivated au-
tomatically if two or more switches of the
cruise control are pressed at the same time. To activate
E00609300771
1. With the ignition
switch in
the “ON” posi-
tion, press the “ON OFF” switch (A) to turn
on the cruise control. The “CRUISE” indica-
tion lamp in the meter cluster will come on. NOTE
l If
the cruise control is
on when the ignition
switch is turned to the “LOCK” or “ACC” po-
sition, cruise control will be on automatically
the next time you start the engine.
The “CRUISE” indication lamp will also be
on.
l If the battery voltage is insufficient, the mem-
ory data for the cruise control may be erased.
As a result, the “CRUISE” indication lamp
may not come on when you restart the engine.
If this happens, press the “ON OFF” switch
once again to turn on the cruise control. Starting and driving
4-50
4
OCRE12E1
Presented by http://mmc-manuals.ru/ \251
Page 182 of 369

Additional precautions for vehicles equipped with
an automatic transmission
It is recommended the “2”
(SECOND) position
(4A/T) or 2 nd
gear in sports mode (5A/T) on slopes
or at low speed. Use the “L” (LOW) position
(4A/T) or 1 st
gear in sports mode (5A/T) in moun-
tainous areas in order to make better use of engine
braking and to assist the brake system. However,
be sure that the speed does not exceed the maxi-
mum speed limit for the selected gear. Starting and driving
4-57 4
OCRE12E1
Presented by http://mmc-manuals.ru/ \251
Page 267 of 369

If the vehicle breaks down
E00800101166
If the vehicle breaks down
on the road, move it to
the shoulder and use the hazard warning flashers and/
or the warning triangle etc.
Refer to “Hazard warning flasher switch” on page
3-34.
If the engine stops/fails
Vehicle operation and control are affected if the en-
gine stops.
Before moving the vehicle to a safe area, be aware
of the following:
l The brake booster becomes inoperative and
the pedal effort will increase. Press down the
brake pedal harder than usual.
l Since the power steering pump is no longer
operative, the steering wheel feels heavy
when turning it. Emergency starting
E00800502112
If the engine cannot be
started because the battery
is weak or dead, the battery from another vehicle
can be used with jumper cables to start the engine. WARNING
l To start the engine
using
jumper cables
connected from another vehicle, perform
the correct procedures according to the in-
struction manual. Incorrect procedures
could result in a fire or explosion or dam-
age to the vehicles.
1. Get the vehicles close enough so the jumper
cables can
reach, but
be sure the vehicles
aren’t touching each other.
If they are, it could cause a ground connec-
tion you don’t want. The vehicle will not
start, and the bad grounding could damage
the electrical systems. CAUTION
l
Check the other vehicle.
It
must have a 12-
volt battery.
If the other system isn’t 12-volt, shorting
can damage both vehicles.
2. You could be injured if the vehicles move.
Set the
parking brake
firmly on each vehicle.
Put an automatic transmission in “P”
(PARK) or a manual transmission in “N”
(Neutral). Turn off the ignition switch. WARNING
l Turn off the ignition on
both vehicles be-
forehand.
Make sure that the cables or your clothes
cannot be caught by the fan or drive belt.
Personal injury could result.
NOTE l Turn
off all lamps, heater
and other electrical
loads. This will avoid sparks and help save
both batteries.
3. Make sure battery electrolyte is at the proper level.
Refer to “Battery” on page 8-10. WARNING
l If electrolyte fluid is
not
visible, or ap-
pears to be frozen, Do Not Attempt Jump
Starting!
A battery might rupture or explode if the
temperature is below the freezing point
or if it is not filled to the proper level.
4. Connect one end of one jumper cable to the
positive (+)
terminal of
the discharged bat-
tery (A), and the other end to the positive (+)
terminal of the booster battery (B).
For emergencies
6-02
6
OCRE12E1
Presented by http://mmc-manuals.ru/ \251
Page 278 of 369

Jacking up the vehicle
E00801001436
1. Park the vehicle on level and stable ground.
2. Set the parking brake firmly.
3. On vehicles
with manual transmission, turn
the ignition key to the “LOCK” position,
move the gearshift lever to the “R” (Reverse)
position.
On vehicles with automatic transmission,
move the selector lever to the “P” (PARK) po-
sition, turn the ignition key to the “LOCK”
position.
4. Turn on the hazard warning flashers and set up a warning triangle, flashing signal lamp,
etc., at an adequate distance from the vehi-
cle, and have all your passengers leave the ve-
hicle.
5. To prevent the vehicle from rolling when it is raised on the jack, place chocks or blocks
(A) at the tyre that is diagonally opposite
from the tyre (B) you are changing. WARNING
l Be sure to apply chocks
or blocks to the
correct tyre when jacking up the vehicle.
If the vehicle moves while jacked up, the
jack could slip out of position, leading to
an accident.
NOTE l The
chocks shown in the
illustration do not
come with your vehicle. It is recommended
that you keep one in the vehicle for use if nee-
ded.
l If chocks are not available, use stones or any
other objects that are large enough to hold
the wheel in position.
6. Get the spare wheel, jack and jack handle ready.
7. Place the jack under one of the jacking points shown in the illustration. Use the jack-
ing point closest to the tyre you wish to
change. 2WD vehicles with 15 inch wheels C- Front jacking point (2WD vehicles with 15
inch wheels)
2WD vehicles with 16 inch wheels and 4WD ve-
hicles D- Front jacking point (2WD vehicles 16 inch
wheels and 4WD vehicles) For emergencies
6-13 6
OCRE12E1
Presented by http://mmc-manuals.ru/ \251