2011 MITSUBISHI TRITON audio
[x] Cancel search: audioPage 197 of 369

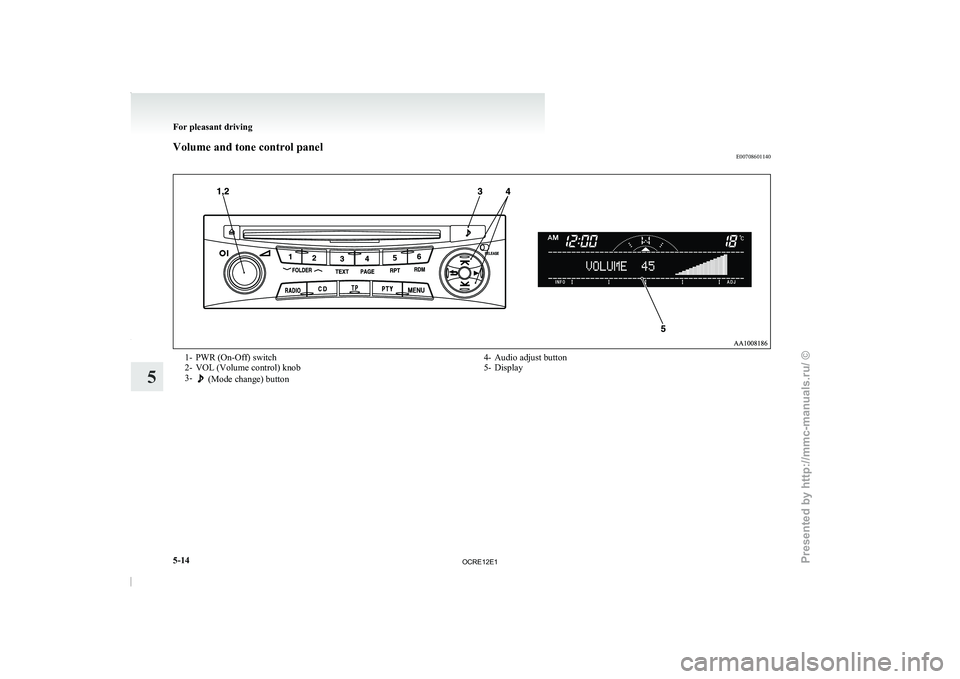
Volume and tone control panel
E007086011401- PWR (On-Off) switch
2-
VOL (Volume control) knob
3- (Mode change) button
4- Audio adjust button
5-
Display For pleasant driving
5-14
5
OCRE12E1
Presented by http://mmc-manuals.ru/ \251
Page 198 of 369

To adjust the volume
E00708700665
VOL (Volume control)
Turn the VOL knob (2)
clockwise to increase the
volume;
anticlockwise to decrease the volume. The status
will be displayed in the display (5).
To adjust the tone E00708801269
Press the button (3) to select BASS TRE-
BLE FADER BALANCE SCV Audio
adjust mode off. The status
will be displayed in the
display (5).
BASS (Bass tone control)
Press the audio adjust button (4) either or to
select the desired bass level. TREBLE (Treble tone control)
Press the audio adjust button
(4) either or to
select the desired treble level.
FADER (Front/Rear balance control)
Press the audio adjust button
(4) either or to
balance the volume of sound
from the front and the
rear speakers.
BALANCE (Left/Right balance control)
Press the audio adjust button (4) either or to
balance the volume of sound
from the left and the
right speakers. SCV (Speed Compensated Volume) function
The Speed Compensated Volume
function
is a fea-
ture that automatically adjusts the VOL, BASS,
MID, and TREBLE settings in accordance with the
vehicle speed.
The effects of the SCV function can be selected ei-
ther of three levels (LOW, MID and HIGH). Select
the degree of your choice by pressing the audio ad-
just button (4) either or . If you want to stop
the SCV function, select the OFF.
NOTE
l Audio
adjust mode will be
cancelled when an-
other mode is selected or no adjustment is per-
formed for more than 10 seconds. For pleasant driving
5-15 5
OCRE12E1
Presented by http://mmc-manuals.ru/ \251
Page 200 of 369

To listen to the radio
E00709000896
1. Press the PWR switch (1)
to turn the audio
system ON and OFF. The system turns on in
the last mode used.
2. Press the RADIO buttons (5) to select the de- sired band.
3. Press the TUNE/SEEK button (3 or 4) to tune to a station, or press one of the memory
select buttons (2) to recall a station memo-
rised for that button.
To tune the radio E00709100451
Automatic tuning
After keeping the TUNE/SEEK
button
(3 or 4) de-
pressed, release the button, and the selected station
reception will start.
Manual tuning
The frequency changes every time the TUNE/
SEEK button (3 or 4) is pressed. Press the button to
select the desired station. To enter frequencies into the memory
E00716101173
Manual setting
You can assign to
the
memory select buttons (2) a
maximum of 18 stations in the FM band (6 FM1, 6
FM2 and 6 FM3 stations) and 6 stations each in the
MW and LW band. (Stations already assigned to
the memory select buttons are replaced by any new-
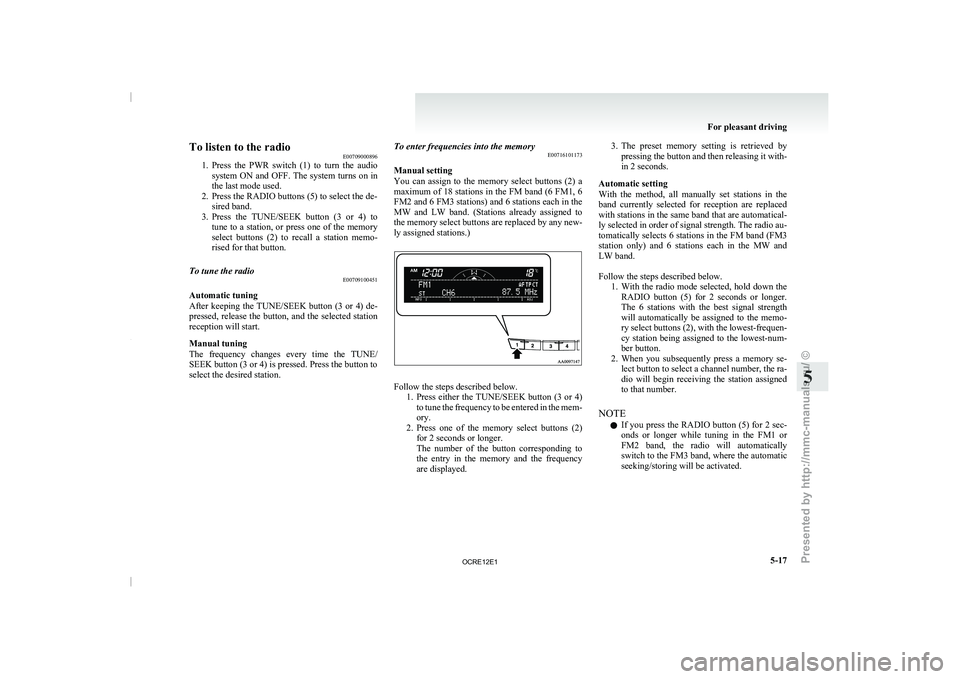
ly assigned stations.) Follow the steps described below.
1. Press either the TUNE/SEEK button
(3 or 4)
to tune the frequency to be entered in the mem-
ory.
2. Press one of the memory select buttons (2) for 2 seconds or longer.
The number of the button corresponding to
the entry in the memory and the frequency
are displayed. 3. The preset memory setting is retrieved by
pressing the button and
then releasing it with-
in 2 seconds.
Automatic setting
With the method, all manually set stations in the
band currently selected for reception are replaced
with stations in the same band that are automatical-
ly selected in order of signal strength. The radio au-
tomatically selects 6 stations in the FM band (FM3
station only) and 6 stations each in the MW and
LW band.
Follow the steps described below. 1. With the radio mode selected, hold down theRADIO button (5) for 2 seconds or longer.
The 6 stations with the best signal strength
will automatically be assigned to the memo-
ry select buttons (2), with the lowest-frequen-
cy station being assigned to the lowest-num-
ber button.
2. When you subsequently press a memory se- lect button to select a channel number, the ra-
dio will begin receiving the station assigned
to that number.
NOTE l If you press the RADIO button (5) for 2 sec-
onds or longer while tuning in the FM1 or
FM2 band, the radio will automatically
switch to the FM3 band, where the automatic
seeking/storing will be activated. For pleasant driving
5-17 5
OCRE12E1
Presented by http://mmc-manuals.ru/ \251
Page 202 of 369

AF (Alternative Frequencies) function
E00720900061
The AF function finds a
station broadcasting the
same program and selects the station with the stron-
gest signal of AF lists.
The AF function is turned on (with the AF indica-
tor (12) shown on the display) at all times unless
you manually switch it off.
The AF function can be turned ON and OFF.
Refer to “Function setup mode” on page 5-21.
CT (Clock Time) function E00721000131
The clock can be set automatically by using the sig-
nal from the local RDS
stations. Refer to “Adjust-
ing the time” on page 3-12.
REG (Regional) function E00721100057
REG function limits to receive the stations broad-
casting regional programs.
Regional programming and regional networks
are
organized differently depending on the country or
area (they may be changed according to the hour,
state, or broadcast area), so if you don’t want to re-
ceive the regional programs automatically, you can
set up REG ON not to receive regional programs.
The REG function can be turned ON and OFF.
Refer to “Function setup mode” on page 5-21.
PI (Program Identification) search function E00721200221
When travelling long distance and the recalled pre-
set station is weak, the
radio searches another fre-
quency broadcasting the same programming with
the same PI code in AF list. If there are no frequencies broadcasting the same
programming, the radio searches
a
frequency broad-
casting the regional programming. The radio suc-
ceeds in searching the regional programming, then
the display shows the REG indicator (11).
If the radio does not succeed in searching the re-
gional programming, the radio returns to the recal-
led preset station.
The PI function can be turned ON and OFF.
Refer to “Function setup mode” on page 5-21.
NOTE
l While searching, the audio system is muted.
The display shows “WAIT” or “SEARCH”.
PTY (Program type) E00721300349
RDS broadcasts are classified according to pro-
gram type (PTY) as follows.
Use the TUNE/SEEK
button (3 or 4) to select your desired PTY.
1. NEWS
2. AFFAIRS (Current affairs)
3. INFO (Information)
4. SPORT
5. EDUCATE (Education)
6. DRAMA
7. CULTURE
8. SCIENCE
9. VARIED
10. POP M (Pop music)
11. ROCK M (Rock music)
12. EASY M (Easy music)
13. LIGHT M (Light classics)
14. CLASSICS
15. OTHER M (Other music)
16. WEATHER (Weather information)
17. FINANCE
18. CHILDREN 19. SOCIAL
20. RELIGION
21. PHONE IN
22. TRAVEL
23. LEISURE
24.
JAZZ
25. COUNTRY
26. NATION M (National music)
27. OLDIES
28. FOLK M (Folk music)
29. DOCUMENT
To search for a broadcast of desired program type: 1. Press the PTY button (7).
2. Press the TUNE/SEEK button (3 or 4) forless than 1 second repeatedly to select your
desired PTY.
3. Two seconds after a desired PTY has been se- lected, the radio will begin to search for a
broadcast of your selected PTY. During
search, the selected PTY on the display blinks.
4. When the radio picks up a station with your desired PTY, the display will show the name
of the station. For pleasant driving
5-19 5
OCRE12E1
Presented by http://mmc-manuals.ru/ \251
Page 203 of 369

NOTE
l If
the TUNE/SEEK button (3
or 4) is pressed
for more than 1 second, the radio will try to
find out another broadcast of the same pro-
gram type as currently selected.
l If no station is found with your desired PTY,
the display will show “EMPTY” for about
5 seconds and the radio will return to the pre-
vious station.
How to enter PTYs in the memory E00721400135
As many as 6 PTYs can be entered in the memory.
Follow the steps described below.
1. Press either the TUNE/SEEK
button
(3 or 4)
to tune the PTY to be entered in the memory.
2. Press one of the memory select buttons (2) for 2 seconds or longer. The number of the
button corresponding to the entry into the
memory and the PTY are displayed.
3. The preset memory setting is retrieved by pressing the button and then releasing it with-
in about 2 seconds.
Traffic information E00721600254
The radio will automatically tune in to traffic infor-
mation broadcasts while receiving FM
broadcasts
or playing compact discs etc.
To select this function, follow the instructions below. 1. Press the TP button (6). The display willshow “TP” (13). If the RDS data can be read,
the display will show “RDS” (9). If not, the
display will show “NO RDS” for about 5 sec-
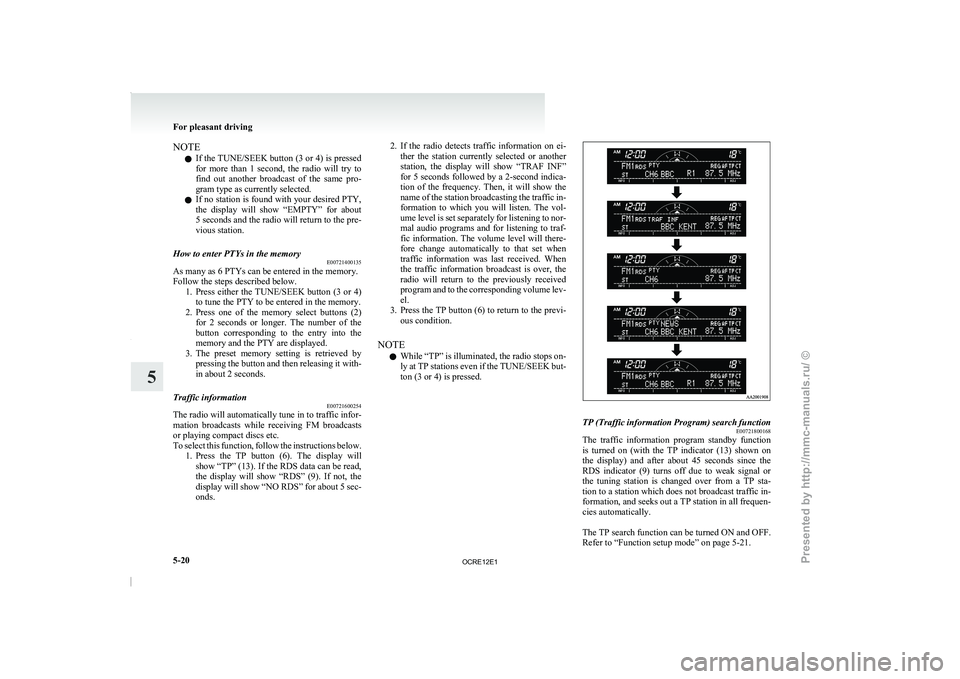
onds. 2. If the radio detects traffic information on ei-
ther the station currently
selected or another
station, the display will show “TRAF INF”
for 5 seconds followed by a 2-second indica-
tion of the frequency. Then, it will show the
name of the station broadcasting the traffic in-
formation to which you will listen. The vol-
ume level is set separately for listening to nor-
mal audio programs and for listening to traf-
fic information. The volume level will there-
fore change automatically to that set when
traffic information was last received. When
the traffic information broadcast is over, the
radio will return to the previously received
program and to the corresponding volume lev-
el.
3. Press the TP button (6) to return to the previ- ous condition.
NOTE l While “TP” is illuminated, the radio stops on-
ly at TP stations even if the TUNE/SEEK but-
ton (3 or 4) is pressed. TP (Traffic information Program) search function
E00721800168
The traffic information program standby function
is turned
on (with
the
TP indicator (13) shown on
the display) and after about 45 seconds since the
RDS indicator (9) turns off due to weak signal or
the tuning station is changed over from a TP sta-
tion to a station which does not broadcast traffic in-
formation, and seeks out a TP station in all frequen-
cies automatically.
The TP search function can be turned ON and OFF.
Refer to “Function setup mode” on page 5-21. For pleasant driving
5-20
5
OCRE12E1
Presented by http://mmc-manuals.ru/ \251
Page 204 of 369

Emergency broadcasts
E00721700213If an emergency broadcast is caught while receiv-
ing a FM broadcast or
playing back a compact disc
with the ignition switch in “ACC” or “ON” posi-
tion, the display will show “ALARM” and the emer-
gency broadcast will interrupt the current program.
The volume level is set separately for listening to
normal audio programs and for listening to emer-
gency broadcasts. The volume level will therefore
change automatically to that set when an emergen-
cy broadcast or traffic information broadcast was
last received. When the emergency broadcast is
over, the radio will return to the previously re-
ceived program and to the corresponding volume
level. Function setup mode
E00722500449
It is possible to change the following functions:
l Gracenote Database*
l AF
l CT
l REG*
l TP-S
l PI-S*
l PHONE
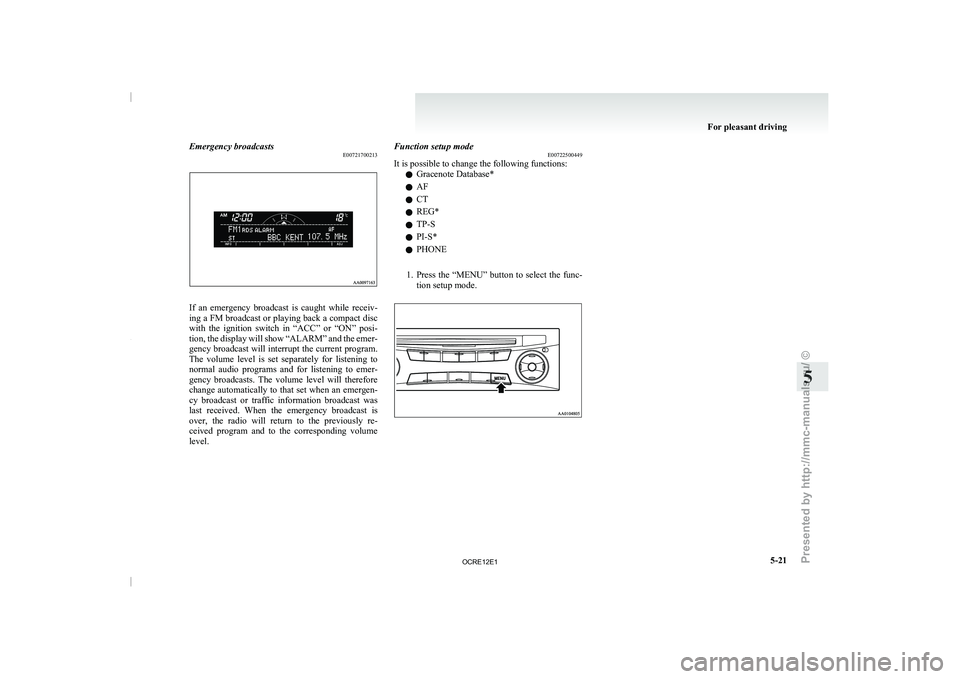
1. Press the “MENU” button to
select the func-
tion setup mode. For pleasant driving
5-21 5
OCRE12E1
Presented by http://mmc-manuals.ru/ \251
Page 207 of 369

To listen to a CD
E00709602290
1. Insert a disc with the
label facing up, and the
CD player will begin playing even if another
mode is being used. The CD indicator (18),
the track number (16), the playing time (17)
will appear on the display.
2. When the CD mode is selected by pressing the CD (12) button several times with the
disc in the player, the CD player will start
playback.
3. To stop the CD, turn off the power by press- ing the PWR switch (11) or change over to
the another mode by pressing the RADIO but-
ton or CD button, or eject the disc by press-
ing the eject button (1).
NOTE l To adjust the volume and tone, refer to “To
adjust the volume” on page 5-15 and “To ad-
just the tone” on page 5-15.
l An 8 cm compact disc cannot be played on
this CD player.
l For information concerning the handling of
compact discs, refer to “Handling of compact
discs” on page 5-48.
To fast-forward/fast-reverse the disc
Fast-forward
You can fast-forward the disc by pressing the button (9). While the button is kept pressed, the
disc will be fast-forwarded.
Fast-reverse
You can fast-reverse the
disc
by pressing the but-
ton (10). While the button
is kept pressed, the disc
will be fast-reversed. NOTE
l When
you have fast-forwarded/fast-reversed
the disc,
the playing-time may be shown
with deviation.
To listen to an MP3 CD
This CD player allows you to play MP3 (MPEG Au-
dio Layer-3) files recorded on CD-ROMs, CD-Rs
(recordable CDs), and CD-RWs (rewritable CDs)
in ISO9660 Level 1/Level 2, Joliet, and Romeo for-
mats. Each disc may have a maximum of 16 trees,
100 folders, and 255 files per disc. During MP3
playback, the unit can display ID3 tag information.
For information concerning ID3 tag, refer to “CD
text and MP3 title display” on page 5-26. 1. Insert a disc containing MP3 files into the slot.
2. The display
shows
the folder number and the
file number, then playback will begin. NOTE
l While
listening to
a disc
on which CD-DA
(CD-Digital Audio) and MP3 files have both
been recorded, you can switch between read-
ing of the CD-DA, reading of the MP3 files,
and the external audio input mode (AUX) by
pressing the CD button for 2 seconds or longer.
l With a disc that contains both CD-DA and
MP3 files, the CD-DA files are automatical-
ly played first.
l The playback sound quality differs depend-
ing on the encoding software and the bit rate.
For details, refer to the user manual of your
encoding software.
l Depending on file/folder configurations on a
disc, it may take some time before playback
starts.
l MP3 encoding software and writing software
are not supplied with this unit.
l You may encounter trouble in playing an
MP3 or displaying the information of MP3
files recorded with certain writing software
or CD recorders (CD-R/RW drivers).
l If you record too many folders or files other
than MP3 onto a disc, it may take some time
before playback starts.
l This unit does not record MP3 files.
l For information concerning CD-Rs/RWs, re-
fer to “Notes on CD-Rs/RWs” on page 5-49. CAUTION
l
Attempting to play a
file
not in the MP3
format which has a “.mp3” file name may
produce noise from the speakers and
speaker damage, and can damage your
hearing. For pleasant driving
5-24
5
OCRE12E1
Presented by http://mmc-manuals.ru/ \251
Page 212 of 369

To play from an iPod
E00756300372
1. Press the PWR button (1)
to turn on the au-
dio system. The system turns on in the last
mode used.
2. Connect your iPod to the USB input terminal. Refer to “How to connect an iPod” on page
5-67.
3. Press the CD button (11) several times to switch to the iPod mode. The mode changes
every time the CD button is pressed.
CD mode → iPod mode → Bluetooth ®
mode*
NOTE l If your vehicle is equipped with Auxiliary Au-
dio connector (RCA), pressing and holding
the CD button for 2 seconds or more
switches the system to the AUX mode.
4. Once the device is selected, playback starts and “iPod” appears on the display.
NOTE l Depending on the condition of your iPod, it
may take a longer time before the playback
starts.
5. To stop the playback, change over to a differ- ent mode.
NOTE l Buttons on the iPod are disabled while the
iPod is connected to the audio system.
l To adjust the volume and tone, refer to “To
adjust the volume” and “To adjust the tone”. To fast-forward/reverse the track
E00756400113
Fast-forward
To fast-forward the current track,
press the but-
ton (8). While the button
is pressed, the track will
be fast-forwarded.
Fast-reverse
To fast-reverse the current track, press the but-
ton (9). While the button
is pressed, the track will
be fast-reversed.
To select a desired track E00756500097
Track up
Press the button (8) repeatedly until the desired
track number appears on the display.
Track down
Press the button (9) repeatedly until the desired
track number appears on the display.
NOTE
l Pressing
the button (9) once during the
song will cause the audio
system to restart
playback from the beginning of the song.
To find a track from the iPod menu E00756600186
You can select desired tracks from the “Playlists”,
“Artists”,“Albums”, “Songs” or “Genre” (vehicles
with Bluetooth ®
2.0 interface) menus on your iPod.
Press the following buttons to select desired tracks.
The
selected menu or category or track is shown in
the display. button (12)
: To start this mode or cancel the
selection. button (8)
or button (9)
: To show the menu or category
or track. button (13)
: To select the menu or category
or track.
NOTE l If
no operation is performed
for 10 seconds
or more or another button is operated after
the button or button has been pressed,
searching of the desired tracks is cancelled.
l If no operation is
performed
for 5 seconds or
more after the track is displayed, playback
starts.
To play the same track repeatedly E00756700099
Press the RPT button (6) during playback to show
“RPT” in the display.
To exit this mode, press the button again.
To play tracks in random order E00756900091
Press the RDM button (7) to show “SHUFFLE” in
the display.The iPod randomly selects
tracks from
the current category and plays the selected tracks.
To exit this mode, press the button again.
To play tracks in each album in random order E00757000099
Press and hold the RDM button (7) until you hear a
beep to show “A-SHUFFLE” in the display.
The iPod randomly selects tracks
in the album
from the current category and play the selected
tracks.
To exit this mode, press the button again. For pleasant driving
5-29 5
OCRE12E1
Presented by http://mmc-manuals.ru/ \251