2011 MITSUBISHI TRITON ECU
[x] Cancel search: ECUPage 169 of 369

WARNING
l Do not leave any objects near the brake
pedal or let a floor mat slide under it; do-
ing so could prevent the full pedal stroke
that would be necessary in an emergency.
Make sure that the pedal can be operated
freely at all times. Make sure the floor
mat is securely held in place.
Brake pads and linings l Avoid hard braking situations.
New
brakes need to be
broken-in by moder-
ate use for the first 200 km (124 miles).
l The disc brakes are provided with a warning
device which emits a shrieking metallic
sound while braking if the brake pads have
reached their wear limit.
If you hear this sound, have the brake pads re-
placed immediately. WARNING
l Driving with worn brake
pads
will make
it harder to stop, and can cause an acci-
dent. Brake assist system*
E00627000392
The brake assist system is a device assisting drivers
who cannot depress the brake
pedal firmly when it
is necessary to do so (such as in emergency stop sit-
uations) and provides greater braking force.
If the brake pedal is depressed suddenly, the brakes
will be applied with more force than usual. CAUTION
l
The brake assist system
is
not a device de-
signed to exercise braking force greater
than its capacity. Make sure to always
keep a sufficient distance between vehi-
cles in front of you without relying too
much on the brake assist system.
NOTE l Once
the brake assist system
is operational,
it maintains great braking force even if the
brake pedal is lightly released.
To stop its operation, completely remove
your foot from the brake pedal.
l When the brake assist system is in use while
driving, you may feel the brake pedal at-
tempt to resist, the pedal moves in small mo-
tions in conjunction with the operation noise,
or the vehicle body and the steering wheel vi-
brate. This occurs when the brake assist sys-
tem is operating normally and does not indi-
cate faulty operation. Continue to firmly de-
press the brake pedal.
l When the active stability & traction control
(ASTC) indication lamp is illuminated, the
brake assist system may not function. Anti-lock brake system (ABS)*
E00607100775
Environmental conditions can have
an
effect on
braking. During sudden braking when there is
snow, ice, oil, water etc. on the road surface, a skid
may occur. In this situation, steering control and
braking effectiveness is reduced and the stopping
distance is increased. The vehicle may also go into
an uncontrolled spin.
The ABS helps prevent the wheels from locking dur-
ing braking, thus maintaining directional stability,
ensuring controllability and providing optimum
braking force.
Driving hints
l With ABS fitted, steering during sudden brak-
ing (when the ABS functions) differs slightly
from when the brakes are not being applied.
Steer the vehicle carefully in these conditions.
l Always maintain the same distance from the
vehicle in front of you as you would for a ve-
hicle not equipped with ABS.
Compared with vehicles not fitted with ABS,
your vehicle may require a longer stopping
distance in the following cases:
• Driving on gravel or snow-covered roads.
• Driving with tyre chains installed.
• Driving on roads where the road surfaceis pitted or has other differences in sur-
face height.
• Driving on bumpy roads or other poor driv- ing surfaces. Starting and driving
4-44
4
OCRE12E1
Presented by http://mmc-manuals.ru/ \251
Page 184 of 369

Ventilators
.................................................................................... 5-02
Heater/Manual air conditioning* ..................................................5-03
Automatic air conditioning* ......................................................... 5-08
Important operation tips for the air conditioning..........................5-12 Air purifier*.................................................................................. 5-12
LW/MW/FM electronic tuning radio with CD player* ................5-13
To play tracks from USB device* ................................................5-27
To play tracks from a Bluetooth ®
device (vehicles with
Bluetooth ®
2.0 interface).......................................................... 5-36
To use the external audio input function* ....................................5-39
Steering wheel remote control switch* ........................................5-40
Error codes
.................................................................................... 5-42
Error codes (iPod)......................................................................... 5-44
Error codes (USB memory device) ..............................................5-46
Audio system anti-theft feature .................................................... 5-48
Handling of compact discs ........................................................... 5-48
Antenna......................................................................................... 5-50
Link System* ................................................................................ 5-51
Bluetooth ®
2.0 interface* ............................................................. 5-51
USB input terminal* ..................................................................... 5-67
Sun visors..................................................................................... 5-69
Vanity mirror* .............................................................................. 5-70
Ashtray.......................................................................................... 5-70
Cigarette lighter ............................................................................ 5-71
Accessory socket*........................................................................ 5-72
Digital clock* ............................................................................... 5-73
Interior lamps ................................................................................5-73
Storage spaces............................................................................... 5-75
Cup holder*.................................................................................. 5-78
Bottle holder ................................................................................. 5-79 Convenient hook
........................................................................... 5-80
Coat hook*.................................................................................... 5-80
First-aid kit and warning triangle securing bands* ......................5-80 For pleasant driving
5
OCRE12E1
Presented by http://mmc-manuals.ru/ \251
Page 233 of 369
l
The unit may not
successfully play back a
CD-R/RW that was made by the combina-
tion of writing software, a CD recorder
(CD-R/RW drive) and a disc if they are in-
compatible with one another.
l This player cannot play the CD-R/RW discs
if the session is not closed.
l This player cannot play CD-R/RW discs
which contain other than CD-DA or MP3 da-
ta (Video CD, etc.).
l Be sure to observe the handling instructions
for the CD-R/RW disc. WARNING
l Operating the CD player
in
a manner oth-
er than specifically instructed herein may
result in hazardous radiation exposure.
Do not remove the cover and attempt to
repair the CD player by yourself. There
are no user serviceable parts inside. In
case of malfunction, we recommend you
to have it checked. Antenna
E00710500022
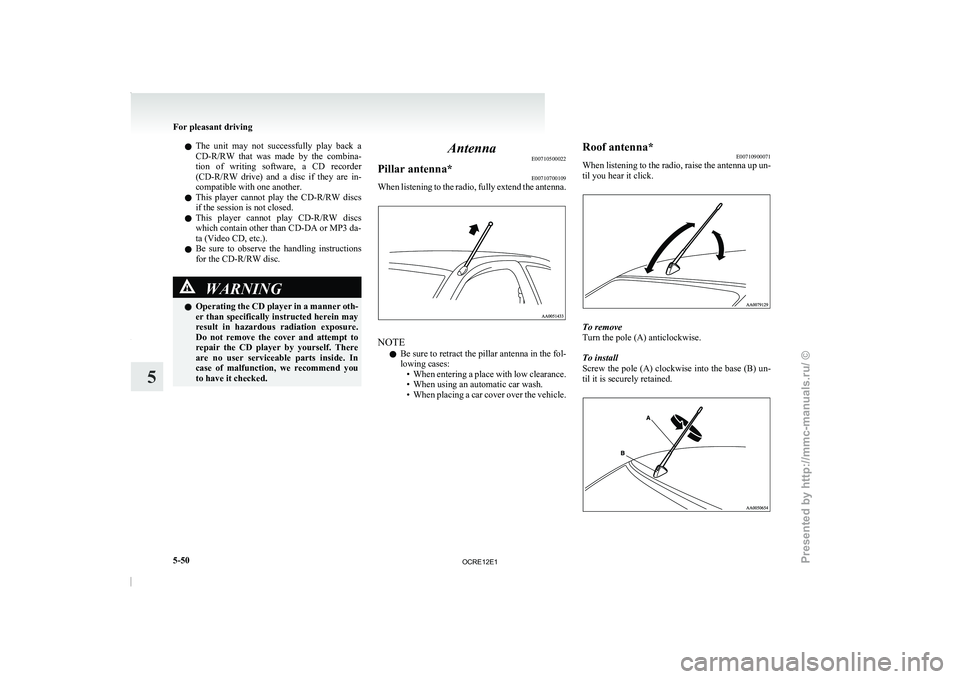
Pillar antenna* E00710700109
When listening to the radio, fully extend the antenna. NOTE
l Be
sure to retract the
pillar antenna in the fol-
lowing cases: • When entering a place with low clearance.
• When using an automatic car wash.
• When placing a car cover over the vehicle. Roof antenna*
E00710900071
When listening to the
radio,
raise the antenna up un-
til you hear it click. To remove
Turn the pole (A) anticlockwise.
To install
Screw the pole (A)
clockwise
into the base (B) un-
til it is securely retained. For pleasant driving
5-50
5
OCRE12E1
Presented by http://mmc-manuals.ru/ \251
Page 237 of 369

1. Press the SPEECH button.
2. Say “Setup”.
3. Say “Confirmation prompts”.
4. The voice
guide will say “Confirmation
prompts are
confirmation prompts
Answer “Yes” to change the setting or an-
swer “No” to keep the current setting.
5. The voice guide will say “Confirmation prompts are
will return to the main menu.
Security function E00760500131
It is possible to use a password as a security func-
tion by setting a password
of your choice for the
Bluetooth ®
2.0 interface.
When the security function is turned on, it is neces-
sary to make a voice input of a 4-digit password in
order to use all functions of the Bluetooth ®
2.0 in-
terface, except for reception.
Setting the password
Use the following procedure to turn on the security
function by setting a password. 1. Press the SPEECH button.
2. Say “Setup”.
3. Say “Password.”
4. The voice guide will say “Password is disa-bled. Would you like to enable it?” Answer
“Yes.”
Answer “No” to cancel the setting of the pass-
word and return to the main menu.
5. The voice guide will say “Please say a 4-dig- it password. Remember this password. It will
be required to use this system”.
Say a 4-digit number which you want to set
as a password. 6. For confirmation purposes, the voice guide
will say “Password <4-digit
password>. Is
this correct?” Answer “Yes.”
Answer “No” to return to the password input
in Step 5.
7. When the registration of the password is com- pleted, the voice guide will say “Password is
enabled” and the system will return to the
main menu.
NOTE l Password will be required to access the sys-
tem after the next ignition cycle.
l It is required for a little time after engine
stop that the entered password is actually re-
corded in the system.
If the ignition switch is made to “ACC” or
“ON” or the engine is started immediately af-
ter engine stop, there is a case when the en-
tered password is not recorded in the system.
At this time, please try to enter the password
again.
Entering the password
If a password has been set and the security function
is enabled, the voice guide will say “Hands-free sys-
tem is locked. State the password to continue”
when the SPEECH button is pressed to enter voice
recognition mode. Say the 4-digit password num-
ber to enter the password.
If the entered password is wrong, the voice guide
will say “<4- digit password>, Incorrect password.
Please try again”. Enter the correct password.
NOTE l You can re-enter the password as many times
as you want. l
If
you have forgotten your password, say
“Cancel” to quit the voice input mode and
then check with a MITSUBISHI MOTORS
Authorized Service Point.
Disabling the password
Use the following procedure to turn off the security
function by disabling the password.
NOTE l System must be unlocked to disable the pass-
word.
1. Press the SPEECH button.
2. Say “Setup”.
3. Say “Password.”
4. The voice guide will say “Password is ena- bled. Would you like to disable it?”
Answer “Yes.” Answer “No” to cancel the
disabling of the password and return to the
main menu.
5. When the disabling of the password is com- pleted, the voice guide will say “Password is
disabled” and the system will return to the
main menu.
Speaker enrollment function E00727400209
The Bluetooth ®
2.0 interface can use
the speaker en-
rollment function to create a voice model for one
person per language.
This makes it easier for the Bluetooth ®
2.0 inter-
face to recognise voice commands said by you.
You can turn a voice model registered with the
speaker enrollment function on and off whenever
you want. For pleasant driving
5-54
5
OCRE12E1
Presented by http://mmc-manuals.ru/ \251
Page 246 of 369
5. The voice guide will say “Home, work, mo-
bile or other?” Select and say the location
where the telephone number you want to
change or add is registered.
When the confirmation function is on, the sys-
tem will check the target name and location
again. Answer “Yes” if you want to continue
with the editing.
Answer “No” to return to Step 3.
6. The voice guide will say “Number please.” Say the telephone number you want to register.
NOTE l If the telephone number is already registered
in the selected location, the voice guide will
say “The current number is
phone number to change the current number.
7. The voice guide will repeat the telephone number.
When the confirmation function is on, the sys-
tem will ask if the number is correct. Answer
“Yes.”
Answer “No” to return to Step 3.
8. Once the telephone number is registered, the voice guide will say “Number saved” and
then the system will return to the main menu.
NOTE l If the location where a telephone number
was already registered has been overwritten
with a new number, the voice guide will say
“Number changed” and then the system will
return to the main menu.
[Editing a name] 1. Press the SPEECH button. 2. Say “Phone book.”
3. The voice guide will say
“Select one of the
following: new entry, edit number, edit
name, list names, delete, erase all, or import
contact.” Say “Edit name.”
4. The voice guide will say “Please say the name of the entry you would like to edit, or
say list names.” Say the name you want to edit.
NOTE l Say “List names,” and the names registered
in the phone book will be read out in order.
Refer to “Vehicle phone book: Listening to
the list of registered names” on page 5-60.
5. The voice guide will say “Changing
tem will ask if the name is correct. Answer
“Yes” if you want to continue with the edit-
ing based on this information.
Answer “No” to return to Step 4.
6. The voice guide will say “Name please.” Say the new name you want to register.
7. The registered name will be changed. When the change is complete, the system
will return to the main menu.
[Listening to the list of registered names] 1. Press the SPEECH button.
2. Say “Phone book.”
3. The voice guide will say “Select one of thefollowing: new entry, edit number, edit
name, list names, delete, erase all, or import
contact.” Say “List names.”
4. Bluetooth ®
2.0 interface will read out the en-
tries in the phone book in order. 5. When the voice guide is done reading the
list, it will say “End of list, would you like to
start from the beginning?”
When you want to check the list again from
the beginning, answer “Yes.”
When you are done, answer “No” to return to
the previous or main menu.
NOTE l You can call, edit or delete a name that is be-
ing read out.
Press the SPEECH button and say “Call” to
call the name, “Edit name” to edit it, or “De-
lete” to delete it.
The system will beep and then execute your
command.
l If you press the SPEECH button and say “Con-
tinue” or “Previous” while the list is being
read, the system will advance or rewind the
list. Say “Continue” to proceed to the next en-
try or “Previous” to return to the previous en-
try.
[Deleting a telephone number] 1. Press the SPEECH button.
2. Say “Phone book.”
3. The voice guide will say “Select one of thefollowing: new entry, edit number, edit
name, list names, delete, erase all, or import
contact.” Say “Delete.”
4. The voice guide will say “Please say the name of the entry you would like to delete,
or say list names.” Say the name of the
phone book entry in which the telephone num-
ber you want to delete is registered. For pleasant driving
5-63 5
OCRE12E1
Presented by http://mmc-manuals.ru/ \251
Page 263 of 369
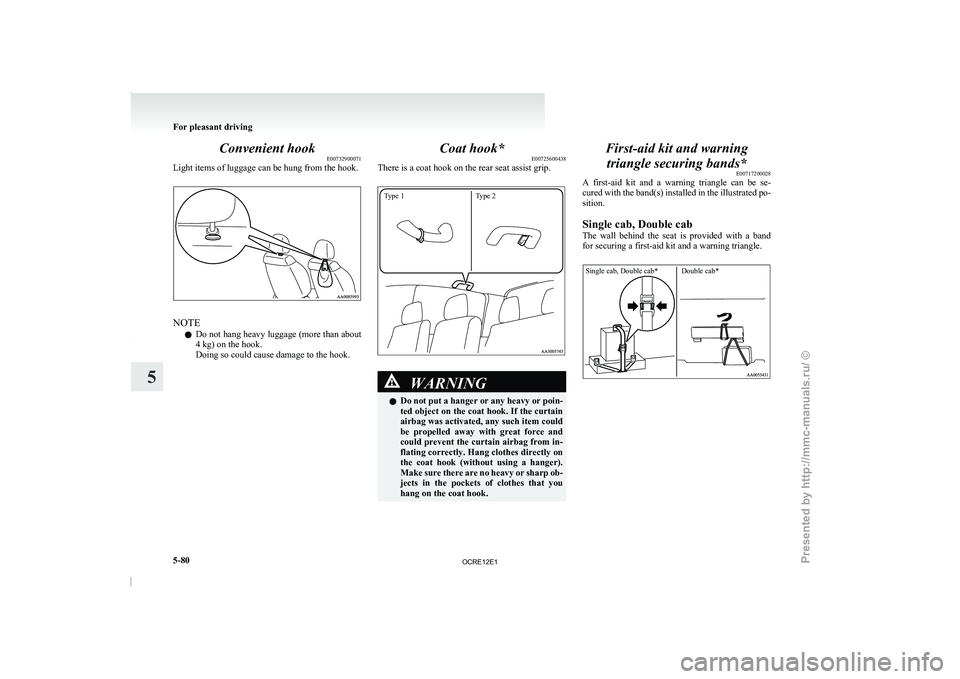
Convenient hook
E00732900071
Light items of luggage can be hung from the hook. NOTE
l Do
not hang heavy luggage
(more than about
4 kg) on the hook.
Doing so could cause damage to the hook. Coat hook*
E00725600438
There is a coat hook on the rear seat assist grip.
Type 1 Type 2 WARNING
l Do not put a
hanger
or any heavy or poin-
ted object on the coat hook. If the curtain
airbag was activated, any such item could
be propelled away with great force and
could prevent the curtain airbag from in-
flating correctly. Hang clothes directly on
the coat hook (without using a hanger).
Make sure there are no heavy or sharp ob-
jects in the pockets of clothes that you
hang on the coat hook. First-aid kit and warning
triangle securing bands* E00717200028
A first-aid kit and a
warning triangle can be se-
cured with the band(s) installed in the illustrated po-
sition.
Single cab, Double cab
The wall behind the seat is provided with a band
for securing a first-aid kit and a warning triangle.
Single cab, Double cab* Double cab* For pleasant driving
5-80
5
OCRE12E1
Presented by http://mmc-manuals.ru/ \251
Page 264 of 369
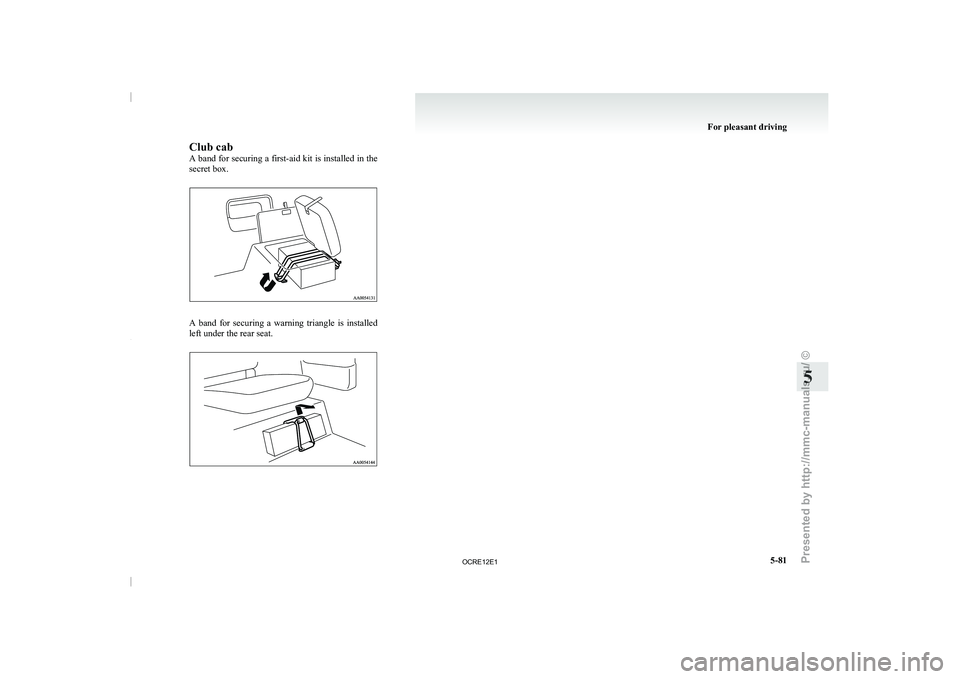
Club cab
A band for securing
a
first-aid kit is installed in the
secret box. A band for securing a warning triangle is installed
left under the rear seat. For pleasant driving
5-81 5
OCRE12E1
Presented by http://mmc-manuals.ru/ \251
Page 274 of 369
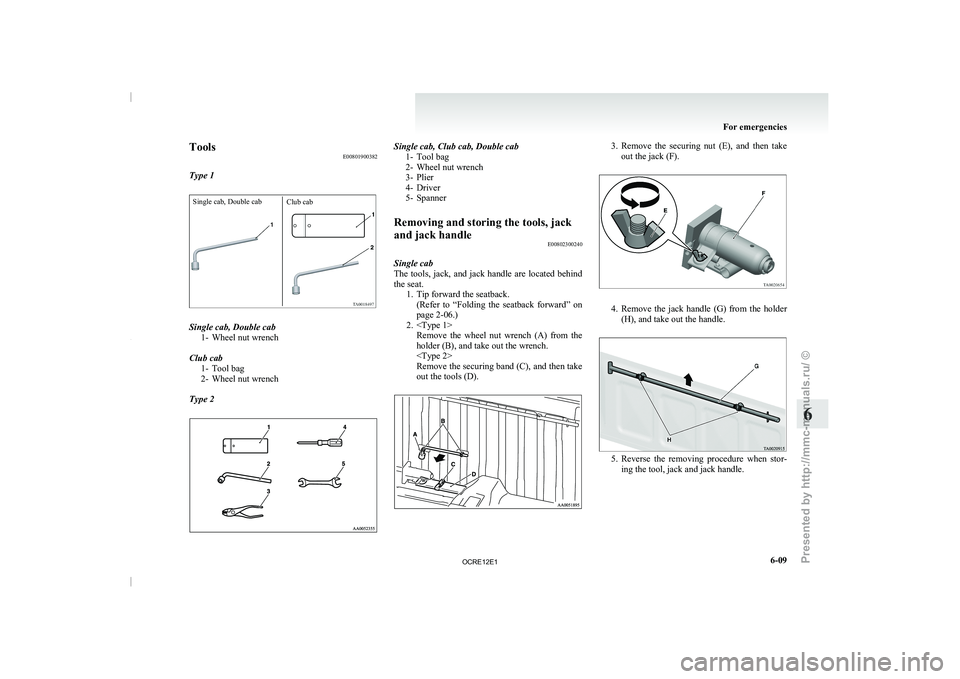
Tools
E00801900382
Type 1Single cab, Double cab Club cabSingle cab, Double cab
1- Wheel nut wrench
Club cab 1- Tool bag
2- Wheel nut wrench
Type 2 Single cab, Club cab, Double cab
1- Tool bag
2- Wheel nut wrench
3- Plier
4- Driver
5-
Spanner
Removing and storing the tools, jack
and jack handle E00802300240
Single cab
The tools, jack,
and jack
handle are located behind
the seat. 1. Tip forward the seatback.(Refer to “Folding the seatback forward” on
page 2-06.)
2.
holder (B), and take out the wrench.
Remove the securing band (C), and then take
out the tools (D). 3. Remove the securing nut (E), and then take
out the jack (F). 4. Remove the jack handle (G) from the holder
(H), and take out the handle. 5. Reverse the removing procedure when stor-
ing the tool, jack and jack handle. For emergencies
6-09 6
OCRE12E1
Presented by http://mmc-manuals.ru/ \251