2011 MITSUBISHI PAJERO IV audio
[x] Cancel search: audioPage 221 of 377

To listen to a CD
E00709601961
The CD can
be loaded or ejected by pressing the
LOAD button (15) or the eject button (7) even if
the audio system power is off. 1. Press the PWR button (2) to turn the audiosystem on and off. The system turns on in
the last mode used.
2. Press the CD button (4) to enter CD mode. The autochanger will start playback if the
CD is already in the autochanger.
3. To stop the CD, turn off the power by press- ing the PWR button (2) or change over to ra-
dio mode by pressing the AM/FM button (1),
or eject the disc by pressing the eject button
(7).
NOTE l To adjust the volume and tone, refer to “To
adjust the volume” on page 5-27 and “To ad-
just the tone” on page 5-27.
l As many as 6 CDs can be inserted into the
CD autochanger.
l For information concerning the handling of
the compact discs, refer to “Handling of com-
pact discs” on page 5-65. To set discs To set a single disc
1. Press the LOAD button (15) briefly.
2.The
autochanger will show “WAIT” on the
display and start making itself ready for disc
loading.
3. When the autochanger is ready for disc load- ing, the indicator light (A) will come on and
the display will show “LOAD DISC (1~6)”.
4. Insert a disc into the disc loading slot.
NOTE l If there are multiple empty slots, you can se-
lect your desired slot by pressing the DISC
buttons (16 or 17).
l If you do not insert a disc for about
15 seconds after the autochanger starts stand-
ing by for loading, the loading standby mode
will be cancelled.
To set all the discs 1. Press the LOAD button (15) for 2 seconds orlonger (until you hear a beep).
2. The autochanger will select the lowest-num- bered empty slot and switch to loading stand-
by mode. 3. When
the display shows “LOAD DISC
(1~6)”, insert
a disc. The autochanger will
then automatically select the next empty slot
and enter loading standby mode.
4. Repeat the above-described steps until every slot contains a disc. Playback will then begin
with the disc that you inserted last.
NOTE l If you press the LOAD button (15) again
while the autochanger is in loading standby
mode, the loading standby mode will be can-
celled.
To eject discs To eject a single disc
Press the
eject
button (7) briefly to eject the current-
ly selected disc.
NOTE
l If you press the eject button (7) while the dis-
play is showing “LOAD DISC (1~6)”, the
loading standby mode will be cancelled and
the next disc will be ejected. For pleasant driving
5-38
5
OBKE12E1
Page 222 of 377

l
If you
do not remove the disc before
15 seconds have elapsed, the autochanger
will automatically reload the disc and stop.
To eject all the discs 1. Press the eject button (7) for 2 seconds or lon-ger (until you hear a beep).
2. The currently selected disc will be ejected. When you remove the ejected disc, the next
disc will automatically be ejected.
3. Repeat the above-described steps until all of the discs have been ejected. The autochanger
will then enter loading standby mode.
NOTE l If you do not remove an ejected disc before
15 seconds have elapsed, the disc will be re-
loaded and the eject mode will be cancelled.
The reloaded disc will not be played.
To select a desired disc
You can select your desired disc by using the DISC
button (16 or 17). The active disc will be indicated
by “ ” on the display.
Disc up
Press the DISC
button (16) repeatedly until the de-
sired disc number appears on the display.
Disc down
Press the DISC button (17) repeatedly until the de-
sired disc number appears on the display. To listen to a music CD
Push the CD button (4) if the discs are already in
the
autochanger. The
autochanger will enter CD
mode and start playback. The disc number, the
track number and the playing-time will appear on
the display. The discs in the unit will be played con-
secutively and continuously. To listen to an MP3 CD
This
autochanger
allows
you to play MP3 (MPEG
Audio Layer-3) files recorded on CD-ROMs, CD-
Rs (recordable CDs), and CD-RWs (rewritable
CDs) in ISO9660 Level 1/Level 2, Joliet, and Ro-
meo formats. Each disc may have a maximum of
16 trees, 100 folders, and 255 files per disc. During
MP3 playback, the unit can display ID3 tag infor-
mation. For information concerning ID3 tag, refer
to “CD text and MP3 title display” on page 5-25. Push the CD button (4) if MP3 CDs are already in
the autochanger.
The
display shows
“READING”, then playback
will begin. The folder number, the track number,
the playing-time and “MP3” indicator will appear
on the display. For pleasant driving
5-39 5
OBKE12E1
Page 223 of 377

NOTE
l While
listening to
a disc on which CD-DA
(CD-Digital Audio) and MP3 files have both
been recorded, you can switch between read-
ing of the CD-DA, reading of the MP3 files,
and the external audio input mode (AUX) by
pressing the CD button for 2 seconds or lon-
ger (until you hear a beep).
For information on the external audio input,
refer to “To use the external audio input func-
tion” on page 5-56.
l With a disc that contains both CD-DA and
MP3 files, the CD-DA files are automatical-
ly played first.
l The playback sound quality differs depend-
ing on the encoding software and the bit rate.
For details, refer to the user manual of your
encoding software.
l Depending on file/folder configurations on a
disc, it may take some time before playback
starts.
l MP3 encoding software and writing software
are not supplied with this unit.
l You may encounter trouble in playing an
MP3 or displaying the information of MP3
files recorded with certain writing software
or CD recorders (CD-R/RW drivers).
l If you record too many folders or files other
than MP3 onto a disc, it may take some time
before playback starts.
l This unit does not record MP3 files.
l For information concerning CD-Rs/RWs, re-
fer to “Notes on CD-Rs/RWs” on page 5-66. CAUTION
l
Attempting to play
a file not in the MP3
format which has a “.mp3” file name may
produce noise from the speakers and
speaker damage, and can damage your
hearing.
Folder selection order/MP3 file playback order
(Example)
Root folder (root directory)
Tree 1 Tree 2 Tree 3 Tree 4 Folder selection
In the order File selection
In the order
To fast-forward/fast-reverse the disc
To fast-forward
or
fast-reverse the disc, press the
fast-forward /fast-reverse button (9).
Fast-forward
You can fast-forward the disc by pressing the side of the fast-forward button. While the button is
kept pressed, the disc will be fast-forwarded.
Fast-reverse
You can
fast-reverse
the disc by pressing the side of the fast-reverse button. While the button is
kept pressed, the disc will be fast-reversed.
NOTE
l When
you have
fast-forwarded/fast-reversed
the disc, the playing-time may be shown
with deviation. For pleasant driving
5-40
5
OBKE12E1
Page 228 of 377

To play from an iPod
E00756300226
1. Press the PWR
button (2) to turn on the au-
dio system. The system turns on in the last
mode used.
2. Connect your iPod to the USB input termi- nal. Refer to “How to connect an iPod” on
page 5-82.
3. Press the CD button (4) several times to switch to the iPod mode. The input mode
changes every time the CD button is pressed.
CD mode → iPod mode → Bluetooth ®
mode* → Rear-seat display mode*
NOTE l If your vehicle is equipped with audio/video
input RCA terminals, pressing and holding
the CD button for 2 seconds or more
switches the system to the AUX mode.
4. Once the device is selected, playback starts and “iPod” appears on the display.
NOTE l Depending on the condition of your iPod, it
may take a longer time before the playback
starts.
5. To stop the playback, press the AM/FM but- ton (1) or CD button (4) to switch to a differ-
ent mode.
NOTE l Buttons on the iPod are disabled while the
iPod is connected to the audio system. l
To
adjust the volume and tone, refer to “To
adjust the volume” on pages 5-13, 5-27 and
“To adjust the tone” on pages 5-13, 5-27.
To fast-forward/reverse the track E00756400012
To fast-forward/reverse the current track, press the
fast-forward (8) or fast-reverse (7) button.
Fast-forward
To fast-forward the current track, press the fast-for-
ward (8) button.
While the button is pressed, the
track will be fast-forwarded.
Fast-reverse
To fast-reverse the current track, press the fast-re-
verse (7) button. While the button is pressed, the
track will be fast-reversed.
To select a desired track E00756500013
Press the TRACK button (11) to select the desired
track number.
Press : The track number increases by
one.
Press : The track number decreases by
one.
Press for a
long period (ap- prox. 2 seconds
or more) :
The track number increases con-
tinuously while the button is
pressed.
Press for a
long period (ap-
prox. 2 seconds
or more) :
The track number decreases con-
tinuouslywhile the button is
pressed. If the side of the button is pressed once while a
track is playing,
playback returns to the start of that
track.
NOTE
l Every time the track selection button is press-
ed, the track number in the display changes.
To find a track from the iPod menu E00756600014
You can select desired tracks from the “Playlists”,
“Artists”, “Albums”, “Songs”
or “Genre” (vehicles
with Bluetooth ®
2.0 interface) menus on your iPod.
Press the following buttons to select desired tracks.
The selected menu or category or track is shown in
the display.
FOLDER but-
ton (12 or 13) : To show the menu or category
or track.
MENU button
(10) : To select the menu or category
or track.
NOTE l To
cancel the
selection, press the DISC but-
ton (14) to return to the previous step.
l If no operation is performed for 10 seconds
or more or other button is operated after the
FOLDER button has been pressed, searching
of the desired tracks is cancelled.
l If no operation is performed for 5 seconds or
more after the track is displayed, playback
starts.
To play the same track repeatedly E00756700015
Press the RPT button (5) during playback to show
“RPT” in the display. For pleasant driving
5-45 5
OBKE12E1
Page 233 of 377

To play from a USB memory device
E00762500210
1. Press the PWR
button (2) to turn on the au-
dio system. The system turns on in the last
mode used.
2. Connect your USB memory device to the USB input terminal. Refer to “How to con-
nect a USB memory device” on page 5-82.
3. Press the CD button (4) several times to switch to the USB mode. The input mode
changes as follows every time the CD button
is pressed.
CD mode → USB mode → Bluetooth ®
mode* → Rear-seat display mode*
NOTE l If your vehicle is equipped with audio/video
input RCA terminals, pressing and holding
the CD button for 2 seconds or more
switches the system to the AUX mode.
4. Once the device is selected, playback starts and “USB” appears on the display.
NOTE l Depending on the condition of your USB de-
vice, it may take a longer time before the play-
back starts.
5. To stop the playback, press the AM/FM but- ton (1) or CD button (4) to switch to a differ-
ent mode. NOTE
l To
adjust the
volume and tone, refer to “To
adjust the volume” on pages 5-13, 5-27 and
“To adjust the tone” on pages 5-13, 5-27.
Supported compressed music files E00758300318
This audio can play MP3, WMA, AAC and WAV
files recorded
in
a USB memory device. This audio
supports up to 65,535 files in 700 folders on 8 levels.
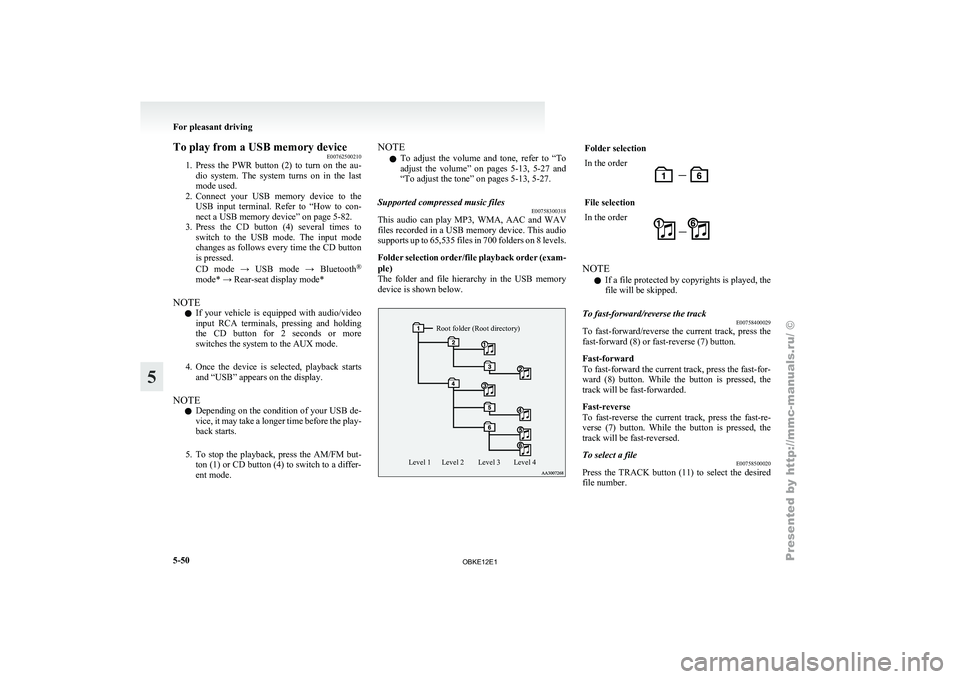
Folder selection order/file playback order (exam-
ple)
The folder and file hierarchy in the USB memory
device is shown below.
Root folder (Root directory)
Level 4
Level 3
Level 2
Level 1 Folder selection
In the order
File selection
In the order
NOTE
l If a file protected by copyrights is played, the
file will be skipped.
To fast-forward/reverse the track E00758400029
To fast-forward/reverse the current track, press the
fast-forward (8) or fast-reverse (7) button.
Fast-forward
To fast-forward the current track, press the fast-for-
ward (8) button.
While the button is pressed, the
track will be fast-forwarded.
Fast-reverse
To fast-reverse the current track, press the fast-re-
verse (7) button. While the button is pressed, the
track will be fast-reversed.
To select a file E00758500020
Press the TRACK button (11) to select the desired
file number. For pleasant driving
5-50
5
OBKE12E1
Page 234 of 377

Press : The track number increases by
one.
Press : The track number decreases by
one.
Press for a
long period
(approx. 2 sec-
onds or more) : The track number increases
continuously while the button
is pressed.
Press for a
long period
(approx. 2 sec-
onds or more) : The track number decreases
continuouslywhile the button
is pressed.
If the side of the button is pressed once after a
few seconds, playback
returns to the start of that
track.
NOTE
l Every time the TRACK button (11) is press-
ed, the file number in the display changes.
To find a track E00758600223
You can select a folder to find a desired track.
1. Press the FOLDER button (12 or 13) to showthe desired folder in the display.
NOTE l If
no
operation is performed for 10 seconds
or more or other button is operated after the
FOLDER button has been pressed, the selec-
ted track becomes unselected and the display
returns to the playback display.
2. Press the MENU button (10) to select the fold- er. NOTE
l When
the DISC
button (15) is pressed, the
track find mode will be cancelled.
3. Press the FOLDER button (12 or 13) to show the desired track in the display.
NOTE l When the DISC button (15) is pressed, the se-
lection is cancelled and returned to the previ-
ous step.
l If no operation is performed for 5 seconds or
more after the FOLDER button (12 or 13) is
pressed, the displayed track is played.
4. Press the MENU button (10) to select the file.
To play the same file repeatedly E00758700022
Press the RPT button (5) to show “RPT” in the dis-
play. To cancel this mode, press the button again.
To play the files in the same folder repeatedly E00758800023
Press and hold the RPT button (5) until you hear a
beep to show “F-RPT” in the display.
All tracks
in
the current folder are played repeatedly.
To exit this mode, press the button again.
To play a folder in random order E00758900024
Press the RDM button (6) to show “RDM” in the
display.
The audio randomly
selects tracks from the current
folder and plays the selected tracks.
To exit this mode, press the button again. To play all folders in random order
E00759000022
Press and hold
the RDM button (6) until you hear a
beep to show “F-RDM” in the display.
The audio randomly selects tracks from all folders
and plays the selected tracks.
To exit this mode, press the button again.
To find the start of each track in a folder for play-
back (vehicles without Bluetooth ®
2.0 interface)
E00759100111
Press the SCAN button (14). “SCAN” is shown in
the display and
the tracks in the current folder are
played for several seconds from the beginning.
The file number will blink while the scan mode is
selected.
To exit this mode, press the button again.
NOTE
l Once all tracks in the folder have been cued
playback will restart from the beginning of
the track that was playing when cueing started.
To find the start of each track in all folders for
playback (vehicles with Bluetooth ®
2.0 interface)
E00765800038
Press the SCAN button (14). “SCAN” is shown in
the display and
all tracks in all folders are played
for several seconds from the beginning.
The file number will blink while the scan mode is
selected.
To exit this mode, press the button again.
To find the start of first tracks in all folders for
playback E00759200112
Press and hold the SCAN button (14) until you
hear a beep to show “F-SCAN” in the display.
The first tracks
in all folders are played for several
seconds from the beginning. For pleasant driving
5-51 5
OBKE12E1
Page 236 of 377

To play tracks from a Bluetooth
®
device (vehicles with Bluetooth ®
2.0 interface) E00759700162
You can wirelessly
connect a digital audio player
or cellular phone supporting Bluetooth ®
to listen to
the tracks on the connected device.
Refer to “Bluetooth ®
2.0 interface” on page 5-67
for the connecting method, etc.
The following explains the basic playback method.
NOTE
l According to the connected device, it is not
to operate correctly or the limitation might
be provided in available function.
l The protected file by copyright might not be
able to start playback.
l It is recommended to adjust the equalizer of
the connected device is flat.
l The voice operation is not available to access
music files on the connected Bluetooth ®
de-
vice. For pleasant driving
5-53 5
OBKE12E1
Page 238 of 377

To listen to tracks from a device con-
nected via Bluetooth
®
E00762700195
1. Press the PWR
button (1) to turn on the au-
dio system. The system turns on in the last
mode used.
2. Press the CD button (3) several times to
switch to the BT-A (Bluetooth ®
) mode. The
input mode changes as follows every time
the CD button is pressed.
CD mode → USB (iPod) mode → Blue-
tooth ®
mode → Rear-seat display mode*
NOTE l For vehicles equipped with audio/video input
RCA terminals, pressing and holding the CD
button for 2 seconds or more switches the sys-
tem to the AUX mode.
3. Connect your Bluetooth ®
device. Refer to
“Connecting the Bluetooth® 2.0 interface
and Bluetooth® device” on page 5-71.
4. Playback starts automatically.
NOTE l Depending on the connected device, the play-
back may not start automatically.
In this case, operate the connected device to
start the playback.
To stop the playback (if supported by the device) E00762800011
To stop the playback, press the Stop button (10).
To restart the playback, press the Play button (9).
To pause the playback (if supported by the device) E00762900038
To pause the playback, press the Pause button (10). To restart the playback, press the Play button (9).
To select a track (if supported by the device)
E00763000078
Press the TRACK button (7) to select the desired
track number.
Press : The track number increases by
one.
Press : The track number decreases by
one.
Press for a
long period
(approx. 2 sec-
onds or more) : The track number increases
continuously while the button
is pressed.
Press for a
long period
(approx. 2 sec-
onds or more) : The track number decreases
continuouslywhile the button
is pressed.
If the side of the button is pressed once while a
track is playing,
playback returns to the start of that
track.
NOTE
l Every time the track selection button is press-
ed, the track number in the display changes.
To play the same track repeatedly (if supported by
the device) E00763100011
Press the RPT button (4) during playback to show
“RPT” in the display.
To exit this mode, press the button again. To play tracks in random order (if supported by
the device)
E00763200012
Press the RDM
button (5) to show “RDM” in the
display.
The system randomly selects and plays tracks from
all tracks in the Bluetooth ®
device.
To exit this mode, press the button again.
To find the start of each track for playback (if sup-
ported by the device) E00763300084
Press the SCAN button (8). “SCAN” is shown in
the display and
all tracks in the Bluetooth ®
device
are played for several seconds from the beginning.
To exit this mode, press the button again.
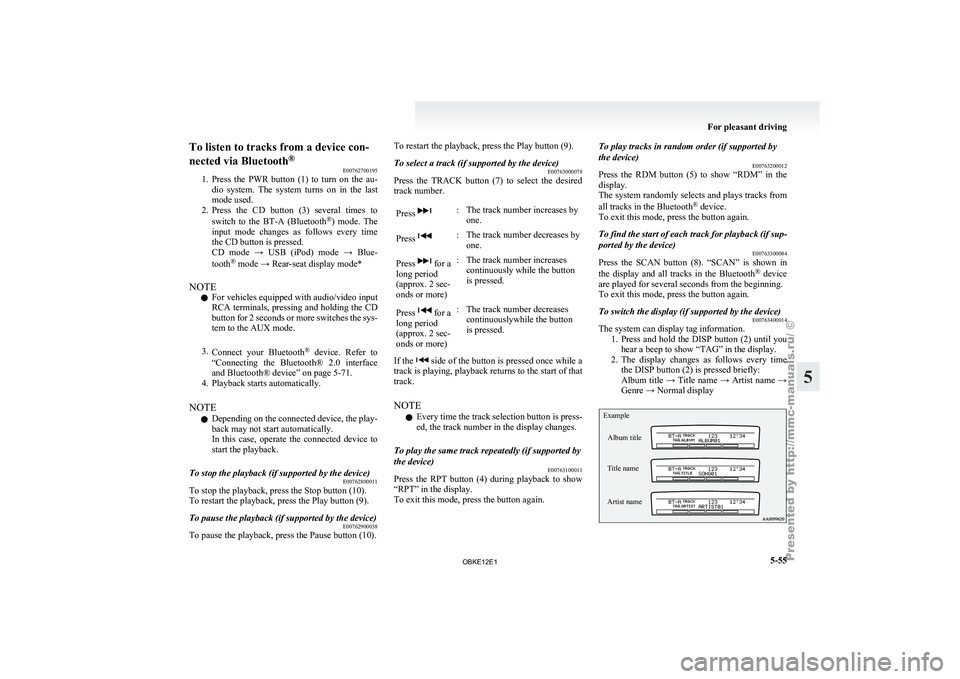
To switch the display (if supported by the device) E00763400014
The system can display tag information.
1. Press and hold
the DISP button (2) until you
hear a beep to show “TAG” in the display.
2. The display changes as follows every time the DISP button (2) is pressed briefly:
Album title → Title name → Artist name →
Genre → Normal display
Example
Album title
Title name
Artist name For pleasant driving
5-55 5
OBKE12E1