Page 288 of 602
. It will return to the neu-
tral pos")
Features and controls
3-191
3 Turn signal lever
N00522600450
When changing lanes, or to making a gradual turn, hold the
lever in the “lane change” position (1). It will return to the neu-
tral position when you let go. Use the full position (2) when
making a normal turn. The lever will return to the neutral posi-
tion when the turn is complete. There may be times when the
lever does not return to the neutral position. This usually hap-
pens when the steering wheel is turned only slightly. You can
easily return the lever by hand.
Also, when you move the lever to (1) slightly then release it,
the turn signal lights and the indicator light in the instrument
cluster will flash three times.
NOTE�A light in the instrument panel flashes to show when the
front and rear turn signal lights are working properly.
If this light flashes faster than usual, check for a burned
out turn signal light bulb or malfunctioning connection in
the signal.
If the panel light does not come on when the lever is
moved, check for a blown fuse or a burned out bulb in the
panel.
Have the system inspected by your authorized Mitsubishi
Motors dealer or a repair facility of your choice.
�It is possible to modify functions as follows:
• Deactivate the turn signal light 3-flash function for lane
changes.
• Adjust the time required to operate the lever for the 3-
flash function.
See your authorized Mitsubishi Motors dealer for details.
For vehicles equipped with the Mitsubishi Multi-Commu-
nication System, adjustments can be made using screen
operations. For further details, refer to the separate
owner’s manual.
BK0120400US.book 191 ページ 2010年5月12日 水曜日 午前10時50分
Page 317 of 602

3-220 Features and controls
3
6. The voice guide will say “Calling ”
and then the system will dial the telephone number.NOTE�When the confirmation function is on, the system will
check if the name and location of the receiver are correct.
If the name is correct, answer “Yes.”
To change the name or location to call, answer “No.” The
system will return to Step 3.
Redialing
You can redial the last number called, based on the history of
dialed calls in the paired cellular phone.
Use the following procedure to redial.
1. Press the SPEECH button.
2. Say “Redial.”Send function
N00565700018
During a call, press the SPEECH button to enter voice recogni-
tion mode, then say “ SEND” to generate DTMF
tones.
For example, if during a call you need to simulate the pressing
of a phone button as a response to an automated system, press
the SPEECH button and speak “1 2 3 4 pound send” and the
1234# will be sent via your cellular phone.
Receiving calls
N00565800019
If an incoming phone call is received while the ignition switch
is in the “ACC” or “ON” position, the audio system will be
automatically turned on and switched to the incoming call,
even when the audio system was originally off.
The voice guide announcement for the incoming call will be
output from the front passenger’s seat speaker.
If the CD player or radio was playing when the incoming call
was received, the audio system will mute the sound from the
CD player or radio and output only the incoming call.
To receive the call, press the PICK-UP button on the steering
wheel control switch.
When the call is over, the audio system will return to its previ-
ous state.
BK0120400US.book 220 ページ 2010年5月12日 水曜日 午前10時50分
Page 486 of 602
For emergencies
6-11
6
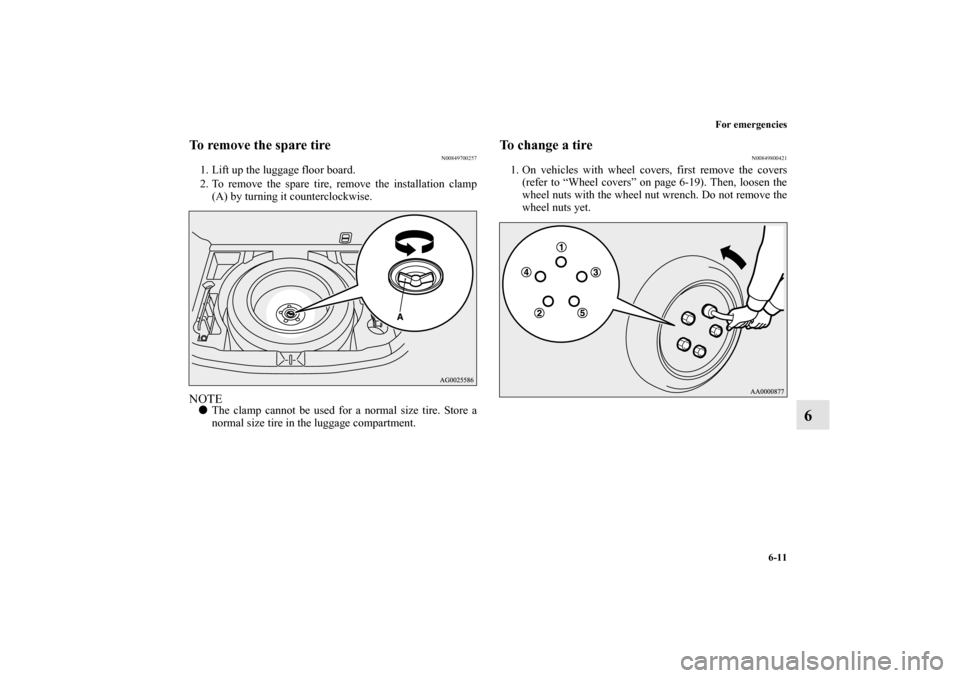
To remove the spare tire
N00849700257
1. Lift up the luggage floor board.
2. To remove the spare tire, remove the installation clamp
(A) by turning it counterclockwise.NOTE�The clamp cannot be used for a normal size tire. Store a
normal size tire in the luggage compartment.
To change a tire
N00849800421
1. On vehicles with wheel covers, first remove the covers
(refer to “Wheel covers” on page 6-19). Then, loosen the
wheel nuts with the wheel nut wrench. Do not remove the
wheel nuts yet.
BK0120400US.book 11 ページ 2010年5月12日 水曜日 午前10時50分
Page 487 of 602
6-12 For emergencies
6
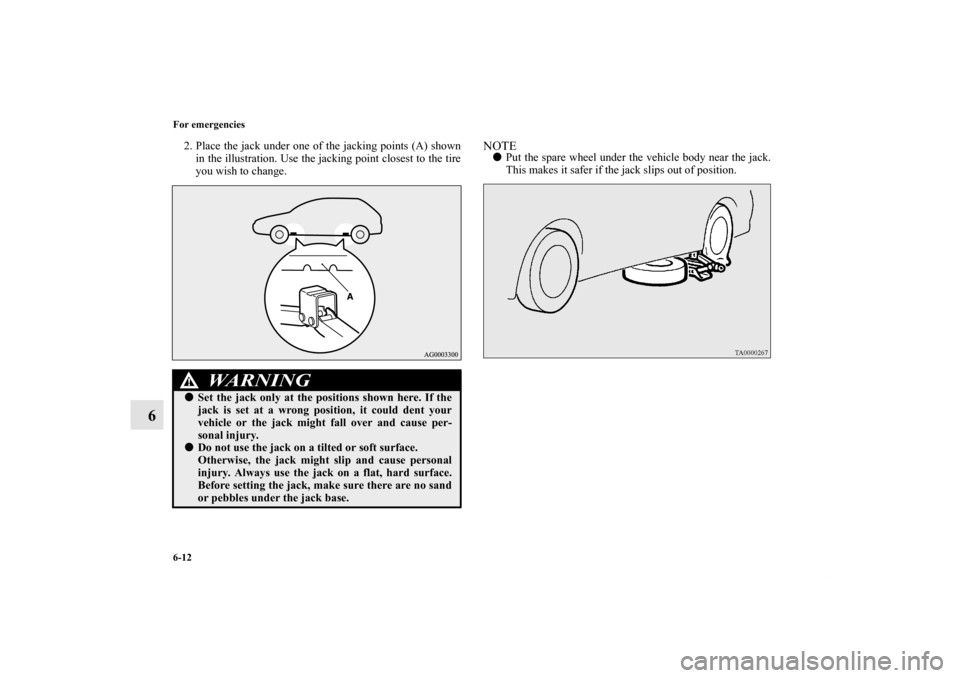
2. Place the jack under one of the jacking points (A) shown
in the illustration. Use the jacking point closest to the tire
you wish to change.
NOTE�Put the spare wheel under the vehicle body near the jack.
This makes it safer if the jack slips out of position.
WA R N I N G
!�Set the jack only at the positions shown here. If the
jack is set at a wrong position, it could dent your
vehicle or the jack might fall over and cause per-
sonal injury.�Do not use the jack on a tilted or soft surface.
Otherwise, the jack might slip and cause personal
injury. Always use the jack on a flat, hard surface.
Before setting the jack, make sure there are no sand
or pebbles under the jack base.
BK0120400US.book 12 ページ 2010年5月12日 水曜日 午前10時50分
Page 488 of 602
For emergencies
6-13
6
3. Rotate the jack by hand until the flange portion (B) fits in
the groove (C) at the top of the jack.4. Insert the bar (D) into the wheel nut wrench (E). Then put
the end of the bar into the shaft’s jack end, as shown in the
illustration.
Slowly rotate the wheel nut wrench until the tire is raised
slightly off the ground surface.
WA R N I N G
!�Stop jacking up the vehicle as soon as the tire is
raised off the ground. It is dangerous to raise the
vehicle any higher.�Do not get under your vehicle while using the jack.�Do not bump the raised vehicle or leave it sitting on
the jack for a long time. Both are very dangerous.�Do not use a jack except the one that came with your
vehicle.�The jack should not be used for any purpose other
than to change a tire.
BK0120400US.book 13 ページ 2010年5月12日 水曜日 午前10時50分
Page 491 of 602
6-16 For emergencies
6
[Vehicle with the flange nuts]
• Aluminium wheel
Temporarily tighten the wheel nuts until their flange
section comes in contact with the wheel and it is no
longer loose.• Steel wheel
Install the wheel nuts with their tapered ends facing
inward, then tighten by hand until the wheel is no longer
loose.
NOTE�Flange nuts can be temporarily used on the compact spare
or steel wheel, but return them to the original wheel and
tire as soon as possible.
�If all 4 wheels are changed to steel wheels, use tapered
nuts.
CAUTION
!�Never apply oil to either the wheel bolts or the nuts
or they will tighten too much.
BK0120400US.book 16 ページ 2010年5月12日 水曜日 午前10時50分
Page 516 of 602
Vehicle care and maintenance
7-15
7 Transfer oil (All-wheel drive models)
N00938400213
Whenever the transfer oil level is checked, add oil as necessary
to maintain the proper level. Fill or change the oil according to
the table.Fluid type
Rear axle oil (All-wheel drive models)
N00915200214
Whenever the oil level is checked, add oil as necessary to
maintain the proper level.
Fill or change oil according to the table.Fluid type
Lubricant Hypoid gear oil API classification GL-5
Viscosity range SAE 80
Lubricant Hypoid gear oil API classification GL-5
Viscosity range SAE 80
BK0120400US.book 15 ページ 2010年5月12日 水曜日 午前10時50分
Page 529 of 602

7-28 Vehicle care and maintenance
7
The recommended inflation pressures under normal driving
conditions should be used for the tires listed below.
Tire pressures should be checked, and adjusted if necessary, at
least once a month.
Pressures should be checked more often whenever weather
temperatures change severely, because tire pressures change
with outdoor temperatures. The pressures listed are always
“cold inflation pressure”.
Cold inflation pressure is measured after the vehicle has been
parked for at least three hours or is driven less than 1 mile (1.6
km) after having been parked for three hours.
Cold inflation pressure must not go above the maximum values
molded into the tire sidewall. After driving several miles, your
tire inflation pressure may increase 2 to 6 psi (14 to 41 kPa)
from the cold inflation pressure. Do not let air out of the tires to
get back to the specified cold pressure, or your tires will be too
low.Check your tires each time you refuel. If one tire looks lower
than the others, check the pressure for all of them.
You should also take the following safety precautions:
�Keep your tires inflated to the recommended pressures.
(See the tire and loading information placard attached to
the driver’s door sill.)
�Stay within the recommended load limits.
�Make sure that the weight of any load in your vehicle is
evenly distributed.
�Drive at safe speeds.
�After filling your tires to the correct pressure, check them
for damage and air leaks. Be sure to reinstall the caps on
the valve stems.
Item
Tire size
Front
Rear
Normal tireP215/70R16
P225/55R18240 kPa,
35 psi240 kPa,
35 psi
Compact spare
wheelT155/90D16 420 kPa, 60 psi
BK0120400US.book 28 ページ 2010年5月12日 水曜日 午前10時50分
 fits in
the groove (C) at the top of the jack.4. Insert the bar (D) into the wheel nut wrench (E). Then put
the end of th")
![MITSUBISHI OUTLANDER SPORT 2011 3.G Owners Manual 6-16 For emergencies
6
[Vehicle with the flange nuts]
• Aluminium wheel
Temporarily tighten the wheel nuts until their flange
section comes in contact with the wheel and it is no
longer loose.• St](/manual-img/19/7539/w960_7539-490.png "MITSUBISHI OUTLANDER SPORT 2011 3.G Owners Manual 6-16 For emergencies
6
[Vehicle with the flange nuts]
• Aluminium wheel
Temporarily tighten the wheel nuts until their flange
section comes in contact with the wheel and it is no
longer loose.• St")

N00938400213
Whenever the transfer oil level is checked, add oil as necessary
to maintain the proper level. Fill or change the")