Page 332 of 602
Features and controls
3-235
3
NOTE�Depending on the type of the USB memory device or
other device connected, the connected device may not
function properly or the available functions may be lim-
ited.
�Use the iPod whose firmware has been updated to the lat-
est version.
�You can charge your iPod by connecting it to the USB
input terminal when the ignition switch or the operation
mode is in ON or ACC.
�Do not keep your USB memory device or iPod in your
vehicle.
�It is recommended that you back up the files in case of
data damage.
�Do not connect to the USB input terminal any device
(hard disk, card reader, memory reader, etc.) other than
the connectable devices specified in the previous section.
The device and/or data may be damaged. If any of these
devices was connected by mistake, remove it after turning
the ignition switch to the “LOCK” position or putting the
operation mode in OFF.
File specifications
N00567200017
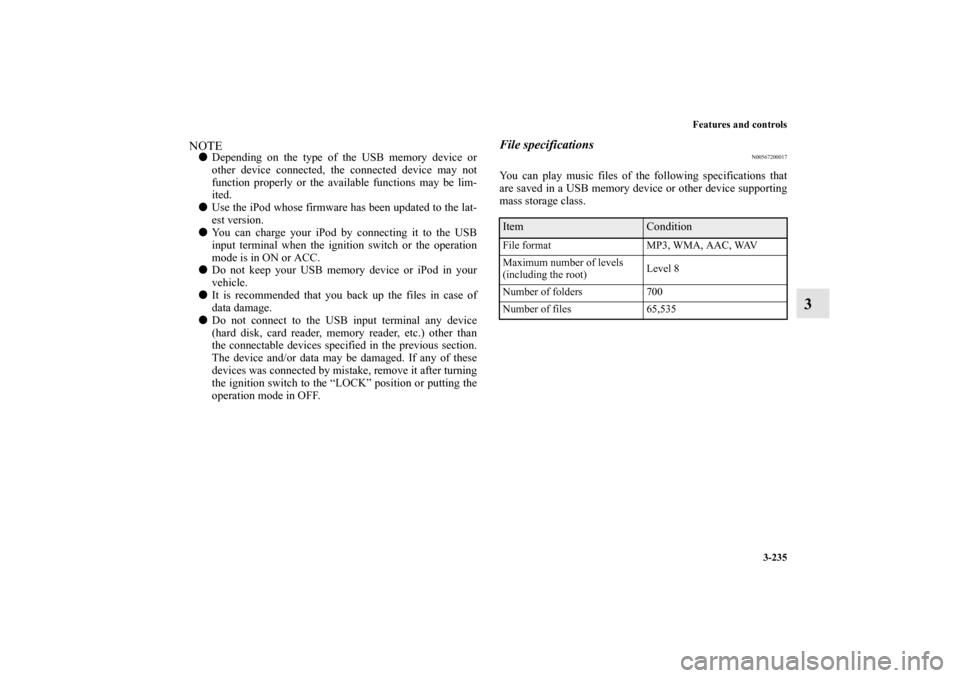
You can play music files of the following specifications that
are saved in a USB memory device or other device supporting
mass storage class.Item
Condition
File format MP3, WMA, AAC, WAV
Maximum number of levels
(including the root)Level 8
Number of folders 700
Number of files 65,535
BK0120400US.book 235 ページ 2010年5月12日 水曜日 午前10時50分
Page 345 of 602
3-248 Features and controls
3
Floor console box
N00551600218
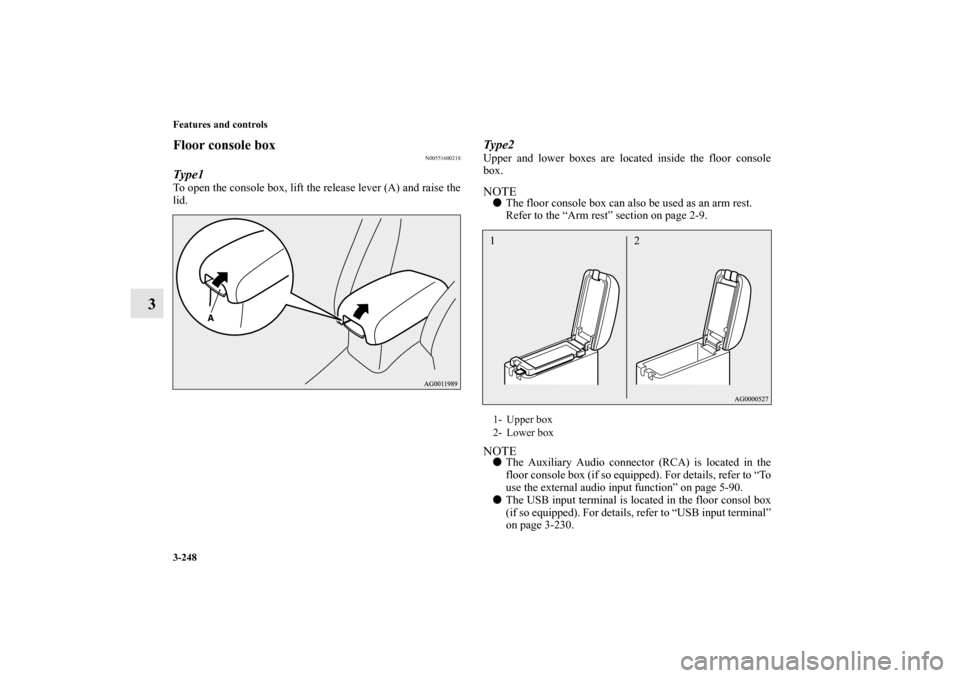
Type1To open the console box, lift the release lever (A) and raise the
lid.
Type2Upper and lower boxes are located inside the floor console
box.NOTE�The floor console box can also be used as an arm rest.
Refer to the “Arm rest” section on page 2-9.NOTE�The Auxiliary Audio connector (RCA) is located in the
floor console box (if so equipped). For details, refer to “To
use the external audio input function” on page 5-90.
�The USB input terminal is located in the floor consol box
(if so equipped). For details, refer to “USB input terminal”
on page 3-230.1- Upper box
2- Lower box12
BK0120400US.book 248 ページ 2010年5月12日 水曜日 午前10時50分
Page 370 of 602
5
Comfort controls
Vents. . . . . . . . . . . . . . . . . . . . . . . . . . . . . . . . . . . .5- 2
Manual air conditioning-Type 1
(if so equipped) . . . . . . . . . . . . . . . . . . . . . . . . . .5- 6
Manual air conditioning-Type 2
(if so equipped) . . . . . . . . . . . . . . . . . . . . . . . . . .5- 16
Automatic air conditioning-Type1
(if so equipped) . . . . . . . . . . . . . . . . . . . . . . . . . .5- 25
Automatic air conditioning-Type2
(if so equipped) . . . . . . . . . . . . . . . . . . . . . . . . . .5- 35
Important air conditioning operating tips . . . . . . .5- 45
Air purifier . . . . . . . . . . . . . . . . . . . . . . . . . . . . . . .5- 46
Audio system (if so equipped) . . . . . . . . . . . . . . . .5- 46
To play tracks from USB device
(if so equipped) . . . . . . . . . . . . . . . . . . . . . . . . . .5- 73
To play tracks from a Bluetooth® device
(vehicles with Bluetooth® 2.0 interface) . . . . . .5- 87
To use the external audio input function
(if so equipped) . . . . . . . . . . . . . . . . . . . . . . . . . .5- 90
Steering wheel audio remote control switch
(if so equipped) . . . . . . . . . . . . . . . . . . . . . . . . . .5- 91
Error codes . . . . . . . . . . . . . . . . . . . . . . . . . . . . . . .5- 94Error codes (SIRIUS Satellite Radio)
(if so equipped) . . . . . . . . . . . . . . . . . . . . . . . . . 5- 95
Error codes (iPod) . . . . . . . . . . . . . . . . . . . . . . . . . 5- 97
Error codes (USB memory device) . . . . . . . . . . . . 5- 98
Handling of compact discs . . . . . . . . . . . . . . . . . . 5- 99
Antenna . . . . . . . . . . . . . . . . . . . . . . . . . . . . . . . . . 5- 101
Clock (if so equipped) . . . . . . . . . . . . . . . . . . . . . . 5- 102
General information about your radio . . . . . . . . . . 5- 103
BK0120400US.book 1 ページ 2010年5月12日 水曜日 午前10時50分
Page 442 of 602
Comfort controls
5-73
5
ID3 tag information
The audio system can display ID3 tag information for files that
have been recorded with ID3 tag information.
1. Press the DISP button for 2 seconds or longer to switch to
the ID3 tag information. “TAG” indicator will appear on
the display.
2. Press the DISP button repeatedly to make selections in the
following sequence: album name → track name → artist
name → normal display mode.NOTE�To return from ID3 tag information to the folder name,
press the DISP button again for 2 seconds or longer.
�When there is no title information to be displayed, the dis-
play shows “NO TITLE”.
�The display can show up to 12 characters. If a folder
name, track name, or item of ID3 tag information has
more than 12 characters, press the PAGE button to view
the next 12 characters.
�Folder names and track names can each be displayed up to
a length of 32 characters. Items of ID3 tag information
can each be displayed up to a length of 30 characters.
�Characters that the audio system cannot display are shown
as “•”.
To play tracks from USB device (if so
equipped)
N00762200027
You can connect your iPod or USB memory device to the USB
input terminal and play music files stored in the iPod or USB
memory device.
See the following section for the types of connectable devices
and supported files.
Refer to “Types of connectable devices and supported file
specifications” on page 3-234.
See the following sections for the connecting methods, “How
to connect an iPod” on page 3-233 and “How to connect a USB
memory device” on page 3-231.
If your vehicle is equipped with a Bluetooth
® 2.0 interface,
you can play music files in your iPod or USB memory device
via voice operation.
Refer to “To play iPod tracks via voice operation” on page 5-77
and “To play USB memory device tracks via voice operation”
on page 5-86.
BK0120400US.book 73 ページ 2010年5月12日 水曜日 午前10時50分
Page 443 of 602
5-74 Comfort controls
5
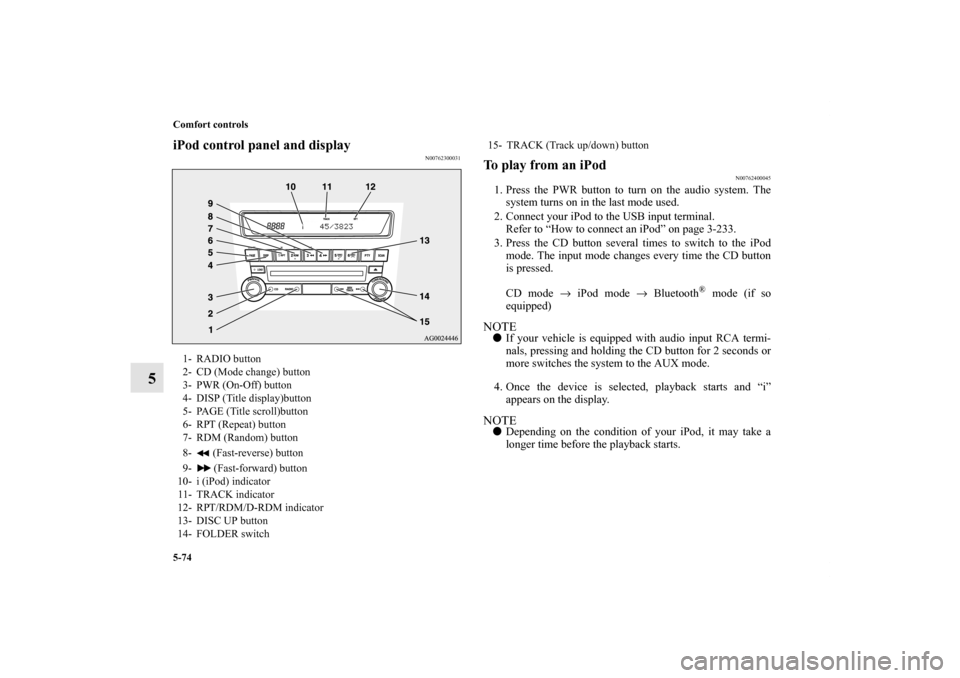
iPod control panel and display
N00762300031
To play from an iPod
N00762400045
1. Press the PWR button to turn on the audio system. The
system turns on in the last mode used.
2. Connect your iPod to the USB input terminal.
Refer to “How to connect an iPod” on page 3-233.
3. Press the CD button several times to switch to the iPod
mode. The input mode changes every time the CD button
is pressed.
CD mode → iPod mode → Bluetooth
® mode (if so
equipped)
NOTE�If your vehicle is equipped with audio input RCA termi-
nals, pressing and holding the CD button for 2 seconds or
more switches the system to the AUX mode.
4. Once the device is selected, playback starts and “i”
appears on the display.NOTE�Depending on the condition of your iPod, it may take a
longer time before the playback starts.
1- RADIO button
2- CD (Mode change) button
3- PWR (On-Off) button
4- DISP (Title display)button
5- PAGE (Title scroll)button
6- RPT (Repeat) button
7- RDM (Random) button
8- (Fast-reverse) button
9- (Fast-forward) button
10- i (iPod) indicator
11- TRACK indicator
12- RPT/RDM/D-RDM indicator
13- DISC UP button
14- FOLDER switch
15- TRACK (Track up/down) button
BK0120400US.book 74 ページ 2010年5月12日 水曜日 午前10時50分
Page 450 of 602
Comfort controls
5-81
5
6. After the voice guide says “Playing ,” the system
creates an index for the genre.NOTE�If the confirmation function is active, the voice guide con-
firms if the genre is correct. If the genre is correct, say
“Yes”. If not, say “No”. After the voice guide says “Genre
not found, please try again,” the system returns to step 2.
Refer to “Confirmation function setting” on page 3-209.
7. The system exits the voice recognition mode and starts
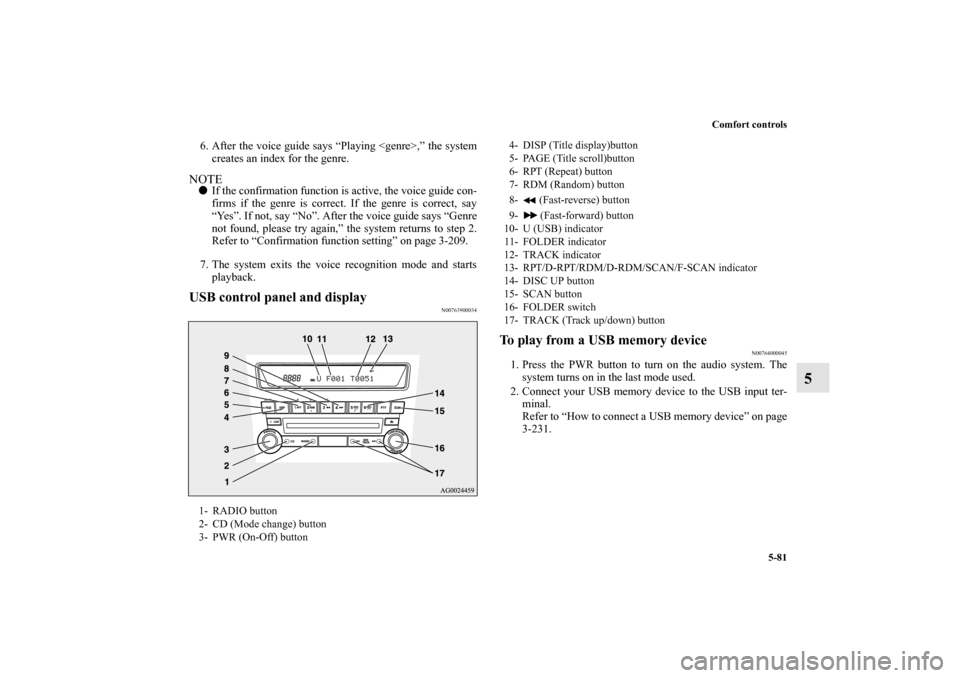
playback.USB control panel and display
N00763900034
To play from a USB memory device
N00764000045
1. Press the PWR button to turn on the audio system. The
system turns on in the last mode used.
2. Connect your USB memory device to the USB input ter-
minal.
Refer to “How to connect a USB memory device” on page
3-231.
1- RADIO button
2- CD (Mode change) button
3- PWR (On-Off) button
4- DISP (Title display)button
5- PAGE (Title scroll)button
6- RPT (Repeat) button
7- RDM (Random) button
8- (Fast-reverse) button
9- (Fast-forward) button
10- U (USB) indicator
11- FOLDER indicator
12- TRACK indicator
13- RPT/D-RPT/RDM/D-RDM/SCAN/F-SCAN indicator
14- DISC UP button
15- SCAN button
16- FOLDER switch
17- TRACK (Track up/down) button
BK0120400US.book 81 ページ 2010年5月12日 水曜日 午前10時50分
Page 451 of 602
5-82 Comfort controls
5
3. Press the CD button several times to switch to the USB
mode. The input mode changes as follows every time the
CD button is pressed.
CD mode → USB mode → Bluetooth
® mode (if so
equipped)
NOTE�If your vehicle is equipped with audio input RCA termi-
nals, pressing and holding the CD button for 2 seconds or
more switches the system to the AUX mode.
4. Once the device is selected, playback starts and “U”
appears on the display.NOTE�Depending on the condition of your USB device, it may
take a longer time before the playback starts.
5. To stop the playback, press the RADIO button or CD but-
ton to switch to a different mode.NOTE�To adjust the volume and tone, refer to “To adjust the vol-
ume” on page 5-48 and “To adjust the tone” on page 5-49.Supported compressed music files
N00764100046
This audio can play MP3, WMA, AAC and WAV files
recorded in a USB memory device. This audio supports up to
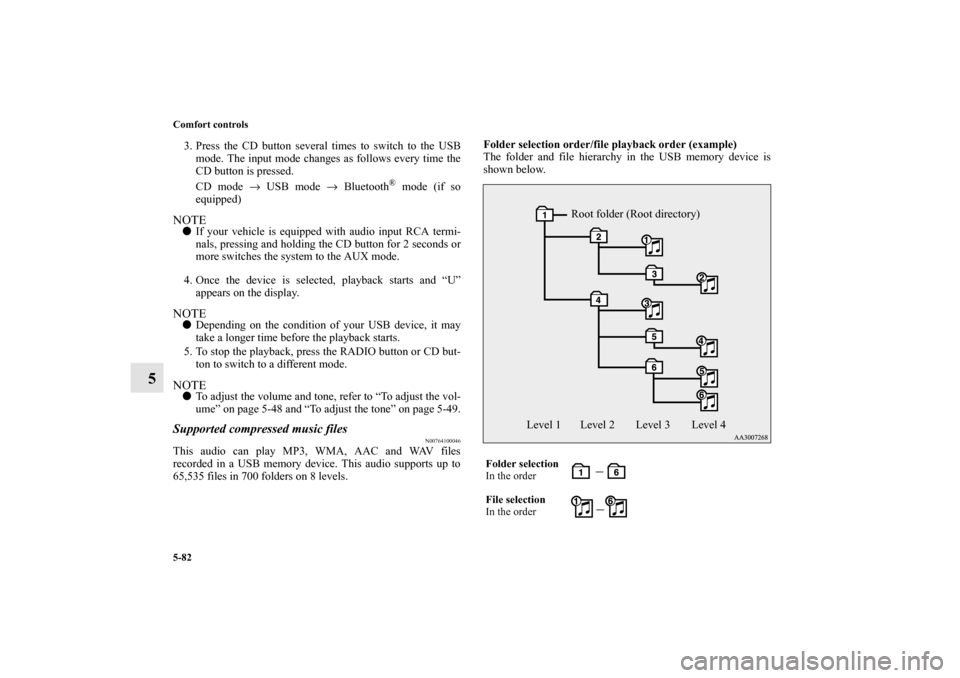
65,535 files in 700 folders on 8 levels.Folder selection order/file playback order (example)
The folder and file hierarchy in the USB memory device is
shown below.
Folder selection
In the order
File selection
In the order
Root folder (Root directory)
Level 1 Level 2 Level 3 Level 4
BK0120400US.book 82 ページ 2010年5月12日 水曜日 午前10時50分
Page 452 of 602
Comfort controls
5-83
5
NOTE�If a file protected by copyrights is played, “USB FILE
ERROR” will appear and the file will be skipped.To fast-forward/reverse the track
N00764200021
To fast-forward/reverse the current track, press the button
or button.
Fast-forward
To fast-forward the current track, press the button. While
the button is pressed, the track will be fast-forwarded.
Fast-reverse
To fast-reverse the current track, press the button. While the
button is pressed, the track will be fast-reversed.
To select a file
N00764300022
Press the TRACK button to select the desired file number.
If the side of the button is pressed once after a few seconds,
playback returns to the start of that track.NOTE�Every time the TRACK button is pressed, the file number
in the display changes.Press : The file number increases by one.
Press : The file number decreases by one.
Press for a long
period (approx. 2
seconds or more): The file number increases continuously
while the button is pressed.
Press for a long
period (approx. 2
seconds or more): The file number decreases continuously
while the button is pressed.
BK0120400US.book 83 ページ 2010年5月12日 水曜日 午前10時50分