Page 472 of 714

Comfort controls
5-45
5 Important air conditioning operating tips
N00733700280
1. Park the vehicle in the shade whenever possible. Parking
in the hot sun makes the vehicle interior extremely hot
which then requires more time to cool. If it is necessary to
park in the sun, open the windows for the first few min-
utes of air conditioning to expel the hot air.
2. Afterwards, keep the windows closed when the air condi-
tioning is in use. The entry of outside air through open
windows will reduce cooling efficiency.
3. When running the air conditioning, make sure the air
intake, which is located in front of the windshield, is free
of obstructions such as leaves. Leaves collected in the air-
intake chamber may reduce air flow and plug the water
drains.Air conditioning system refrigerant and lubri-
cant recommendationsIf the air conditioning seems less effective than usual, the cause
might be a refrigerant leak.
Have the system inspected by your authorized Mitsubishi
Motors dealer or a repair facility of your choice.
During a long period of disuseThe air conditioning should be operated for at least five min-
utes each week, even in cold weather. This includes the quick
defrosting mode. Operating the air condition system weekly
maintains lubrication of the compressor internal parts to keep
the air conditioning in the best operating condition.
CAUTION
!�The air conditioning system in your vehicle must be
charged with the refrigerant HFC-134a and the
lubricant SUN-PAG56.
Use of any other refrigerant or lubricant will cause
severe damage and may require replacing your vehi-
cle’s entire air conditioning system.
The release of refrigerant into the atmosphere is not
recommended.
The new refrigerant HFC-134a in your vehicle is
designed not to harm the earth’s ozone layer. How-
ever, it may contribute slightly to global warming.
It is recommended that the old refrigerant be saved
and recycled for future use.
BK0122500US.book 45 ページ 2010年5月12日 水曜日 午前11時11分
Page 475 of 714
 clockwise to increase the volume;
counterclockwise to decrease the volume.
The status will be displayed in the display (")
5-48 Comfort controls
5
To adjust the volume
N00712000310
Turn the VOL knob (2) clockwise to increase the volume;
counterclockwise to decrease the volume.
The status will be displayed in the display (3).NOTE�The volume control mode will shut off automatically if
either the radio or CD is selected, or if no adjustment is
made within about 2 seconds.To adjust the tone
N00712100601
1. Press the SOUND switch (4) repeatedly to select the tone
or balance control to change. The order is: TYPE →
FIELD → BASS → MID → TREBLE → FADER →
BALANCE → Audio adjust mode OFFQUICK ACCESS MODE
To access the sound customization features quickly, push
and hold the SOUND switch (4), then turn the switch
clockwise or counterclockwise to access your desired
sound customization setting. Release the switch to adjust
the setting.
2. Turn the SOUND switch (4) either clockwise or counter-
clockwise to change the tone/balance setting.
The status will be displayed in the display (3).
A- Adjust mode
B- Adjust level
BK0122500US.book 48 ページ 2010年5月12日 水曜日 午前11時11分
Page 477 of 714
To select the desired sound field.
BASS (Bass tone control)To select the desired bass level.MID (Midrange tone control)To select the desired midran")
5-50 Comfort controls
5
FIELD (Sound field selection)To select the desired sound field.
BASS (Bass tone control)To select the desired bass level.MID (Midrange tone control)To select the desired midrange level.TREBLE (Treble tone control)To select the desired treble level.FADER (Front/Rear balance control)To balance the volume from the F (front) and the R (rear)
speakers.BALANCE (Left/Right balance control)To balance the volume from the L (left) and the R (right)
speakers.NOTE�When set to “0”, it will beep.
�When TYPE or FIELD is changed, the sound will cut out
briefly, but this does not indicate a malfunction.
�The audio adjust mode will automatically shut off when
either the radio or CD is selected, or if no adjustment is
made within about 10 seconds.
�If the SOUND switch (4) is pushed and held for more than
2 seconds during the audio adjust mode, it will change to
“Hold” mode. The selected audio mode will be held until
the SOUND switch (4) is pushed for more than 2 seconds
again.
Sound field type
Description
NORMALAllows the listeners to enjoy an
image of a sound stage where
music is performed so that the
instrumental sound surrounds
them, while keeping the vocal-
ist in front.
STAGEPlaces the image of a sound
stage in front of the driver with
the vocalist in the center (for
driver only).
LIVEFront seat occupants are sur-
rounded by sound from front
and rear speakers.
HALLPlaces the image of a sound
stage in front of the driver with
the vocalist in the center (for
driver only). Sound reflections
are added to the rear speakers
to simulate the experience of
being at a concert hall. Best
with classical or vocalist music.
BK0122500US.book 50 ページ 2010年5月12日 水曜日 午前11時11分
Page 478 of 714
Comfort controls
5-51
5
Speed Compensated Volume function
N00752200200
Speed Compensated Volume function is a feature that automat-
ically adjusts the VOLUME, BASS, MID, and TREBLE set-
tings in accordance with the vehicle speed. It is possible to turn
this function ON-OFF using the following methods:
1. If you are presently pushing the SOUND switch (4) and
making a tone adjustment, finish making the tone adjust-
ment.
2. Push the SOUND switch (4) for at least about 2 seconds.
The system will switch to MENU mode and the characters
“SCV ON” will be shown on the display.
3. Turn the SOUND switch (4) clockwise to turn the func-
tion ON. Turn it counterclockwise to turn the function
OFF.NOTE�The factory setting for the Speed Compensated Volume
function is ON.
�The MENU mode will automatically shut off when either
the radio or CD is selected or the user does not move any
of the switches for 10 seconds.
BK0122500US.book 51 ページ 2010年5月12日 水曜日 午前11時11分
Page 480 of 714
 to turn the audio system ON and
OFF. The system turns on in the last mode used.
Press the RADIO button (1) to tu")
Comfort controls
5-53
5
To listen to the radio
N00735000809
1. Press the PWR switch (2) to turn the audio system ON and
OFF. The system turns on in the last mode used.
Press the RADIO button (1) to turn ON the radio.
2. Press the RADIO button (1) to select the desired band
(AM/FM1/FM2).
3. Press the SEEK button (5 or 6) to tune to a station, or
press one of the Memory select buttons (10) to tune in to a
station memorized for that button.
Refer to “Automatic tuning”, “Manual tuning” or “To
enter frequencies into the memory”.Automatic tuningAfter pressing the SEEK button (5 or 6), a receivable station
will be automatically selected and reception of the station will
begin.
SCAN function
Press the SCAN button (9). The radio will tune consecutively
to each available station for about 5 seconds per station. If you
want to stop scanning, press the SCAN button again.
The frequency display of the current station flashes once per
second during SCAN.Manual tuningThe frequency changes every time the TUNE switch (7) is
turned.
Turn the switch to select the desired station.To enter frequencies into the memoryAs many as 6 AM and 12 FM stations can be entered into the
memory.To store a frequency in the memory, follow these steps:
1. Press the SEEK button (5 or 6), or turn the TUNE switch
(7) to tune to the frequency you wish to keep in the mem-
ory.
2. Press one of the Memory select buttons (10) until it beeps.
The sound will be momentarily interrupted while the fre-
quency is being entered into the memory. The number of
the button matching the entry in the memory as well as the
frequency are displayed.
3. To recall a frequency that has been saved in memory,
press the corresponding button briefly for no longer than
about 1 second.
NOTE�Disconnecting the battery cables erases all the radio sta-
tion settings stored in the memory.
BK0122500US.book 53 ページ 2010年5月12日 水曜日 午前11時11分
Page 481 of 714

N00751800078
RBDS features are available for use only on FM stations that
broadcast RBDS information.
This RBDS radio can search for stations")
5-54 Comfort controls
5
Radio Broadcast Data System (RBDS)
N00751800078
RBDS features are available for use only on FM stations that
broadcast RBDS information.
This RBDS radio can search for stations broadcasting the
selected type of programming and display messages from radio
stations.PTY (Program Type)RBDS broadcasts are classified according to program type
(PTY) as follows.
To search for a broadcast of desired PTY1. To enter PTY (Program Type) mode, press the PTY button
(8) during FM reception.
2. Press the PTY button repeatedly until your desired PTY is
reached.
You can press one of the Memory select buttons (10) for
about 2 seconds to save the currently displayed PTY to
that Memory select button. Thereafter, you can easily call
up your desired PTY by pressing the corresponding Mem-
ory select button.
3. Press the SEEK button (5 or 6), and the radio will begin to
search for a broadcast of the selected PTY. During search,
the selected PTY on the display blinks and the sound will
be momentarily interrupted.
4. When the radio picks up a station with your desired PTY,
the PTY and the frequency will each appear on the display
for 2 seconds. Then the PTY and the station name will
alternately appear on the display for 6 seconds.
5. The frequency will appear on the display. Then the radio
will start receiving the program and exit the PTY mode.
1. ROCK
2. COUNTRY
3. EASY LIS
4. CLASSICL
5. JAZZ
6. Top 40
7. R&B
8. INFORM
9. RELIGION
10. MISC
BK0122500US.book 54 ページ 2010年5月12日 水曜日 午前11時11分
Page 482 of 714
Comfort controls
5-55
5
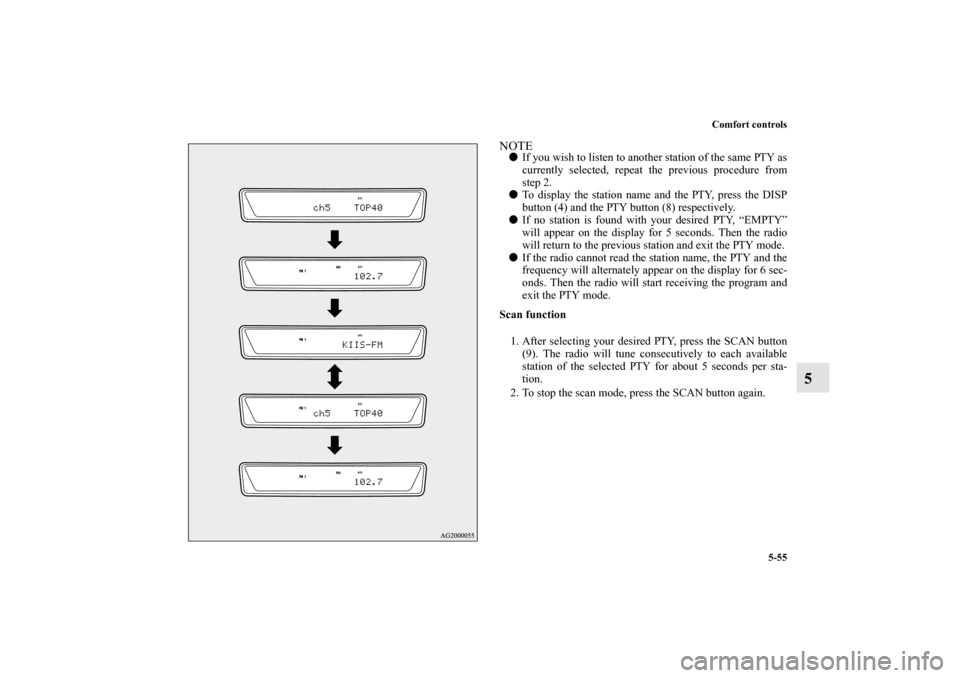
NOTE�If you wish to listen to another station of the same PTY as
currently selected, repeat the previous procedure from
step 2.
�To display the station name and the PTY, press the DISP
button (4) and the PTY button (8) respectively.
�If no station is found with your desired PTY, “EMPTY”
will appear on the display for 5 seconds. Then the radio
will return to the previous station and exit the PTY mode.
�If the radio cannot read the station name, the PTY and the
frequency will alternately appear on the display for 6 sec-
onds. Then the radio will start receiving the program and
exit the PTY mode.
Scan function
1. After selecting your desired PTY, press the SCAN button
(9). The radio will tune consecutively to each available
station of the selected PTY for about 5 seconds per sta-
tion.
2. To stop the scan mode, press the SCAN button again.
BK0122500US.book 55 ページ 2010年5月12日 水曜日 午前11時11分
Page 485 of 714
 to turn the audio system ON and
OFF. The system turns on in the last mode used.
2. Insert the disc with t")
5-58 Comfort controls
5
To listen to a CD
N00735500950
To set discs1. Press the PWR switch (3) to turn the audio system ON and
OFF. The system turns on in the last mode used.
2. Insert the disc with the label facing up.
When a disc is inserted, the CD player will begin playing
even if the radio is being used. The CD player will also
begin playing when the CD button (2) is pressed with a
disc set in the CD player or in the disc loading slot (12),
even if the radio is being used.NOTE�For information concerning the adjustment of volume and
tone, refer to “To adjust the volume” on page 5-48 and
“To adjust the tone” on page 5-48.
�For information concerning the handing of the compact
discs, refer to “Handling of compact discs” on page 5-131.To eject discsWhen the eject button (11) is pressed, the disc automatically
stops and is ejected. The system automatically switches to
radio mode.NOTE�If you do not remove an ejected disc before 15 seconds
have elapsed, the disc will be reloaded.
To listen to a music CDPush the CD button (2) if a disc is already in the CD player.
The audio system will enter CD mode and start playback. The
track number and the playing-time will appear on the display.
The tracks in the disc will be played consecutively and contin-
uously.
BK0122500US.book 58 ページ 2010年5月12日 水曜日 午前11時11分