Page 643 of 700
7-66 Vehicle care and maintenance
7
4. Turn the bulb counterclockwise while pressing it and pull
it out of the socket.
5. To install a bulb, perform the removal steps in reverse.
Headlights (low/high beam, for vehicles with high
intensity discharge lights)
N00943100625
Do not attempt to disassemble or repair headlights, and do not
attempt to replace their bulbs.Adjustment of headlight aim
N00943200121
The alignment of the headlights should be checked by an
authorized Mitsubishi Motors dealer or a repair facility of your
choice.
WA R N I N G
!�A high voltage is present in the power circuit and in
the bulbs and bulb terminals. To avoid the risk of an
electric shock, contact an authorized Mitsubishi
dealer whenever repair or replacement is necessary.
BK0119300US.book 66 ページ 2010年5月21日 金曜日 午前10時13分
Page 644 of 700
Vehicle care and maintenance
7-67
7
Parking and side-marker lights (except for vehi-
cles with high intensity discharge headlights)
N00917300512
1. For vehicles equipped with turbocharger, when replacing
the bulb on the driver’s side, remove the bolt (A) holding
down the relay box and move the relay box toward the
rear of the vehicle.2. For vehicles equipped with turbocharger, when replacing
the bulb on the passenger’s side, lift up the engine coolant
reservoir (B).*- Front of the vehicle
*- Front of the vehicle
BK0119300US.book 67 ページ 2010年5月21日 金曜日 午前10時13分
Page 646 of 700
Vehicle care and maintenance
7-69
7
Parking and side-marker lights (for vehicles with
high intensity discharge headlights)
N00917300509
1. To create enough work space, turn the steering wheel all
the way in the direction opposite to the side you wish to
replace.
2. Remove the clips (A), and screw (B) or bolts (B) to turn
up the cover (C).Except for vehicles
with turbocharger
Vehicles with
turbocharger
BK0119300US.book 69 ページ 2010年5月21日 金曜日 午前10時13分
Page 648 of 700
Vehicle care and maintenance
7-71
7
Front turn signal lights
N00943400237
1. Remove the clips (A) and clips (B), then remove the duct
(C) and the upper cover (D).Except for vehicles with turbocharger
Vehicles with turbocharger
BK0119300US.book 71 ページ 2010年5月21日 金曜日 午前10時13分
Page 650 of 700
Vehicle care and maintenance
7-73
7
Front fog lights (except for vehicles with turbo-
charger)
(if so equipped)
N00943600705
1. Remove the screw (A) and pull the cover out.2. Remove the screws (B) and pull the entire light unit out.
BK0119300US.book 73 ページ 2010年5月21日 金曜日 午前10時13分
Page 651 of 700
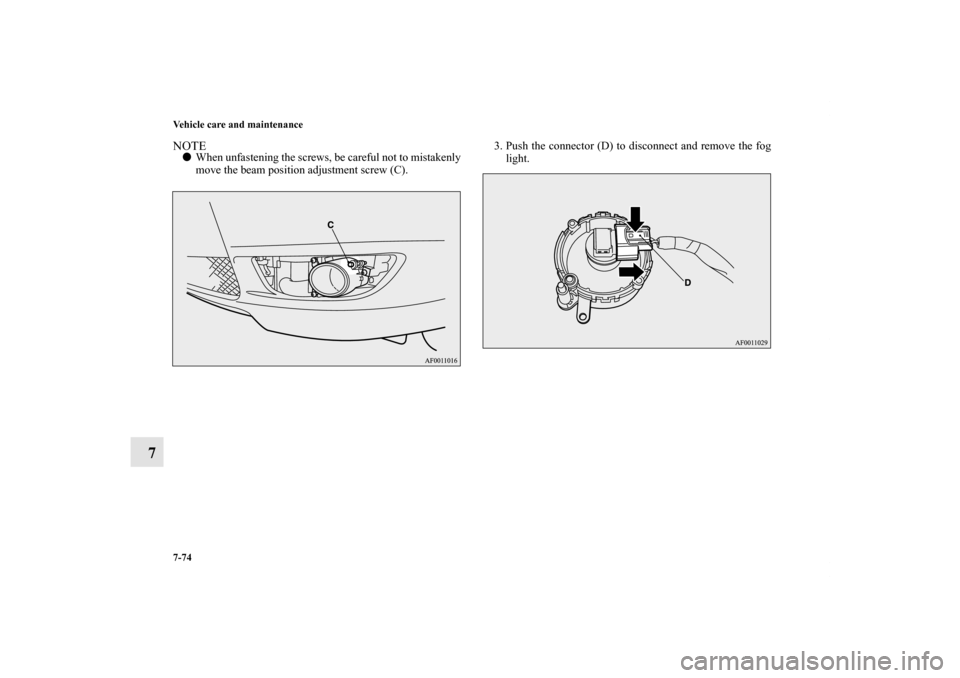
7-74 Vehicle care and maintenance
7
NOTE�When unfastening the screws, be careful not to mistakenly
move the beam position adjustment screw (C).3. Push the connector (D) to disconnect and remove the fog
light.
BK0119300US.book 74 ページ 2010年5月21日 金曜日 午前10時13分
Page 653 of 700
7-76 Vehicle care and maintenance
7
Front fog lights (for vehicles with turbocharger)
N00943600718
1. Remove the screw (A).
CAUTION
!�Handle halogen light bulbs with care. The gas inside
a halogen light bulb is highly pressurized, so drop-
ping, knocking, or scratching a halogen light bulb
can cause it to shatter.�Never hold the halogen lights bulb with a bare hand,
dirty glove, etc. The oil from your hand could cause
the bulb to break the next time the fog lights are
used.
If the glass surface is dirty, clean it with alcohol and
let it dry completely before installing the bulb.
BK0119300US.book 76 ページ 2010年5月21日 金曜日 午前10時13分
Page 654 of 700
Vehicle care and maintenance
7-77
7
2. Pull the cover out in the direction of the arrow shown in
the illustration.3. Remove the screws (B) and pull the entire light unit out.
Passenger’s side Driver’s side
BK0119300US.book 77 ページ 2010年5月21日 金曜日 午前10時13分


N00917300512
1. For vehicles equipped with turbocharger, when replac")

N00917300509
1. To create enough work space, turn the steering wheel all
the")
 and clips (B), then remove the duct
(C) and the upper cover (D).Except for vehicles with turbocharger")

(if so equipped)
N00943600705
1. Remove the screw (A) and pull the cover out.2. Remove the screws (B) an")

 and pull the entire light unit out.
Passenger’s side Driver")