2011 MITSUBISHI L200 tow
[x] Cancel search: towPage 178 of 330
WARNINGlOn vehicles with
A/T, although, the set
speed driving will be deactivated when
shifting to the “N” (NEUTRAL) position,
never move the selector lever to the “N”
(NEUTRAL) position while driving.
You would have no engine braking and
could cause a serious accident.
Also, the set speed driving may be deactivated as
follows:
l When the engine speed rises and approaches
the tachometer's red zone (the red-coloured
part of the tachometer dial).
CAUTIONl When the set speed driving is deactivated
automatically in any situation other than
those listed above, there may be a system
malfunction.
Press the “ON-OFF” switch to turn off
the cruise control and have it inspected
by a MITSUBISHI MOTORS Author-
ized Service Point.To resume the set speed E00609800561
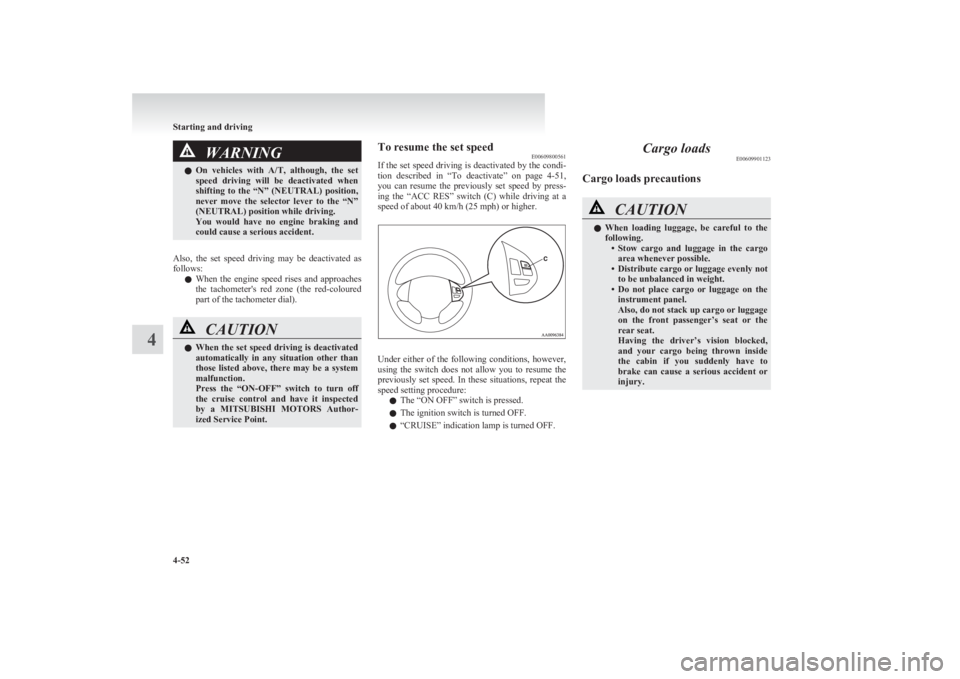
If the set speed driving is deactivated by the condi-
tion described in “To deactivate” on page 4-51,
you can resume the previously set speed by press-
ing the “ACC RES” switch (C) while driving at a
speed of about 40 km/h (25 mph) or higher.
Under either of the following conditions, however,
using the switch does not allow you to resume the
previously set speed. In these situations, repeat the
speed setting procedure:
l The “ON OFF” switch is pressed.
l The ignition switch is turned OFF.
l “CRUISE” indication lamp is turned OFF.
Cargo loads
E00609901123
Cargo loads precautionsCAUTIONl When loading luggage, be careful to the
following. •Stow cargo and luggage in the cargo
area whenever possible.
• Distribute cargo or luggage evenly not
to be unbalanced in weight.
• Do not place cargo or luggage on the
instrument panel.
Also, do not stack up cargo or luggage
on the front passenger’s seat or the
rear seat.
Having the driver’s vision blocked,
and your cargo being thrown inside
the cabin if you suddenly have to
brake can cause a serious accident or
injury.
Starting and driving
4-52
4
Page 179 of 330
Trailer towingE00610000462
In order to tow a trailer with your vehicle, when hav-
ing a trailer towing device mounted that meets all
relevant regulations in your area, consult a
MITSUBISHI MOTORS Authorized Service Point.
The regulations concerning the towing of a trailer
may differ from country to country. You are ad-
vised to obey the regulations in each area.CAUTIONl Danger of Accident!
A towing bar should be fitted according
to MITSUBISHI MOTORS guidelines.
NOTE
l If you are going to tow a trailer, pay careful
attention to the following points.
Maximum towable weight with brake
and maximum trailer-nose weight
Never exceed the maximum towable weight with
brake and the maximum trailer-nose weight as lis-
ted in the specifications.
(Refer to “Vehicle weight” on page 9-10.)
If you tow a trailer at an altitude of more than
1,000 m above sea-level, reduce your weight by
10 % of the gross combination weight for every in-
crease of 1,000 m above sea-level, as the engine out-
put is lowered owing to decrease in atmospheric
pressure.
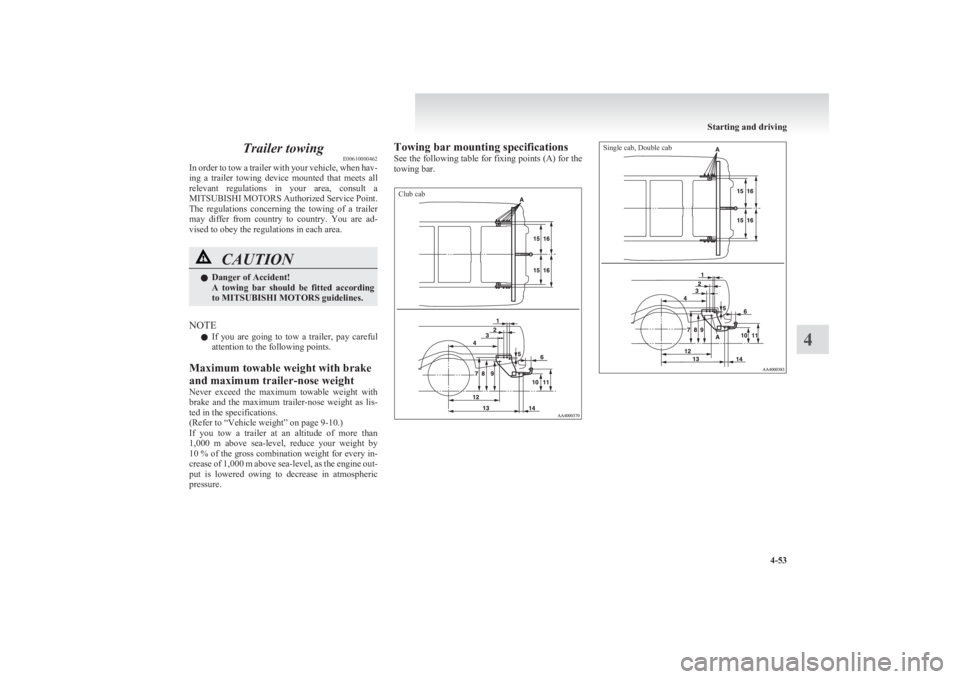
Towing bar mounting specifications
See the following table for fixing points (A) for the
towing bar.Club cabSingle cab, Double cab
Starting and driving
4-53
4
Page 180 of 330
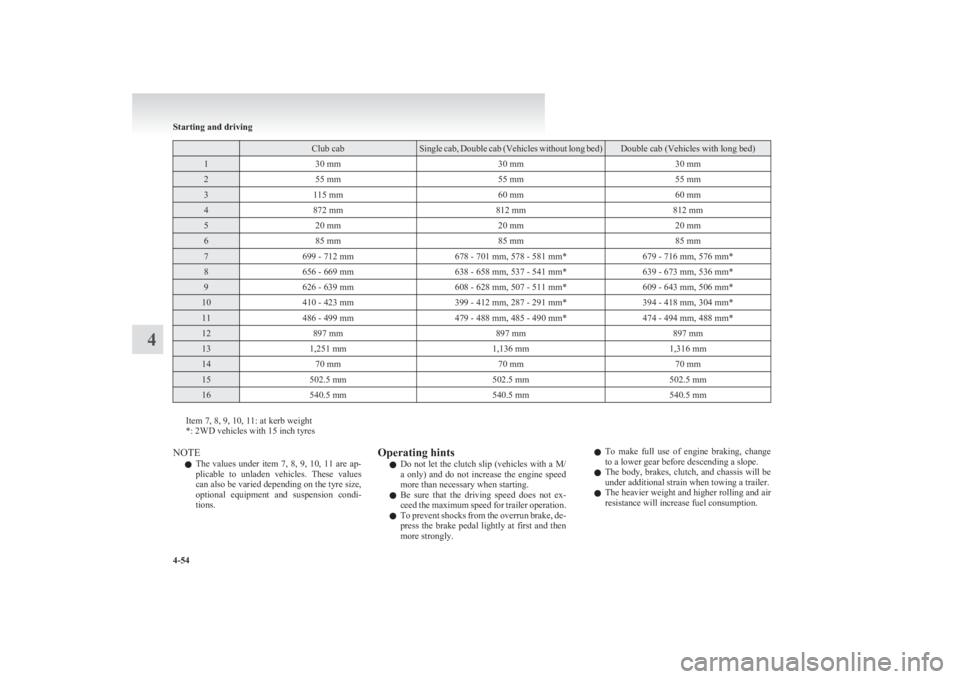
Club cabSingle cab, Double cab (Vehicles without long bed)Double cab (Vehicles with long bed)130 mm30 mm30 mm255 mm55 mm55 mm3115 mm60 mm60 mm4872 mm812 mm812 mm520 mm20 mm20 mm685 mm85 mm85 mm7699 - 712 mm678 - 701 mm, 578 - 581 mm*679 - 716 mm, 576 mm*8656 - 669 mm638 - 658 mm, 537 - 541 mm*639 - 673 mm, 536 mm*9626 - 639 mm608 - 628 mm, 507 - 511 mm*609 - 643 mm, 506 mm*10410 - 423 mm399 - 412 mm, 287 - 291 mm*394 - 418 mm, 304 mm*11486 - 499 mm479 - 488 mm, 485 - 490 mm*474 - 494 mm, 488 mm*12897 mm897 mm897 mm131,251 mm1,136 mm1,316 mm1470 mm70 mm70 mm15502.5 mm502.5 mm502.5 mm16540.5 mm540.5 mm540.5 mm
Item 7, 8, 9, 10, 11: at kerb weight
*: 2WD vehicles with 15 inch tyres
NOTE
l The values under item 7, 8, 9, 10, 11 are ap-
plicable to unladen vehicles. These values
can also be varied depending on the tyre size,
optional equipment and suspension condi-
tions.Operating hints
l Do not let the clutch slip (vehicles with a M/
a only) and do not increase the engine speed
more than necessary when starting.
l Be sure that the driving speed does not ex-
ceed the maximum speed for trailer operation.
l To prevent shocks from the overrun brake, de-
press the brake pedal lightly at first and then
more strongly.l To make full use of engine braking, change
to a lower gear before descending a slope.
l The body, brakes, clutch, and chassis will be
under additional strain when towing a trailer.
l The heavier weight and higher rolling and air
resistance will increase fuel consumption.
Starting and driving
4-54
4
Page 189 of 330
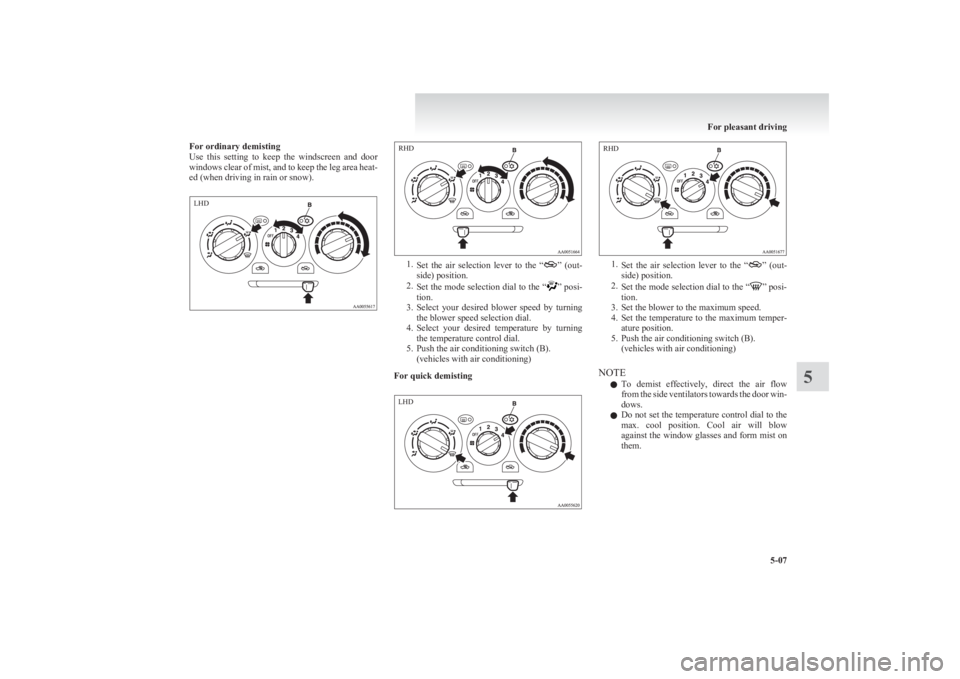
For ordinary demisting
Use this setting to keep the windscreen and door
windows clear of mist, and to keep the leg area heat-
ed (when driving in rain or snow).
1. Set the air selection lever to the “” (out-
side) position.
2. Set the mode selection dial to the “
” posi-
tion.
3. Select your desired blower speed by turning
the blower speed selection dial.
4. Select your desired temperature by turning
the temperature control dial.
5. Push the air conditioning switch (B). (vehicles with air conditioning)
For quick demisting
1. Set the air selection lever to the “” (out-
side) position.
2. Set the mode selection dial to the “
” posi-
tion.
3. Set the blower to the maximum speed.
4. Set the temperature to the maximum temper-
ature position.
5. Push the air conditioning switch (B). (vehicles with air conditioning)
NOTE l To demist effectively, direct the air flow
from the side ventilators towards the door win-
dows.
l Do not set the temperature control dial to the
max. cool position. Cool air will blow
against the window glasses and form mist on
them.
For pleasant driving
5-07
5LHD RHD LHD RHD
Page 193 of 330
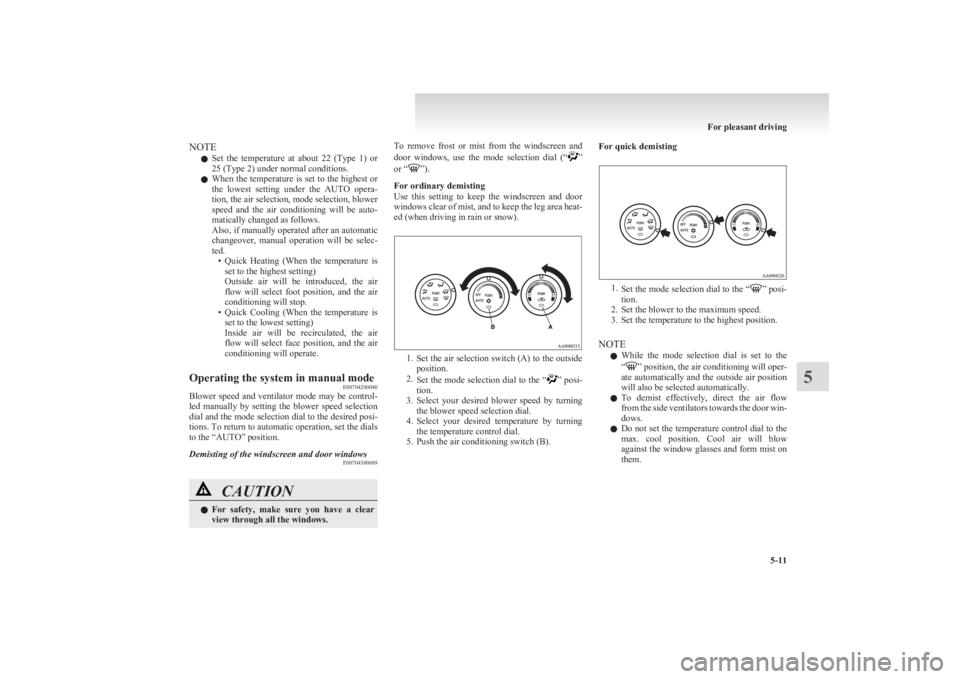
NOTEl Set the temperature at about 22 (Type 1) or
25 (Type 2) under normal conditions.
l When the temperature is set to the highest or
the lowest setting under the AUTO opera-
tion, the air selection, mode selection, blower
speed and the air conditioning will be auto-
matically changed as follows.
Also, if manually operated after an automatic
changeover, manual operation will be selec-
ted. •Quick Heating (When the temperature is
set to the highest setting)
Outside air will be introduced, the air
flow will select foot position, and the air
conditioning will stop.
• Quick Cooling (When the temperature is
set to the lowest setting)
Inside air will be recirculated, the air
flow will select face position, and the air
conditioning will operate.Operating the system in manual mode E00704200040
Blower speed and ventilator mode may be control-
led manually by setting the blower speed selection
dial and the mode selection dial to the desired posi-
tions. To return to automatic operation, set the dials
to the “AUTO” position.
Demisting of the windscreen and door windows E00704300689CAUTIONlFor safety, make sure you have a clear
view through all the windows.To remove frost or mist from the windscreen and
door windows, use the mode selection dial (“”
or “”).
For ordinary demisting
Use this setting to keep the windscreen and door
windows clear of mist, and to keep the leg area heat-
ed (when driving in rain or snow).
1. Set the air selection switch (A) to the outside
position.
2. Set the mode selection dial to the “
” posi-
tion.
3. Select your desired blower speed by turning
the blower speed selection dial.
4. Select your desired temperature by turning
the temperature control dial.
5. Push the air conditioning switch (B).
For quick demisting
1. Set the mode selection dial to the “” posi-
tion.
2. Set the blower to the maximum speed.
3. Set the temperature to the highest position.
NOTE l While the mode selection dial is set to the
“
” position, the air conditioning will oper-
ate automatically and the outside air position
will also be selected automatically.
l To demist effectively, direct the air flow
from the side ventilators towards the door win-
dows.
l Do not set the temperature control dial to the
max. cool position. Cool air will blow
against the window glasses and form mist on
them.
For pleasant driving
5-11
5
Page 215 of 330

lThe use of special shaped, damaged compact
discs (like cracked discs) or low-quality com-
pact discs (like warped discs or burrs on the
discs) such as those shown will damage the
CD player.
l In the following circumstances, moisture can
form on discs and inside the audio system,
preventing normal operation. •When there is high humidity (for exam-
ple, when it is raining).
• When the temperature suddenly rises,
such as right after the heater is turned on
in cold weather.
In this case, wait until the moisture has
had time to dry out.
l When the CD player is subjected to violent vi-
brations, such as during off-road driving, the
tracking may not work.
l When storing compact discs, always store
them in their separate cases. Never place com-
pact discs in direct sunlight, or in any place
where the temperature or humidity is high.
l Never touch the flat surface of the disc with-
out a label. This will damage the disc surface
and could affect the sound quality. When han-
dling a compact disc, always hold it by the
outer edge and the centre hole.
l To clean a disc, use a soft, clean, dry cloth.
Wipe directly from the centre hole towards
the outer edge. Do not wipe in a circle. Nev-
er use any chemicals such as benzine, paint
thinner, a disc spray cleaner, or an anti-static
agent on the disc.l Do not use a ball point pen, felt pen, pencil,
etc. to write on the label surface of the disc.
l Do not put additional labels (A) or stickers
(B) on compact discs. Also, do not use any
compact disc on which a label or sticker has
started to peel off or any compact disc that
has stickiness or other contamination left by
a peeled-off label or sticker. If you use such
a compact disc, the CD player may stop work-
ing properly and you may not be able to eject
the compact disc.Notes on CD-Rs/RWs E00725100039
lYou may have trouble playing back some
CD-R/RW discs recorded on CD recorders
(CD-R/RW drives), either due to their record-
ing characteristics or dirt, fingerprints,
scratches, etc. on the disc surface.
l CD-R/RW
discs are less resistant to high tem-
peratures and high humidity than ordinary mu-
sic CDs. Leaving them inside a vehicle for ex-
tended periods may damage them and make
playback impossible.
For pleasant driving
5-33
5
Page 231 of 330
If the vehicle breaks down............................................................ 6-02
Emergency starting ....................................................................... 6-02
Engine overheating ....................................................................... 6-04
Bleeding the fuel system...............................................................6-05
Removal of water from the fuel filter ...........................................6-06
Tools, jack and jack handle .......................................................... 6-07
Jacking up the vehicle...................................................................6-13
Spare wheel...................................................................................6-16
How to change a tyre .................................................................... 6-17
Towing .......................................................................................... 6-20
Operation under adverse driving conditions .................................6-24For emergencies6
Page 240 of 330
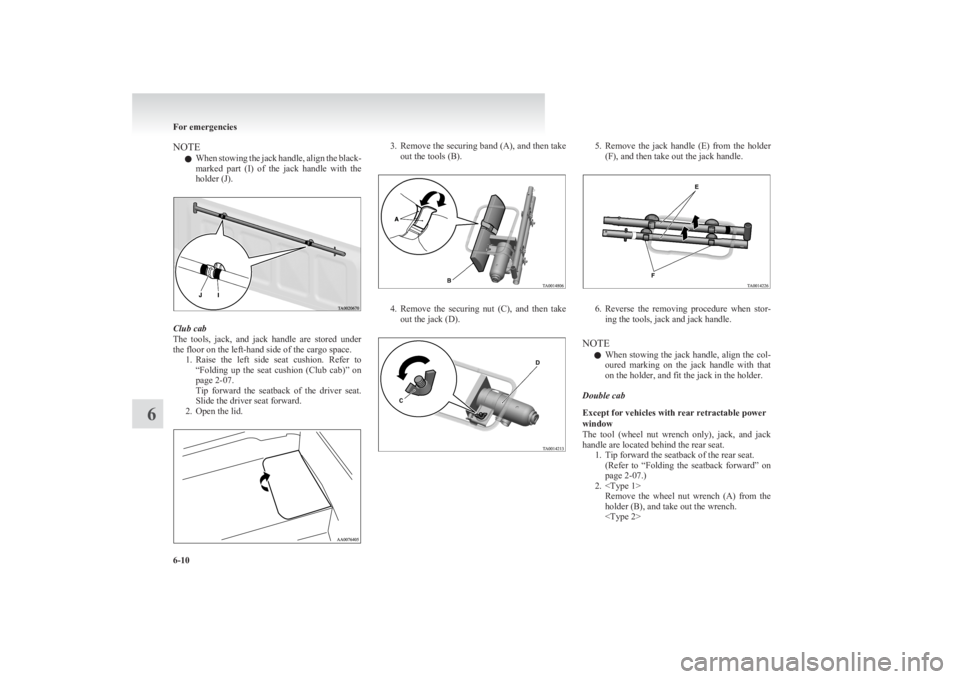
NOTEl When stowing the jack handle, align the black-
marked part (I) of the jack handle with the
holder (J).
Club cab
The tools, jack, and jack handle are stored under
the floor on the left-hand side of the cargo space. 1.Raise the left side seat cushion. Refer to
“ Folding up the seat cushion (Club cab)” on
page 2-07.
Tip forward the seatback of the driver seat.
Slide the driver seat forward.
2. Open the lid.
3. Remove the securing band (A), and then take
out the tools (B).
4. Remove the securing nut (C), and then take
out the jack (D).
5. Remove the jack handle (E) from the holder
(F), and then take out the jack handle.
6. Reverse the removing procedure when stor-
ing the tools, jack and jack handle.
NOTE l When stowing the jack handle, align the col-
oured marking on the jack handle with that
on the holder, and fit the jack in the holder.
Double cab
Except for vehicles with rear retractable power
window
The tool (wheel nut wrench only), jack, and jack
handle are located behind the rear seat. 1. Tip forward the seatback of the rear seat.(Refer to “Folding the seatback forward” on
page 2-07.)
2.
holder (B), and take out the wrench.
For emergencies
6-10
6