Page 58 of 424

Seat and restraint systems
2-31
2
NOTE�Before purchasing a child restraint system, try installing it
in the rear seat to make sure there is a good fit. Because of
the location of the seat belt buckles and the shape of the
seat cushion, it may be difficult to securely install some
manufacturer’s child restraint systems.
If the child restraint system can be pulled forward or to
either side easily on the seat cushion after the seat belt has
been tightened, choose another manufacturer’s child
restraint system.
Depending on the seating position in the vehicle and the
child restraint system that you have, the child restraint can
be attached using one of the following two methods:
• To the lower anchorage in the rear seat ONLY if the
child restraint is compatible with the LATCH system
(See page 2-31).
• To the seat belt (See page 2-34).
Installing a child restraint system using the
LATCH (Lower Anchors and Tethers for chil-
dren) system
N00418800072
Lower anchor locationsThe outboard seating positions in rear seat of your vehicle are
equipped with lower anchors for attaching child restraint sys-
tems compatible with the LATCH system.NOTE�The symbols on the seatback show the location of the
lower anchor points.
BK0121200US.book 31 ページ 2010年4月14日 水曜日 午前11時24分
Page 59 of 424
2-32 Seat and restraint systems
2
Tether anchor locations
N00418900161
Your vehicle has 3 attachment points on the rear shelf, located
behind the top of your rear seat. These are for securing a child
restraint system tether strap to each of the 3 rear seating posi-
tions in your vehicle.
Examples of child restraint systems compatible with the
LATCH system
N00419000156
A- Rear-facing child restraint
B- Front-facing child restraint
C- Child restraint system lower anchor connectors
D- Tether strap
(These are only examples.)
BK0121200US.book 32 ページ 2010年4月14日 水曜日 午前11時24分
Page 159 of 424
 is in the trunk lid.
Screen imageReference guide marks, upper surface of the rear bumper (A)
and a part of the trunk l")
3-70 Features and controls
3
Location of rear-view cameraThe rear-view camera (A) is in the trunk lid.
Screen imageReference guide marks, upper surface of the rear bumper (A)
and a part of the trunk lid (C) are displayed on the screen.
�Five guide marks in red (B) indicates approximately 20
inches (50 cm) behind the rear bumper.
�Each row of green guide marks (1 to 4) indicates approxi-
mately 8 inches (20 cm) outside of the vehicle body.
�Every single green guide mark indicates distance from the
rear bumper.
CAUTION
!�If the camera lens gets dirty, a clear image cannot be
obtained. As necessary, rinse the lens with clean
water and gently wipe with a clean, soft cloth.�To avoid damaging the camera;
• Do not rub the cover excessively or polish it by
using an abrasive compound.
• Do not disassemble the camera.
• Do not splash hot water directly on the lens.
• Do not spray the camera and its surroundings with
high-pressure water.
• Make sure that the trunk lid is securely closed
when backing up.
1: Approximately at the rear edge of the rear bumper
2: Approximately 39 inches (100 cm)
3: Approximately 79 inches (200 cm)
4: Approximately 118 inches (300 cm)
BK0121200US.book 70 ページ 2010年4月14日 水曜日 午前11時24分
Page 198 of 424

Features and controls
3-109
3
Having the system tell you a list of the phonebook
entries
N00508600052
You can hear a list of the names registered in the phonebook by
saying “List names” on the phonebook main menu.
1. The Bluetooth
® HFP will read out the entries in the
phonebook in order.
2. When the voice guide is done reading the list, it will say
“End of list, would you like to start from the beginning?”
When you want to check the list again from the beginning,
answer “Yes.”
When you are done, answer “No” to return to the main
menu.
NOTE�You can call, edit or delete a name that is being read out.
Press the SPEECH button and say “Call” to call the name,
“Edit” to edit it, or “Delete” to delete it.
The system will beep and then execute your command.
�If you press and release the SPEECH button and say
“Continue” or “Previous” while the list is being read, the
system will advance or rewind the list. Say “Continue” to
proceed to the next entry or “Previous” to return to the
previous entry.
Deleting a registered number
N00511700057
You can delete a telephone number in the phonebook by saying
“Delete” on the phonebook main menu.
1. The voice guide will say “Please say the name of the entry
you would like to delete, or say “list names,” or say “can-
cel” to return to main menu.” Say the name of the entry
that you want to delete.NOTE�If the name that you said is not in the phonebook, the
voice guide will say “Name not found. Would you like to
try again or say ‘Cancel’ to return to main menu?”
Say “Try again” to try again or “Cancel” to end the dele-
tion process and return to the main menu.
�If you say “List Names,” the system will read out each
entry registered in the phonebook in order. Refer to “Hav-
ing the system tell you a list of the phonebook entries” on
page 3-109.
2. If there are telephone numbers registered for multiple
locations for the selected name, the voice guide will say
“Would you like to delete [Home,] [Work,] [Mobile,]
[Pager,] or all.” Select the location that has the telephone
number that you want to delete.
Say “All” if you want to delete the telephone numbers for
all locations.
3. The system will confirm whether it is ok to delete the tele-
phone number of the selected location. Answer “Yes” to
delete the number.
Answer “No” to cancel the deletion process and return to
Step 1.
BK0121200US.book 109 ページ 2010年4月14日 水曜日 午前11時24分
Page 331 of 424
6-20 For emergencies
6
NOTE�The wheel cover is made of plastic. Be careful when pry-
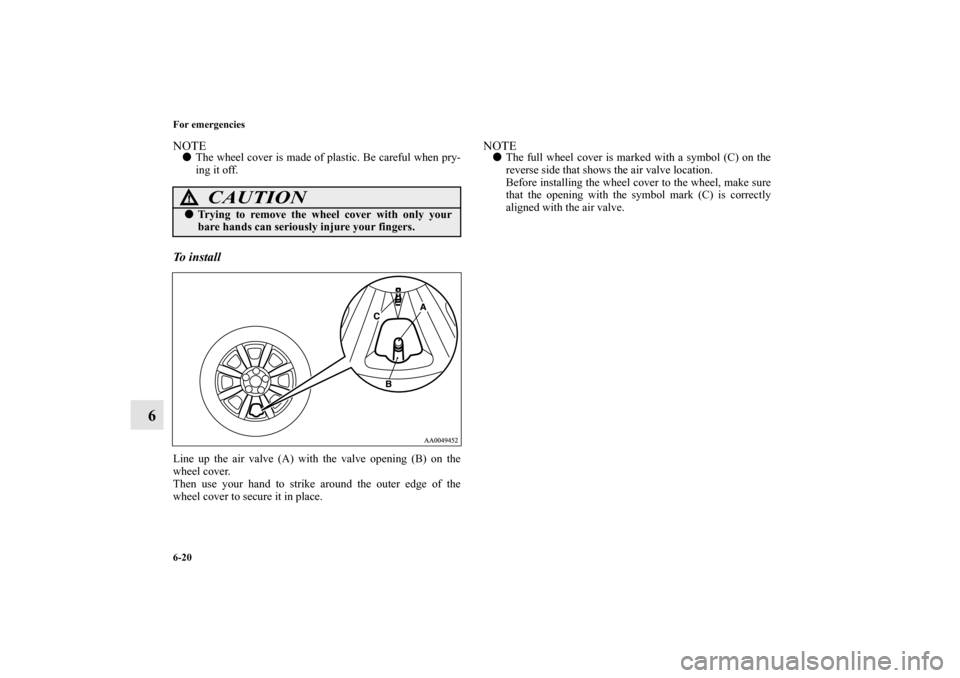
ing it off. To i n s t a l l Line up the air valve (A) with the valve opening (B) on the
wheel cover.
Then use your hand to strike around the outer edge of the
wheel cover to secure it in place.
NOTE�The full wheel cover is marked with a symbol (C) on the
reverse side that shows the air valve location.
Before installing the wheel cover to the wheel, make sure
that the opening with the symbol mark (C) is correctly
aligned with the air valve.
CAUTION
!�Trying to remove the wheel cover with only your
bare hands can seriously injure your fingers.
BK0121200US.book 20 ページ 2010年4月14日 水曜日 午前11時24分