Page 213 of 424
N00554300027
HomeLink® Wireless Control System is a registered trademark
of Johnson Controls Inc..
HomeLink® provide")
3-124 Features and controls
3HomeLink® Wireless Control System
(if so
equipped)N00554300027
HomeLink® Wireless Control System is a registered trademark
of Johnson Controls Inc..
HomeLink® provides a convenient way to consolidate the
functions of up to three individual hand-held transmitters into
one built-in device.
HomeLink® will operate most radio frequency devices such as
garage doors, gates, home and office lighting, entry door locks
and security systems.NOTE�Your vehicle’s engine should be turned off while program-
ming HomeLink®.�HomeLink® is powered by your vehicle’s battery. No sep-
arate batteries are required. If the vehicle’s battery is dis-
charged or is disconnected, HomeLink® will retain all
programming.
�Once HomeLink® is programmed, retain the original
transmitter for future programming procedures (for exam-
ple, new vehicle purchases). Upon sale of the vehicle, the
programmed HomeLink® buttons should be erased for
security purposes.
WA R N I N G
!�Do not use HomeLink® with any garage door
opener that lacks safety stop and reverse features as
required by U.S. Federal Regulations. A garage door
opener which cannot detect an object in the path of
a closing garage door and then automatically stop
and reverse, does not meet current U.S. Federal
Regulations. Using a garage door opener without
these features increases the risk of serious injury or
death.�During programming, your garage door or gate may
open or close. Make sure that people and objects are
clear of the garage door or gate that you are pro-
gramming.
BK0121200US.book 124 ページ 2010年4月14日 水曜日 午前11時24分
Page 270 of 424
Comfort controls
5-33
5
To fast forward/reverse the discTo fast forward or reverse, use the TRACK button (6 or 7).
Fast forward
You can fast forward by holding down the side of the
TRACK button (6) for more than about 1 second.
Fast reverse
You can fast reverse by holding down the side of the
TRACK button (7) for more than about 1 second.
To select a desired folder (MP3 CDs only)You can select your desired folder by turning the
TUNE/FOLDER switch (10).
Folder up
Turn the TUNE/FOLDER switch (10) clockwise until the
desired folder number appears on the display.
Folder down
Turn the TUNE/FOLDER switch (10) counterclockwise until
the desired folder number appears on the display.
BK0121200US.book 33 ページ 2010年4月14日 水曜日 午前11時24分
Page 294 of 424
Comfort controls
5-57
5
To fast forward/reverse the discTo fast forward or reverse, use the TRACK button (7 or 8).
Fast forward
You can fast forward by holding down the side of the
TRACK button (7) for more than about 1 second.
Fast reverse
You can fast reverse by holding down the side of the
TRACK button (8) for more than about 1 second.
To select a desired folder (MP3 CDs only)You can select your desired folder by turning the
TUNE/FOLDER switch (11).
Folder up
Turn the TUNE/FOLDER switch (11) clockwise until the
desired folder number appears on the display.
Folder down
Turn the TUNE/FOLDER switch (11) counterclockwise until
the desired folder number appears on the display.
BK0121200US.book 57 ページ 2010年4月14日 水曜日 午前11時24分
Page 299 of 424
N00714800312
The remote control switches are located on the rear surface of
the steering wheel. Reach behind the wheel to")
5-62 Comfort controls
5Steering wheel remote control switch
(if so
equipped)N00714800312
The remote control switches are located on the rear surface of
the steering wheel. Reach behind the wheel to access the
switches.
These switches can be used when the ignition switch is in the
“ON” or “ACC” position.
NOTE�Do not push two or more of the steering wheel remote
control switches at the same time.To turn on the powerPWR ON/OFF button — 4When the power is off, press this button to turn the power on.
To turn the power off, press this button for 2 seconds or longer.To adjust the volumeVolume up button — 2The volume will increase when this button is pressed.Volume down button — 6The volume will decrease when this button is pressed.To listen to the audio systemSelect the desired mode by lightly pressing the Mode change
button (4).
The mode switches between the radio and CD with each push
of the button.To listen to the radioTo select AM/FM/SAT modeMode change button — 4
Select the desired band by pressing this button.
The order is: AM → FM1 → FM2 → (SAT1 → SAT2 → SAT3
→ SAT4) → CD → AM.
1- Seek up/Track up/Fast-forward button
2- Volume up button
3- Preset change/Folder up/Disc up button
4- PWR (ON/OFF)/Mode change button
5- Seek down/Track down/Fast-reverse button
6- Volume down button
BK0121200US.book 62 ページ 2010年4月14日 水曜日 午前11時24分
Page 300 of 424

Comfort controls
5-63
5
Automatic radio tuningSeek up button — 1/Seek down button — 5
After pressing these buttons, reception of the selected station
will begin.Category selection (vehicle with satellite radio)Seek up button — 1/Seek down button — 5
Keep one of the buttons pressed to scan through the categories.
When your desired category is reached, release the button.To select the preset memoryPreset change button — 3
When the radio is on and this button is pressed, the preset sta-
tion frequencies are sequentially selected each time the button
is pressed; 1, 2, 3, 4, 5, 6, 1, 2 etc.To listen to a CDTo select a desired trackTrack up button —1
Press the button repeatedly until the desired track number
appears on the display.
Track down button —5
Press the button repeatedly until the desired track number
appears on the display.
To fast-forward/fast-reverse the disc (Type 1 and Type 2
audio system only)To fast-forward or fast-reverse the disc, press the fast-forward
button (1) or the fast-reverse button (5).
Fast-forward button —1
You can fast-forward the disc by pressing the fast-forward but-
ton. While the button is kept pressed, the disc will be fast-for-
warded.
Fast-reverse button —5
You can fast-reverse the disc by pressing the fast-reverse but-
ton. While the button is kept pressed, the disc will be fast-
reversed.To select a desired disc (CD autochanger only)Disc up button — 3
Press this button until the desired disc is reached.To select a desired folder (MP3 CDs only)Folder up button — 3
Press this button until the desired folder is reached. By giving
the button a long push, you can jump to the next disc.
BK0121200US.book 63 ページ 2010年4月14日 水曜日 午前11時24分
Page 315 of 424
 terminal of the booster battery (B), and the other end to
the engine block of the vehicle with the low battery (A")
6-4 For emergencies
6
6. Connect one end of the other jumper cable to the negative
(-) terminal of the booster battery (B), and the other end to
the engine block of the vehicle with the low battery (A) at
the point farthest from the battery.
7. Start the engine in the vehicle providing the boost. Let the
engine idle a few minutes, then start the engine in the
vehicle with the low battery.8. After the engine is started, disconnect the cables in the
reverse order from the way you connected them.
WA R N I N G
!�Be sure to follow the proper order when connecting
the batteries, of: →→→. �Make sure that the connection is made to the
engine properly. If the connection is directly made to
the negative side of the battery, the flammable gases
from inside the battery might catch fire and explode,
causing personal injury. �When connecting the jumper cable, do not connect
the positive (+) cable to the negative (-) terminal.
Otherwise sparks can make the battery explode.
CAUTION
!�Make sure that the jumper cable will not be caught
in the cooling fan or other moving parts in the
engine compartment.
WA R N I N G
!�Charging your battery while it is still in your vehicle
might cause the battery to catch fire and explode. If
you have to charge it while in the vehicle, disconnect
the negative terminal. �Keep sparks, cigarettes and flames away from the
battery because the battery may explode.�Keep your work area well vented when charging or
using the battery in an enclosed space. �Remove all the caps before charging the battery. �Electrolyte (battery acid) is corrosive diluted sul-
phuric acid. If electrolyte comes in contact with your
hands, eyes, clothes, or the painted surface of your
vehicle, thoroughly flush with water. If electrolyte
gets in your eyes, flush them immediately and thor-
oughly with water, and get prompt medical atten-
tion.�Always wear protective clothing and goggles when
working near the battery.�Keep the battery out of the reach of children.
BK0121200US.book 4 ページ 2010年4月14日 水曜日 午前11時24分
Page 330 of 424

For emergencies
6-19
6
To store the flat tire or spare tire, jack, bar and
wheel nut wrench
N00850000058
Reverse the removing procedure when storing the flat tire or
spare tire, jack, bar and wheel nut wrench.
Refer to “To remove the spare tire” on page 6-11.Wheel covers
(if so equipped)
N00849400111
To remove Wrap the tip of the bar with a cloth, insert it deeply into the
notch provided in the wheel cover, and pry the cover away
from the wheel.
Using the same procedure at the other wheel cover notches,
work the wheel cover away from the wheel to remove it com-
pletely.
CAUTION
!�While the compact spare tire is stowed, the inflation
pressure should be checked at least once a month to
assure that it remains at the recommended inflation
pressure. See the tire and loading information plac-
ard attached to the driver’s door sill. Refer to “Tire
and loading information placard” on page 9-3.�Driving with an improperly inflated tire can cause
an accident. If you have no choice but to drive with
an under-inflated tire, keep your speed down and
avoid sudden steering or braking. Inflate the tire to
the correct pressure as soon as possible. Refer to
“Tire inflation pressures” on page 7-23.�The compact spare tire should only be used tempo-
rarily. When the compact spare tire is used, the tire
pressure monitoring system will not work properly.
See an authorized Mitsubishi Motors dealer as soon
as possible to replace or repair the original tire.�After changing the tire and driving the vehicle about
620 miles (1,000 km), retighten the wheel nuts to
make sure that they have not come loose.�If the steering wheel vibrates when driving after
changing the tire, have the tire checked for balance
at an authorized Mitsubishi Motors dealer or a
repair facility of your choice.�Do not mix one type of tire with another or use a dif-
ferent size from the one listed. This would cause
early wear and poor handling.
BK0121200US.book 19 ページ 2010年4月14日 水曜日 午前11時24分
Page 331 of 424
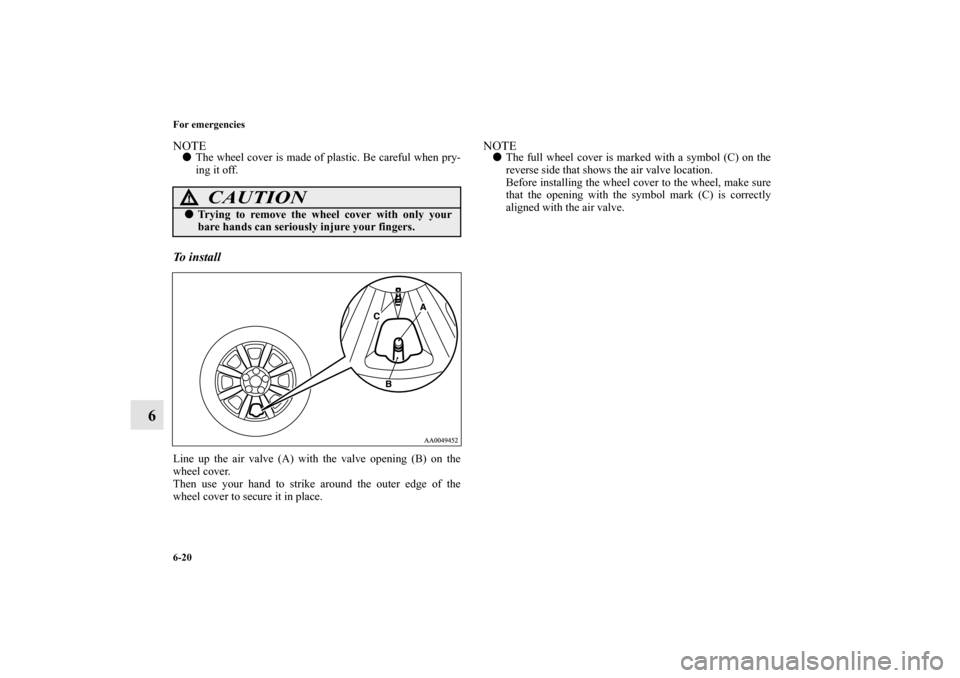
6-20 For emergencies
6
NOTE�The wheel cover is made of plastic. Be careful when pry-
ing it off. To i n s t a l l Line up the air valve (A) with the valve opening (B) on the
wheel cover.
Then use your hand to strike around the outer edge of the
wheel cover to secure it in place.
NOTE�The full wheel cover is marked with a symbol (C) on the
reverse side that shows the air valve location.
Before installing the wheel cover to the wheel, make sure
that the opening with the symbol mark (C) is correctly
aligned with the air valve.
CAUTION
!�Trying to remove the wheel cover with only your
bare hands can seriously injure your fingers.
BK0121200US.book 20 ページ 2010年4月14日 水曜日 午前11時24分
.
Fast forward
You can fast forward by holding down the side of the
TRACK button (6)")
.
Fast forward
You can fast forward by holding down the side of the
TRACK button (7)")