Page 142 of 514

Features and controls
3-53
3 Service brake
N00517500204
Brake pedalOveruse of the brake can cause poor brake response and pre-
mature wear of the brake pads.
When driving down a long or steep hill, use engine braking by
shifting the transaxle into a lower gear of the sports mode.
Power brakes
N00517600247
Your vehicle is equipped with power brakes for more braking
force with minimal brake pedal effort.
Your brakes are designed to operate at full capacity, even if the
power assist is lost.
If the power assist is lost, the effort needed to press the brake
pedal is greater.
If you should loose the power assist for some reason, the
brakes will still work.
If the power brake unit or either of the two brake hydraulic sys-
tems stops working properly, the rest of the brake system will
still work, but the vehicle will not slow down as quickly.
You will know this has happened if you find you need to
depress the brake pedal down further, or harder when slowing
down or stopping, or if the brake warning light comes on.
WA R N I N G
!�Do not leave any objects near the brake pedal or let
a floor mat slide under it; doing so could prevent the
full pedal stroke that would be necessary in an emer-
gency. Make sure that the pedal can be operated
freely at all times. Make sure the floor mat is
securely held in place.
CAUTION
!�It is important not to drive the vehicle with your foot
resting on the brake pedal when braking is not
required. This practice can result in very high brake
temperatures, premature pad wear, and possible
damage to the brakes.
WA R N I N G
!�Never coast downhill with the engine OFF. Keep the
engine running whenever your vehicle is in motion.
If you turn off the engine while driving, the power
brake booster will stop working and your brakes
will not work as well.�If the power assist is lost or if either brake hydraulic
system stops working properly, take your vehicle to
an authorized Mitsubishi Motors dealer or a repair
facility of your choice immediately.
BK0121600US.book 53 ページ 2010年4月12日 月曜日 午前10時39分
Page 146 of 514
Features and controls
3-57
3 Power steering system
N00518000189
The power steering system has mechanical steering capability
in case the power assist is lost. If the hydraulic pressure is
interrupted for some reason (such as engine stalling), you will
still be able to steer your vehicle.
If the power assist is lost, you will notice it takes much more
effort to steer and that there is much more “free play” in the
steering wheel. If this happens, take your vehicle to an autho-
rized Mitsubishi Motors dealer or a repair facility of your
choice.
FrontRear
WA R N I N G
!�Never turn off the engine while the vehicle is mov-
ing, or your ability to steer the vehicle may be seri-
ously reduced.
CAUTION
!�Do not leave the steering wheel turned all the way in
one direction. This can cause damage to the power
steering system.
BK0121600US.book 57 ページ 2010年4月12日 月曜日 午前10時39分
Page 183 of 514

3-94 Features and controls
3
NOTE�The electronic compass may not show the correct direc-
tion in the following places where the earth’s magnetic
field is disrupted.
In these cases, the correct direction will be displayed once
the vehicle returns to a place where the earth’s magnetic
field is stable.
• Vehicle in tunnels or parked in buildings
• Expressways, near railroads, underneath railroad cables,
or over subways
• Near transformer stations or high voltage power lines
�Do not attach ski racks, antennas, or any other object to
the vehicle by means of a magnet.
Such magnets will affect the operation of the electronic
compass.
Compass varianceUnder certain circumstances, as during a long distance cross-
country trip, it will be necessary to adjust for compass vari-
ance.
Compass variance is the difference between the earth’s mag-
netic north and the true geographic north. If not adjusted to
account for this compass variance, your compass could give
false readings.
Refer to “Compass zone code setting” on page 3-131.Compass direction adjustmentThis compass is self-calibrating, which means it automatically
makes corrections against magnetization of its components
when the vehicle is running. It should not be necessary to man-
ually calibrate the compass. If the indicated direction appears
to be wrong, first check the compass variance.
If the compass variance is correct, but the compass still shows
the wrong direction, calibrate the compass as described.
Refer to “Compass calibration” on page 3-133.
BK0121600US.book 94 ページ 2010年4月12日 月曜日 午前10時39分
Page 197 of 514

3-108 Features and controls
3
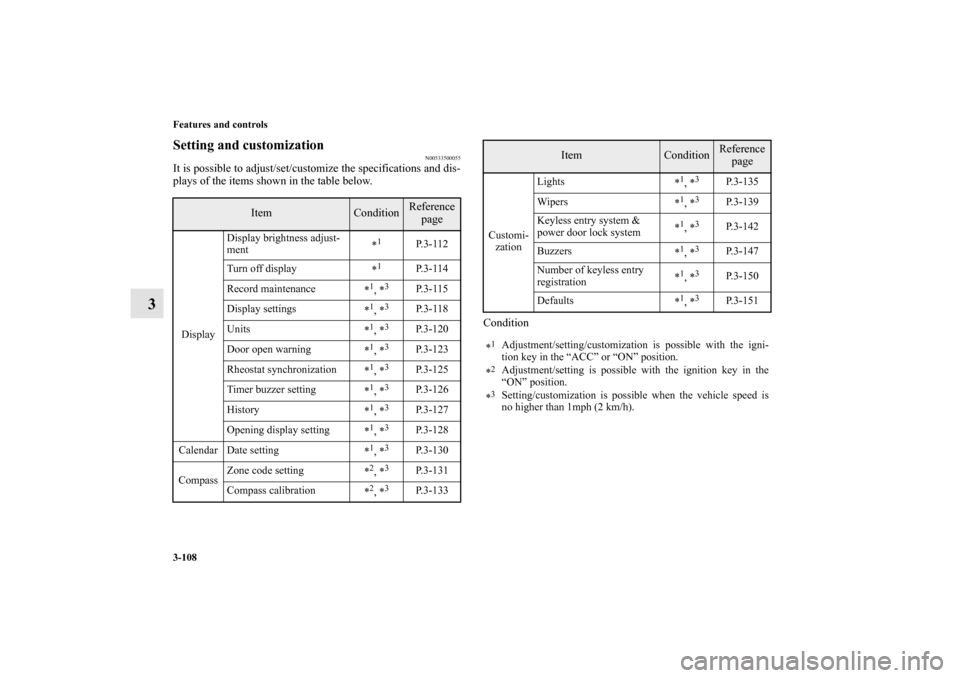
Setting and customization
N00533500055
It is possible to adjust/set/customize the specifications and dis-
plays of the items shown in the table below.
Condition
Item
Condition
Reference
page
DisplayDisplay brightness adjust-
ment*
1
P. 3 - 1 1 2
Turn off display
*
1
P. 3 - 1 1 4
Record maintenance
*
1, *3
P. 3 - 1 1 5
Display settings
*
1, *3
P. 3 - 1 1 8
Units
*
1, *3
P.3-120
Door open warning
*
1, *3
P.3-123
Rheostat synchronization
*
1, *3
P.3-125
Timer buzzer setting
*
1, *3
P.3-126
History
*
1, *3
P.3-127
Opening display setting
*
1, *3
P.3-128
Calendar Date setting
*
1, *3
P.3-130
CompassZone code setting
*
2, *3
P.3-131
Compass calibration
*
2, *3
P.3-133
Customi-
zationLights
*
1, *3
P.3-135
Wipers
*
1, *3
P.3-139
Keyless entry system &
power door lock system*
1, *3
P.3-142
Buzzers
*
1, *3
P.3-147
Number of keyless entry
registration*
1, *3
P.3-150
Defaults
*
1, *3
P.3-151
*
1Adjustment/setting/customization is possible with the igni-
tion key in the “ACC” or “ON” position.
*2Adjustment/setting is possible with the ignition key in the
“ON” position.
*3Setting/customization is possible when the vehicle speed is
no higher than 1mph (2 km/h).
Item
Condition
Reference
page
BK0121600US.book 108 ページ 2010年4月12日 月曜日 午前10時39分
Page 201 of 514

3-112 Features and controls
3
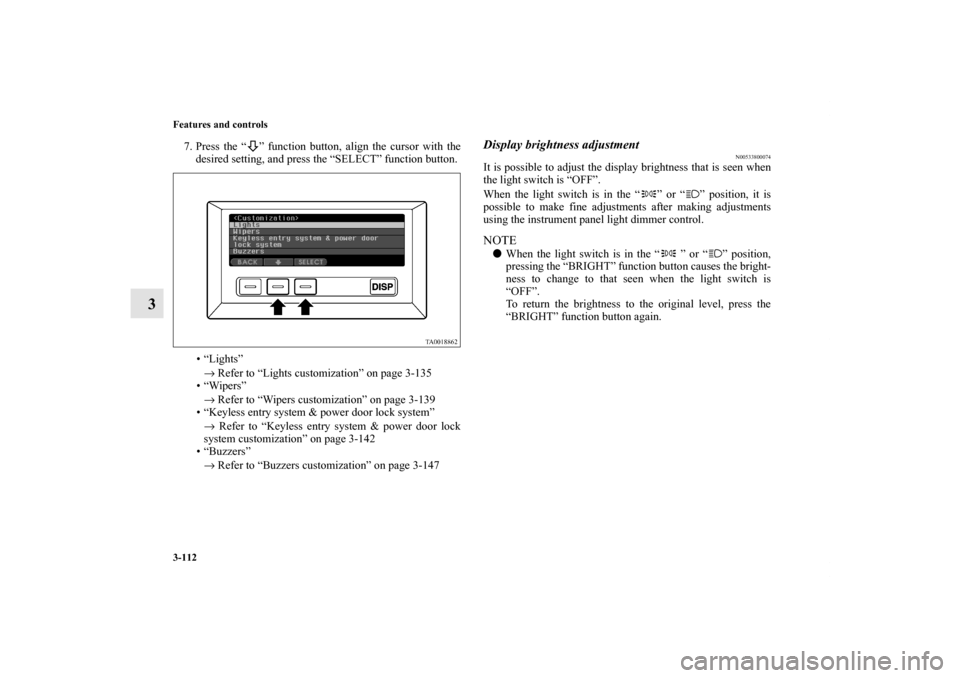
7. Press the “ ” function button, align the cursor with the
desired setting, and press the “SELECT” function button.
• “Lights”
→ Refer to “Lights customization” on page 3-135
•“Wipers”
→ Refer to “Wipers customization” on page 3-139
• “Keyless entry system & power door lock system”
→ Refer to “Keyless entry system & power door lock
system customization” on page 3-142
• “Buzzers”
→ Refer to “Buzzers customization” on page 3-147
Display brightness adjustment
N00533800074
It is possible to adjust the display brightness that is seen when
the light switch is “OFF”.
When the light switch is in the “ ” or “ ” position, it is
possible to make fine adjustments after making adjustments
using the instrument panel light dimmer control.NOTE�When the light switch is in the “ ” or “ ” position,
pressing the “BRIGHT” function button causes the bright-
ness to change to that seen when the light switch is
“OFF”.
To return the brightness to the original level, press the
“BRIGHT” function button again.
BK0121600US.book 112 ページ 2010年4月12日 月曜日 午前10時39分
Page 231 of 514
3-142 Features and controls
3
Keyless entry system & power door lock system customi-
zation
N00534700038
1. Display “Keyless entry system & power door lock sys-
tem” on the monitor in accordance with “Basic operation”
(see page 3-109), align the cursor with it, and press the
“SELECT” function button.2. Press the “ ” function button, align the cursor with the
function you wish to change, and press the “SELECT”
function button.
BK0121600US.book 142 ページ 2010年4月12日 月曜日 午前10時39分
Page 252 of 514

Features and controls
3-163
3 Electric rear window defogger switch
N00523700328
The electric rear window defogger can be used with the igni-
tion key in the “ON” position.
The indicator light (A) will come on when you press the elec-
tric rear window defogger switch. Electric current will flow
through the heating wires on the rear window to help clear
away moisture or frost.
After about 17 minutes of operation, the defogger will shut off
automatically.
To switch the defogger OFF before 17 minutes have passed,
press the switch again. The indicator light will go out and the
defogger will turn off.
If you need the defogger for more than 17 minutes, press the
switch again. This will add 17 more minutes.
NOTE�If your vehicle is equipped with heated mirrors, mist can
also be removed from the outside rearview mirrors when
the rear window defogger switch is pressed. (Refer to
“Heated mirror” on page 3-33.)
CAUTION
!�The rear window defogger is not designed to melt
snow. Remove any snow manually before using the
rear window defogger.�Use the rear window defogger only after the engine
has started and is running. Be sure to turn the
defogger switch off immediately after the window is
clear to save on battery power.�Do not place stickers, tape, or other items that are
attached with adhesive over the grid wires on the
rear window.�When cleaning the inside rear window, use a soft
cloth and wipe lightly over the grid wires.
BK0121600US.book 163 ページ 2010年4月12日 月曜日 午前10時39分
Page 284 of 514

Features and controls
3-195
3 Vanity mirror
N00524700208
The vanity mirrors are located on the back of the sun visors.
Opening the lid (A) of the vanity mirror will automatically turn
on the mirror light (B).
Power outlet
(if so equipped)
N00525000455
To use a “plug-in” type accessory, open the cover located on
the floor console and the right side wall of the rear luggage
area, then insert the plug in the power outlet.NOTE�The power outlets can be used simultaneously.
CAUTION
!�If the lid of the lighted vanity mirror is kept open for
prolonged periods of time, the battery may be dis-
charged.
CAUTION
!�Be aware that using electronic equipment with the
engine off may run the battery down.
Be sure to use a “plug-in” type accessory operating
at 12 V and 120 W or less.
When using two or more power outlets at the same
time, make sure the total power consumption of the
electrical accessories for the power outlets does not
exceed 120 W at 12 V.�When the power outlet is not in use, be sure to close
the power outlet cover. This will prevent the power
outlet from becoming clogged and short circuiting.
BK0121600US.book 195 ページ 2010年4月12日 月曜日 午前10時39分