Page 189 of 514

3-100 Features and controls
3
Stopwatch
N00501100029
It is possible to measure the time taken for a journey.
1. Press the “START” function button to start the stopwatch.NOTE�When the stopwatch has been started, the “START” func-
tion button becomes a “STOP” function button.
2. To stop the stopwatch, press the “STOP” function button.
If you wish to subsequently start the stopwatch again
without resetting it, press the “START” function button
again.3. To reset the stopwatch, press the “RESET” function but-
ton after stopping the stopwatch.
NOTE�While the stopwatch is running, pressing the “RESET”
function button does not cause the display to be reset.
�If the ignition switch is turned to the “LOCK” or “ACC”
position while the stopwatch is running, stopwatch opera-
tion is suspended. When the ignition switch is next turned
to the “ON” position, the stopwatch automatically starts
running again.
�The stopwatch display can show a time up to 23:59:59.
When this time is exceeded, the display returns to 0:00:00
and the stopwatch continues running.
BK0121600US.book 100 ページ 2010年4月12日 月曜日 午前10時39分
Page 191 of 514

3-102 Features and controls
3
3. Press the “START” function button to start the timer. To
stop the timer before it has reached 0:00:00, press the
“STOP” function button.NOTE�If the timer reaches 0:00:00 while another display is
showing, a tone sounds once and the display changes to
the countdown timer for seven seconds.
If the “DISP” function button is pressed at this time, the
countdown timer disappears and the previous display
appears again.
�When the countdown timer has started, the “START”
function button becomes the “STOP” function button.
�Even if the ignition switch is turned to the “OFF” position
while the countdown timer is running, the countdown
timer continues counting down to 0:00:00.�Normally, a tone sounds to indicate that the countdown
timer has reached 0:00:00. It is possible to make a setting
so that the tone does not sound at this time. For details,
refer to “Timer buzzer setting” on page 3-126.
4. To reset the countdown timer, press the “SET” function
button for at least 2 seconds. The display will return to
0:00:00.
NOTE�Even if the “SET” function button is pressed while the
countdown timer is running, the countdown timer will not
be reset.
�If the “SET” function button is pressed lightly one time,
the previously set timer duration will be shown. To
change the timer duration setting, perform the procedure
again from step 1.
BK0121600US.book 102 ページ 2010年4月12日 月曜日 午前10時39分
Page 192 of 514
 of the vehicle’s present location and a
barometer (C) are shown together with a graph. For instruc-
tions on resettin")
Features and controls
3-103
3
Elevation/Barometer
N00501300063
The elevation (A) of the vehicle’s present location and a
barometer (C) are shown together with a graph. For instruc-
tions on resetting the historical data in the graph, refer to “To
reset the display” on page 3-105.
NOTE�The range (B) for which historical data are shown in the
graph can be changed. Refer to “Graph indication” on
page 3-106.
�The unit for elevation can be set to feet or meters. Refer to
“Display unit selection” on page 3-106 or “Units customi-
zation” on page 3-120.
�The display can show elevations up to 12,000 feet (4,000
meters).
�The altimeter displays the elevation to the nearest 200 feet
(50 meters). When the vehicle is below sea level, the ele-
vation is shown as 0 feet (0 meters).
�The unit for the atmospheric pressure can be set to in.Hg,
hPa, kPa, or mb.
Refer to “Units customization” on page 3-120.
�The display can show the atmospheric pressure in the
range from 18.1 in.Hg (614 hPa) to 31.2 in.Hg
(1,058 hPa).
�The altimeter works by using changes in atmospheric
pressure. This means it may be affected by changes in the
weather and other conditions, and show a figure different
from the real elevation.
�Fluctuations in air pressure may change the figure dis-
played even when the vehicle remains in the same place.
This is normal.
BK0121600US.book 103 ページ 2010年4月12日 月曜日 午前10時39分
Page 193 of 514
 is shown with a graph. For
instructions on resetting the historical data in the graph, refer to
“To reset t")
3-104 Features and controls
3
Outside temperature
N00501600037
The outside temperature (B) is shown with a graph. For
instructions on resetting the historical data in the graph, refer to
“To reset the display” on page 3-105.
NOTE�The range (A) for which historical data are shown in the
graph can be changed. Refer to “Graph indication” on
page 3-106.
�The unit for the outside temperature can be set to °F or °C.
Refer to the “Units customization” on page 3-120.
�The outside temperature can be displayed from -40 °F
(-40 °C) to 122 °F (50 °C).
�The outside temperature displayed may differ from the
actual temperature on account of surrounding conditions,
driving conditions, etc.
�When the outside temperature is over 122 °F (50 °C) or
below -40 °F (-40 °C), the display will remain 122 °F
(50°C) or -40 °F (-40 °C).
CAUTION
!�There is a danger the road might be icy, even when
the outside air temperature figure is not flashed, so
please take care when driving.
BK0121600US.book 104 ページ 2010年4月12日 月曜日 午前10時39分
Page 194 of 514
Features and controls
3-105
3
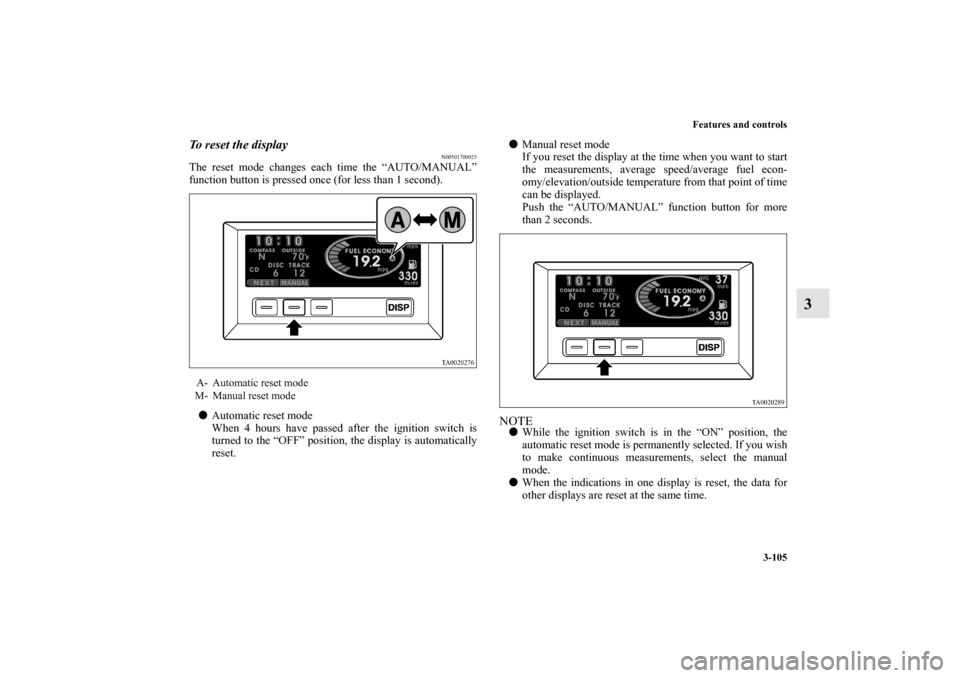
To reset the display
N00501700025
The reset mode changes each time the “AUTO/MANUAL”
function button is pressed once (for less than 1 second).
�Automatic reset mode
When 4 hours have passed after the ignition switch is
turned to the “OFF” position, the display is automatically
reset.�Manual reset mode
If you reset the display at the time when you want to start
the measurements, average speed/average fuel econ-
omy/elevation/outside temperature from that point of time
can be displayed.
Push the “AUTO/MANUAL” function button for more
than 2 seconds.
NOTE�While the ignition switch is in the “ON” position, the
automatic reset mode is permanently selected. If you wish
to make continuous measurements, select the manual
mode.
�When the indications in one display is reset, the data for
other displays are reset at the same time.
A- Automatic reset mode
M- Manual reset mode
BK0121600US.book 105 ページ 2010年4月12日 月曜日 午前10時39分
Page 206 of 514

Features and controls
3-117
3
3. The date when maintenance was performed on the
selected item will automatically be updated, and the driv-
ing distance until the next scheduled maintenance will
flash.
Press the “+” or “-” button to change the distance until the
next scheduled maintenance. After adjusting the distance
until the next scheduled maintenance, press the “SET”
function button.NOTE�The driving distance until the next scheduled maintenance
was not set at the factory, so a figure that serves only as a
rough guide is initially shown.
For instructions on setting the calendar, refer to “Date set-
ting” on page 3-130.
�The distance until the next scheduled maintenance can be
set in units of 100 miles/km.
�The unit for the distance can be set to mile or km. Refer to “Units customization” on page 3-120.
4. Press the “YES” function button to confirm the mainte-
nance date and distance until next scheduled maintenance
that were set in step 3. If you press the “NO” function but-
ton, the monitor will return to the display in step 2 of this
procedure.
NOTE�The distance indication represents the total distance to be
driven until the next maintenance.
�If the setting change is not successful, the monitor will
show “EEPROM is broken” and then return to the display
in step 1 of this procedure.After replacing a component
N00503000022
After replacing a component, reset the maintenance date and
the distance until the next scheduled maintenance using the
display shown in step 1.
BK0121600US.book 117 ページ 2010年4月12日 月曜日 午前10時39分
Page 210 of 514

Features and controls
3-121
3
Outside temperature unit
N00501500049
The unit for the outside temperature can be set to °F or °C.NOTE�When the unit for the outside temperature is changed, the
air conditioning’s preset temperature indication changes
accordingly.
1. Press the “ ” function button, align the cursor with the
unit you wish to select, and press the “SELECT” function
button.
•°F
•°C2. The monitor will show “The setting is progressing” while
the setting change is in progress.
When the setting change has been completed successfully,
a tone will sound once and the monitor will return to the
“Outside temperature unit” display. If the setting change
is not successful, the monitor will show “The setting
failed.” then return to the “Outside temperature unit” dis-
play.
Distance unit
N00502000025
The unit for the distance can be set to miles or kilometers.NOTE�When the unit for the distance is changed, the trip com-
puter and record maintenance’s preset distance indication
changes accordingly.
BK0121600US.book 121 ページ 2010年4月12日 月曜日 午前10時39分
Page 286 of 514
Features and controls
3-197
3 Digital clock
(if so equipped)
N00525100182
When the ignition switch is in the “ACC” or “ON” position,
the time is displayed.How each button works:Set the time by pressing the various buttons as described
below.NOTE�If the battery cables are disconnected or the battery
becomes discharged, the clock will have to be reset.
�For vehicles with multi center display, see “Digital
clock/Calender” on page 3-90.
Interior lights
N00525300474
H (HOUR)- Press and hold the “H” button until the correct
hour appears.
M (MINUTE)- Press and hold the “M” button until the correct
minute appears.
Luggage room light
→ P. 3 - 2 0 2Dome light/
Reading lights
→ P.3-200, 3-200
Door lights
→ P.3-202 Rear personal lights
→P.3-201
BK0121600US.book 197 ページ 2010年4月12日 月曜日 午前10時39分

N00525100182
When the ignition switch is in the “ACC” or “ON” position,
the time is displayed.How each button works:Set the time b")