Page 281 of 494

4-6 Driving safety
4Braking
N00629500260
All the parts of the brake system are critical to safety. Have the
vehicle serviced by an authorized Mitsubishi Motors dealer or
a repair facility of your choice at regular intervals according to
the “WARRANTY AND MAINTENANCE MANUAL”.When brakes are wetCheck the brake system while driving at a low speed immedi-
ately after starting, especially when the brakes are wet, to con-
firm they work normally.
A film of water can be formed on the brake discs and prevent
normal braking after driving in heavy rain or through large
puddles, or after the vehicle is washed. If this occurs, dry the
brakes out by driving slowly while lightly depressing the brake
pedal.When driving in cold weatherOn snowy roads, ice can form on the braking system, making
the brakes less effective. While driving in such conditions, pay
close attention to preceding and following vehicles and to the
condition of the road surface. From time to time, lightly
depress the brake pedal and check how effective the brakes are.When driving downhillIt is important to take advantage of the engine braking by shift-
ing to a lower gear while driving on steep downhill roads in
order to prevent the brakes from overheating.
Parking
N00629600274
Parking on a hillWhen parking on a hill, set the parking brake, and turn the
front wheels toward the curb on a downhill, or away from the
curb on an uphill.
If necessary, apply chocks to wheels.For vehicles with manual transaxlePlace the gearshift lever into the “R” (Reverse) position when
parking on a downhill slope, into the 1st position when parking
on an uphill slope.For vehicles with automatic transaxleBe sure that the parking brake is firmly set when parked and
that the selector lever is in the “P” (PARK) position.
When parking on a hill, it is important to set the parking brake
before moving the selector lever to the “P” (PARK) position.
This prevents loading the parking brake against the transaxle
gear. When this happens, it is difficult to move the selector
lever out of the “P” (PARK) position.
BK0115900US.book 6 ページ 2009年10月27日 火曜日 午後12時1分
Page 290 of 494
. . . . . . . .5- 5
Automatic air conditioning (if so equipp")
5
Comfort controls
Vents. . . . . . . . . . . . . . . . . . . . . . . . . . . . . . . . . . . .5- 2
Manual air conditioning (if so equipped). . . . . . . .5- 5
Automatic air conditioning (if so equipped) . . . . .5- 14
Important air conditioning operating tips . . . . . . .5- 22
Audio system . . . . . . . . . . . . . . . . . . . . . . . . . . . . .5- 24
AM/FM electronically tuned radio
with CD player-Type 1 (if so equipped) . . . . . . .5- 26
AM/FM electronically tuned radio
with CD autochanger-Type 2 (if so equipped)
AM/FM/Satellite electronically tuned radio
with CD autochanger-Type 3 (if so equipped) . .5- 39
To use the external audio input function . . . . . . . .5- 63
Steering wheel audio remote control switch
(if so equipped) . . . . . . . . . . . . . . . . . . . . . . . . . .5- 65
Error codes . . . . . . . . . . . . . . . . . . . . . . . . . . . . . . .5- 67
Error codes (SIRIUS Satellite Radio) . . . . . . . . . .5- 69
Handling of compact discs . . . . . . . . . . . . . . . . . . .5- 71
Antenna . . . . . . . . . . . . . . . . . . . . . . . . . . . . . . . . .5- 74
General information about your radio . . . . . . . . . .5- 76
BK0115900US.book 1 ページ 2009年10月27日 火曜日 午後12時1分
Page 354 of 494

N00714800413
The remote control switches are located on the rear surface of
the steering wheel. Reach behind the w")
Comfort controls
5-65
5 Steering wheel audio remote control switch
(if so equipped)
N00714800413
The remote control switches are located on the rear surface of
the steering wheel. Reach behind the wheel to access the
switches.
These switches can be used when the ignition switch is in the
“ON” or “ACC” position.
NOTE�Do not push two or more of the steering wheel remote
control switches at the same time.To turn on the powerPWR ON/OFF button — 4When the power is off, press this button to turn the power on.
To turn the power off, press this button for 2 seconds or longer.To adjust the volumeVolume up button — 2The volume will increase when this button is pressed.Volume down button — 6The volume will decrease when this button is pressed.To listen to the audio systemSelect the desired mode by lightly pressing the Mode change
button (4).
The mode switches between the radio and CD with each push
of the button.To listen to the radioTo select AM/FM/SAT modeMode change button — 4
Select the desired band by pressing this button.
The order is: AM → FM1 → FM2 (SAT1 → SAT2 → SAT3 →
SAT4) → CD → AM.
1- Seek up/Track up/Fast-forward button
2- Volume up button
3- Preset change/Folder up/Disc up button
4- PWR (ON/OFF)/Mode change button
5- Seek down/Track down/Fast-reverse button
6- Volume down button
BK0115900US.book 65 ページ 2009年10月27日 火曜日 午後12時1分
Page 369 of 494

6-2 For emergencies
6If the vehicle breaks down
N00836300073
If your vehicle breaks down on the road, move to the shoulder
and turn on the hazard warning flashers. If there is no shoulder,
or the shoulder is not safe, drive in the right lane slowly, with
the hazard lights flashing, until you come to a safe stopping
place. Keep the flashers flashing. If the engine stops/fails If the engine stops, there will be no power assist to the steering
and brakes, making these difficult to use.
�The brake booster will not work, so the brakes will not
grip well. The brake pedal will be harder to press than
usual.
�Since there is no power steering assist, the steering wheel
will be hard to turn. Turning the steering wheel requires
more effort than usual. When the engine fails at the intersection Get help from your passengers, bystanders, etc. to push the
vehicle and move it to a safe zone.
Jump-starting the engine
N00836400638
If the engine cannot be started because the battery is weak or
dead, you can start it with the battery from another vehicle
using jumper cables.
1. Take off any metal jewelry such as watch bands or brace-
lets that might make an accidental electrical contact.
2. Position the vehicles close enough together so that the
jumper cables can reach, but be sure the vehicles aren’t
touching each other.
WA R N I N G
!�When using jumper cables to start a vehicle, follow
the procedures and be very cautious.
CAUTION
!�Do not try to start your vehicle by pushing or tow-
ing. Vehicles with automatic transaxles cannot be
started this way. Pushing or towing a vehicle that
has a manual transaxle may overheat and damage
the catalytic converter. Also, there is more risk of an
accident when a vehicle is being pushed or towed.
CAUTION
!�Check the other vehicle. It must have a 12-volt bat-
tery. If the other system isn’t 12-volt, both systems
can be damaged.
BK0115900US.book 2 ページ 2009年10月27日 火曜日 午後12時1分
Page 375 of 494
6-8 For emergencies
6Tools and jack
N00836600223
StorageThe tools and jack are stowed beneath the luggage floor board
of the cargo area (trunk).
Tools
N00832600108
NOTE�When returning the tools to the tool bag, place each one in
its own pocket.
1- Tools
2- Jack
1- Tool bag
2- Bar
3- Wheel nut wrench
BK0115900US.book 8 ページ 2009年10月27日 火曜日 午後12時1分
Page 377 of 494
6-10 For emergencies
6
5. To prevent the vehicle from rolling when it is raised on the
jack, place chocks or blocks (A) at the tire that is diago-
nally opposite from the tire (B) you are changing.
NOTE�The chocks shown in the illustration do not come with
your vehicle. It is recommended that you purchase chocks
or blocks and keep them in the vehicle for use if needed.
�If chocks or blocks are not available, use stones or any
other objects that are large enough to hold the wheel in
position.
6. Get the jack, bar and wheel nut wrench ready.
Refer to “Tools and jack” on page 6-8.
WA R N I N G
!�Be sure to apply chocks or blocks to the correct tire
when jacking up the vehicle. If the vehicle moves
while jacked up, the jack could slip out of position,
leading to an accident.
BK0115900US.book 10 ページ 2009年10月27日 火曜日 午後12時1分
Page 378 of 494
. Its lighter weight makes it easier to use if a")
For emergencies
6-11
6
Spare tire information
N00849600285
Compact spare tireThe compact spare tire is designed to save space in the cargo
area (trunk). Its lighter weight makes it easier to use if a flat tire
occurs.
WA R N I N G
!�Tires, including spare tire, degrade over time with
age even when they are not being used.
It is recommended that tires over 6 years generally
be replaced even if damage is not obvious.
CAUTION
!�While the compact spare tire is stowed, the inflation
pressure should be checked at least once a month to
assure that it remains at the recommended inflation
pressure. See the tire and loading information plac-
ard attached to the driver’s door sill.
Refer to “Tire and loading information placard” on
page 9-4.�Driving with an improperly inflated tire can cause
an accident. If you have no choice but to drive with
an under-inflated tire, keep your speed down and
avoid sudden steering or braking, if possible. Inflate
the tire to the correct pressure as soon as possible.
Refer to “Tire inflation pressures” on page 7-23.�The compact spare tire should only be used tempo-
rarily. When the compact spare tire is used, the tire
pressure monitoring system will not work properly.
See an authorized Mitsubishi Motors dealer as soon
as possible to replace or repair the original tire.�If your vehicle has aluminum type wheels, you can
use the same wheel nuts on the compact spare tire
wheel. �Do not go over 50 mph (80 km/h) when driving with
the compact spare tire.�Avoid fast starting and braking when driving with
the compact spare tire. �Do not drive through automatic car washes and over
obstacles that could possibly damage the underside
of your vehicle. Because the compact spare tire is
smaller than the original tire, there is less clearance
between the ground and your vehicle.
BK0115900US.book 11 ページ 2009年10月27日 火曜日 午後12時1分
Page 379 of 494
6-12 For emergencies
6
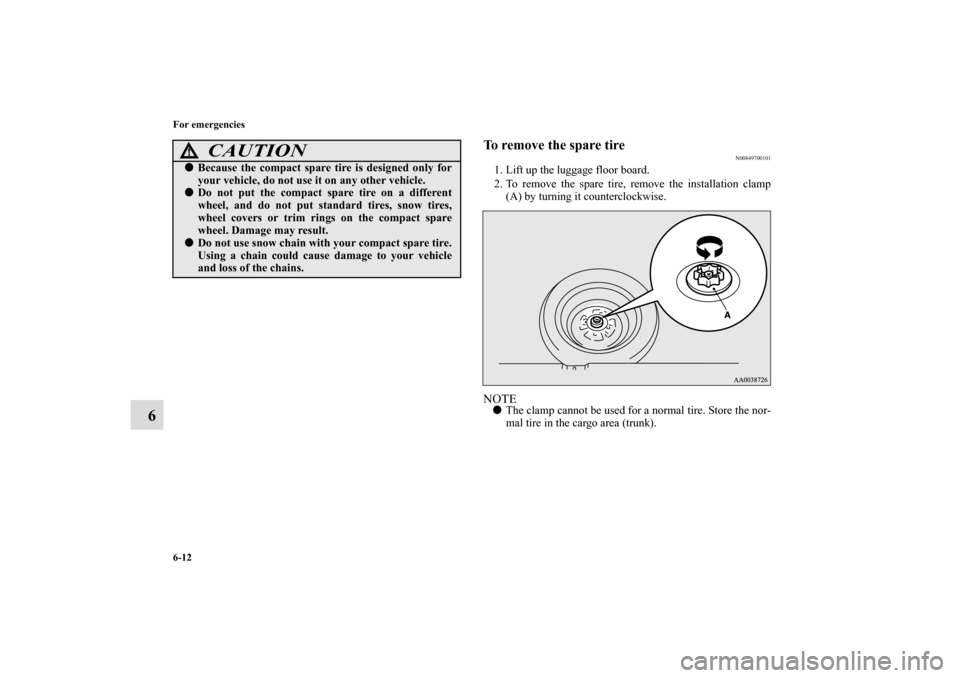
To remove the spare tire
N00849700101
1. Lift up the luggage floor board.
2. To remove the spare tire, remove the installation clamp
(A) by turning it counterclockwise.NOTE�The clamp cannot be used for a normal tire. Store the nor-
mal tire in the cargo area (trunk).
�Because the compact spare tire is designed only for
your vehicle, do not use it on any other vehicle. �Do not put the compact spare tire on a different
wheel, and do not put standard tires, snow tires,
wheel covers or trim rings on the compact spare
wheel. Damage may result.�Do not use snow chain with your compact spare tire.
Using a chain could cause damage to your vehicle
and loss of the chains.
CAUTION
!
BK0115900US.book 12 ページ 2009年10月27日 火曜日 午後12時1分

 at the tire that is diago-
nally opposite from the tire (B) you are changing.
NO")