2011 MINI Clubman phone
[x] Cancel search: phonePage 25 of 256

Voice activation systemAT A GLANCE
23
Notes
For voice commands, bear in mind the follow-
ing:
>Do not use the voice activation system to ini-
tiate an emergency call. In stressful situa-
tions, the voice and vocal pitch can change.
This can unnecessarily delay the establish-
ment of a telephone connection.
> Pronounce the commands and digits
smoothly and at norm al volume, avoiding
excessive emphases and pauses. The same
applies to spelling wh en entering a destina-
tion for navigation.
> Always speak the commands in the lan-
guage of the voice activation system.
> When selecting a radio station, use the stan-
dard pronunciation of the station name.
> Keep the doors, windows and glass roof
*
closed to prevent interference from outside
noise.
> Avoid ambient noise in the vehicle while
speaking.
Page 80 of 256

CONTROLSTechnology for driving comfort and safety
78
Airbags
The following airbags are located under the
marked covers:1
Front airbags
2 Side airbags in backrests
3 Head airbags at the front and rear
Protective effect
Observe the instructions on page 37 to
ensure the best possible personal protec-
tion. <
The front airbags help protect the driver and
front passenger by re sponding to frontal
impacts in which safety belts alone cannot pro-
vide adequate restraint. When needed, the head
and side airbags help provide protection in the
event of side impact. The relevant side airbag
supports the side upper body area. The respec-
tive head airbag supports the head.
The airbags are designed to not be triggered in
every type of collision, e.g. not in minor acci-
dents, certain rollover situations or rear impacts.
Do not apply adhesive materials to the
cover panels of the airbags, cover them or
modify them in any other way.
Keep the dashboard and window on the passen-
g e r s i d e f r e e f r o m o b s t r u c t i o n , i . e . d o n o t c o v e r i t
with adhesive film or co verings, and do not affix
any holders such as for a navigation device or a
mobile phone.
Do not attach seat cove rs, cushions or other
objects not specifically approved for seats with
integral side airbags to the front seats. Do not
hang items of clothing su ch as coats or jackets
over the backrests. Do not attempt to remove
the airbag retention system from the vehicle. Do
not modify the individual components of the syste m o r its w iring in any way. Th is includ es the
upholstery in the center of the steering wheel,
on the instrument cluster, the doors, and the
roof pillars as well as the sides of the headliner.
Do not attempt to remove or dismantle the
steering wheel.
Do not touch the individual components imme-
diately after the system has been triggered,
because there is a danger of burns.
In the event of malfunctions, deactivation, or
triggering of the airbag
restraint system, have
the testing, repair, remova l, and disposal of air-
bag generators executed only by a MINI dealer
or a workshop that work s according to repair
procedures of the manufacturer of your MINI
with correspondingly trained personnel and has
the required explosives licenses. Otherwise,
unprofessional attempts to service the system
could lead to failure in an emergency or undes-
ired airbag activation, either of which could
result in personal injury. <
Warning notices and information about the air-
bags can also be found on the sun visors.
Page 95 of 256

Practical interior accessoriesCONTROLS
93
Connection for external
audio device
You can connect an external audio device such
as a CD or MP3 player and play audio tracks over
the vehicle's speaker system, refer to the Enter-
tainment chapter starting on page 142.
Center armrest*
Storage compartment
The center armrest between the front seats con-
tains either a compartment or the cover for the
mobile phone base plate
* or the snap-in
adapter
*.
Opening
The cover slides along guide rails and can be
opened fully by pushing it back and lifting it.
Closing
Push the cover forward.
Storage compartments
In the vehicle interior
Depending on your vehicle's equipment, you
will find storage compartments in the doors,
next to the rear seats and in the center console
*.
Nets
* are located in the passenger footwell and
on the backs of the front seat backrests.
Storage compartment on the front
passenger side*
Opening
Briefly press the bottom edge of the cover.
Closing
Push the cover back into its original position.
To prevent injury in the event of an acci-
dent, close the storage compartment after
use while the vehicle is being driven. <
Clothes hooks
There are clothes hooks on the grab handles in
the rear passenger compartment.
Items of clothing hung from the hooks
must not obstruct the driver's view. Do not
hang heavy objects from the hooks; otherwise,
they could endanger the car's occupants, e.g. in
case of heavy braking or sudden swerving. <
In the cargo area
Depending on your vehicle's equipment, you
have the following storage options:
>Umbrella holder
* under the loading sill in
front of the warning triangle
> Storage compartment under the flat load
floor
*
>Removable box with lid* under the flat load
floor, e.g. for wet or dirty items
> Storage compartment in the Split Rear Barn
Doors
> Net
* on the rear cargo well for smaller
objects; for attaching to the lashing eyes
Page 113 of 256

Destination entryNAVIGATION
111
>Search for "Points of Inte rest at loc.", refer to
page 112.
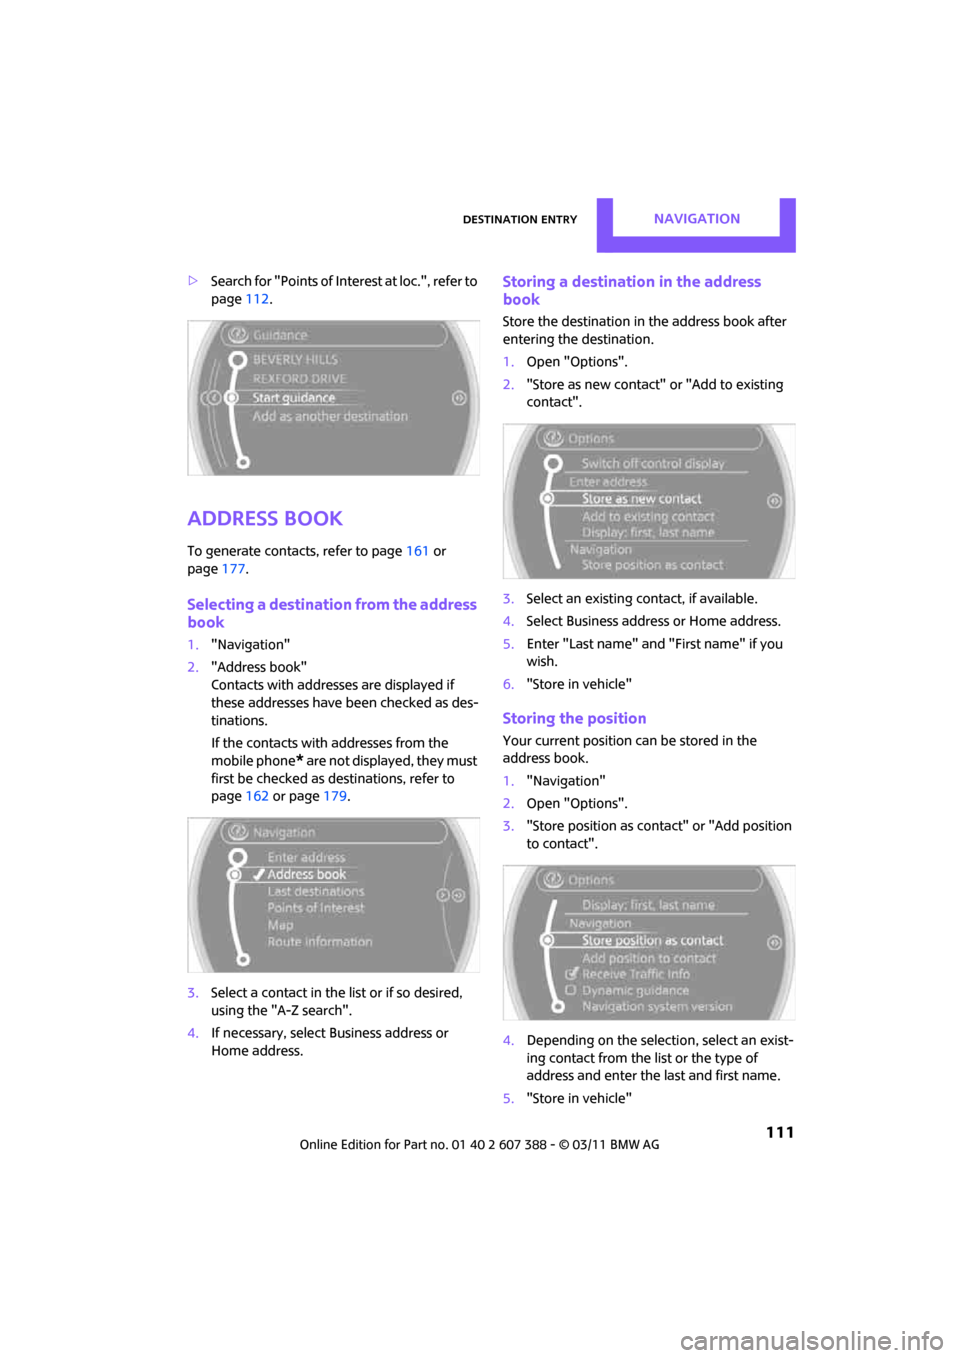
Address book
To generate contacts, refer to page 161 or
page 177.
Selecting a destination from the address
book
1."Navigation"
2. "Address book"
Contacts with addresses are displayed if
these addresses have been checked as des-
tinations.
If the contacts with addresses from the
mobile phone
* are not displayed, they must
first be checked as destinations, refer to
page 162 or page 179.
3. Select a contact in the list or if so desired,
using the "A-Z search".
4. If necessary, select Business address or
Home address.
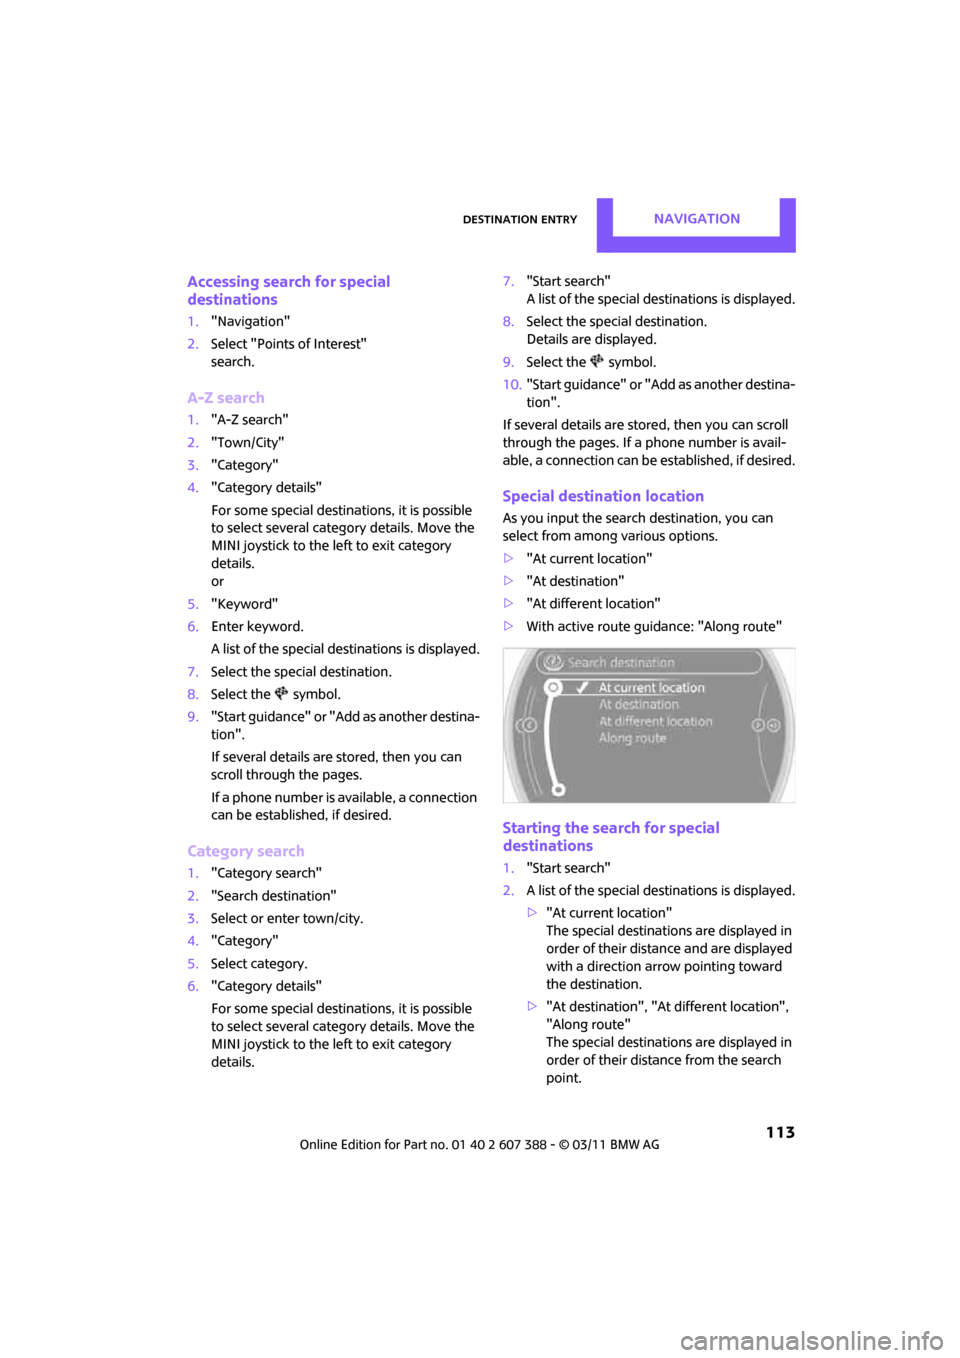
Storing a destination in the address
book
Store the destination in the address book after
entering the destination.
1. Open "Options".
2. "Store as new contact" or "Add to existing
contact".
3. Select an existing contact, if available.
4. Select Business address or Home address.
5. Enter "Last name" and "First name" if you
wish.
6. "Store in vehicle"
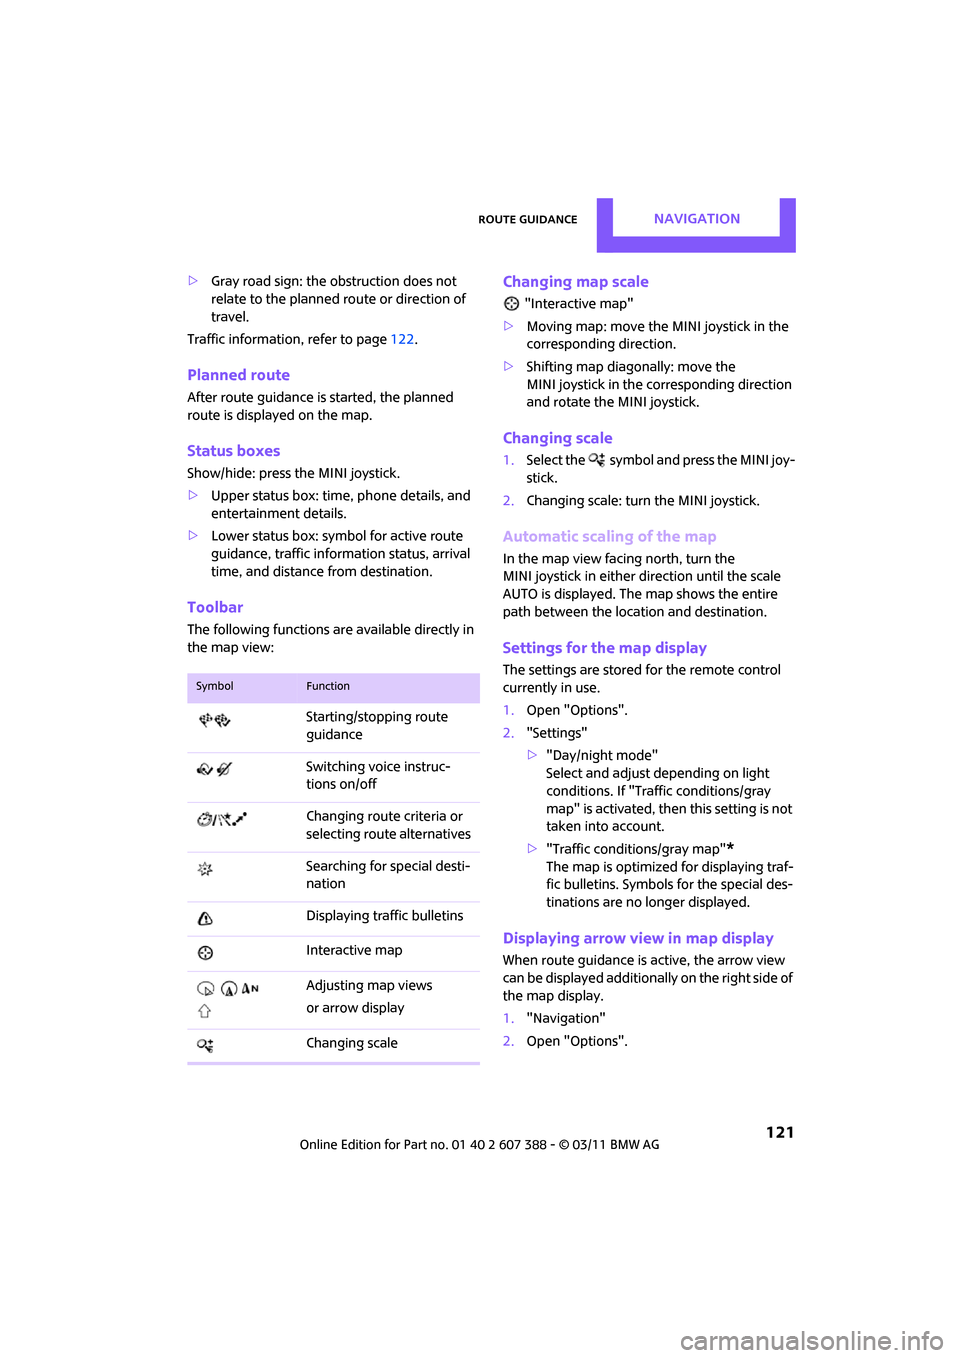
Storing the position
Your current position can be stored in the
address book.
1."Navigation"
2. Open "Options".
3. "Store position as cont act" or "Add position
to contact".
4. Depending on the selection, select an exist-
ing contact from the list or the type of
address and enter the last and first name.
5. "Store in vehicle"
Page 115 of 256

Destination entryNAVIGATION
113
Accessing search for special
destinations
1."Navigation"
2. Select "Points of Interest"
search.
A-Z search
1."A-Z search"
2. "Town/City"
3. "Category"
4. "Category details"
For some special destin ations, it is possible
to select several catego ry details. Move the
MINI joystick to the left to exit category
details.
or
5. "Keyword"
6. Enter keyword.
A list of the special destinations is displayed.
7. Select the special destination.
8. Select the symbol.
9. "Start guidance" or "Add as another destina-
tion".
If several details are stored, then you can
scroll through the pages.
If a phone number is available, a connection
can be established, if desired.
Category search
1."Category search"
2. "Search destination"
3. Select or enter town/city.
4. "Category"
5. Select category.
6. "Category details"
For some special destin ations, it is possible
to select several catego ry details. Move the
MINI joystick to the left to exit category
details. 7.
"Start search"
A list of the special destinations is displayed.
8. Select the special destination.
Details are displayed.
9. Select the symbol.
10. "Start guidance" or "Add as another destina-
tion".
If several details are stored, then you can scroll
through the pages. If a phone number is avail-
able, a connection can be established, if desired.
Special destination location
As you input the search destination, you can
select from among various options.
>"At current location"
> "At destination"
> "At different location"
> With active route gu idance: "Along route"
Starting the search for special
destinations
1."Start search"
2. A list of the special destinations is displayed.
>"At current location"
The special destinations are displayed in
order of their distance and are displayed
with a direction arro w pointing toward
the destination.
> "At destination", "At different location",
"Along route"
The special destinations are displayed in
order of their distance from the search
point.
Page 123 of 256

Route guidanceNAVIGATION
121
>Gray road sign: the obstruction does not
relate to the planned route or direction of
travel.
Traffic information, refer to page 122.
Planned route
After route guidance is started, the planned
route is displayed on the map.
Status boxes
Show/hide: press the MINI joystick.
>Upper status box: time, phone details, and
entertainment details.
> Lower status box: symbol for active route
guidance, traffic inform ation status, arrival
time, and distance from destination.
Toolbar
The following functions ar e available directly in
the map view:
Changing map scale
"Interactive map"
> Moving map: move the MINI joystick in the
corresponding direction.
> Shifting map diag onally: move the
MINI joystick in the corresponding direction
and rotate the MINI joystick.
Changing scale
1. Select the symbol and press the MINI joy-
stick.
2. Changing scale: turn the MINI joystick.
Automatic scaling of the map
In the map view facing north, turn the
MINI joystick in either direction until the scale
AUTO is displayed. The map shows the entire
path between the location and destination.
Settings for the map display
The settings are stored for the remote control
currently in use.
1.Open "Options".
2. "Settings"
>"Day/night mode"
Select and adjust depending on light
conditions. If "Traffic conditions/gray
map" is activated, then this setting is not
taken into account.
> "Traffic conditions/gray map"
*
The map is optimized for displaying traf-
fic bulletins. Symbols for the special des-
tinations are no longer displayed.
Displaying arrow view in map display
When route guidance is active, the arrow view
can be displayed additionally on the right side of
the map display.
1. "Navigation"
2. Open "Options".
SymbolFunction
Starting/stopping route
guidance
Switching voice instruc-
tions on/off
Changing route criteria or
selecting rout e alternatives
Searching for special desti-
nation
Displaying traffic bulletins
Interactive map
Adjusting map views
or arrow display
Changing scale
Page 133 of 256

On/off and toneENTERTAINMENT
131
Tone control
Various tone settings can be changed, e.g. treble
and bass or the speed-dependent volume con-
trol.
The tone settings are set for all audio sources at
once.
The settings are stored for the remote control
currently in use; refer to Personal Profile,
page 26.
Treble, bass, balance, fader
> "Treble": treble setting.
> "Bass": bass.
> "Balance": volume distribution right/left.
> "Fader": volume distribution front/back.
Adjustments
1."CD/Multimedia", "Rad io" or "Settings".
2. "Tone"
3. Selecting the desired tone setting.
4. To adjust: turn the MINI joystick.
5. To store: press the MINI joystick.
Volume levels
>"Speed volume": vo lume is adapted
depending on the speed
> "PDC"
*: volume of the PDC acoustic signal
relative to the entertainment sound output
> "Gong": volume of the acoustic signal, e.g.
for the acoustic seat belt warning relative to
the entertainment sound output
> "Microphone"
*: volume of the microphone
during a phone conversation
> "Loudspeak."
*: volume of the speaker dur-
ing a phone conversation
Adjustments
1. "CD/Multimedia", "Rad io" or "Settings".
2. "Tone"
3. "Volume settings"
4. Select the desired volume setting.
5. To adjust: turn the MINI joystick.
6. To store: press the MINI joystick.
Resetting tone settings
All tone settings can be reset to the default
value.
1."CD/Multimedia", "Rad io" or "Settings".
2. "Tone"
3. "Reset"
Page 136 of 256

ENTERTAINMENTRadio
134
Displaying additional information
Some stations broadcast additional information
on the current track, such as the name of the art-
ist.
1. Select the desired station.
2. Open "Options".
3. "Station info"
Selecting a substation
The symbol indicates that a main station also
broadcasts additional su bstations. The station
name of the main station ends in HD1. The sta-
tion names of the substa tions end in HD2, HD3,
etc.
1. Select the desired station.
2. Press the MINI joystick.
3. Select the substation.
When reception is poor, the substation is muted
for several seconds. If reception is interrupted
for an extended period, the radio switches back
to the main station.
Stored stations
It is possible to store up to 40 stations.
Selecting a station
1. "Radio"
2. "Presets"
3. Select the desired station.
Storing a station
The station currently selected is stored.
1. "Radio"
2. "Presets" 3.
"Store station"
4. Select the desired memory location.
The list of stored stations is stored for the remote
control currently in use.
Deleting a station
1. "Radio"
2. "Presets"
3. Select the desired station.
4. Open "Options".
5. "Delete entry"
Satellite radio*
General information
The channels are offered in fixed packages.
Packages must be activated by telephone.
Navigation bar
SymbolFunction
Changing list view
Selecting category
Entering channel directly
Time shift