2011 MERCEDES-BENZ SLS fuel
[x] Cancel search: fuelPage 272 of 436
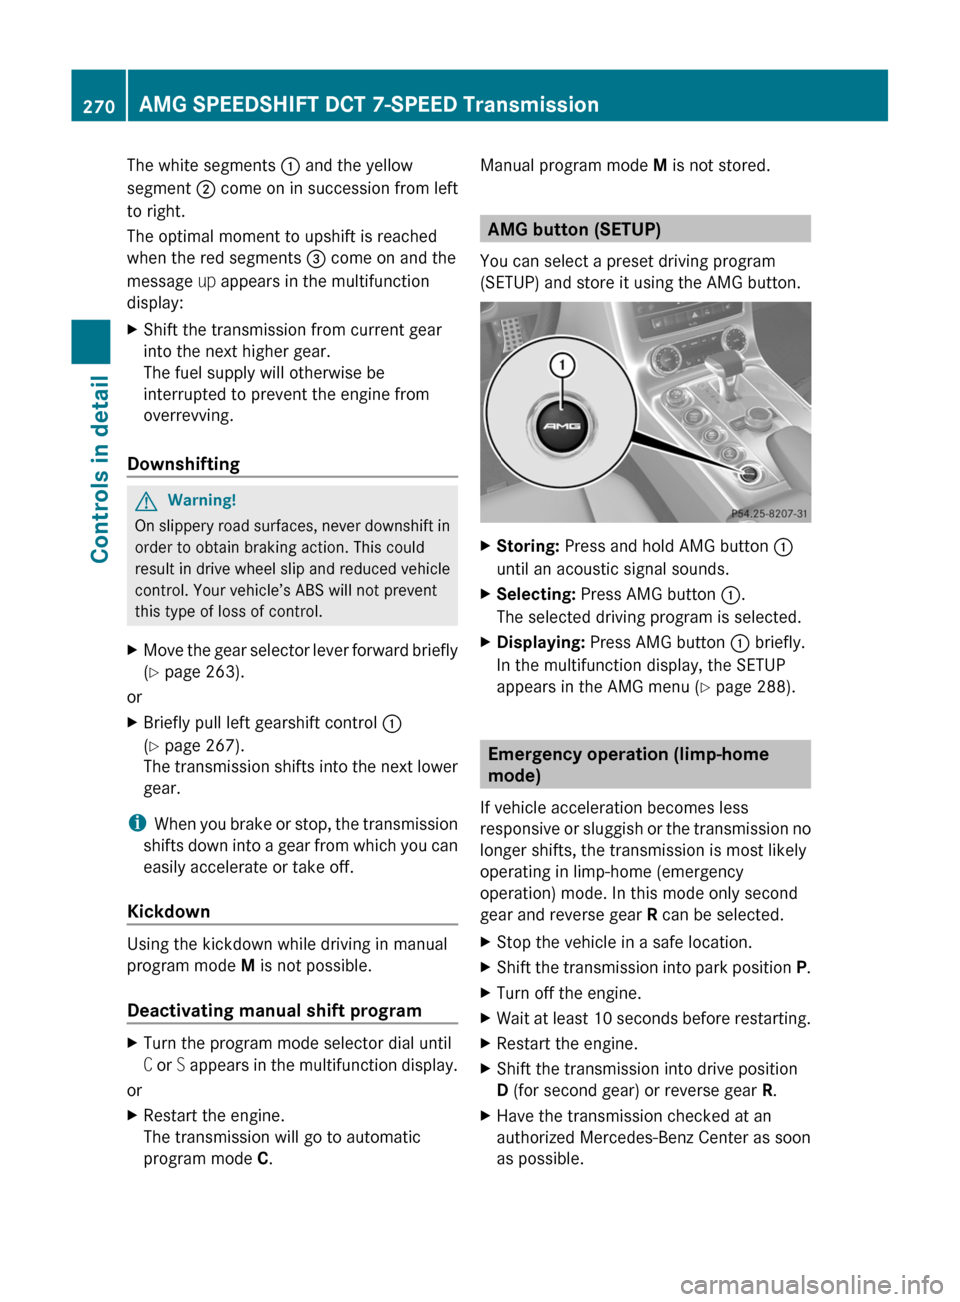
The white segments : and the yellow
segment ; come on in succession from left
to right.
The optimal moment to upshift is reached
when the red segments = come on and the
message up appears in the multifunction
display:
XShift the transmission from current gear
into the next higher gear.
The fuel supply will otherwise be
interrupted to prevent the engine from
overrevving.
Downshifting
GWarning!
On slippery road surfaces, never downshift in
order to obtain braking action. This could
result in drive wheel slip and reduced vehicle
control. Your vehicle’s ABS will not prevent
this type of loss of control.
XMove the gear selector lever forward briefly
(Y page 263).
or
XBriefly pull left gearshift control :
(Y page 267).
The transmission shifts into the next lower
gear.
iWhen you brake or stop, the transmission
shifts down into a gear from which you can
easily accelerate or take off.
Kickdown
Using the kickdown while driving in manual
program mode M is not possible.
Deactivating manual shift program
XTurn the program mode selector dial until
C or S appears in the multifunction display.
or
XRestart the engine.
The transmission will go to automatic
program mode C.
Manual program mode M is not stored.
AMG button (SETUP)
You can select a preset driving program
(SETUP) and store it using the AMG button.
XStoring: Press and hold AMG button :
until an acoustic signal sounds.
XSelecting: Press AMG button :.
The selected driving program is selected.
XDisplaying: Press AMG button : briefly.
In the multifunction display, the SETUP
appears in the AMG menu (Y page 288).
Emergency operation (limp-home
mode)
If vehicle acceleration becomes less
responsive or sluggish or the transmission no
longer shifts, the transmission is most likely
operating in limp-home (emergency
operation) mode. In this mode only second
gear and reverse gear R can be selected.
XStop the vehicle in a safe location.XShift the transmission into park position P.XTurn off the engine.XWait at least 10 seconds before restarting.XRestart the engine.XShift the transmission into drive position
D (for second gear) or reverse gear R.
XHave the transmission checked at an
authorized Mercedes-Benz Center as soon
as possible.
270AMG SPEEDSHIFT DCT 7-SPEED TransmissionControls in detail
BA 197 USA, CA Edition A 2011; 1; 27, en-UShereepeVersion: 3.0.3.52010-03-24T15:31:10+01:00 - Seite 270
Page 273 of 436
Instrument cluster
Introduction
For a full view illustration of the instrument
cluster, see “Instrument cluster”
( Y page 34).
GWarning!
No messages will be displayed if either the
instrument cluster or the multifunction
display is inoperative.
As a result, you will not be able to see
information about your driving conditions,
such as
R speed
R outside temperature
R warning/indicator lamps
R malfunction/warning messages
R failure of any systems
Driving characteristics may be impaired.
If you must continue to drive, do so with added
caution. Contact an authorized Mercedes-
Benz Center as soon as possible.
The language setting for the multifunction
display can be changed via COMAND system
( Y page 99).
Activating the instrument cluster
The instrument cluster is activated when you
R open the driver’s door
R switch on the ignition
R switch on the exterior lamps
Engine oil temperature gauge
The engine oil temperature gauge is located
in the instrument cluster. The engine oil
temperature may rise up to 140† under
normal driving conditions.
! The engine should not be operated with
the engine oil temperature above 140†.
Doing so may cause serious damage which
is not covered by the Mercedes-Benz
Limited Warranty.
The temperature of the transmission fluid and
coolant are displayed in the AMG menu
( Y page 287).
Tachometer
The red marking on the tachometer
( Y page 34) denotes excessive engine speed.
! Avoid driving at excessive engine speeds,
as it may result in serious engine damage
that is not covered by the Mercedes-Benz
Limited Warranty.
To help protect the engine, the fuel supply is
interrupted if the engine is operated within
the red marking.
Outside temperature indicator
The outside temperature indicator is
displayed in the multifunction display
( Y page 273).
GWarning!
The outside temperature indicator is not
designed to serve as an ice-warning device
and is therefore unsuitable for that purpose.
Indicated temperatures just above the
freezing point do not guarantee that the road
surface is free of ice. The road may still be icy,
especially in wooded areas or on bridges.
Fuel gauge
The fuel gauge is on the left-hand side of the
instrument cluster (Y page 34). Once the fuel
level has fallen below the reserve mark, the
yellow fuel tank reserve warning lamp 8
for the fuel reserve comes on.
Instrument cluster271Controls in detailBA 197 USA, CA Edition A 2011; 1; 27, en-UShereepeVersion: 3.0.3.52010-03-24T15:31:10+01:00 - Seite 271Z
Page 277 of 436
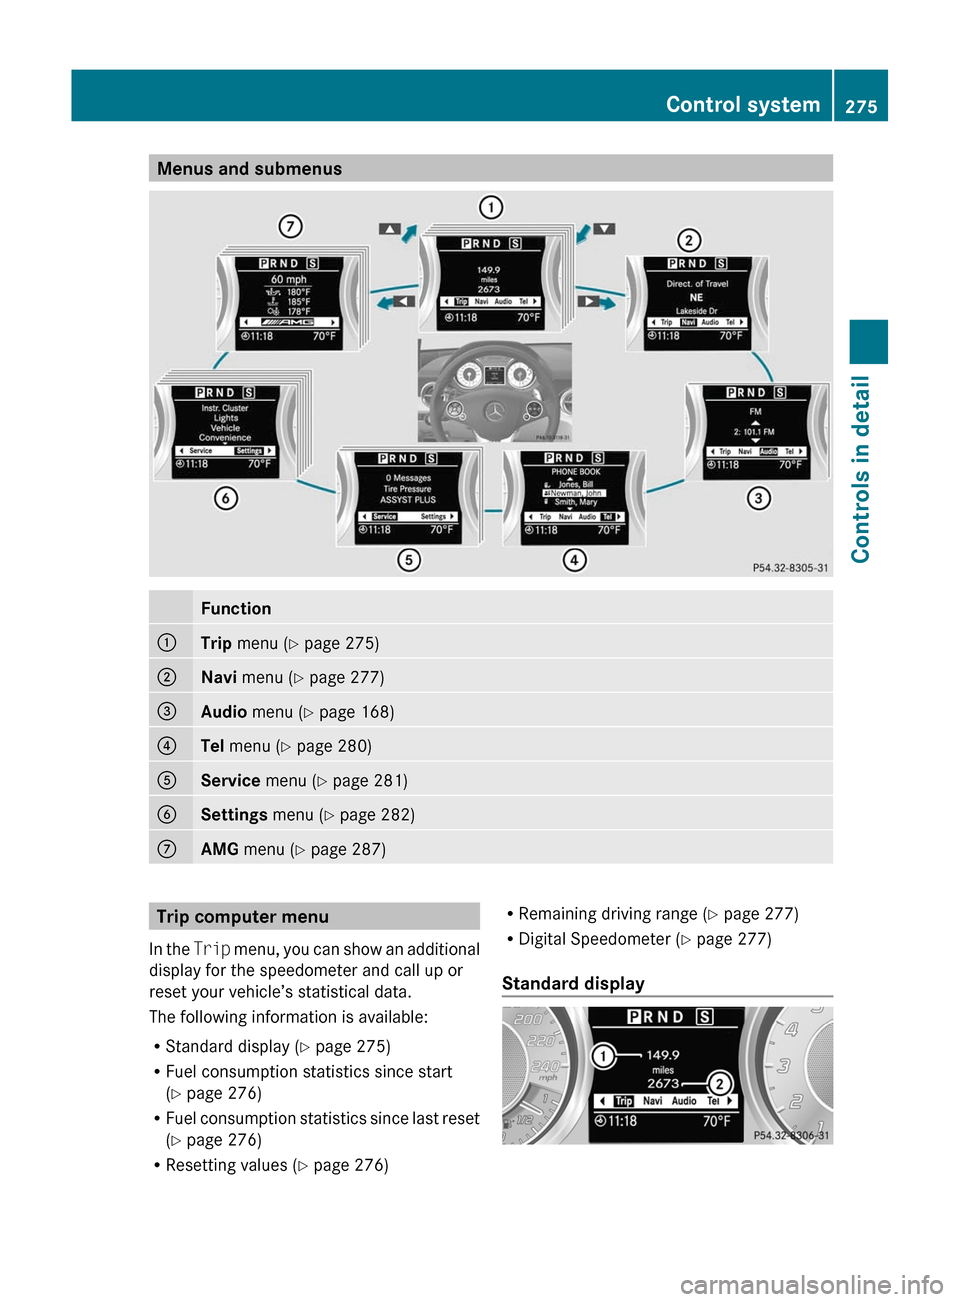
Menus and submenusFunction:Trip menu ( Y page 275);Navi menu ( Y page 277)=Audio menu ( Y page 168)?Tel menu ( Y page 280)AService menu (Y page 281)BSettings menu (Y page 282)CAMG menu ( Y page 287)Trip computer menu
In the Trip menu, you can show an additional
display for the speedometer and call up or
reset your vehicle’s statistical data.
The following information is available:
R Standard display ( Y page 275)
R Fuel consumption statistics since start
( Y page 276)
R Fuel consumption statistics since last reset
( Y page 276)
R Resetting values ( Y page 276)R
Remaining driving range ( Y page 277)
R Digital Speedometer ( Y page 277)
Standard display Control system275Controls in detailBA 197 USA, CA Edition A 2011; 1; 27, en-UShereepeVersion: 3.0.3.52010-03-24T15:31:10+01:00 - Seite 275Z
Page 278 of 436
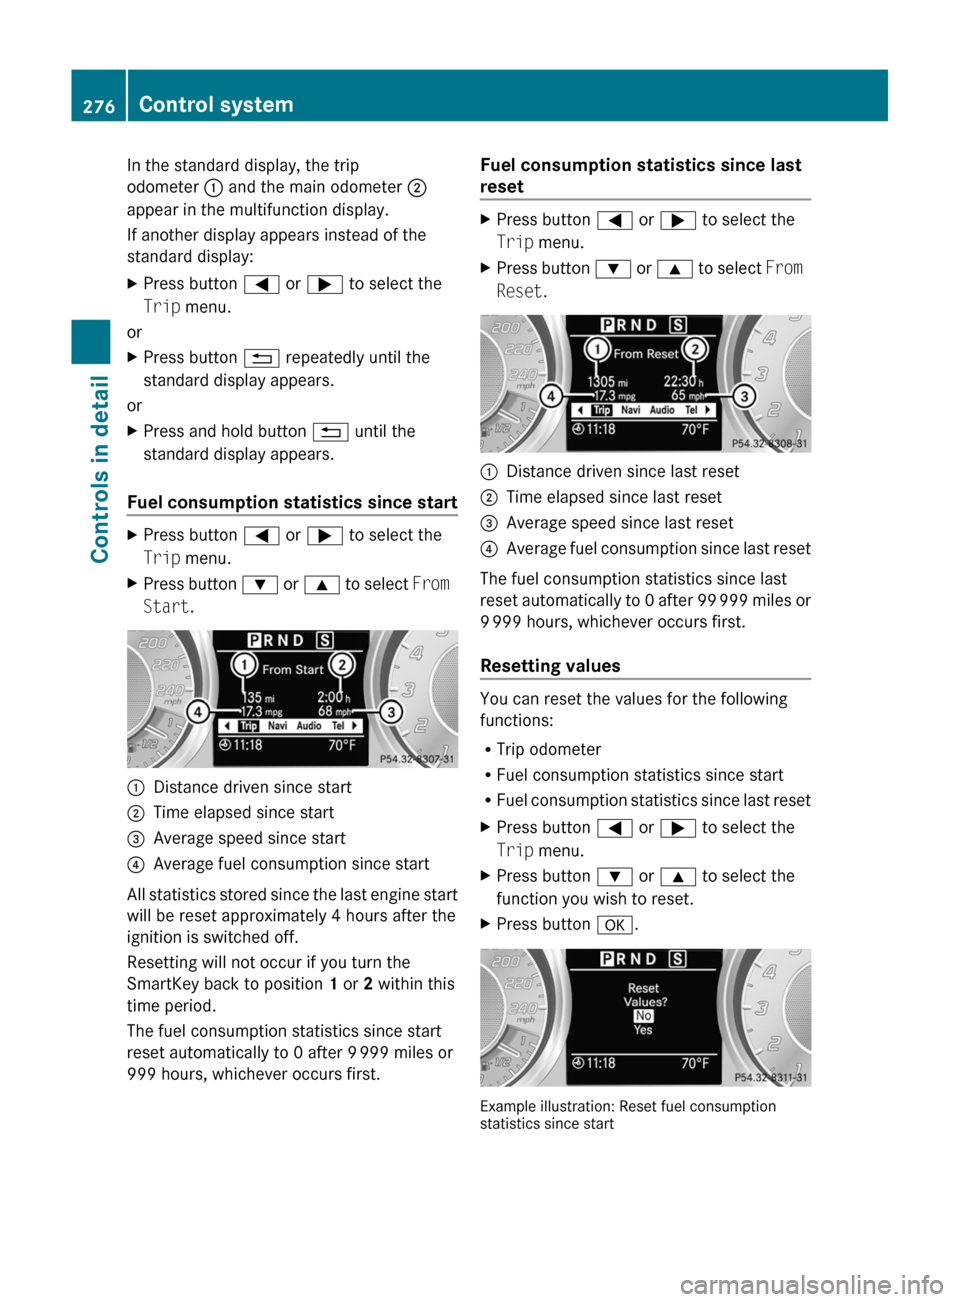
In the standard display, the trip
odometer : and the main odometer ;
appear in the multifunction display.
If another display appears instead of the
standard display:XPress button = or ; to select the
Trip menu.
or
XPress button % repeatedly until the
standard display appears.
or
XPress and hold button % until the
standard display appears.
Fuel consumption statistics since start
XPress button = or ; to select the
Trip menu.XPress button : or 9 to select From
Start .:Distance driven since start;Time elapsed since start=Average speed since start?Average fuel consumption since start
All statistics stored since the last engine start
will be reset approximately 4 hours after the
ignition is switched off.
Resetting will not occur if you turn the
SmartKey back to position 1 or 2 within this
time period.
The fuel consumption statistics since start
reset automatically to 0 after 9 999 miles or
999 hours, whichever occurs first.
Fuel consumption statistics since last
resetXPress button = or ; to select the
Trip menu.XPress button : or 9 to select From
Reset .:Distance driven since last reset;Time elapsed since last reset=Average speed since last reset?Average fuel consumption since last reset
The fuel consumption statistics since last
reset automatically to 0 after 99 999 miles or
9 999 hours, whichever occurs first.
Resetting values
You can reset the values for the following
functions:
R Trip odometer
R Fuel consumption statistics since start
R Fuel consumption statistics since last reset
XPress button = or ; to select the
Trip menu.XPress button : or 9 to select the
function you wish to reset.XPress button a.
Example illustration: Reset fuel consumption
statistics since start
276Control systemControls in detail
BA 197 USA, CA Edition A 2011; 1; 27, en-UShereepeVersion: 3.0.3.52010-03-24T15:31:10+01:00 - Seite 276
Page 279 of 436
XPress button : to select Yes.XPress button a to confirm.
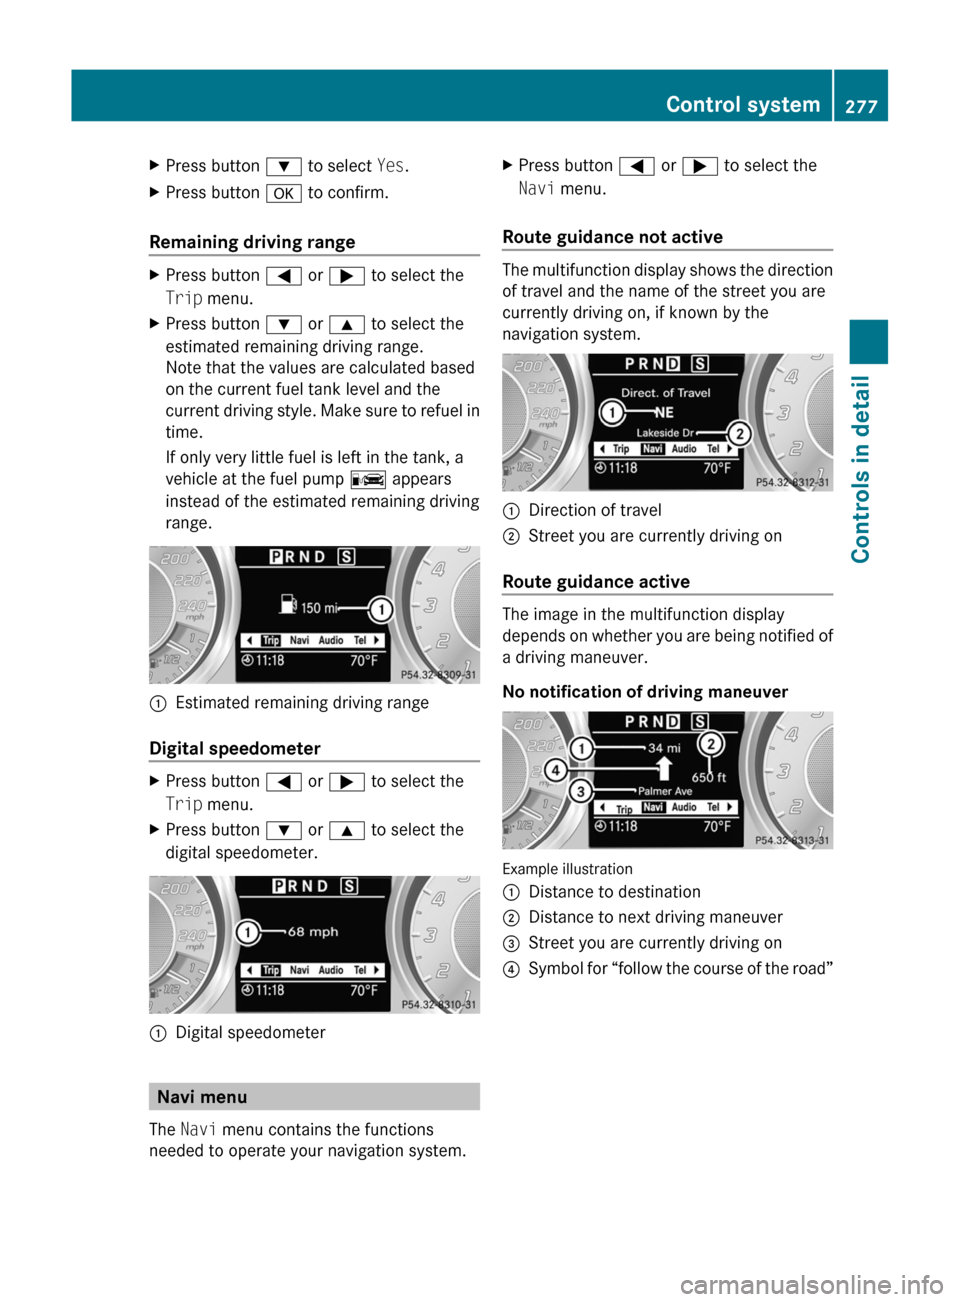
Remaining driving range
XPress button = or ; to select the
Trip menu.XPress button : or 9 to select the
estimated remaining driving range.
Note that the values are calculated based
on the current fuel tank level and the
current driving style. Make sure to refuel in
time.
If only very little fuel is left in the tank, a
vehicle at the fuel pump C appears
instead of the estimated remaining driving
range.:Estimated remaining driving range
Digital speedometer
XPress button = or ; to select the
Trip menu.XPress button : or 9 to select the
digital speedometer.:Digital speedometer
Navi menu
The Navi menu contains the functions
needed to operate your navigation system.
XPress button = or ; to select the
Navi menu.
Route guidance not active
The multifunction display shows the direction
of travel and the name of the street you are
currently driving on, if known by the
navigation system.
:Direction of travel;Street you are currently driving on
Route guidance active
The image in the multifunction display
depends on whether you are being notified of
a driving maneuver.
No notification of driving maneuver
Example illustration
:Distance to destination;Distance to next driving maneuver=Street you are currently driving on?Symbol for “follow the course of the road”Control system277Controls in detailBA 197 USA, CA Edition A 2011; 1; 27, en-UShereepeVersion: 3.0.3.52010-03-24T15:31:10+01:00 - Seite 277Z
Page 313 of 436
XTerminating calls: Press button ~ on
the multifunction steering wheel.
or
XPress the respective button for ending a
telephone call on the COMAND system.
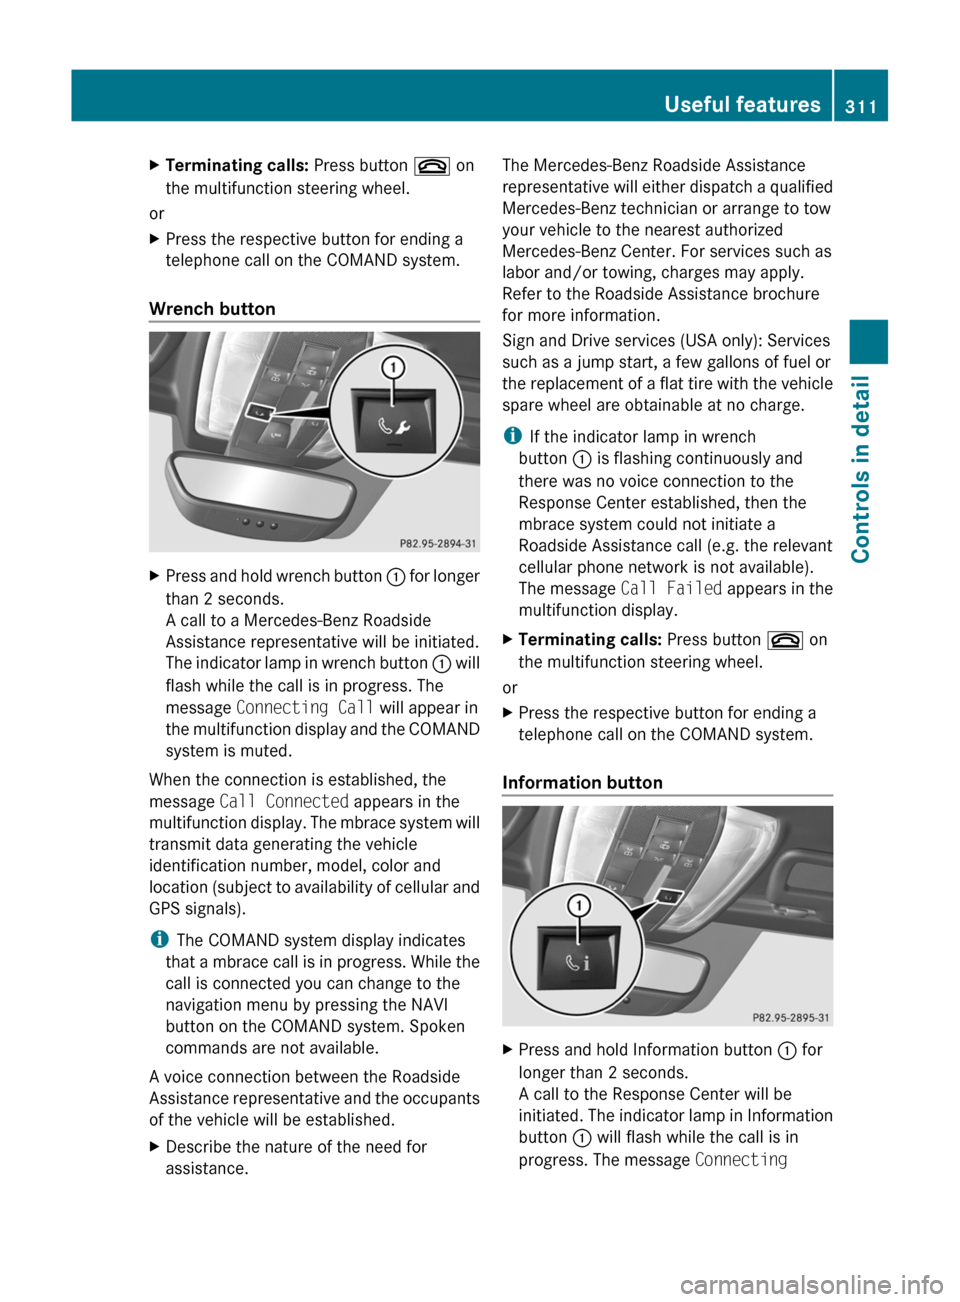
Wrench button
XPress and hold wrench button : for longer
than 2 seconds.
A call to a Mercedes-Benz Roadside
Assistance representative will be initiated.
The indicator lamp in wrench button : will
flash while the call is in progress. The
message Connecting Call will appear in
the multifunction display and the COMAND
system is muted.
When the connection is established, the
message Call Connected appears in the
multifunction display. The mbrace system will
transmit data generating the vehicle
identification number, model, color and
location (subject to availability of cellular and
GPS signals).
i The COMAND system display indicates
that a mbrace call is in progress. While the
call is connected you can change to the
navigation menu by pressing the NAVI
button on the COMAND system. Spoken
commands are not available.
A voice connection between the Roadside
Assistance representative and the occupants
of the vehicle will be established.
XDescribe the nature of the need for
assistance.The Mercedes-Benz Roadside Assistance
representative will either dispatch a qualified
Mercedes-Benz technician or arrange to tow
your vehicle to the nearest authorized
Mercedes-Benz Center. For services such as
labor and/or towing, charges may apply.
Refer to the Roadside Assistance brochure
for more information.
Sign and Drive services (USA only): Services
such as a jump start, a few gallons of fuel or
the replacement of a flat tire with the vehicle
spare wheel are obtainable at no charge.
i If the indicator lamp in wrench
button : is flashing continuously and
there was no voice connection to the
Response Center established, then the
mbrace system could not initiate a
Roadside Assistance call (e.g. the relevant
cellular phone network is not available).
The message Call Failed appears in the
multifunction display.XTerminating calls: Press button ~ on
the multifunction steering wheel.
or
XPress the respective button for ending a
telephone call on the COMAND system.
Information button
XPress and hold Information button : for
longer than 2 seconds.
A call to the Response Center will be
initiated. The indicator lamp in Information
button : will flash while the call is in
progress. The message Connecting Useful features311Controls in detailBA 197 USA, CA Edition A 2011; 1; 27, en-UShereepeVersion: 3.0.3.52010-03-24T15:31:10+01:00 - Seite 311Z
Page 322 of 436
Vehicle equipment
i This Operator’s Manual describes all
features, standard or optional, potentially
available for your vehicle at the time of
purchase. Please be aware that your
vehicle might not be equipped with all
features described in this manual.
The first 1000 miles (1500 km)
The more cautiously you treat your vehicle
during the break-in period, the more satisfied
you will be with its performance later on.
R Drive your vehicle during the first
1 000 miles (1 500 km) at varying but
moderate vehicle and engine speeds.
R During the first 1 000 miles (1 500 km), do
not exceed a speed of 85 mph
(140 km/h).
R During this period, avoid engine speeds
above 4 500 rpm in each gear.
R During this period, avoid heavy loads (full
throttle driving) and excessive engine
speeds (no more than 2
/ 3 of maximum rpm
in each gear).
R Shift gears in a timely manner.
R Avoid accelerating by kickdown.
R Do not attempt to slow the vehicle down by
shifting to a lower gear using the gear
selector lever.
R Select gear ranges 3, 2 or 1 (Y page 266)
only when driving at moderate speeds (for
hill driving).
R Select C as the preferred shift program
( Y page 267) for the first 1 000 miles
(1 500 km).
After 1 000 miles (1 500 km) you may
gradually increase vehicle and engine speeds
to the permissible maximum.
All of the above instructions also apply when
driving the first 1 000 miles (1 500 km) after
the engine or the transmission has been
replaced.
i Always obey applicable speed limits.
At the gas station
Refueling
GWarning!
Gasoline is highly flammable and poisonous.
It burns violently and can cause serious
personal injury.
Never allow sparks, flames or smoking
materials near gasoline!
Turn off the engine before refueling.
Whenever you are around gasoline, avoid
inhaling fumes and any skin or clothing
contact. Extinguish all smoking materials.
Direct skin contact with fuels and the
inhalation of fuel vapors are damaging your
health.
GWarning!
Overfilling of the fuel tank may create
pressure in the system which could cause a
gas discharge. This could cause the gas to
spray back out when removing the fuel pump
nozzle, which could cause personal injury.
! Never refuel vehicles with gasoline engine
with diesel fuel. Even small amounts of
diesel fuel will damage the fuel system and
engine. Damage resulting from the use of
non-approved fuels or fuel additives or
resulting from mixing gasoline with diesel
fuel is not covered by the Mercedes-Benz
Limited Warranty.
! If you have accidentally filled the tank
with incorrect or non-approved fuel, do not
switch on the ignition. Otherwise the
incorrect or non-approved fuel will get into
the fuel lines. The fuel system must be
drained completely. Contact an authorized
Mercedes-Benz Center to have the fuel
system drained completely.
320At the gas stationOperation
BA 197 USA, CA Edition A 2011; 1; 27, en-UShereepeVersion: 3.0.3.52010-03-24T15:31:10+01:00 - Seite 320
Page 323 of 436
! To prevent damage to the catalytic
converters, only use premium unleaded
gasoline in this vehicle.
Any noticeable irregularities in engine
operation should be repaired promptly.
Otherwise, excessive unburned fuel may
reach the catalytic converter, causing it to
overheat and potentially start a fire.
i Only use premium unleaded gasoline with
a minimum Posted Octane Rating of 91
(average of 96 RON/86 MON).
Information on gasoline quality can
normally be found on the fuel pump. Please
contact gas station personnel in case
labels on the pump cannot be found.
For more information on gasoline, see
“Premium unleaded gasoline”
( Y page 425), see “Fuel requirements”
( Y page 427), or contact an authorized
Mercedes-Benz Center, or visit
http://www.MBUSA.com (USA only).
Locking/unlocking the vehicle with the
SmartKey automatically locks/unlocks the
fuel filler flap.
i In case the central locking system does
not release the fuel filler flap, or the
opening mechanism is clamping, contact
Roadside Assistance or an authorized
Mercedes-Benz Center.
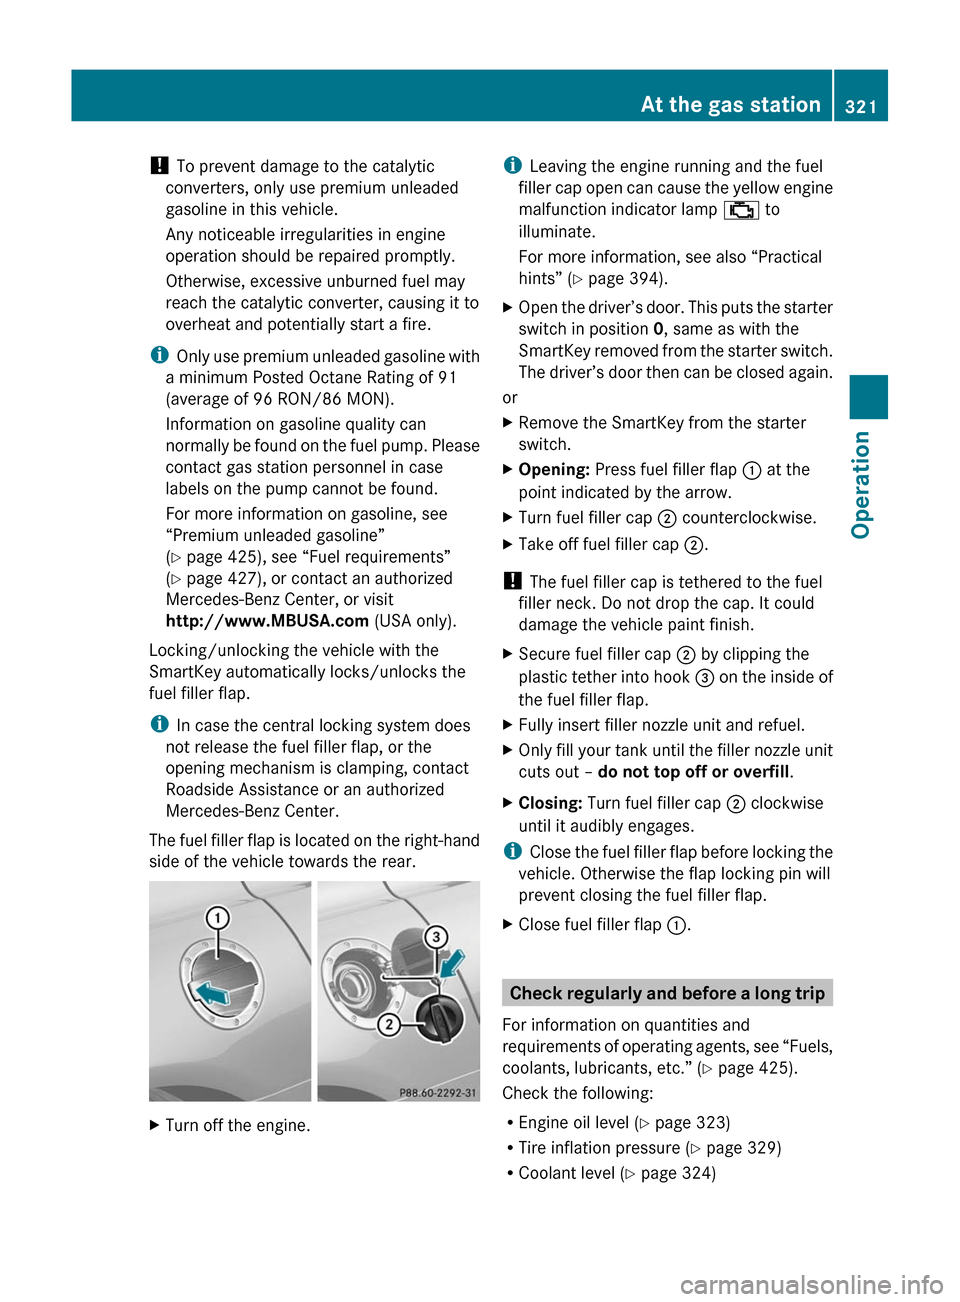
The fuel filler flap is located on the right-hand
side of the vehicle towards the rear. XTurn off the engine.i Leaving the engine running and the fuel
filler cap open can cause the yellow engine
malfunction indicator lamp ; to
illuminate.
For more information, see also “Practical
hints” ( Y page 394).XOpen the driver’s door. This puts the starter
switch in position 0, same as with the
SmartKey removed from the starter switch.
The driver’s door then can be closed again.
or
XRemove the SmartKey from the starter
switch.XOpening: Press fuel filler flap : at the
point indicated by the arrow.XTurn fuel filler cap ; counterclockwise.XTake off fuel filler cap ;.
!
The fuel filler cap is tethered to the fuel
filler neck. Do not drop the cap. It could
damage the vehicle paint finish.
XSecure fuel filler cap ; by clipping the
plastic tether into hook = on the inside of
the fuel filler flap.XFully insert filler nozzle unit and refuel.XOnly fill your tank until the filler nozzle unit
cuts out – do not top off or overfill .XClosing: Turn fuel filler cap ; clockwise
until it audibly engages.
i Close the fuel filler flap before locking the
vehicle. Otherwise the flap locking pin will
prevent closing the fuel filler flap.
XClose fuel filler flap :.
Check regularly and before a long trip
For information on quantities and
requirements of operating agents, see “Fuels,
coolants, lubricants, etc.” ( Y page 425).
Check the following:
R Engine oil level ( Y page 323)
R Tire inflation pressure ( Y page 329)
R Coolant level ( Y page 324)
At the gas station321OperationBA 197 USA, CA Edition A 2011; 1; 27, en-UShereepeVersion: 3.0.3.52010-03-24T15:31:10+01:00 - Seite 321Z