2011 MERCEDES-BENZ SLS stop start
[x] Cancel search: stop startPage 57 of 436
special seat belt retractors, see “Infant and
child restraint systems” ( Y page 58).
To release the seat belt with seat belt release
button ?, see ( Y page 55).
Releasing the seat beltsXPress seat belt release button ?
( Y page 54).
Allow the retractor to completely rewind
the seat belt by guiding latch plate ;
( Y page 54).
!
Make sure the seat belt retracts
completely. Otherwise the seat belt and/or
latch plate could get caught or pinched in
the door or in the seat mechanism. This can
damage the seat belt and impair its
effectiveness, and/or cause damage to the
door and/or door trim panel. Such damage
is not covered by the Mercedes-Benz
Limited Warranty.
Damaged seat belts must be replaced.
Contact an authorized Mercedes-Benz
Center.
Enhanced seat belt reminder system
When the engine is started, the seat belt
telltale 7 will always illuminate for
6 seconds to remind you and your passenger
to fasten your seat belts.
If the driver’s seat belt is not fastened when
the engine is started, an additional warning
chime will sound. The warning chime goes out
after approximately 6 seconds or once the
driver’s seat belt is fastened.
If after these 6 seconds the driver’s or the
passenger’s seat belt (with the passenger
seat occupied) is not fastened with both
doors closed,
R the seat belt telltale 7 remains
illuminated for as long as either the driver’s
or passenger’s seat belt is not fastened.
R and if the vehicle speed once exceeds
15 mph (25 km/h), the seat belt telltale
7 starts flashing and a warning chime
sounds with increasing intensity for a
maximum of 60 seconds or until the
driver’s and passenger’s seat belt are
fastened.
If you and/or your passenger release the
seat belt during driving, the seat belt
telltale 7 starts flashing and the
warning chime sounds as described before.
If the driver’s or the passenger’s seat belt
remains unfastened after 60 seconds, the
warning chime stops sounding, the seat
belt telltale 7 stops flashing but
continues to be illuminated.
After a vehicle standstill, the warning chime
is reactivated and the seat belt telltale
7 is flashing again if the vehicle speed
once exceeds 15 mph (25 km/h).
The seat belt telltale 7 will only go out if
both the driver’s and the passenger’s seat
belt (with the passenger seat occupied) are
fastened, or the vehicle is standing still and a
door is opened.
For more information, see “Practical hints”
( Y page 35).
Emergency Tensioning Device (ETD),
seat belt force limiter
The seat belts are equipped with ETDs and
seat belt force limiters.
The ETDs are designed to activate in the
following cases:
R in frontal or rear-end impacts exceeding
the system’s preset deployment threshold
R in side impacts exceeding the system’s
preset deployment threshold on the far
side of the impact
R in certain vehicle rollovers
R if the restraint systems are operational and
functioning correctly, see “SRS indicator
lamp” ( Y page 44)
The ETDs will only activate if the seat belts are
fastened (latch plate properly inserted into
buckle).
In an impact, the ETDs remove slack from the
seat belts in such a way that the seat belts fit
Occupant safety55Safety and securityBA 197 USA, CA Edition A 2011; 1; 27, en-UShereepeVersion: 3.0.3.52010-03-24T15:31:10+01:00 - Seite 55Z
Page 62 of 436
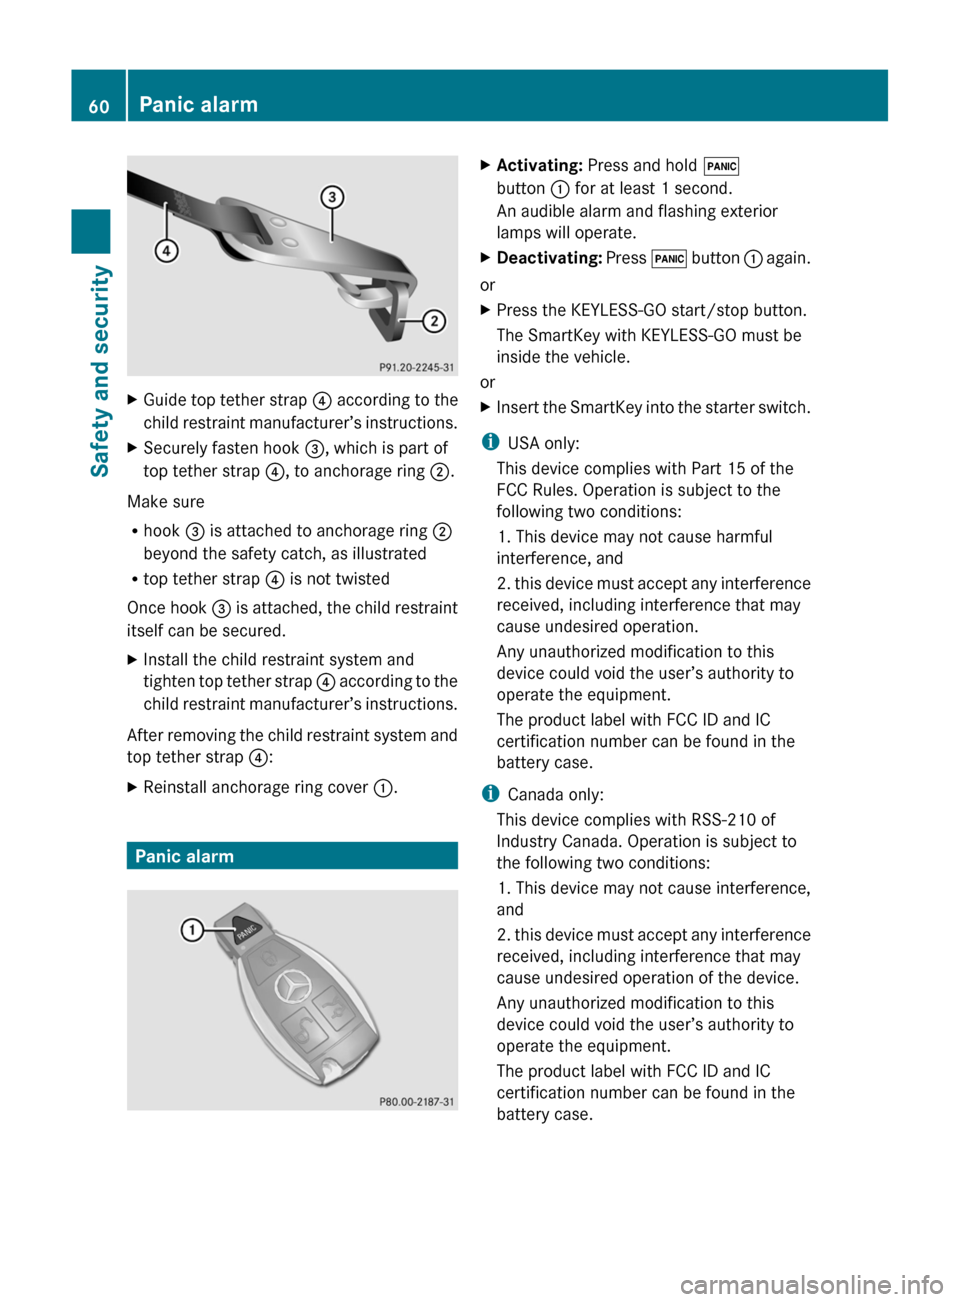
XGuide top tether strap ? according to the
child restraint manufacturer’s instructions.XSecurely fasten hook =, which is part of
top tether strap ?, to anchorage ring ;.
Make sure
R hook = is attached to anchorage ring ;
beyond the safety catch, as illustrated
R top tether strap ? is not twisted
Once hook = is attached, the child restraint
itself can be secured.
XInstall the child restraint system and
tighten top tether strap ? according to the
child restraint manufacturer’s instructions.
After removing the child restraint system and
top tether strap ?:
XReinstall anchorage ring cover :.
Panic alarm
XActivating: Press and hold !
button : for at least 1 second.
An audible alarm and flashing exterior
lamps will operate.XDeactivating: Press ! button : again.
or
XPress the KEYLESS-GO start/stop button.
The SmartKey with KEYLESS-GO must be
inside the vehicle.
or
XInsert the SmartKey into the starter switch.
i USA only:
This device complies with Part 15 of the
FCC Rules. Operation is subject to the
following two conditions:
1. This device may not cause harmful
interference, and
2. this device must accept any interference
received, including interference that may
cause undesired operation.
Any unauthorized modification to this
device could void the user’s authority to
operate the equipment.
The product label with FCC ID and IC
certification number can be found in the
battery case.
i Canada only:
This device complies with RSS-210 of
Industry Canada. Operation is subject to
the following two conditions:
1. This device may not cause interference,
and
2. this device must accept any interference
received, including interference that may
cause undesired operation of the device.
Any unauthorized modification to this
device could void the user’s authority to
operate the equipment.
The product label with FCC ID and IC
certification number can be found in the
battery case.
60Panic alarmSafety and security
BA 197 USA, CA Edition A 2011; 1; 27, en-UShereepeVersion: 3.0.3.52010-03-24T15:31:10+01:00 - Seite 60
Page 64 of 436

functions as a reminder to take extra care
while driving.
Emergency brake maneuverXKeep continuous full pressure on the brake
pedal.GWarning!
If the ABS malfunctions, other driving safety
systems such as the BAS or the ESC are also
switched off. Observe indicator and warning
lamps that may come on as well as messages
in the multifunction display that may appear.
If the ABS malfunctions, the wheels may lock
during hard braking, reducing steering
capability and extending the braking distance.
BAS
GObserve Safety notes, see page 61.
The Brake Assist System (BAS) operates in
emergency situations. If you apply the brakes
very quickly, the BAS provides full brake
boost automatically, thereby potentially
reducing the braking distance.
XApply continuous full braking pressure until
the emergency braking situation is over.
The ABS will prevent the wheels from
locking.
When you release the brake pedal, the brakes
function again as normal. The BAS is then
deactivated.
GWarning!
If the BAS malfunctions, the brake system still
functions, but without the additional brake
boost available that the BAS would normally
provide in an emergency braking maneuver.
Therefore, the braking distance may increase.
ESC
GObserve Safety notes, see page 61.
The Electronic Stability Control (ESC) is
operational as soon as the engine is running.
It monitors the vehicle’s traction (force of
adhesive friction between the tires and the
road surface) and handling.
The ESC recognizes that the vehicle deviates
from the direction of travel as intended by the
driver. By applying brakes to individual
wheels and by limiting the engine output, the
ESC works to stabilize the vehicle. The ESC is
especially useful while driving off and on wet
or slippery road surfaces. The ESC also
stabilizes the vehicle during braking and
steering maneuvers.
The ESC warning lamp ÷ in the instrument
cluster comes on when you switch on the
ignition. It goes out when the engine is
running.GWarning!
Never switch off the ESC when you see the
ESC warning lamp ÷ flashing in the
instrument cluster. In this case proceed as
follows:
R When driving off, apply as little throttle as
possible.
R While driving, ease up on the accelerator
pedal.
R Adapt your speed and driving style to the
prevailing road conditions.
Failure to observe these guidelines could
cause the vehicle to skid. The ESC cannot
prevent accidents resulting from excessive
speed.
! Because the ESC operates automatically,
the engine and ignition must be shut off
(KEYLESS-GO start/stop button in position
0 or 1, or SmartKey in starter switch
position 0 or 1) when the electronic parking
brake is being tested on a brake test
dynamometer or when the vehicle is being
towed with the rear axle raised.
Active braking action through the ESC may
otherwise seriously damage the brake
system which is not covered by the
Mercedes-Benz Limited Warranty.
62Driving safety systemsSafety and security
BA 197 USA, CA Edition A 2011; 1; 27, en-UShereepeVersion: 3.0.3.52010-03-24T15:31:10+01:00 - Seite 62
Page 69 of 436
XArming: Lock the vehicle with the
SmartKey.
The turn signal lamps flash three times and
an acoustic warning sounds three times to
indicate that the vehicle is locked. Indicator
lamp : flashes to indicate that the alarm
system is armed.
i If the turn signal lamps do not flash three
times and the acoustic warning does not
sound three times, a door or the trunk may
not be properly closed.
Close the respective element.
XDisarming: Unlock the vehicle with the
SmartKey.
The turn signal lamps flash once and an
acoustic warning sounds once to indicate
that the alarm system is disarmed.
i Unless you open a door or the trunk within
approximately 40 seconds after unlocking
the vehicle:
R The vehicle will be locked again.
R The anti-theft alarm system will be
rearmed.
Canceling the alarm
To cancel the alarm, do one of the following:
XPress the KEYLESS-GO start/stop button.
The SmartKey must be inside the vehicle.
or
XPress button % or & on the
SmartKey.
or
XInsert the SmartKey into the starter switch.Anti-theft systems67Safety and securityBA 197 USA, CA Edition A 2011; 1; 27, en-UShereepeVersion: 3.0.3.52010-03-24T15:31:10+01:00 - Seite 67Z
Page 87 of 436
XIf only one telephone number is stored
for a name: Press 6 or a to start
dialing.
The message Connecting Call... and
the selected number appear in the
multifunction display. The name also
appears, provided it is stored in the phone
book. The selected number is stored in the
CALLS DIALED list in COMAND
(Y page 156).
If a call is connected, the phone book entry
appears in the multifunction display.
or
XIf there is more than one number for a
particular name: Press 6 or a to
display the numbers.
XPress : or 9 to select the number
you want to dial.
XPress 6 or a to start dialing.
The message Connecting Call... and
the selected number appear in the
multifunction display. The name also
appears, provided it is stored in the phone
book. The selected number is stored in the
CALLS DIALED list in COMAND.
If a call is connected, the phone book entry
appears in the multifunction display.
iTo exit the phone book without making a
call, press the ~ button. Phone READY
appears in the multifunction display.
iIf you press and hold the : or 9
button for more than one second, a rapid
scroll begins. After four seconds, the rapid
scroll speeds up. The rapid scroll stops
when you release the button or reach the
end of the list.
Redialing
COMAND saves the most recently dialed
names and numbers from the mobile phone.
This means that you do not have to search
through the entire phone book.
XSelect the Tel menu.
The multifunction display shows
Phone READY .
XPress 6 to go to the most recently
dialed number or name in the
CALLS DIALED menu.
XPress : or 9 to select the number
or name you are looking for.
XPress 6 or a to start dialing.
Operating COMAND
Opening Menu of a Main Function
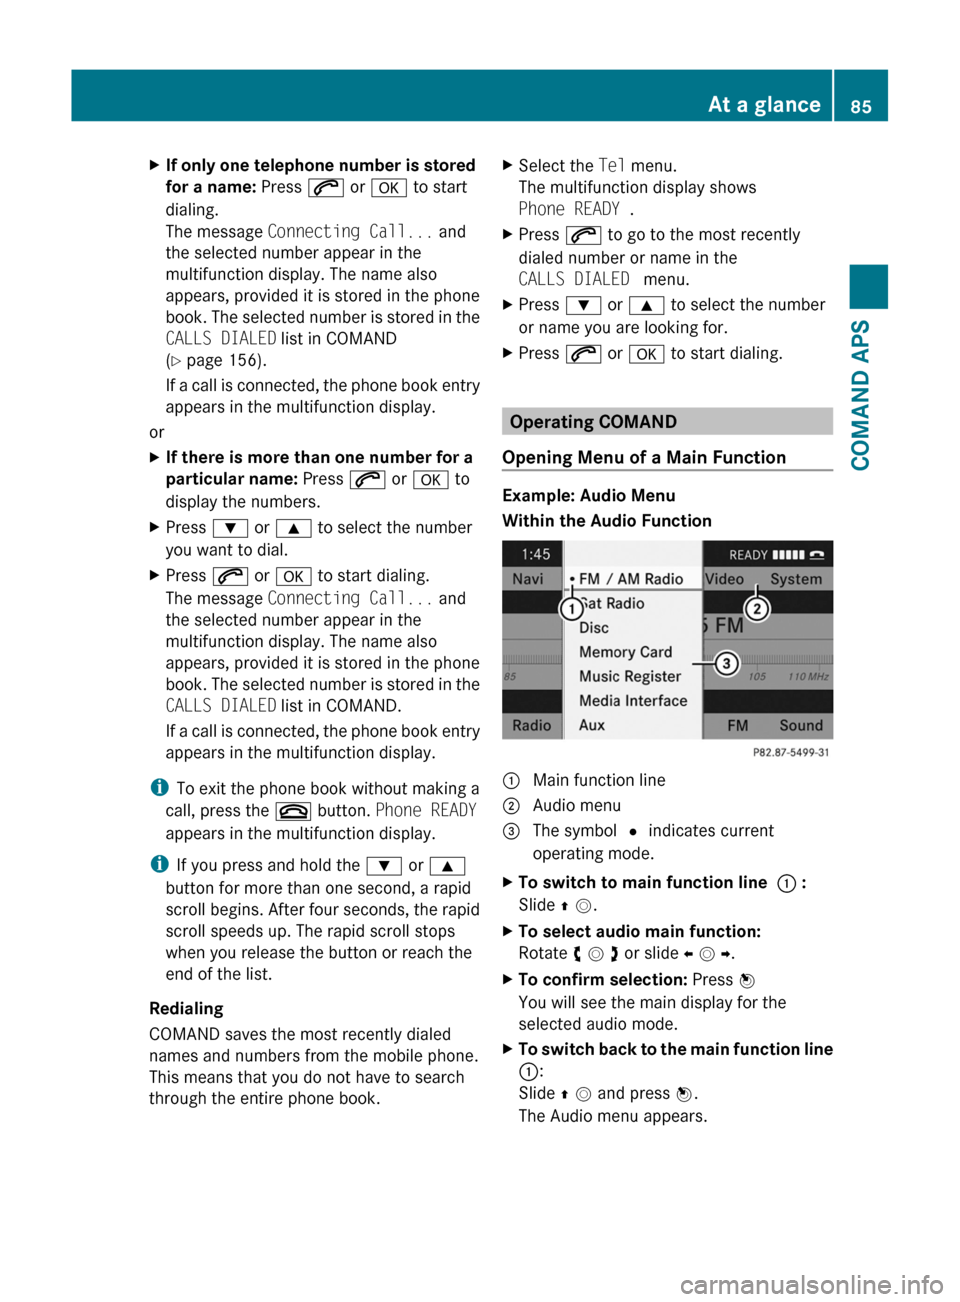
Example: Audio Menu
Within the Audio Function
1 Main function line2 Audio menu3 The symbol R indicates current
operating mode.
XTo switch to main function line 1 :
Slide q m.
XTo select audio main function:
Rotate y m z or slide o m p.
XTo confirm selection: Press n
You will see the main display for the
selected audio mode.
XTo switch back to the main function line
1:
Slide q m and press n.
The Audio menu appears.
At a glance85COMAND APSBA 197 USA, CA Edition A 2011; 1; 27, en-UShereepeVersion: 3.0.3.52010-03-24T15:31:10+01:00 - Seite 85Z
Page 91 of 436
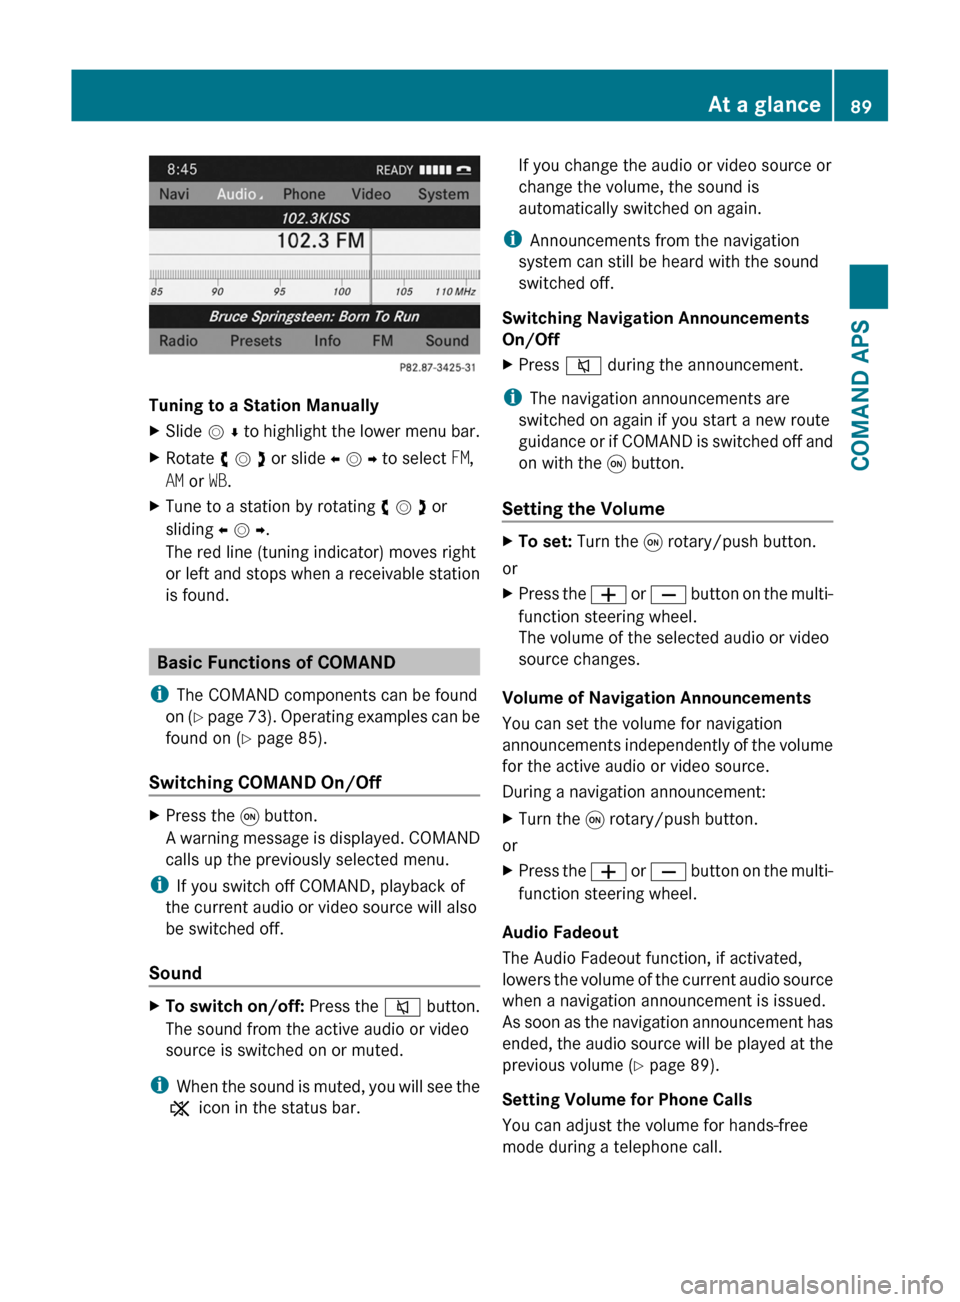
Tuning to a Station Manually
XSlide m r to highlight the lower menu bar.XRotate y m z or slide o m p to select FM,
AM or WB.
XTune to a station by rotating y m z or
sliding o m p.
The red line (tuning indicator) moves right
or left and stops when a receivable station
is found.
Basic Functions of COMAND
iThe COMAND components can be found
on (Y page 73). Operating examples can be
found on (Y page 85).
Switching COMAND On/Off
XPress the q button.
A warning message is displayed. COMAND
calls up the previously selected menu.
iIf you switch off COMAND, playback of
the current audio or video source will also
be switched off.
Sound
XTo switch on/off: Press the 8 button.
The sound from the active audio or video
source is switched on or muted.
iWhen the sound is muted, you will see the
X icon in the status bar.
If you change the audio or video source or
change the volume, the sound is
automatically switched on again.
iAnnouncements from the navigation
system can still be heard with the sound
switched off.
Switching Navigation Announcements
On/Off
XPress 8 during the announcement.
iThe navigation announcements are
switched on again if you start a new route
guidance or if COMAND is switched off and
on with the q button.
Setting the Volume
XTo set: Turn the q rotary/push button.
or
XPress the W or X button on the multi-
function steering wheel.
The volume of the selected audio or video
source changes.
Volume of Navigation Announcements
You can set the volume for navigation
announcements independently of the volume
for the active audio or video source.
During a navigation announcement:
XTurn the q rotary/push button.
or
XPress the W or X button on the multi-
function steering wheel.
Audio Fadeout
The Audio Fadeout function, if activated,
lowers the volume of the current audio source
when a navigation announcement is issued.
As soon as the navigation announcement has
ended, the audio source will be played at the
previous volume (Y page 89).
Setting Volume for Phone Calls
You can adjust the volume for hands-free
mode during a telephone call.
At a glance89COMAND APSBA 197 USA, CA Edition A 2011; 1; 27, en-UShereepeVersion: 3.0.3.52010-03-24T15:31:10+01:00 - Seite 89Z
Page 116 of 436
Navigation (Destination Input)
Introduction to Destination Input
GWarning!
For safety reasons, only enter a new
destination when the vehicle is stationary.
iIt is possible to enter a destination
regardless of whether route guidance is
active or inactive.
The following destination entry options are
available:
REntering a destination via the address
(Y page 114)
REntering a destination from the destination
memory (Y page 122)
REntering a destination from the last
destinations (Y page 123)
REntering a POI (Y page 126)
REntering a destination via the map
(Y page 123)
REntering a stopover destination
(Y page 124)
REntering a destination via “Search & Send”
(Y page 125)
Entering a Destination via the
Address
iIn some countries it is not possible to
enter addresses at vehicle speeds above
approx. 3 mph. The function becomes
available again as soon as the speed falls
below approx. 2 mph.
The following options are available for
entering a destination via an address:
REntering state/province, city/zip code and
street
REntering state/province, city and city
center
REntering state/province, city/zip code and
street and house number
REntering state/province, city/zip code and
street and junction
REntering street, state/province, city/zip
code and house number
Route calculation can then be started
(Y page 121).
Opening Enter Destination Menu
XIf necessary switch to navigation mode and
display menu system (Y page 105).
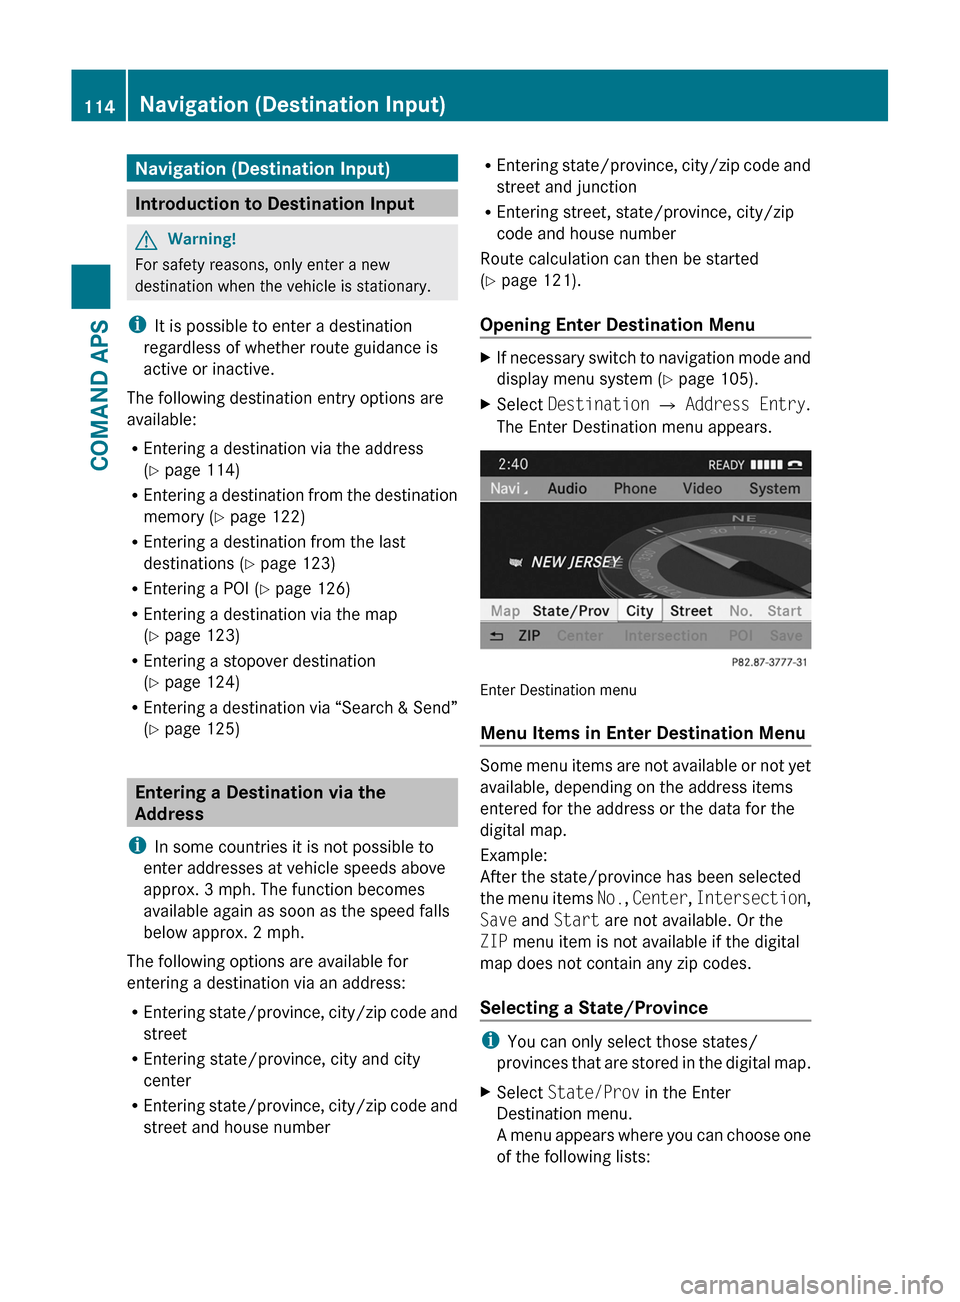
XSelect Destination £ Address Entry.
The Enter Destination menu appears.
Enter Destination menu
Menu Items in Enter Destination Menu
Some menu items are not available or not yet
available, depending on the address items
entered for the address or the data for the
digital map.
Example:
After the state/province has been selected
the menu items No., Center, Intersection,
Save and Start are not available. Or the
ZIP menu item is not available if the digital
map does not contain any zip codes.
Selecting a State/Province
iYou can only select those states/
provinces that are stored in the digital map.
XSelect State/Prov in the Enter
Destination menu.
A menu appears where you can choose one
of the following lists:
114Navigation (Destination Input)COMAND APS
BA 197 USA, CA Edition A 2011; 1; 27, en-UShereepeVersion: 3.0.3.52010-03-24T15:31:10+01:00 - Seite 114
Page 126 of 436
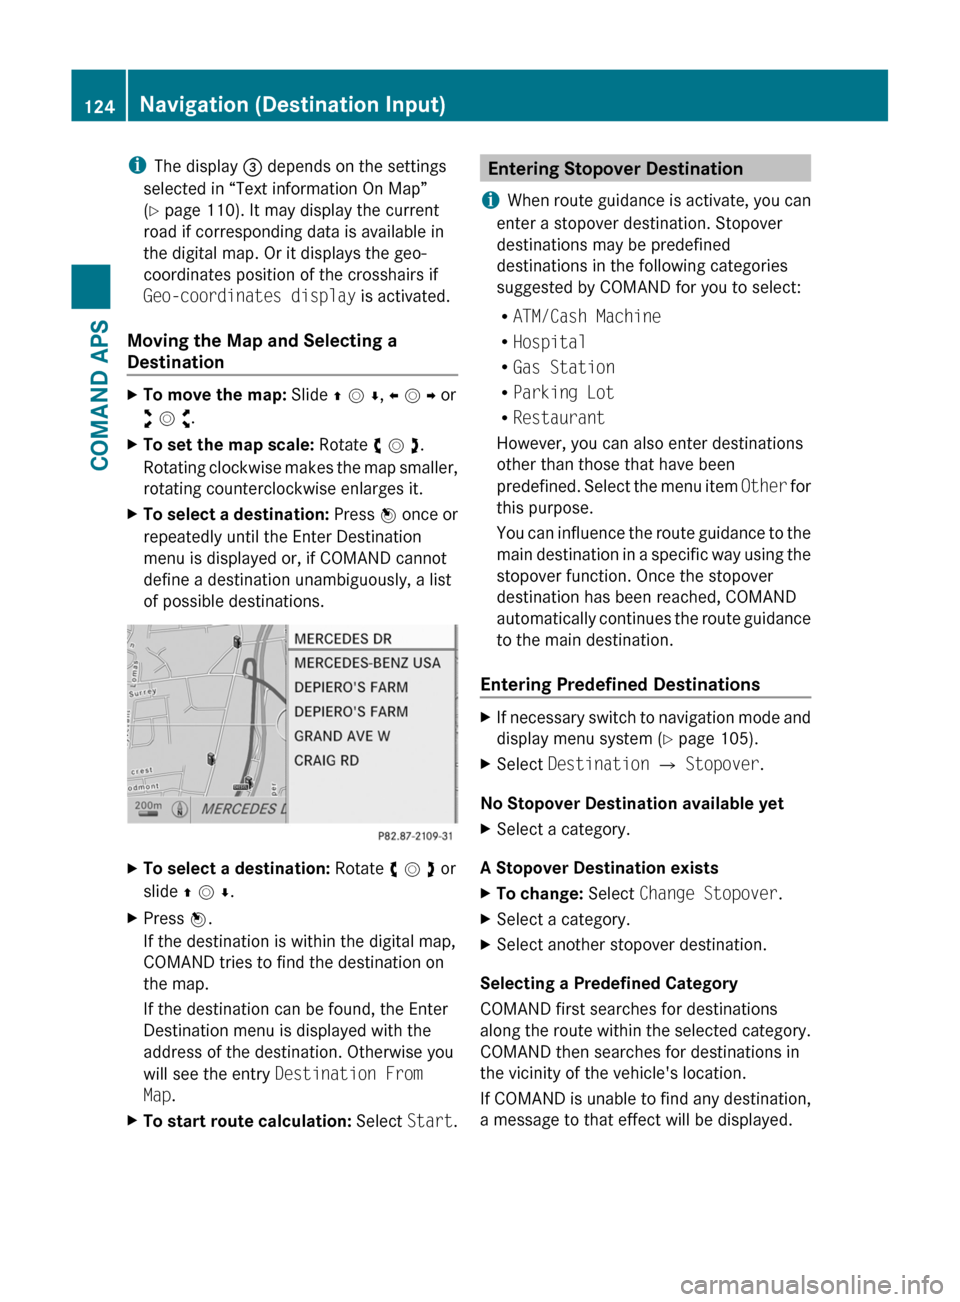
iThe display 3 depends on the settings
selected in “Text information On Map”
(Y page 110). It may display the current
road if corresponding data is available in
the digital map. Or it displays the geo-
coordinates position of the crosshairs if
Geo-coordinates display is activated.
Moving the Map and Selecting a
Destination
XTo move the map: Slide q m r, o m p or
w m x.
XTo set the map scale: Rotate y m z.
Rotating clockwise makes the map smaller,
rotating counterclockwise enlarges it.
XTo select a destination: Press n once or
repeatedly until the Enter Destination
menu is displayed or, if COMAND cannot
define a destination unambiguously, a list
of possible destinations.
XTo select a destination: Rotate y m z or
slide q m r.
XPress n.
If the destination is within the digital map,
COMAND tries to find the destination on
the map.
If the destination can be found, the Enter
Destination menu is displayed with the
address of the destination. Otherwise you
will see the entry Destination From
Map.
XTo start route calculation: Select Start.Entering Stopover Destination
iWhen route guidance is activate, you can
enter a stopover destination. Stopover
destinations may be predefined
destinations in the following categories
suggested by COMAND for you to select:
RATM/Cash Machine
RHospital
RGas Station
RParking Lot
RRestaurant
However, you can also enter destinations
other than those that have been
predefined. Select the menu item Other for
this purpose.
You can influence the route guidance to the
main destination in a specific way using the
stopover function. Once the stopover
destination has been reached, COMAND
automatically continues the route guidance
to the main destination.
Entering Predefined Destinations
XIf necessary switch to navigation mode and
display menu system (Y page 105).
XSelect Destination £ Stopover.
No Stopover Destination available yet
XSelect a category.
A Stopover Destination exists
XTo change: Select Change Stopover.XSelect a category.XSelect another stopover destination.
Selecting a Predefined Category
COMAND first searches for destinations
along the route within the selected category.
COMAND then searches for destinations in
the vicinity of the vehicle's location.
If COMAND is unable to find any destination,
a message to that effect will be displayed.
124Navigation (Destination Input)COMAND APS
BA 197 USA, CA Edition A 2011; 1; 27, en-UShereepeVersion: 3.0.3.52010-03-24T15:31:10+01:00 - Seite 124