2011 MERCEDES-BENZ SLS power steering
[x] Cancel search: power steeringPage 264 of 436
iIf you have not fastened your seat belt,
the following conditions must be met in
order for the electronic parking brake to
release automatically:
R The driver’s door is closed and you shift
the transmission out of park position P.
or
R The driver’s door is closed and you drive
faster than 2 mph (3 km/h).
Emergency braking with electronic
parking brake
In an emergency situation, you can also brake
your vehicle by using the electronic parking
brake.XWhile driving, press handle :.
All four wheels of the vehicle will be braked
for as long as you press and hold the handle
for the electronic parking brake. The longer
you keep the handle pressed, the stronger
your vehicle will be braked.
During the braking procedure
R an acoustic warning sounds
R the message Release Parking Brake
appears in the multifunction display
R the red indicator lamp for the electronic
parking brake F (USA only) or !
(Canada only) in the instrument cluster
flashes
Once the vehicle comes to a complete stop,
the electronic parking brake will engage
automatically.
Turning off the engine
GWarning!
Do not turn off the engine before the vehicle
has come to a complete stop. With the engine
not running, there is no power assistance for
the brake and steering systems. In this case,
it is important to keep in mind that a
considerably higher degree of effort is
necessary to brake and steer the vehicle.
XShift the transmission into park position P .With KEYLESS-GOXPress the KEYLESS-GO start/stop button.
With the driver’s door closed, the starter
switch is now in position 1. With the driver’s
door opened, the starter switch is set to
position 0, same as the SmartKey removed
from the starter switch ( Y page 242).
Read and observe messages that may appear
in the multifunction display ( Y page 367).
i The transmission will shift into neutral
position N automatically when you turn off
the engine with the transmission in reverse
gear R or drive position D.
The transmission will remain in neutral
position N for approximately 30 minutes
when you have shifted the transmission to
neutral position N before turning off the
engine.
The transmission will shift into park
position P automatically when you open a
door during this period.
i In an emergency you can turn off the
engine while driving by pressing and
holding the KEYLESS-GO start/stop button
for approximately 3 seconds.
With SmartKey
! Do not remove the SmartKey from the
starter switch while driving. When driving
at low speed, the transmission will
otherwise shift into park position P
automatically. The transmission could be
damaged as a result.
XTurn the SmartKey in the starter switch to
position 0.XRemove the SmartKey from the starter
switch.
Read and observe messages that may appear
in the multifunction display ( Y page 367).
i The transmission will shift into neutral
position N automatically when you turn off
the engine with the transmission in reverse
gear R or drive position D.
262Driving and parkingControls in detail
BA 197 USA, CA Edition A 2011; 1; 27, en-UShereepeVersion: 3.0.3.52010-03-24T15:31:10+01:00 - Seite 262
Page 311 of 436
steps may result in a system that is not
activated.
If you have any questions regarding
activation, please call the Response Center
at 866-990-9007 (USA only) or
1-888-923-8367 (Canada only).
Shortly after the completion of your mbrace
acquaintance call, you will receive an account
number via email. You will also receive a two-
part welcome kit via mail that will provide
your account and Personal Identification
Number (PIN). You will only need the PIN once
to access the mbrace account section in
“Owners Online” at
http://www.MBUSA.com (USA only).
The mbrace system is available if
R it has been activated and is operational.
Activation requires a subscription for
monitoring services, connection and
cellular air time
R vehicle battery power is available
R the relevant cellular phone network and
GPS signals are available
i Location of the vehicle on a map is only
possible if the vehicle is able to receive
signals from the GPS satellite network and
pass the information on to the Response
Center.
The mbrace system
The mbrace system consists of three types of
response:
R Automatic and manual emergency
R Roadside Assistance
R Information
To adjust the speaker volume during a
mbrace call do the following:
XPress button W or X on the
multifunction steering wheel.
or
XUse the volume adjustment button on your
COMAND system.Be sure to check “Owners Online” at
http://www.MBUSA.com (USA only) for
more information and a description of all
available features.
System self-test
The system performs a self-test after you
have switched on the ignition.
GWarning!
A malfunction in the system has been
detected if any or all of the following
conditions occur:
R The indicator lamp in the SOS button does
not come on during the system self-test.
R The indicator lamp in the wrench button
F does not come on during the system
self-test.
R The indicator lamp in the Information
button ï does not come on during the
system self-test.
R The indicator lamp in the SOS button,
wrench button F, or Information button
ï remains illuminated constantly in red
after the system self-test.
R The message Tele Aid Inoperative or
Tele Aid Not Activated appears in the
multifunction display after the system self-
test.
If a malfunction is indicated as outlined above,
the system may not operate as expected. In
case of an emergency, help will have to be
summoned by other means.
Have the system checked at the nearest
Mercedes-Benz Center or contact the
Response Center at 866-990-9007 (USA
only) or 1-888-923-8367 (Canada only) as
soon as possible.
Emergency calls
! In order to activate the mbrace system, a
subscriber agreement must be completed.
To ensure your system is activated and
operational, please press Information
button ï to perform the acquaintance
Useful features309Controls in detailBA 197 USA, CA Edition A 2011; 1; 27, en-UShereepeVersion: 3.0.3.52010-03-24T15:31:10+01:00 - Seite 309Z
Page 347 of 436
may vary from data shown in above
illustration.
This marking tells you about the type of cord
and number of plies in the sidewall : and
under the tread ;.
Tire and loading terminology
Accessory weight
The combined weight (in excess of those
standard items which may be replaced) of
transmission, power steering, power brakes,
power windows, power seats, radio, and
heater, to the extent that these items are
available as factory-installed equipment
(whether installed or not).
Air pressure
The amount of air inside the tire pressing
outward on each square inch of the tire. Air
pressure is expressed in pounds per square
inch (psi), kilopascal (kPa), or bar.
Aspect ratio
Dimensional relationship between tire
section height and section width expressed
in percentage.
Bar
Metric unit for air pressure. There are
14.5038 pounds per square inch (psi) to
1 bar; there are 100 kilopascals (kPa) to 1 bar.
Bead
The tire bead contains steel wires wrapped by
steel cords that hold the tire onto the rim.
Cold tire inflation pressure
Tire inflation pressure when your vehicle has
been sitting for at least 3 hours or driven no
more than 1 mile (1.6 km).
Curb weight
The weight of a motor vehicle with standard
equipment including the maximum capacity
of fuel, oil, and coolant, and, if so equipped,
air conditioning and additional optional
equipment, but without passengers and
cargo.
DOT (Department of Transportation)
A tire branding symbol which denotes the tire
meets requirements of the U.S. Department
of Transportation.
GAWR (Gross Axle Weight Rating)
The GAWR is the maximum permissible axle
weight. The gross vehicle weight on each axle
must never exceed the GAWR for the front
and rear axle indicated on the certification
label located on the driver’s door B-pillar.
GVW (Gross Vehicle Weight)
The GVW comprises the weight of the vehicle
including fuel, tools, spare wheel, installed
accessories, passengers and cargo and, if
applicable, trailer tongue load. The GVW must
never exceed the GVWR indicated on the
certification label located on the driver’s door
B-pillar.
GVWR (Gross Vehicle Weight Rating)
This is the maximum permissible vehicle
weight of the fully loaded vehicle (weight of
the vehicle including all options, passengers,
fuel, and cargo and, if applicable, trailer
tongue load). It is indicated on the
certification label located on the driver’s door
B-pillar.
Kilopascal (kPa)
Metric unit for air pressure. There are 6.9 kPa
to 1 psi; another metric unit for air pressure
is bar. There are 100 kilopascals (kPa) to
1 bar.
Load index
Numerical code associated with the
maximum load a tire can support.
Maximum load rating
The maximum load in kilograms and pounds
that can be carried by the tire.Tires and wheels345OperationBA 197 USA, CA Edition A 2011; 1; 27, en-UShereepeVersion: 3.0.3.52010-03-24T15:31:10+01:00 - Seite 345Z
Page 351 of 436

Fuel consumption is also increased by driving
in cold weather, in stop-and-go traffic, on
short trips and in mountainous areas.
Drinking and driving
GWarning!
Drinking and driving and/or taking drugs and
driving are very dangerous combinations.
Even a small amount of alcohol or drugs can
affect your reflexes, perceptions and
judgment.
The possibility of a serious or even fatal
accident are greatly increased when you drink
or take drugs and drive.
Do not drink or take drugs and drive or allow
anyone to drive who has been drinking or
taking drugs.
Pedals
GWarning!
Make sure absolutely no objects are
obstructing the pedals’ range of movement.
Keep the driver’s footwell clear of all
obstacles. If there are any floormats or
carpets in the footwell, make sure that the
pedals still have sufficient clearance.
During sudden driving or braking maneuvers,
the objects could get caught between the
pedals. You could then no longer brake or
accelerate. This could lead to accidents and
injury.
Power assistance
GWarning!
There is no power assistance for the steering
and the brake when the engine is not running.
Steering and braking requires significantly
more effort and you could lose control of the
vehicle and cause an accident as a result.
Do not turn off the engine while the vehicle is
in motion.
Brakes
Downhill grades
! When driving down long and steep
grades, relieve the load on the brakes by
shifting into a lower gear to use the
engine’s braking power. This helps prevent
overheating of the brakes and reduces
wear.
When using the engine’s braking power, a
drive wheel may not spin for an extended
period of time, e.g. on slippery road
surfaces. This may cause serious damage
to the drivetrain which is not covered by the
Mercedes-Benz Limited Warranty.
Continuous or hard braking
GWarning!
Resting your foot on the brake pedal will
cause excessive and premature wear of the
brake pads.
It can also result in the brakes overheating,
thereby significantly reducing their
effectiveness. It may not be possible to stop
the vehicle in sufficient time to avoid an
accident.
After hard braking, it is advisable to drive on
for some time, rather than immediately park,
so that the air stream will cool down the
brakes faster.
Wet roads
GWarning!
After driving in heavy rain for some time
without applying the brakes or through water
deep enough to wet brake components, the
first braking action may be somewhat
reduced and increased pedal pressure may be
necessary to obtain expected brake effect.
Maintain a safe distance from vehicles in
front.
To help prevent brake disk corrosion after
driving on wet or salt-covered roads, it is
Driving instructions349OperationBA 197 USA, CA Edition A 2011; 1; 27, en-UShereepeVersion: 3.0.3.52010-03-24T15:31:10+01:00 - Seite 349Z
Page 371 of 436
Display messagesPossible causes/consequences and M SolutionsAt least one wheel without appropriate wheel sensors is mounted.
The respective tire is indicated by – – instead of the tire inflation
pressure in the multifunction display.XHave the Advanced TPMS checked at an authorized Mercedes-
Benz Center.XHave the wheel sensors installed at an authorized Mercedes-
Benz Center.Tire Press. Monitor
Currently
UnavailableThe Advanced TPMS cannot monitor the tire inflation pressure due
to a nearby radio interference source or insufficient power supply.
As soon as the causes of the malfunction have been rectified, the
Advanced TPMS becomes active again automatically after a few
minutes of driving.Correct Tire
PressureThe tire inflation pressure is too low in at least one tire.
or
The tire inflation pressures of the individual tires differ from each
other significantly.
The tire inflation pressure values are shown in the multifunction
display.XCheck and correct tire inflation pressure as required
( Y page 329).XRestart the Advanced TPMS ( Y page 329).Caution Tire
MalfunctionAt least one tire is deflating.
The respective tire is indicated in the multifunction display.XCarefully bring the vehicle to a halt, avoiding abrupt steering and
braking maneuvers.XIf necessary, change the wheel ( Y page 405).Check TiresThe tire inflation pressure in at least one tire is significantly below
the reference value.
The respective tire is indicated in the multifunction display.XCarefully bring the vehicle to a halt, avoiding abrupt steering and
braking maneuvers.XCheck and adjust tire inflation pressure as required.XIf necessary, change the wheel ( Y page 405).GWarning!
Do not drive with a flat tire. A flat tire affects the ability to steer or brake the vehicle. You may
lose control of the vehicle. Continued driving with a flat tire will cause excessive heat build-up
and possibly a fire.
Vehicle status messages in the multifunction display369Practical hintsBA 197 USA, CA Edition A 2011; 1; 27, en-UShereepeVersion: 3.0.3.52010-03-24T15:31:10+01:00 - Seite 369Z
Page 417 of 436
Towing the vehicle
Safety notes
Mercedes-Benz recommends that the vehicle
be transported with all wheels off the ground
using flatbed or appropriate wheel lift/dolly
equipment. This method is preferable to other
types of towing.
! To prevent damage during transport, do
not tie down vehicle by its chassis or
suspension parts.
If circumstances do not permit the
recommended towing methods, the vehicle
may be towed with all wheels on the ground
or rear axle raised only so far as necessary to
have the vehicle moved to a safe location
where the recommended towing methods
can be employed.
! Before towing the vehicle observe the
following instructions:
RDo not tow-start the vehicle. You could
otherwise seriously damage the
transmission which is not covered by the
Mercedes-Benz Limited Warranty.
RDo not tow with sling-type equipment.
Towing with sling-type equipment over
bumpy roads will damage radiator and
supports.
RTowing of the vehicle should only be
done using the properly installed towing
eye bolt. Never attach a tow cable, tow
rope or tow rod to the vehicle chassis,
frame or suspension parts.
GWarning!
With the engine not running, there is no power
assistance for the brake and steering
systems. In this case, it is important to keep
in mind that a considerably higher degree of
effort is necessary to brake and steer the
vehicle. Adapt your driving accordingly.
! Avoid pulling the vehicle abruptly or
diagonally, since it could result in damage
to the chassis alignment.
! Do not use the towing eye bolt for
recovery, as this could damage the vehicle.
If in doubt, recover the vehicle with a crane.
iIf the battery is disconnected or
discharged
Rthe transmission will remain in park
position P
Rthe SmartKey will not turn in the starter
switch
For more information see “Battery”
(Y page 410) or “Jump starting”
(Y page 413).
Installing towing eye bolt
The towing eye bolt is supplied with the
vehicle tool kit, located in the storage
compartment underneath the trunk floor
(Y page 362).
XTake the towing eye bolt and the wheel
wrench out of the trunk.
Your vehicle is equipped with a front towing
eye bolt only. You cannot tow other vehicles
with your vehicle.
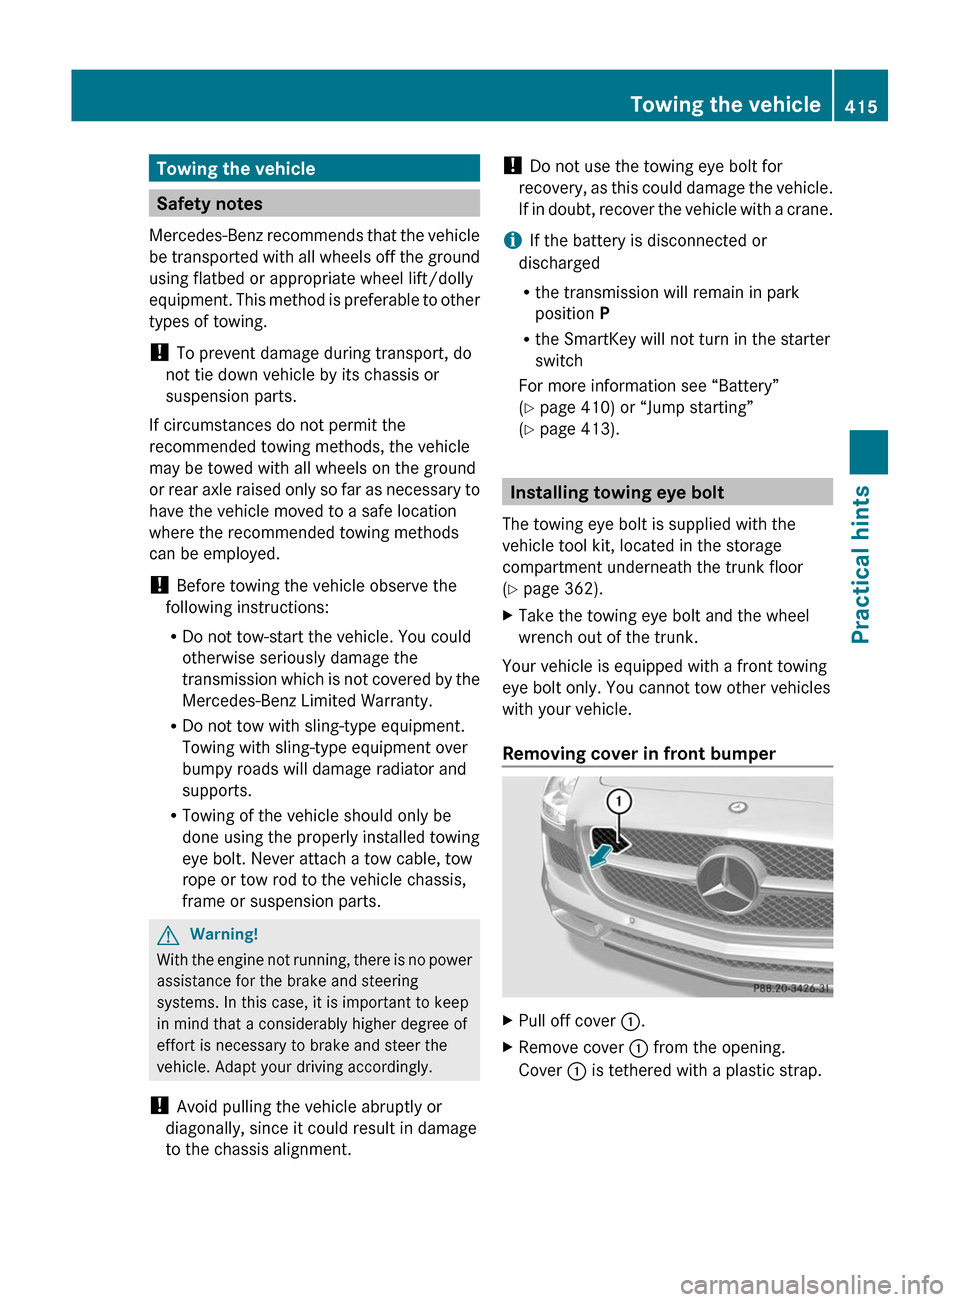
Removing cover in front bumper
XPull off cover :.XRemove cover : from the opening.
Cover : is tethered with a plastic strap.
Towing the vehicle415Practical hintsBA 197 USA, CA Edition A 2011; 1; 27, en-UShereepeVersion: 3.0.3.52010-03-24T15:31:10+01:00 - Seite 415Z
Page 418 of 436
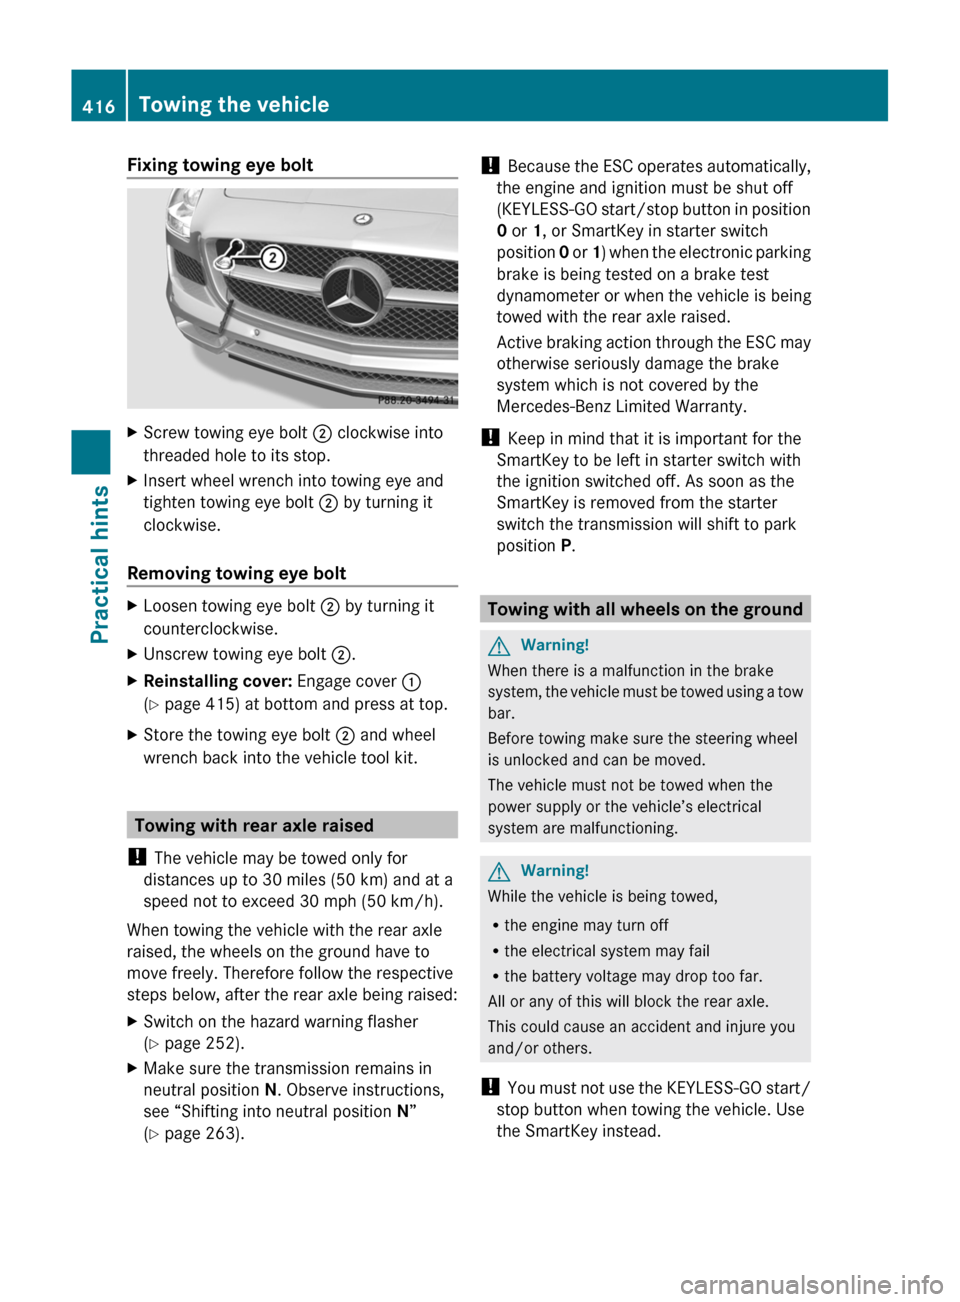
Fixing towing eye boltXScrew towing eye bolt ; clockwise into
threaded hole to its stop.XInsert wheel wrench into towing eye and
tighten towing eye bolt ; by turning it
clockwise.
Removing towing eye bolt
XLoosen towing eye bolt ; by turning it
counterclockwise.XUnscrew towing eye bolt ;.XReinstalling cover: Engage cover :
( Y page 415) at bottom and press at top.XStore the towing eye bolt ; and wheel
wrench back into the vehicle tool kit.
Towing with rear axle raised
! The vehicle may be towed only for
distances up to 30 miles (50 km) and at a
speed not to exceed 30 mph (50 km/h).
When towing the vehicle with the rear axle
raised, the wheels on the ground have to
move freely. Therefore follow the respective
steps below, after the rear axle being raised:
XSwitch on the hazard warning flasher
( Y page 252).XMake sure the transmission remains in
neutral position N. Observe instructions,
see “Shifting into neutral position N”
( Y page 263).!
Because the ESC operates automatically,
the engine and ignition must be shut off
(KEYLESS-GO start/stop button in position
0 or 1, or SmartKey in starter switch
position 0 or 1) when the electronic parking
brake is being tested on a brake test
dynamometer or when the vehicle is being
towed with the rear axle raised.
Active braking action through the ESC may
otherwise seriously damage the brake
system which is not covered by the
Mercedes-Benz Limited Warranty.
! Keep in mind that it is important for the
SmartKey to be left in starter switch with
the ignition switched off. As soon as the
SmartKey is removed from the starter
switch the transmission will shift to park
position P.
Towing with all wheels on the ground
GWarning!
When there is a malfunction in the brake
system, the vehicle must be towed using a tow
bar.
Before towing make sure the steering wheel
is unlocked and can be moved.
The vehicle must not be towed when the
power supply or the vehicle’s electrical
system are malfunctioning.
GWarning!
While the vehicle is being towed,
R the engine may turn off
R the electrical system may fail
R the battery voltage may drop too far.
All or any of this will block the rear axle.
This could cause an accident and injure you
and/or others.
! You must not use the KEYLESS-GO start/
stop button when towing the vehicle. Use
the SmartKey instead.
416Towing the vehiclePractical hints
BA 197 USA, CA Edition A 2011; 1; 27, en-UShereepeVersion: 3.0.3.52010-03-24T15:31:10+01:00 - Seite 416
Page 427 of 436
Fuels, coolants, lubricants, etc.
Capacities
Vehicle components and their respective lubricants must match. Therefore only use products
tested and approved by Mercedes-Benz.
For information on tested and approved products, contact an authorized Mercedes-Benz
Center or visit http://www.MBUSA.com (USA only).
GWarning!
Comply with all valid regulations with respect to handling, storing, and disposing of service fluids.
Otherwise you could endanger persons or the environment.
Keep service fluids out of the reach of children.
For health reasons, you should prevent service fluids from coming into direct contact with your
skin or clothing.
If a service fluid is swallowed, contact a physician immediately.
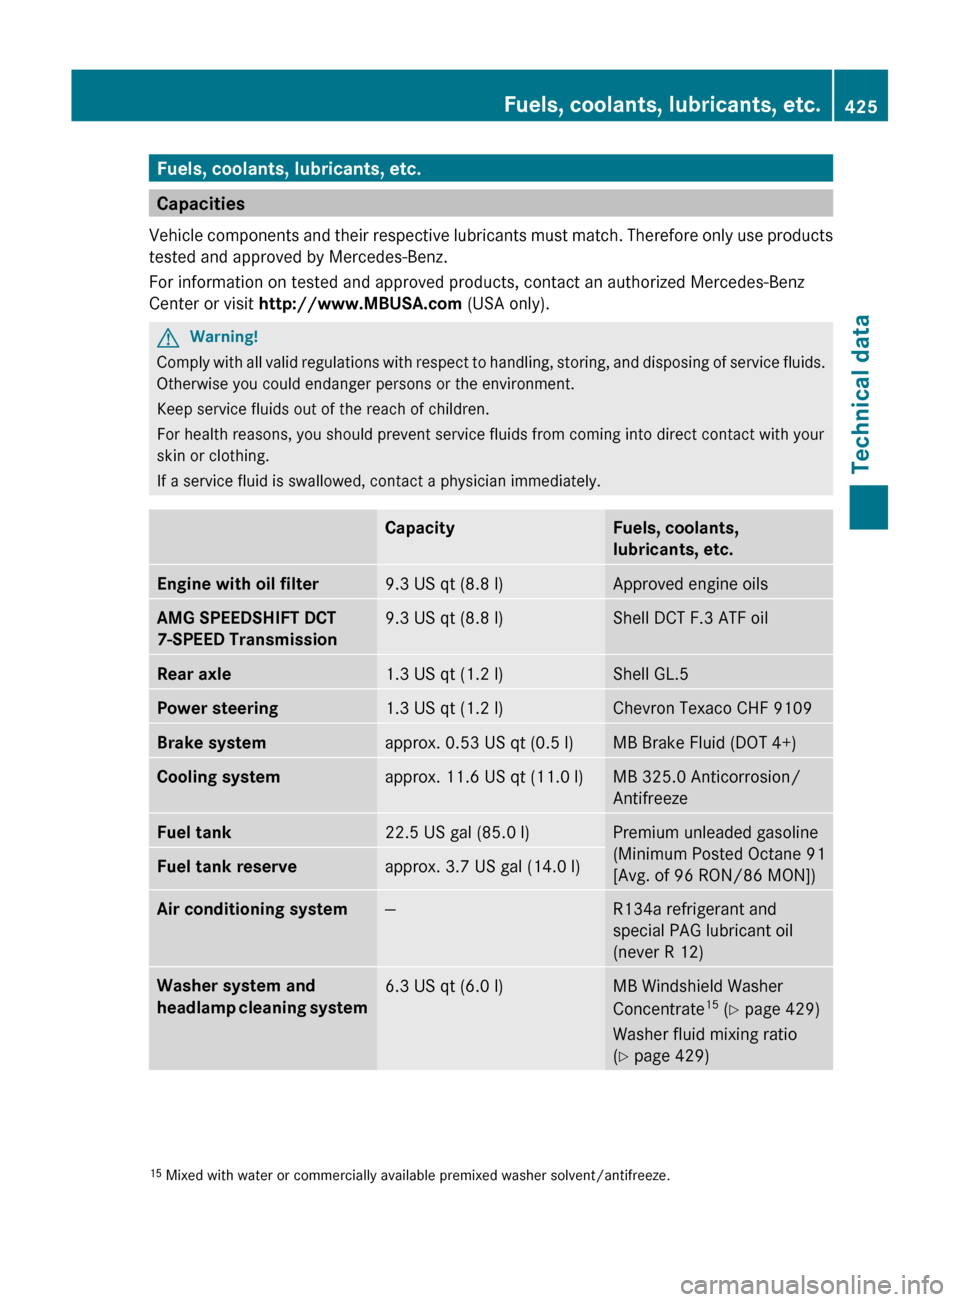
CapacityFuels, coolants,
lubricants, etc.Engine with oil filter 9.3 US qt (8.8 l)Approved engine oilsAMG SPEEDSHIFT DCT
7-SPEED Transmission 9.3 US qt (8.8 l)Shell DCT F.3 ATF oilRear axle 1.3 US qt (1.2 l)Shell GL.5Power steering 1.3 US qt (1.2 l)Chevron Texaco CHF 9109Brake system approx. 0.53 US qt (0.5 l)MB Brake Fluid (DOT 4+)Cooling system approx. 11.6 US qt (11.0 l)MB 325.0 Anticorrosion/
AntifreezeFuel tank 22.5 US gal (85.0 l)Premium unleaded gasoline
(Minimum Posted Octane 91
[Avg. of 96 RON/86 MON])Fuel tank reserveapprox. 3.7 US gal (14.0 l)Air conditioning system—R134a refrigerant and
special PAG lubricant oil
(never R 12)Washer system and
headlamp cleaning system 6.3 US qt (6.0 l)MB Windshield Washer
Concentrate 15
(Y page 429)
Washer fluid mixing ratio
( Y page 429)15
Mixed with water or commercially available premixed washer solvent/antifreeze.Fuels, coolants, lubricants, etc.425Technical dataBA 197 USA, CA Edition A 2011; 1; 27, en-UShereepeVersion: 3.0.3.52010-03-24T15:31:10+01:00 - Seite 425Z