2011 MERCEDES-BENZ SLS AMG height
[x] Cancel search: heightPage 14 of 436
GVW (Gross Vehicle Weight) ............ 345
GVWR (Gross Vehicle Weight
Rating) ................................................ 345
H
Hands-free microphone, switching
on/off ................................................. 160
Hanging up (phone calls) .................. 160
Hard disk drive voice control with ..................225, 229
Hard plastic trim items, cleaning .... 359
Hazard warning flasher .................... 252
Head air bags ....................................... 49
Headlamp cleaning system .............. 252
Headlamps Automatic headlamp mode ............250
Bi-Xenon ........................................ 249
Cleaning lenses ............................. 357
Cleaning system ............................ 252
Daytime running lamp mode ..........251
Delayed shut-off ............................ 285
High-beam flasher .........................252
High-beam headlamps ...................252
Low-beam headlamps ....................250
Replacing bulbs ............................. 400
Switch ............................................ 250
Headliner, cleaning and care of ....... 359
Height adjustment Seats ............................................. 243
Help with voice control, general ...... 232
High-beam flasher ............................. 252
High-beam headlamps ...................... 252
Indicator lamp .................................. 35
High-performance brake system ..... 350
Highway information, displaying ..... 111
Highway junctions, selecting as
destination ......................................... 120
Hill-start assist system ..................... 293
Home address in destination
memory ...................................... 122, 143
deleting .......................................... 146
setting or changing ........................143
Hood ................................................... 322
Messages in the multifunction
display ........................................... 379
Horn ...................................................... 33
House numbers, entering for
destination ................................. 119, 215
Hydroplaning ..................................... 351
I
Identification labels .......................... 420
Identification number, vehicle
(VIN) ................................................... 421
Ignition ............................... 241, 242, 258
Immobilizer .......................................... 66
Incident (traffic notification) ............ 139
Incoming calls answering ...................................... 158
rejecting .................................. 84, 158
Infant and child restraint systems
see Children in the vehicle
Inflation pressure
see Tires, Inflation pressure
Initiating phone calls
see Calling
Input of navigation destination ........ 114
speed restriction on ..............102, 123
Input speller
settings for address book ..............157
Installing map data ........................... 100
Instrument cluster ...................... 34, 271
Lamps ............................................ 388
Multifunction display .....................273
Instrument panel
see Instrument cluster
Instruments and controls
see Cockpit
Interactive content on DVDs ............ 205
Interior lighting ................................. 253
Delayed shut-off ............................ 286
Emergency lighting ........................253
Reading lamps ............................... 253
Interior rear view mirror ................... 246
Auto-dimming rear view mirrors ....247
Interior storage spaces
see Storage compartments
Intermittent wiping ........................... 254
Rain sensor .................................... 254
Interrupting audio playback ............. 186
Interrupting video playback ............. 202
Intersection (selecting) .................... 215
12IndexBA 197 USA, CA Edition A 2011; 1; 27, en-UShereepeVersion: 3.0.3.52010-03-24T15:31:10+01:00 - Seite 12
Page 61 of 436
with the weight of a standard appropriate
child restraint on the passenger seat.
R A child in a rear-facing child restraint on the
passenger seat will be seriously injured or
even killed if the passenger front air bag
inflates in a collision which could occur
under some circumstances, even with the
air bag technology installed in your vehicle.
R If you install a rear-facing child restraint on
the passenger seat, make sure the 007F
0080 indicator lamp is illuminated,
indicating that the passenger front air bag
is deactivated. Should the 007F 0080
indicator lamp not illuminate or go out while
the restraint is installed, please check
installation. Periodically check the 007F
0080 indicator lamp while driving to make
sure the 007F 0080 indicator lamp is
illuminated. If the 007F 0080 indicator
lamp goes out or remains out, do not
transport a child on the passenger seat
until the system has been repaired.
A child in a rear-facing child restraint on the
passenger seat will be seriously injured or
even killed if the passenger front air bag
inflates.
R If you place a child in a forward-facing child
restraint on the passenger seat, move the
seat as far back as possible, use the proper
child restraint recommended for the age,
size and weight of the child, and secure
child restraint with the vehicle’s seat belt
according to the child seat manufacturer’s
instructions. For children larger than the
typical 12-month-old child, the passenger
front air bag may or may not be activated.GWarning!
Infants and small children should never share
a seat belt with another occupant. During an
accident, they could be crushed between the
occupant and seat belt.
A child’s risk of serious or fatal injuries is
significantly increased if the child restraints
are not properly secured in the vehicle and/
or the child is not properly secured in the child
restraint.
Children too big for a toddler restraint must
ride in seats using regular seat belts. Position
shoulder belt across chest and shoulder, not
face or neck. A booster seat may be
necessary to achieve proper seat belt
positioning for children over 41 lb (18 kg) until
they reach a height where a lap/shoulder belt
fits properly without a booster.
When the child restraint is not in use, remove
it from the vehicle or secure it with the seat
belt to prevent the child restraint from
becoming a projectile in the event of an
accident.
Installation of infant and child restraint
systemsGObserve Safety notes, see page 57.
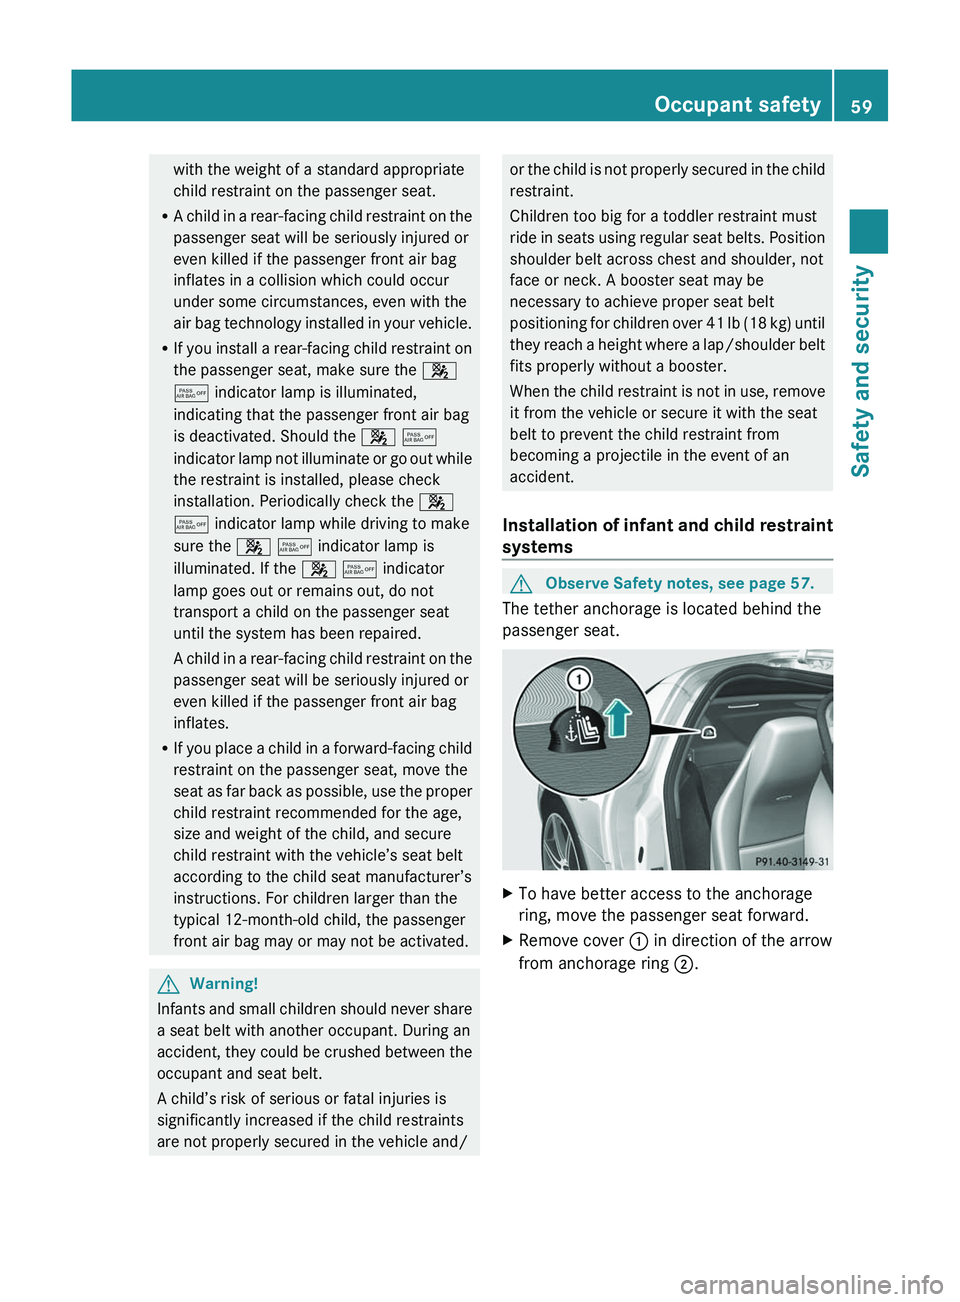
The tether anchorage is located behind the
passenger seat.
XTo have better access to the anchorage
ring, move the passenger seat forward.XRemove cover 0046 in direction of the arrow
from anchorage ring 0047.Occupant safety59Safety and securityBA 197 USA, CA Edition A 2011; 1; 27, en-UShereepeVersion: 3.0.3.52010-03-24T15:31:10+01:00 - Seite 59Z
Page 113 of 436
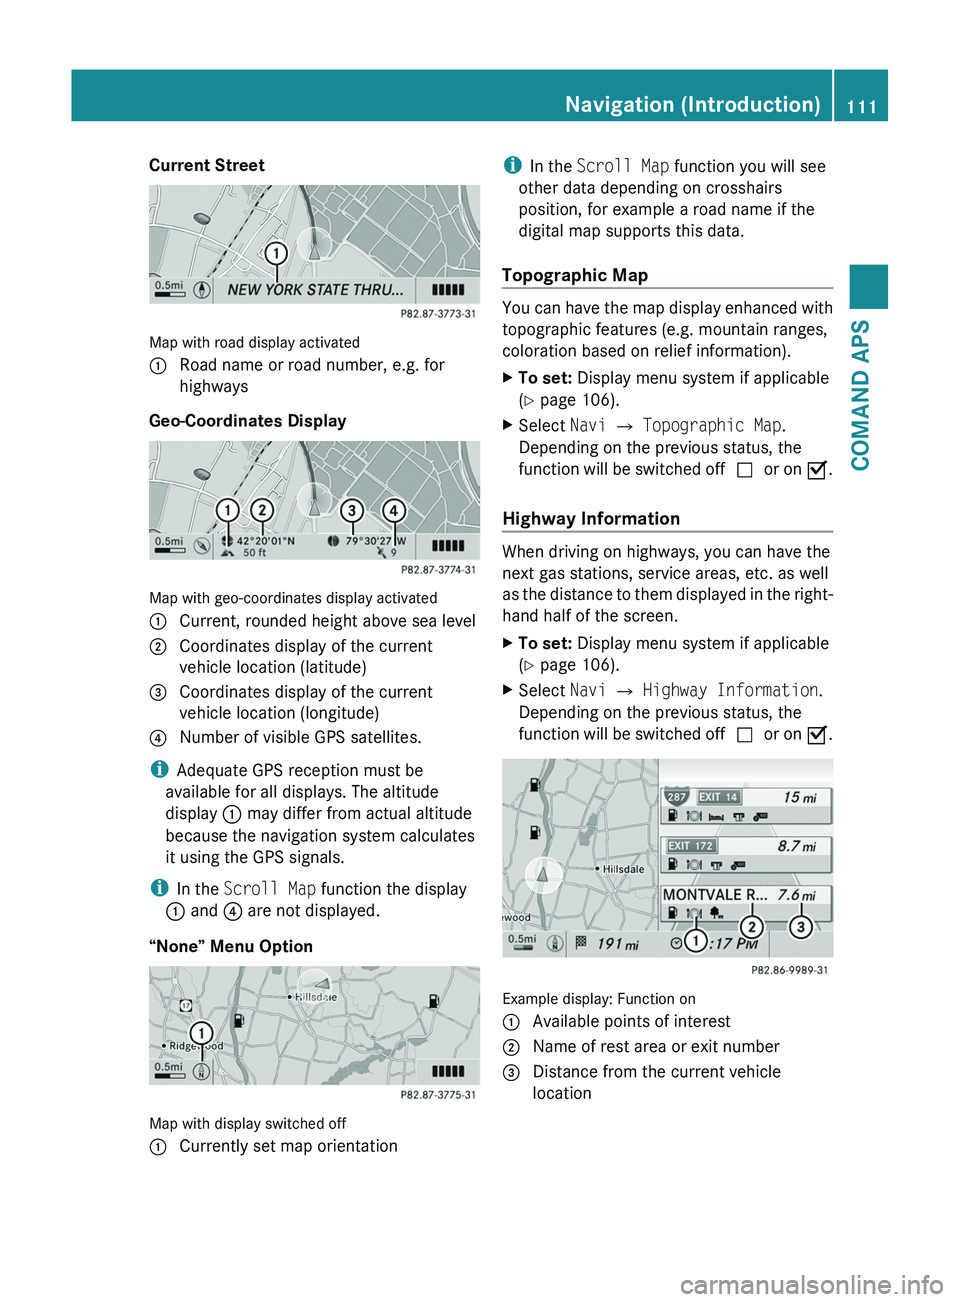
Current Street
Map with road display activated
1 Road name or road number, e.g. for
highways
Geo-Coordinates Display
Map with geo-coordinates display activated
1 Current, rounded height above sea level2 Coordinates display of the current
vehicle location (latitude)
3 Coordinates display of the current
vehicle location (longitude)
4 Number of visible GPS satellites.
iAdequate GPS reception must be
available for all displays. The altitude
display 1 may differ from actual altitude
because the navigation system calculates
it using the GPS signals.
iIn the Scroll Map function the display
1 and 4 are not displayed.
“None” Menu Option
Map with display switched off
1 Currently set map orientationiIn the Scroll Map function you will see
other data depending on crosshairs
position, for example a road name if the
digital map supports this data.
Topographic Map
You can have the map display enhanced with
topographic features (e.g. mountain ranges,
coloration based on relief information).
XTo set: Display menu system if applicable
(Y page 106).
XSelect Navi £ Topographic Map.
Depending on the previous status, the
function will be switched offcor on Ç.
Highway Information
When driving on highways, you can have the
next gas stations, service areas, etc. as well
as the distance to them displayed in the right-
hand half of the screen.
XTo set: Display menu system if applicable
(Y page 106).
XSelect Navi £ Highway Information.
Depending on the previous status, the
function will be switched offcor on Ç.
Example display: Function on
1 Available points of interest2 Name of rest area or exit number3 Distance from the current vehicle
location
Navigation (Introduction)111COMAND APSBA 197 USA, CA Edition A 2011; 1; 27, en-UShereepeVersion: 3.0.3.52010-03-24T15:31:10+01:00 - Seite 111Z
Page 241 of 436
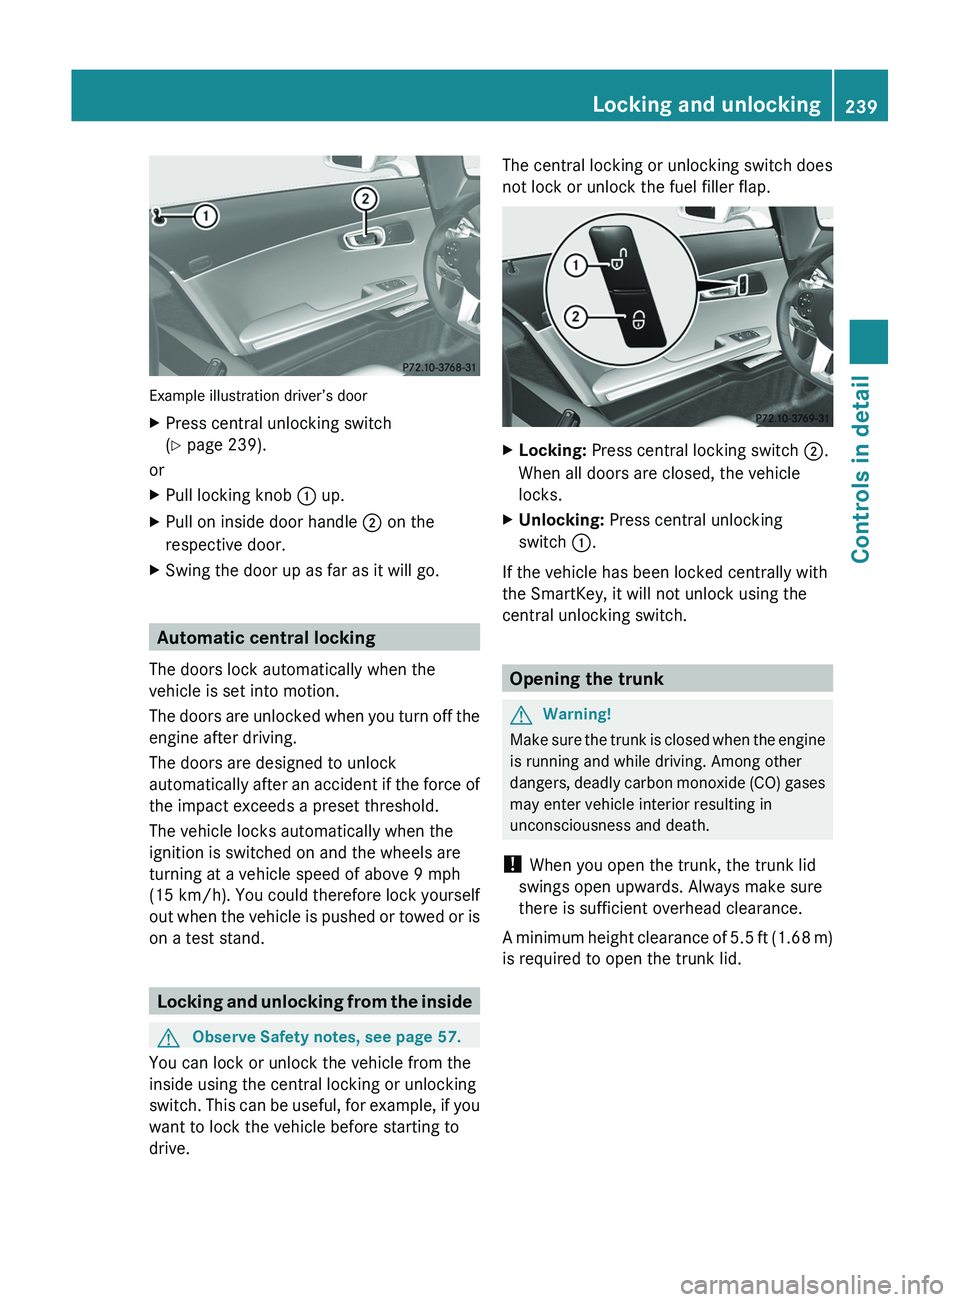
Example illustration driver’s door
XPress central unlocking switch
( Y page 239).
or
XPull locking knob 0046 up.XPull on inside door handle 0047 on the
respective door.XSwing the door up as far as it will go.
Automatic central locking
The doors lock automatically when the
vehicle is set into motion.
The doors are unlocked when you turn off the
engine after driving.
The doors are designed to unlock
automatically after an accident if the force of
the impact exceeds a preset threshold.
The vehicle locks automatically when the
ignition is switched on and the wheels are
turning at a vehicle speed of above 9 mph
(15 km/h) . You could therefore lock yourself
out when the vehicle is pushed or towed or is
on a test stand.
Locking and unlocking from the inside
GObserve Safety notes, see page 57.
You can lock or unlock the vehicle from the
inside using the central locking or unlocking
switch. This can be useful, for example, if you
want to lock the vehicle before starting to
drive.
The central locking or unlocking switch does
not lock or unlock the fuel filler flap.XLocking: Press central locking switch 0047.
When all doors are closed, the vehicle
locks.XUnlocking: Press central unlocking
switch 0046.
If the vehicle has been locked centrally with
the SmartKey, it will not unlock using the
central unlocking switch.
Opening the trunk
GWarning!
Make sure the trunk is closed when the engine
is running and while driving. Among other
dangers, deadly carbon monoxide (CO) gases
may enter vehicle interior resulting in
unconsciousness and death.
! When you open the trunk, the trunk lid
swings open upwards. Always make sure
there is sufficient overhead clearance.
A minimum height clearance of 5.5 ft (1.68 m)
is required to open the trunk lid.
Locking and unlocking239Controls in detailBA 197 USA, CA Edition A 2011; 1; 27, en-UShereepeVersion: 3.0.3.52010-03-24T15:31:10+01:00 - Seite 239Z
Page 296 of 436
Parktronic system
The Parktronic system is an electronic
parking aid with ultrasonic sensors designed
to assist the driver during parking maneuvers.
The Parktronic system indicates the relative
distance between the vehicle and an obstacle
visually and audibly.
The Parktronic system is activated
automatically when
Ryou switch on the ignition
and
Ryou release the electronic parking brake
or
Ryou start the engine
and
Rshift the transmission into drive position
D, reverse gear R, or neutral position N
The Parktronic system deactivates at speeds
above approximately 11 mph (18 km/h). At
lower speeds, the Parktronic system
activates again.
The Parktronic system also deactivates when
you shift the transmission into park position
P or engage the electronic parking brake and
turn off the engine.
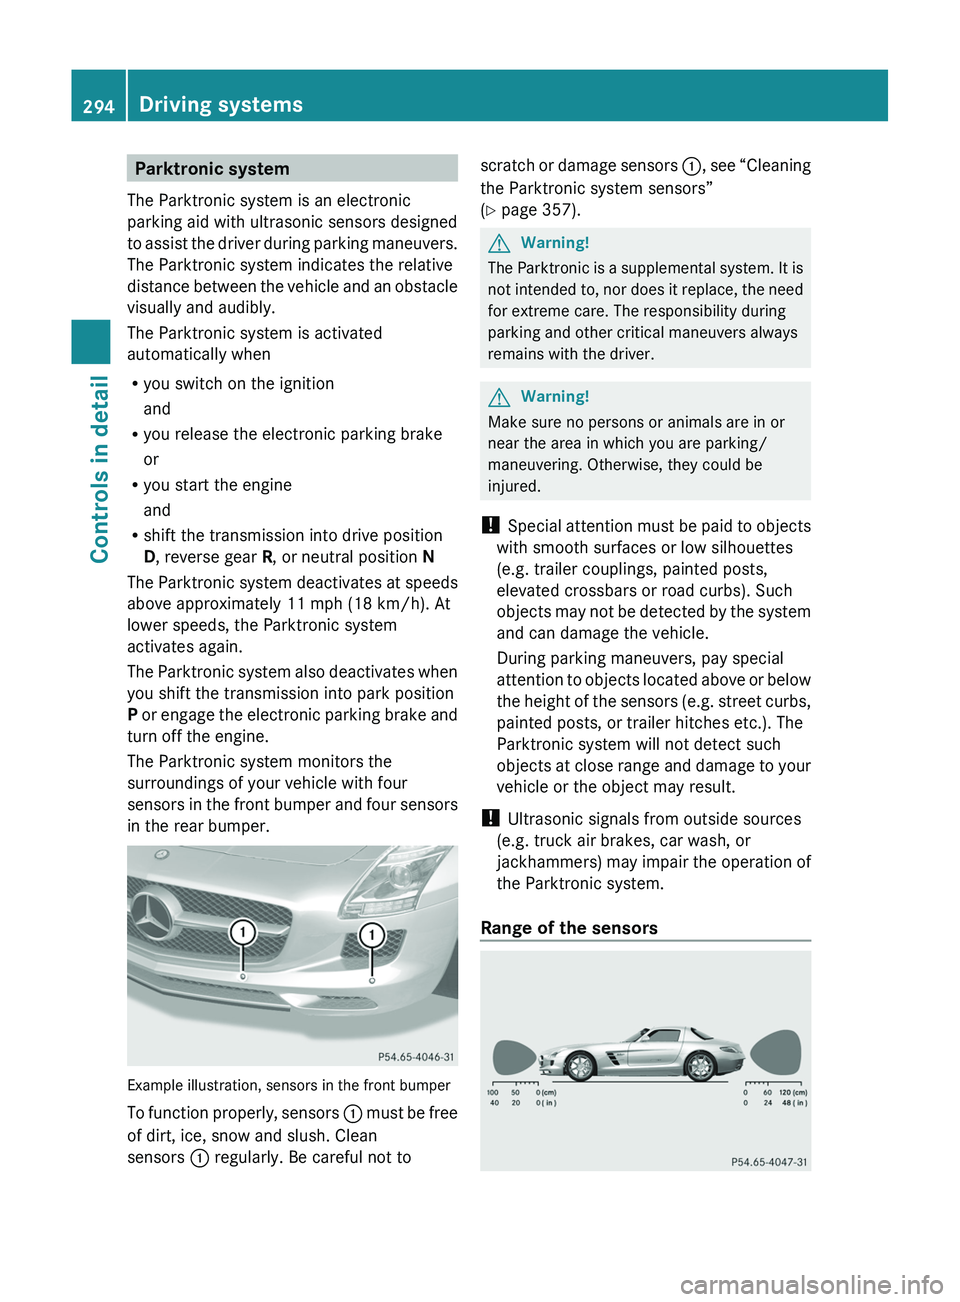
The Parktronic system monitors the
surroundings of your vehicle with four
sensors in the front bumper and four sensors
in the rear bumper.
Example illustration, sensors in the front bumper
To function properly, sensors \000F must be free
of dirt, ice, snow and slush. Clean
sensors \000F regularly. Be careful not to
scratch or damage sensors \000F, see “Cleaning
the Parktronic system sensors”
(Y page 357).
GWarning!
The Parktronic is a supplemental system. It is
not intended to, nor does it replace, the need
for extreme care. The responsibility during
parking and other critical maneuvers always
remains with the driver.
GWarning!
Make sure no persons or animals are in or
near the area in which you are parking/
maneuvering. Otherwise, they could be
injured.
! Special attention must be paid to objects
with smooth surfaces or low silhouettes
(e.g. trailer couplings, painted posts,
elevated crossbars or road curbs). Such
objects may not be detected by the system
and can damage the vehicle.
During parking maneuvers, pay special
attention to objects located above or below
the height of the sensors (e.g. street curbs,
painted posts, or trailer hitches etc.). The
Parktronic system will not detect such
objects at close range and damage to your
vehicle or the object may result.
! Ultrasonic signals from outside sources
(e.g. truck air brakes, car wash, or
jackhammers) may impair the operation of
the Parktronic system.
Range of the sensors
294Driving systemsControls in detail
BA 197 USA, CA Edition A 2011; 1; 27, en-UShereepeVersion: 3.0.3.52010-03-24T15:31:10+01:00 - Seite 294
Page 308 of 436
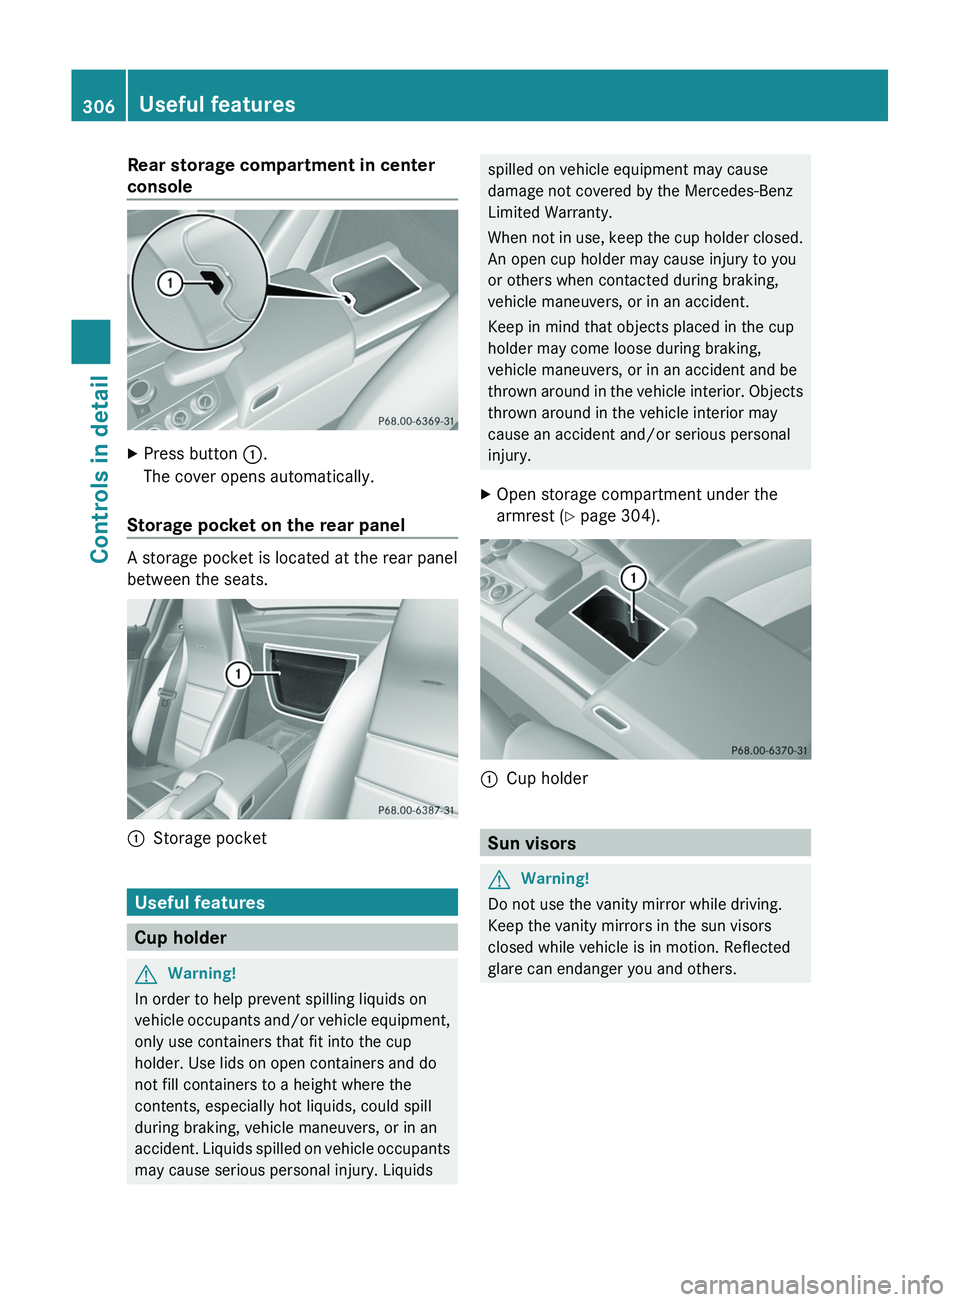
Rear storage compartment in center
console
XPress button \000F.
The cover opens automatically.
Storage pocket on the rear panel
A storage pocket is located at the rear panel
between the seats.
\000FStorage pocket
Useful features
Cup holder
GWarning!
In order to help prevent spilling liquids on
vehicle occupants and/or vehicle equipment,
only use containers that fit into the cup
holder. Use lids on open containers and do
not fill containers to a height where the
contents, especially hot liquids, could spill
during braking, vehicle maneuvers, or in an
accident. Liquids spilled on vehicle occupants
may cause serious personal injury. Liquids
spilled on vehicle equipment may cause
damage not covered by the Mercedes-Benz
Limited Warranty.
When not in use, keep the cup holder closed.
An open cup holder may cause injury to you
or others when contacted during braking,
vehicle maneuvers, or in an accident.
Keep in mind that objects placed in the cup
holder may come loose during braking,
vehicle maneuvers, or in an accident and be
thrown around in the vehicle interior. Objects
thrown around in the vehicle interior may
cause an accident and/or serious personal
injury.
XOpen storage compartment under the
armrest (Y page 304).\000FCup holder
Sun visors
GWarning!
Do not use the vanity mirror while driving.
Keep the vanity mirrors in the sun visors
closed while vehicle is in motion. Reflected
glare can endanger you and others.
306Useful featuresControls in detail
BA 197 USA, CA Edition A 2011; 1; 27, en-UShereepeVersion: 3.0.3.52010-03-24T15:31:10+01:00 - Seite 306
Page 324 of 436
RVehicle lighting (Y page 400)
RWasher system and headlamp cleaning
system (Y page 325)
RBrake fluid level (Y page 325)
Engine compartment
Hood
GWarning!
Do not pull the release lever while the vehicle
is in motion. Otherwise the hood could be
forced open by passing air flow.
This could cause the hood to come loose and
injure you and/or others.
Opening
GWarning!
Do not open the hood when the engine is
overheated. You could be seriously injured.
Observe the coolant temperature display to
determine whether the engine may be
overheated. If you see flames or smoke
coming from the engine compartment, move
away from the vehicle. Wait until the engine
has cooled. If necessary, call the fire
department.
GWarning!
You could be injured when the hood is open –
even when the engine is turned off.
Parts of the engine can become very hot. To
prevent burns, let the engine cool completely
before touching any components on the
vehicle. Comply with all relevant safety
precautions.
GWarning!
To help prevent personal injury, stay clear of
moving parts when the hood is open and the
engine is running.
The radiator fan may continue to run for
approximately 30 seconds or may even
restart after the engine has been turned off.
Stay clear of fan blades.
GWarning!
The engine is equipped with a transistorized
ignition system. Because of the high voltage
it is dangerous to touch any components
(ignition coils, spark plug sockets, diagnostic
socket) of the ignition system
Rwith the engine running
Rwhile starting the engine
Rwhen the ignition is switched on and the
engine is turned manually
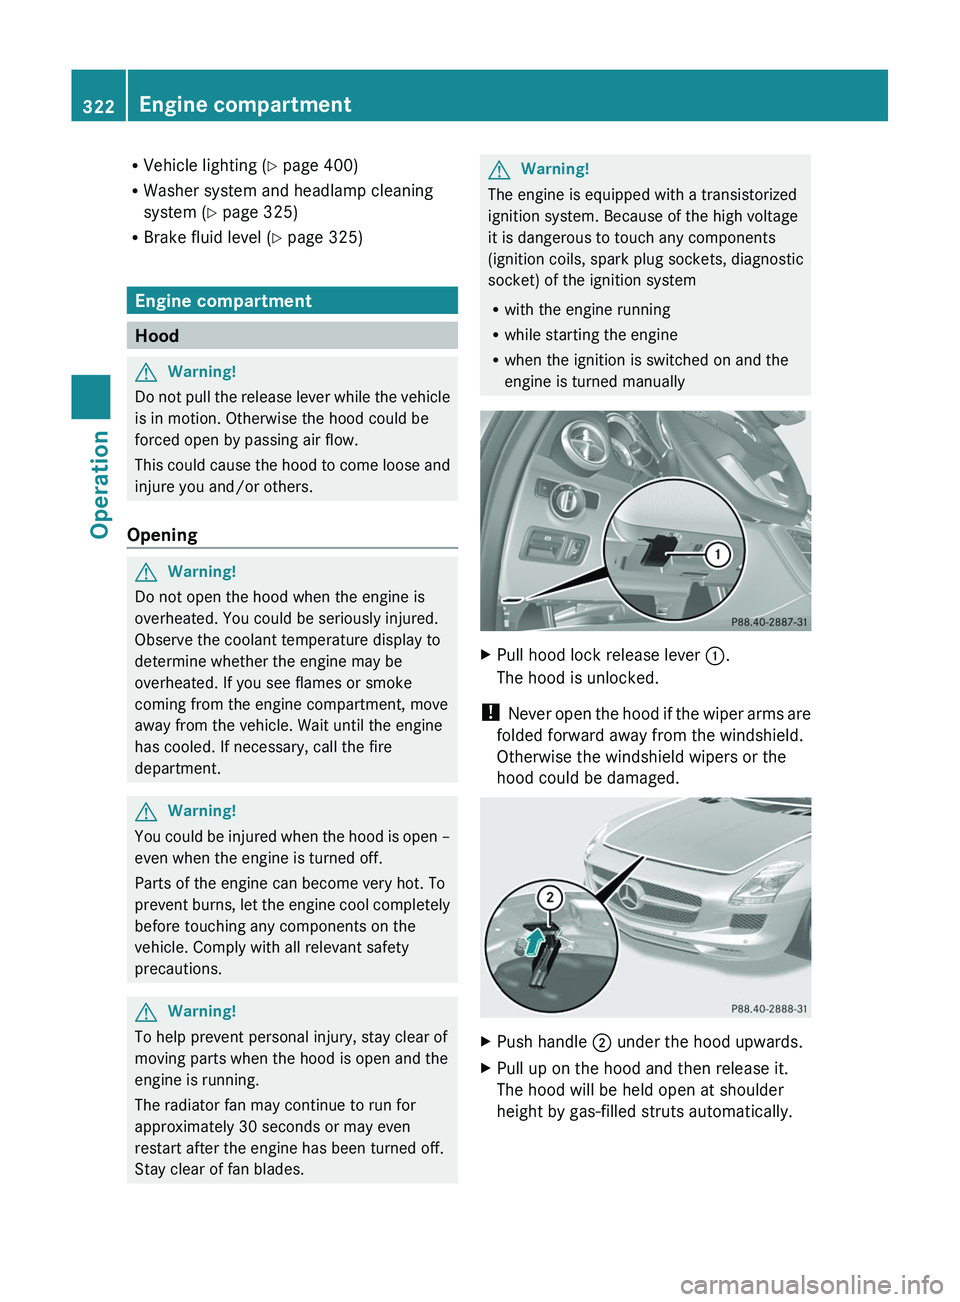
XPull hood lock release lever \000F.
The hood is unlocked.
! Never open the hood if the wiper arms are
folded forward away from the windshield.
Otherwise the windshield wipers or the
hood could be damaged.
XPush handle \000G under the hood upwards.XPull up on the hood and then release it.
The hood will be held open at shoulder
height by gas-filled struts automatically.
322Engine compartmentOperation
BA 197 USA, CA Edition A 2011; 1; 27, en-UShereepeVersion: 3.0.3.52010-03-24T15:31:10+01:00 - Seite 322
Page 325 of 436
ClosingGWarning!
When closing the hood, use extreme caution
not to catch hands or fingers. Be careful that
you do not close the hood on anyone.
Make sure the hood is securely engaged
before driving off. Do not continue driving if
the hood can no longer engage after an
accident, for example. The hood could
otherwise come loose while the vehicle is in
motion and injure you and/or others.
XLet the hood drop from a height of
approximately 8 in (20 cm).XCheck to make sure the hood is fully
closed.
If you can raise the hood at a point above
the headlamps, then it is not properly
closed. Open it again and let it drop with
somewhat greater force.
Engine oil
The amount of oil your engine consumes will
depend on a number of factors, including
driving style. Increased oil consumption can
occur when the vehicle is new or the vehicle
is driven frequently at higher engine speeds.
Engine oil consumption checks should only
be made after the vehicle break-in period.
! Do not use any special lubricant additives,
as these may damage the drive assemblies.
Using special additives not approved by
Mercedes-Benz may cause damage not
covered by the Mercedes-Benz Limited
Warranty.
For further information contact an
authorized Mercedes-Benz Center.
Notes on checking engine oil level
XPark the vehicle on level ground.XTurn off the engine at operating
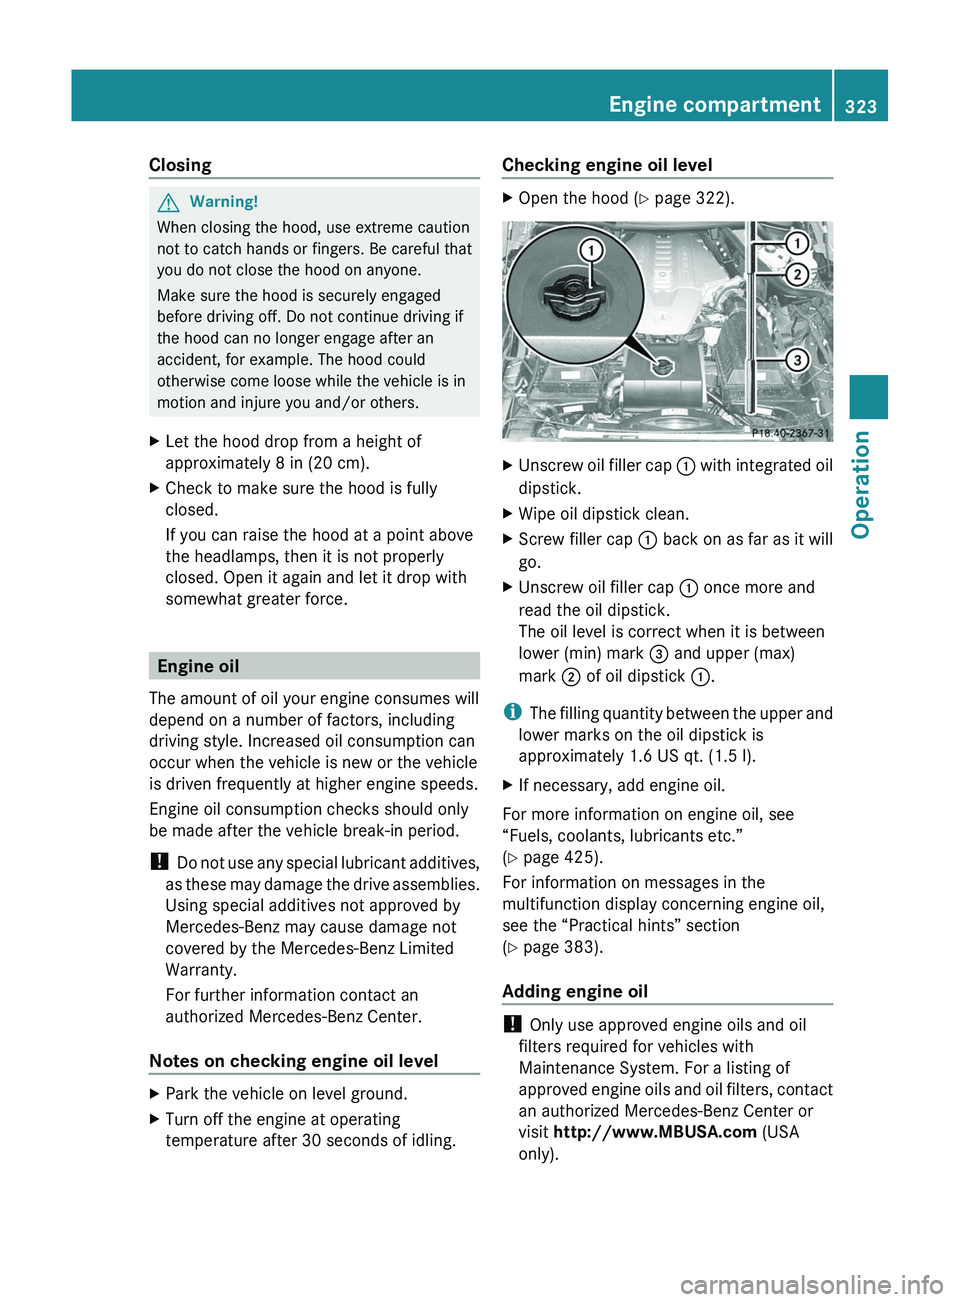
temperature after 30 seconds of idling.Checking engine oil level XOpen the hood ( Y page 322).XUnscrew oil filler cap 0046 with integrated oil
dipstick.XWipe oil dipstick clean.XScrew filler cap 0046 back on as far as it will
go.XUnscrew oil filler cap 0046 once more and
read the oil dipstick.
The oil level is correct when it is between
lower (min) mark 008A and upper (max)
mark 0047 of oil dipstick 0046.
i
The filling quantity between the upper and
lower marks on the oil dipstick is
approximately 1.6 US qt. (1.5 l).
XIf necessary, add engine oil.
For more information on engine oil, see
“Fuels, coolants, lubricants etc.”
( Y page 425).
For information on messages in the
multifunction display concerning engine oil,
see the “Practical hints” section
( Y page 383).
Adding engine oil
! Only use approved engine oils and oil
filters required for vehicles with
Maintenance System. For a listing of
approved engine oils and oil filters, contact
an authorized Mercedes-Benz Center or
visit http://www.MBUSA.com (USA
only).
Engine compartment323OperationBA 197 USA, CA Edition A 2011; 1; 27, en-UShereepeVersion: 3.0.3.52010-03-24T15:31:10+01:00 - Seite 323Z