2011 MERCEDES-BENZ SLS AMG ECU
[x] Cancel search: ECUPage 246 of 436
GWarning!
Children 12 years old and under must be
seated and properly secured in an
appropriately sized infant restraint, toddler
restraint, or booster seat recommended for
the size and weight of the child. For additional
information, see section “Children in the
vehicle”.
A child’s risk of serious or fatal injuries is
significantly increased if the child restraints
are not properly secured in the vehicle and/
or the child is not properly secured in the child
restraint.
Seat adjustment
! When moving the seats, make sure there
are no items in the footwell or behind the
seats. Otherwise, you could damage the
seats and/or the items.
Power seats
iThe memory function (Y page 249) lets
you store the settings for the seat position
together with the settings for the steering
wheel and the exterior rear view mirrors.
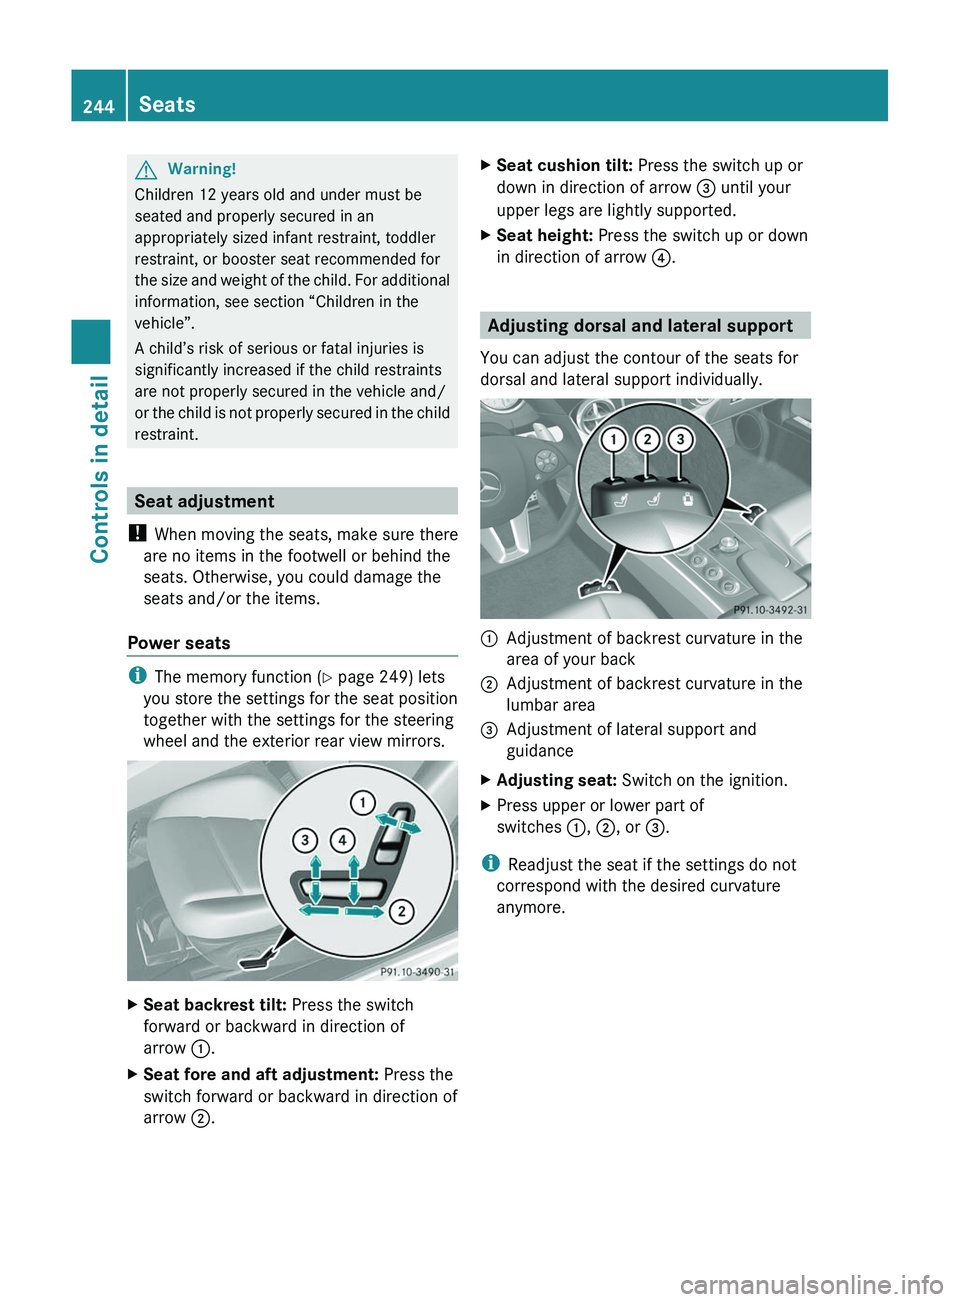
XSeat backrest tilt: Press the switch
forward or backward in direction of
arrow \000F.
XSeat fore and aft adjustment: Press the
switch forward or backward in direction of
arrow \000G.
XSeat cushion tilt: Press the switch up or
down in direction of arrow \000
Page 267 of 436
Transmission positions
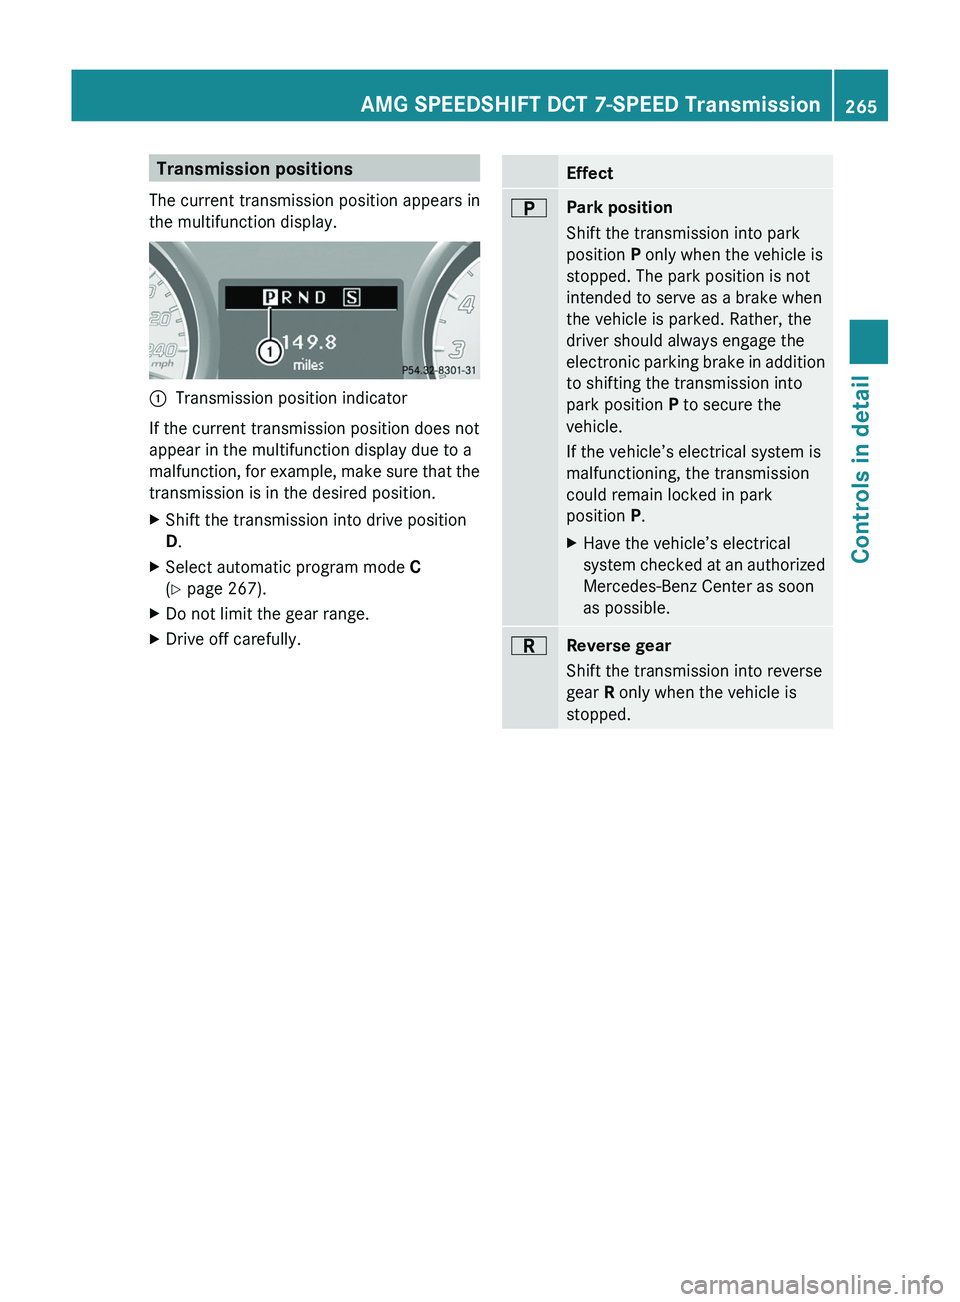
The current transmission position appears in
the multifunction display.0046Transmission position indicator
If the current transmission position does not
appear in the multifunction display due to a
malfunction, for example, make sure that the
transmission is in the desired position.
XShift the transmission into drive position
D .XSelect automatic program mode C
( Y page 267).XDo not limit the gear range.XDrive off carefully.Effect0045Park position
Shift the transmission into park
position P only when the vehicle is
stopped. The park position is not
intended to serve as a brake when
the vehicle is parked. Rather, the
driver should always engage the
electronic parking brake in addition
to shifting the transmission into
park position P to secure the
vehicle.
If the vehicle’s electrical system is
malfunctioning, the transmission
could remain locked in park
position P.XHave the vehicle’s electrical
system checked at an authorized
Mercedes-Benz Center as soon
as possible.0046Reverse gear
Shift the transmission into reverse
gear R only when the vehicle is
stopped.AMG SPEEDSHIFT DCT 7-SPEED Transmission265Controls in detailBA 197 USA, CA Edition A 2011; 1; 27, en-UShereepeVersion: 3.0.3.52010-03-24T15:31:10+01:00 - Seite 265Z
Page 292 of 436
008AAverage speed during lap0088Lap length0086Maximum speed during lapXPress button 003D or 003C to see other lap
analyses.
Driving systems
Introduction
This section describes the following driving
systems of your vehicle:
R Cruise control
R RACE START
R Hill-start assist system
R Parktronic system
R Rear view camera
The driving safety systems ABS, Adaptive
Brake, BAS, EBP, ESC and Trunk Wing are
described in the “Safety and security” section
( Y page 61).
Cruise control
The cruise control maintains the speed you
set for your vehicle automatically.
The use of the cruise control is recommended
for driving at a constant speed for extended
periods of time.
The currently set speed or last set speed
(“Resume” function) appears in the
multifunction display for approximately
5 seconds.
GWarning!
The cruise control is a convenience system
designed to assist the driver during vehicle
operation. The driver is and must always
remain responsible for the vehicle’s speed
and for safe brake operation.
Only use the cruise control if the road, traffic,
and weather conditions make it advisable to
travel at a constant speed.
R The use of the cruise control can be
dangerous on winding roads or in heavy
traffic because conditions do not allow safe
driving at a constant speed.
R The use of the cruise control can be
dangerous on slippery roads. Rapid
changes in tire traction can result in wheel
spin and loss of control.
R Deactivate the cruise control when driving
in fog.
The “Resume” function should only be
operated if the driver is fully aware of the
previously set speed and wishes to resume
this particular preset speed.GWarning!
The cruise control brakes automatically so
that the set speed is not exceeded.
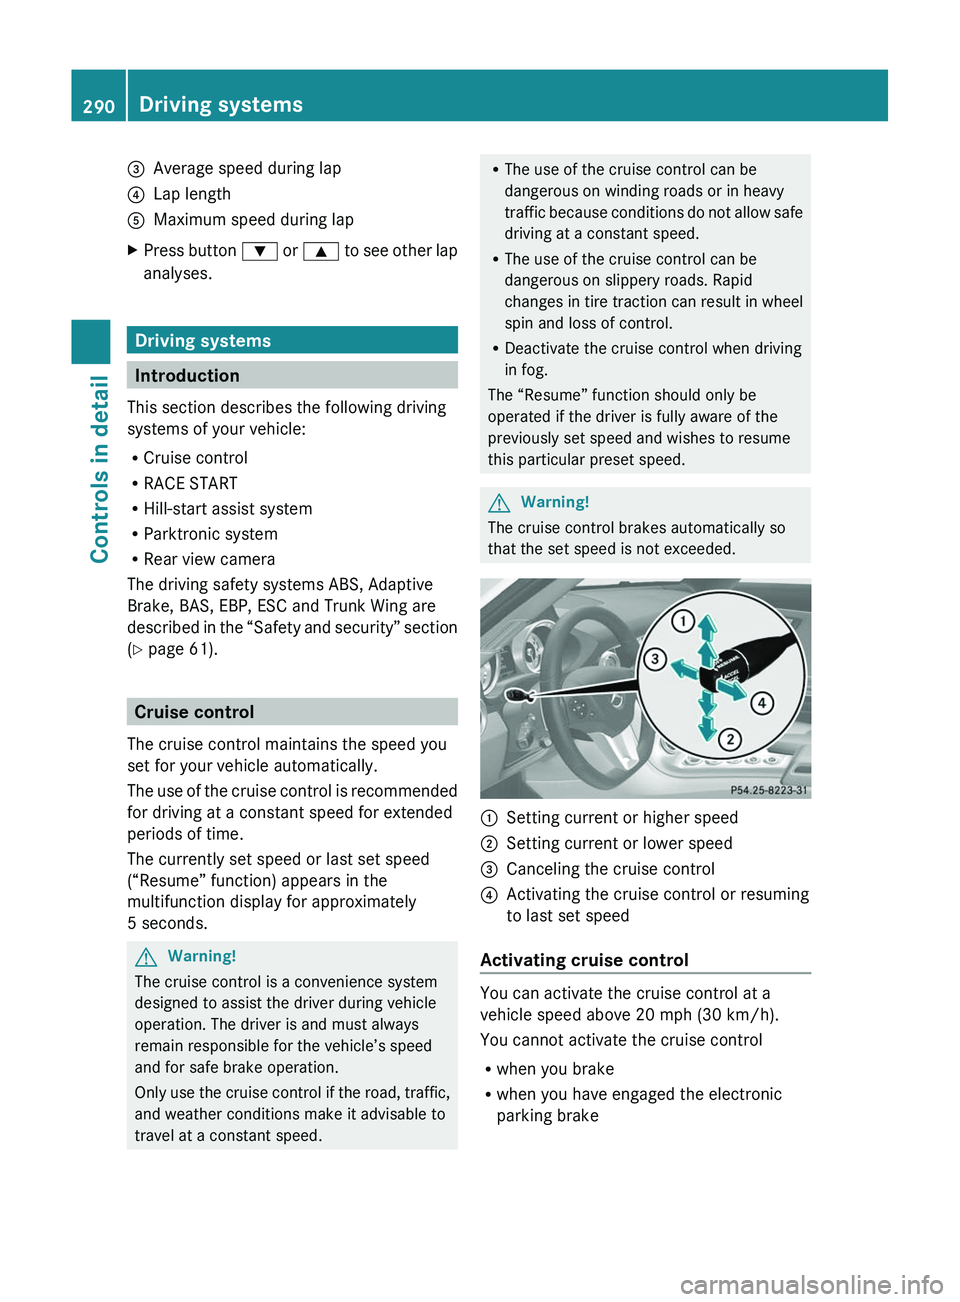
0046Setting current or higher speed0047Setting current or lower speed008ACanceling the cruise control0088Activating the cruise control or resuming
to last set speed
Activating cruise control
You can activate the cruise control at a
vehicle speed above 20 mph (30 km/h).
You cannot activate the cruise control
R when you brake
R when you have engaged the electronic
parking brake
290Driving systemsControls in detail
BA 197 USA, CA Edition A 2011; 1; 27, en-UShereepeVersion: 3.0.3.52010-03-24T15:31:10+01:00 - Seite 290
Page 319 of 436
2. this device must accept any interference
received, including interference that may
cause undesired operation.
Any unauthorized modification to this
device could void the user’s authority to
operate the equipment.
iCanada only:
This device complies with RSS-210 of
Industry Canada. Operation is subject to
the following two conditions:
1. This device may not cause interference,
and
2. this device must accept any interference
received, including interference that may
cause undesired operation of the device.
Any unauthorized modification to this
device could void the user’s authority to
operate the equipment.
Trickle charge socket
The trickle charge socket is located on the
driver’s side of the trunk. The trickle charge
socket is suitable for connection of a trickle
charger only. A trickle charger can be
purchased at any authorized Mercedes-Benz
Center.
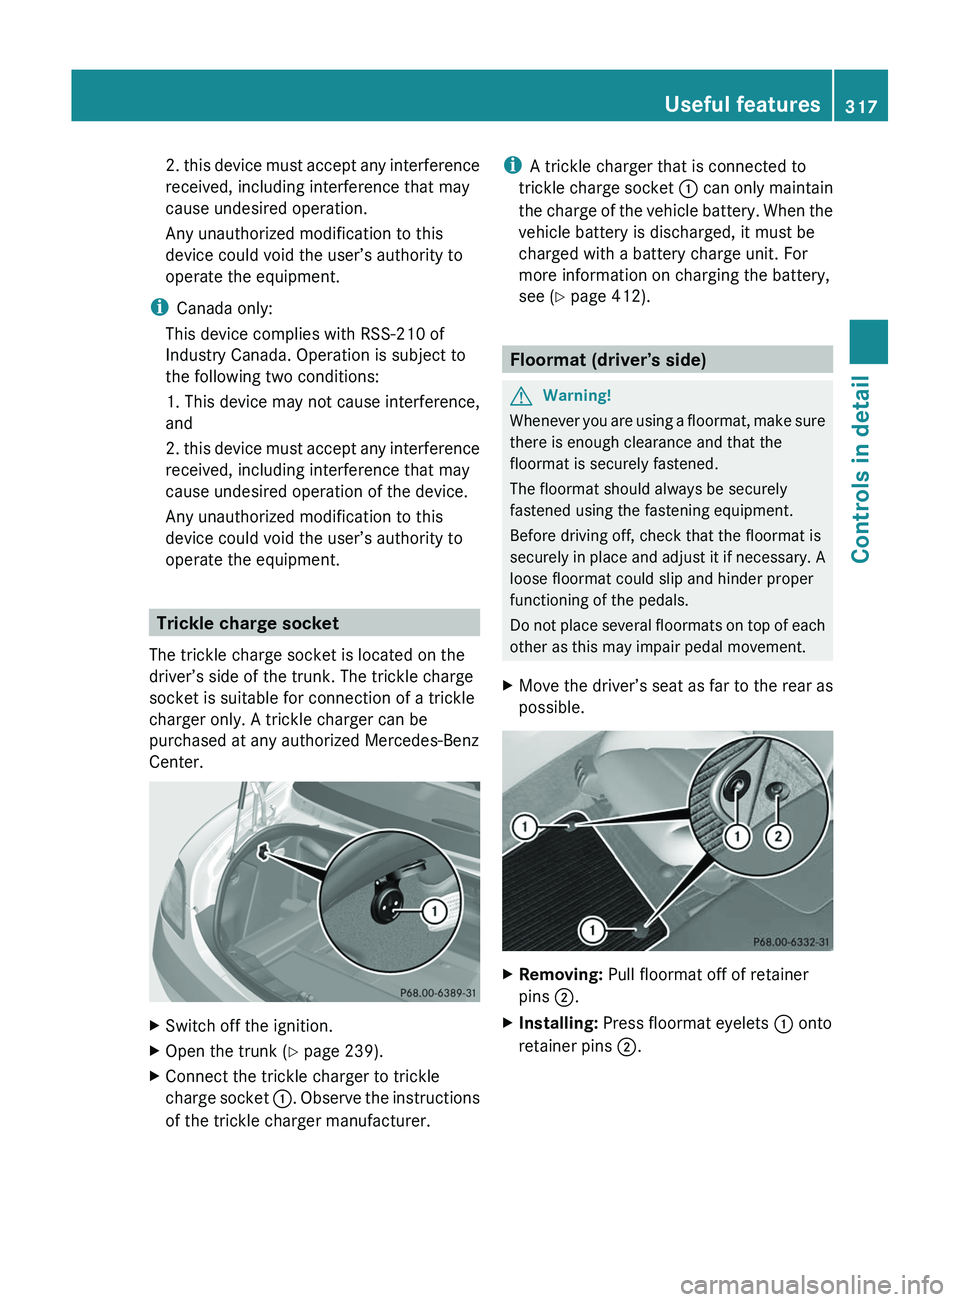
XSwitch off the ignition.XOpen the trunk (Y page 239).XConnect the trickle charger to trickle
charge socket \000F. Observe the instructions
of the trickle charger manufacturer.
iA trickle charger that is connected to
trickle charge socket \000F can only maintain
the charge of the vehicle battery. When the
vehicle battery is discharged, it must be
charged with a battery charge unit. For
more information on charging the battery,
see (Y page 412).
Floormat (driver’s side)
GWarning!
Whenever you are using a floormat, make sure
there is enough clearance and that the
floormat is securely fastened.
The floormat should always be securely
fastened using the fastening equipment.
Before driving off, check that the floormat is
securely in place and adjust it if necessary. A
loose floormat could slip and hinder proper
functioning of the pedals.
Do not place several floormats on top of each
other as this may impair pedal movement.
XMove the driver’s seat as far to the rear as
possible.
XRemoving: Pull floormat off of retainer
pins \000G.
XInstalling: Press floormat eyelets \000F onto
retainer pins \000G.
Useful features317Controls in detailBA 197 USA, CA Edition A 2011; 1; 27, en-UShereepeVersion: 3.0.3.52010-03-24T15:31:10+01:00 - Seite 317Z
Page 323 of 436
! To prevent damage to the catalytic
converters, only use premium unleaded
gasoline in this vehicle.
Any noticeable irregularities in engine
operation should be repaired promptly.
Otherwise, excessive unburned fuel may
reach the catalytic converter, causing it to
overheat and potentially start a fire.
i Only use premium unleaded gasoline with
a minimum Posted Octane Rating of 91
(average of 96 RON/86 MON).
Information on gasoline quality can
normally be found on the fuel pump. Please
contact gas station personnel in case
labels on the pump cannot be found.
For more information on gasoline, see
“Premium unleaded gasoline”
( Y page 425), see “Fuel requirements”
( Y page 427), or contact an authorized
Mercedes-Benz Center, or visit
http://www.MBUSA.com (USA only).
Locking/unlocking the vehicle with the
SmartKey automatically locks/unlocks the
fuel filler flap.
i In case the central locking system does
not release the fuel filler flap, or the
opening mechanism is clamping, contact
Roadside Assistance or an authorized
Mercedes-Benz Center.
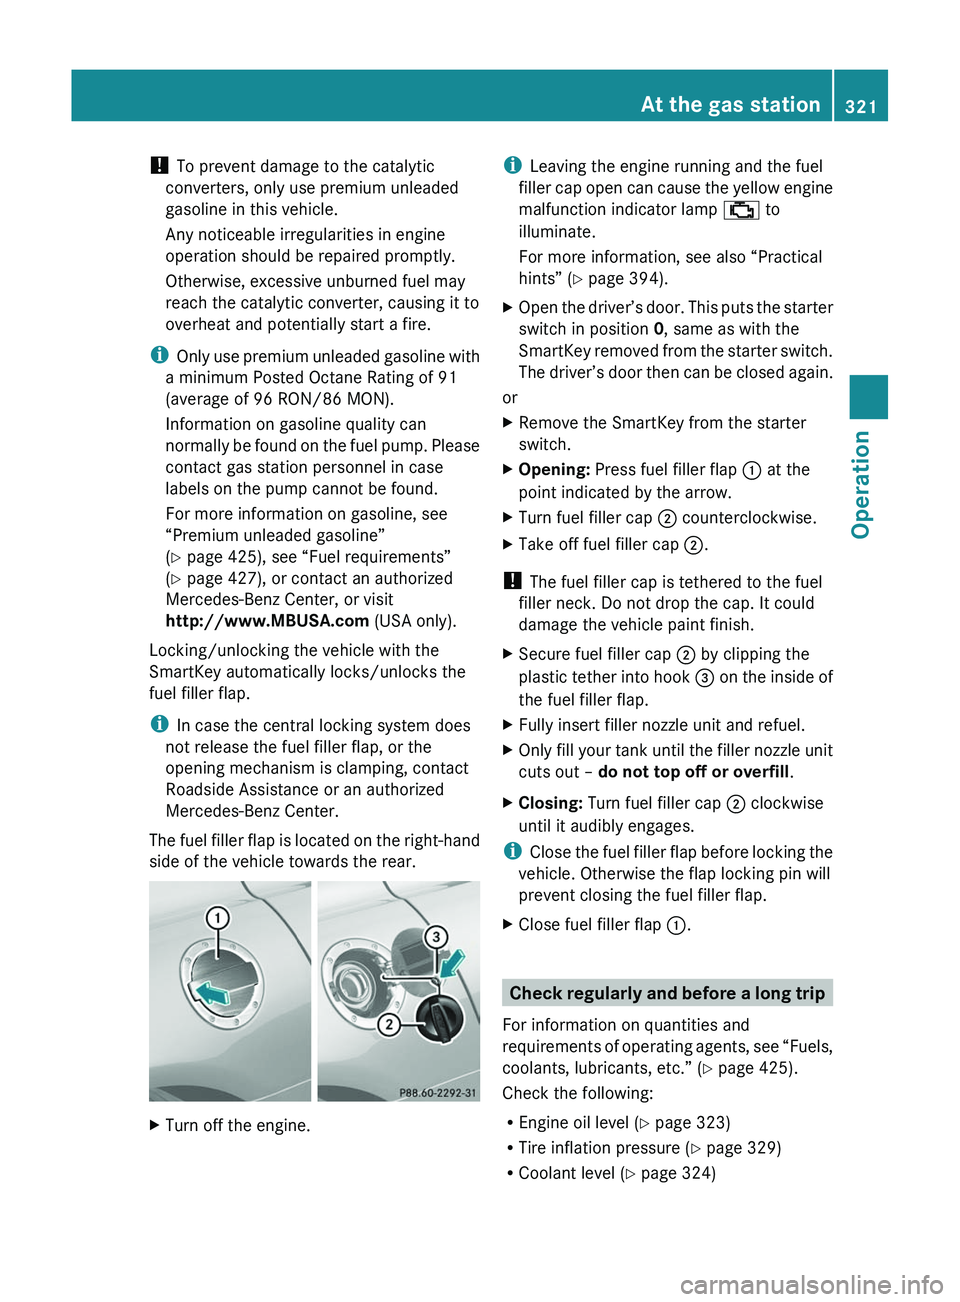
The fuel filler flap is located on the right-hand
side of the vehicle towards the rear. XTurn off the engine.i Leaving the engine running and the fuel
filler cap open can cause the yellow engine
malfunction indicator lamp 00BB to
illuminate.
For more information, see also “Practical
hints” ( Y page 394).XOpen the driver’s door. This puts the starter
switch in position 0, same as with the
SmartKey removed from the starter switch.
The driver’s door then can be closed again.
or
XRemove the SmartKey from the starter
switch.XOpening: Press fuel filler flap 0046 at the
point indicated by the arrow.XTurn fuel filler cap 0047 counterclockwise.XTake off fuel filler cap 0047.
!
The fuel filler cap is tethered to the fuel
filler neck. Do not drop the cap. It could
damage the vehicle paint finish.
XSecure fuel filler cap 0047 by clipping the
plastic tether into hook 008A on the inside of
the fuel filler flap.XFully insert filler nozzle unit and refuel.XOnly fill your tank until the filler nozzle unit
cuts out – do not top off or overfill .XClosing: Turn fuel filler cap 0047 clockwise
until it audibly engages.
i Close the fuel filler flap before locking the
vehicle. Otherwise the flap locking pin will
prevent closing the fuel filler flap.
XClose fuel filler flap 0046.
Check regularly and before a long trip
For information on quantities and
requirements of operating agents, see “Fuels,
coolants, lubricants, etc.” ( Y page 425).
Check the following:
R Engine oil level ( Y page 323)
R Tire inflation pressure ( Y page 329)
R Coolant level ( Y page 324)
At the gas station321OperationBA 197 USA, CA Edition A 2011; 1; 27, en-UShereepeVersion: 3.0.3.52010-03-24T15:31:10+01:00 - Seite 321Z
Page 325 of 436
ClosingGWarning!
When closing the hood, use extreme caution
not to catch hands or fingers. Be careful that
you do not close the hood on anyone.
Make sure the hood is securely engaged
before driving off. Do not continue driving if
the hood can no longer engage after an
accident, for example. The hood could
otherwise come loose while the vehicle is in
motion and injure you and/or others.
XLet the hood drop from a height of
approximately 8 in (20 cm).XCheck to make sure the hood is fully
closed.
If you can raise the hood at a point above
the headlamps, then it is not properly
closed. Open it again and let it drop with
somewhat greater force.
Engine oil
The amount of oil your engine consumes will
depend on a number of factors, including
driving style. Increased oil consumption can
occur when the vehicle is new or the vehicle
is driven frequently at higher engine speeds.
Engine oil consumption checks should only
be made after the vehicle break-in period.
! Do not use any special lubricant additives,
as these may damage the drive assemblies.
Using special additives not approved by
Mercedes-Benz may cause damage not
covered by the Mercedes-Benz Limited
Warranty.
For further information contact an
authorized Mercedes-Benz Center.
Notes on checking engine oil level
XPark the vehicle on level ground.XTurn off the engine at operating
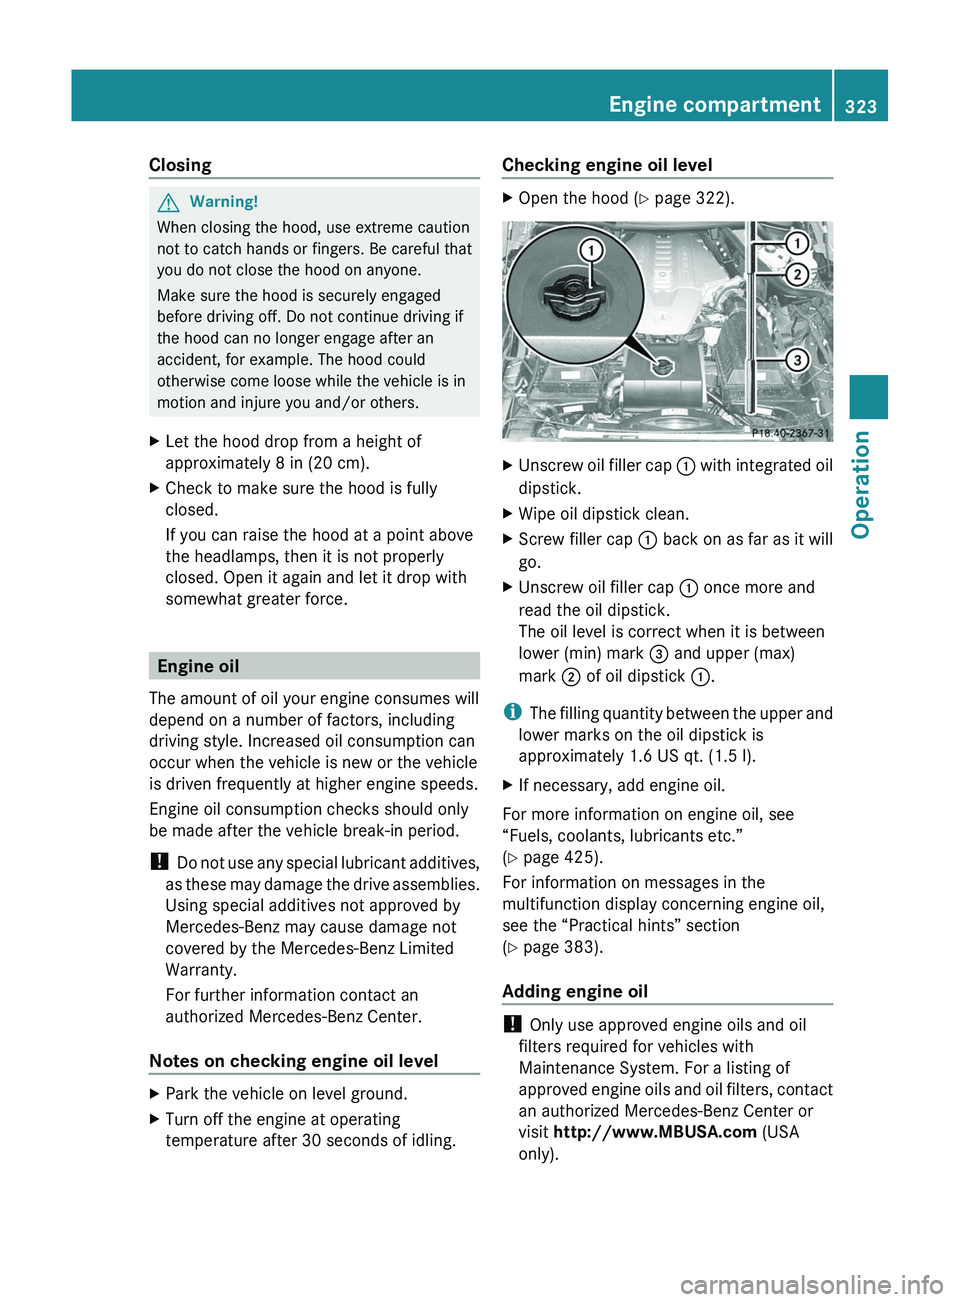
temperature after 30 seconds of idling.Checking engine oil level XOpen the hood ( Y page 322).XUnscrew oil filler cap 0046 with integrated oil
dipstick.XWipe oil dipstick clean.XScrew filler cap 0046 back on as far as it will
go.XUnscrew oil filler cap 0046 once more and
read the oil dipstick.
The oil level is correct when it is between
lower (min) mark 008A and upper (max)
mark 0047 of oil dipstick 0046.
i
The filling quantity between the upper and
lower marks on the oil dipstick is
approximately 1.6 US qt. (1.5 l).
XIf necessary, add engine oil.
For more information on engine oil, see
“Fuels, coolants, lubricants etc.”
( Y page 425).
For information on messages in the
multifunction display concerning engine oil,
see the “Practical hints” section
( Y page 383).
Adding engine oil
! Only use approved engine oils and oil
filters required for vehicles with
Maintenance System. For a listing of
approved engine oils and oil filters, contact
an authorized Mercedes-Benz Center or
visit http://www.MBUSA.com (USA
only).
Engine compartment323OperationBA 197 USA, CA Edition A 2011; 1; 27, en-UShereepeVersion: 3.0.3.52010-03-24T15:31:10+01:00 - Seite 323Z
Page 365 of 436
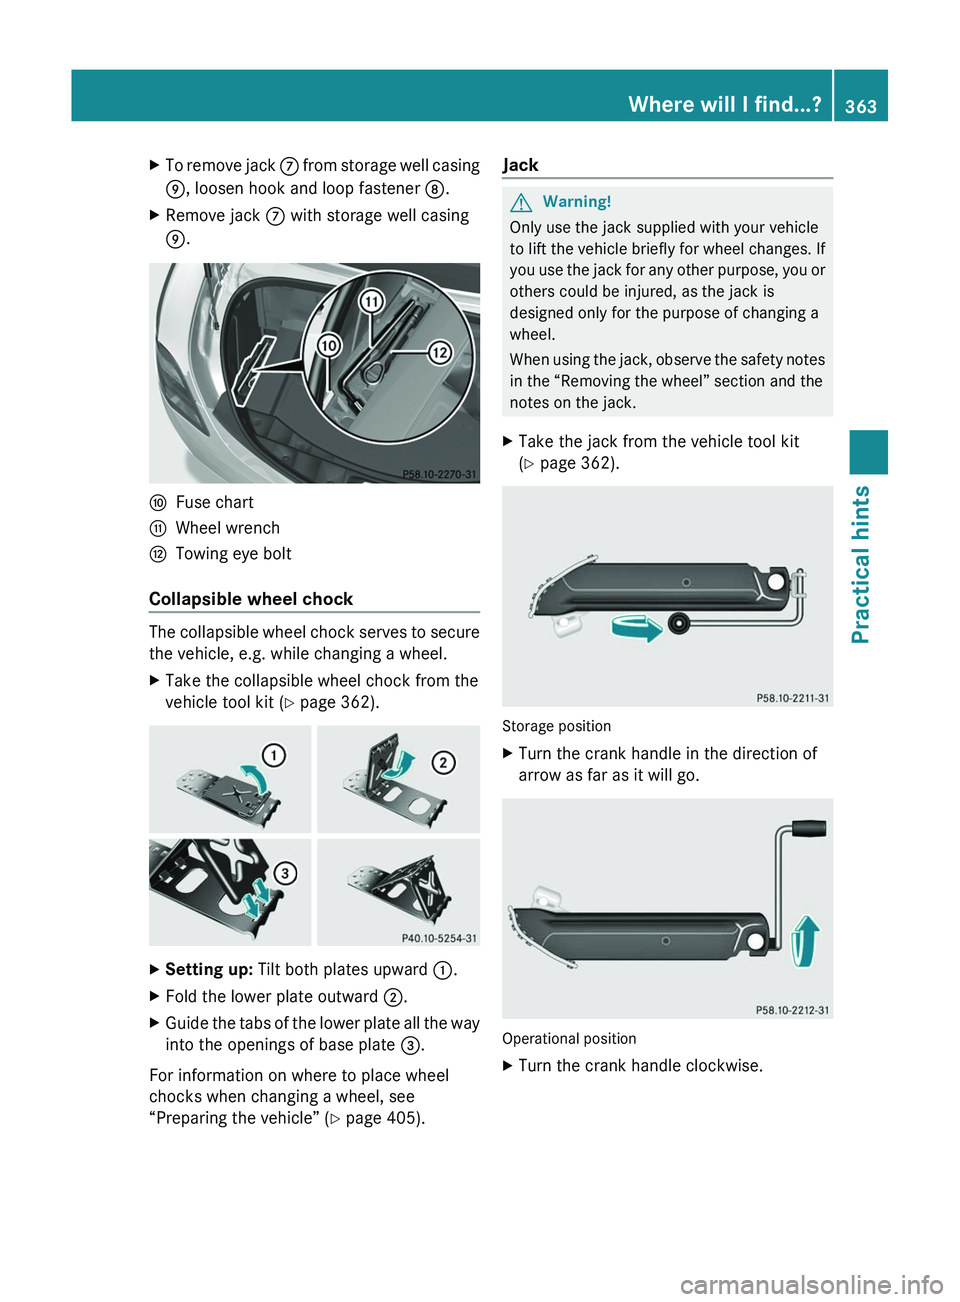
XTo remove jack \000n from storage well casing
\000p, loosen hook and loop fastener \000o.
XRemove jack \000n with storage well casing
\000p.
\000qFuse chart\000rWheel wrench\000sTowing eye bolt
Collapsible wheel chock
The collapsible wheel chock serves to secure
the vehicle, e.g. while changing a wheel.
XTake the collapsible wheel chock from the
vehicle tool kit (Y page 362).
XSetting up: Tilt both plates upward \000F.XFold the lower plate outward \000G.XGuide the tabs of the lower plate all the way
into the openings of base plate \000
Page 413 of 436
Do not rub the battery with rags or cloths. The
battery could explode if touched due to
electrostatic charge or due to spark
formation.
! The battery is a Valve-Regulated Lead
Acid (VRLA) battery, also referred to as
“fleece” battery.
Such batteries do not require topping-up of
the electrolyte level. VRLA batteries
therefore do not have cell caps and the
battery cover is non-removable. Do not
attempt to open the battery as otherwise
the battery will be damaged.
VRLA batteries do not require topping-up of
the electrolyte level. They cannot be
opened to check the electrolyte level.
However, the battery condition must be
checked periodically by performing a
battery conductance test. Refer to
Maintenance Booklet for battery condition
testing intervals.
The factory-equipped battery may only be
replaced with a battery that
Rhas the same security features
Ris of identical size
Ris of identical voltage
Ris of identical capacity
! As any other battery, the battery may
discharge if you do not operate the vehicle
for an extended period of time. Have the
battery disconnected at a qualified
workshop or an authorized Mercedes-Benz
Center in such a case. You may also
connect an accessory battery charge unit
expressly approved by Mercedes-Benz for
your vehicle model to maintain the battery
charge. Contact an authorized Mercedes-
Benz Center for further information.
The battery, the battery ventilation hose
and the lateral plug must always be
securely installed when the vehicle is in
operation.
! Never loosen or detach battery terminal
clamps while the engine is running or the
SmartKey is in the starter switch or
KEYLESS-GO button is in position 1.
Otherwise the alternator and other
electronic components could be severely
damaged.
Have the battery checked regularly at an
authorized Mercedes-Benz Center.
Refer to Maintenance Booklet for
maintenance intervals or contact an
authorized Mercedes-Benz Center for
further information.
iMake sure the vehicle’s on-board
electronics have status 0 when you turn off
the engine and no longer require any
electrical consumers. The vehicle then
uses very little power and the battery is
spared.
iIf the battery is discharged, you must use
the mechanical key to unlock the vehicle.
iAfter battery power was interrupted, do
the following:
RSynchronize the power windows
(Y page 256).
RSynchronize the exterior rear view
mirrors (Y page 248).
Battery location
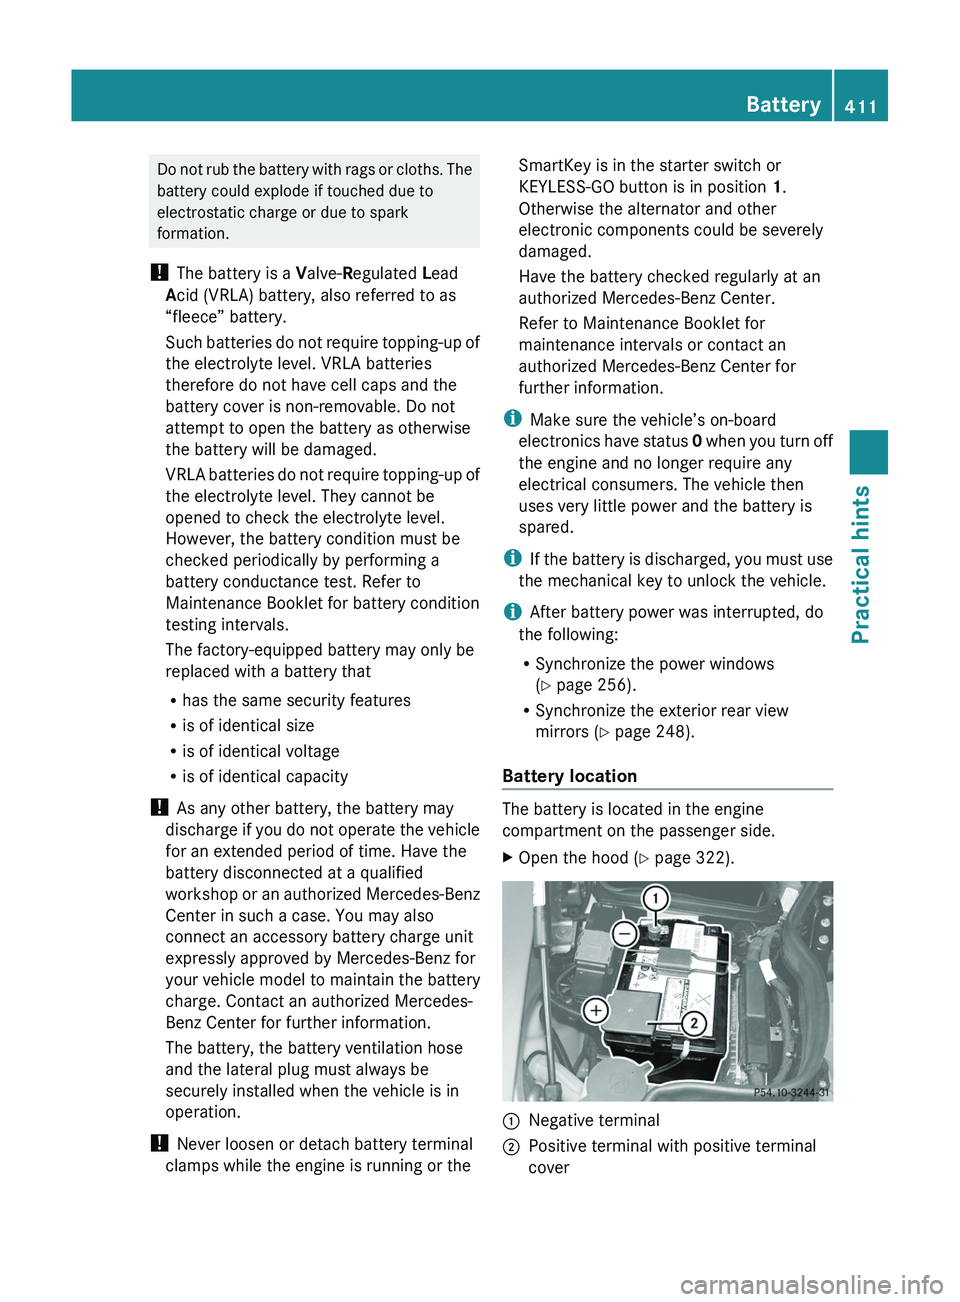
The battery is located in the engine
compartment on the passenger side.
XOpen the hood (Y page 322).\000FNegative terminal\000GPositive terminal with positive terminal
cover
Battery411Practical hintsBA 197 USA, CA Edition A 2011; 1; 27, en-UShereepeVersion: 3.0.3.52010-03-24T15:31:10+01:00 - Seite 411Z