2011 MERCEDES-BENZ SLK55AMG steering
[x] Cancel search: steeringPage 75 of 312
USA only
With the exterior lamp switch in position
$ or
Ã, you cannot switch on the high-
beam headlamps.
The high-beam flasher is available at all times.
X For nighttime driving turn the exterior lamp
switch to position L to permit activation
of the high-beam headlamps.
When the engine is running, and you turn the
exterior lamp switch to position T or
L, the manual headlamp mode has
priority over the daytime running lamp mode.
The corresponding exterior lamps come on
(Y page 71).
Fog lamps Fog lamps cannot be switched on with the
exterior lamp switch in position Ã.
G
Warning!
In low ambient lighting or foggy conditions,
only switch from position à to L with
the vehicle at a standstill in a safe location.
Switching from à to L will briefly
switch off the headlamps. Doing so while
driving in low ambient lighting conditions may
result in an accident.
Fog lamps will operate with the parking lamps
and/or the low-beam headlamps on. Fog
lamps should only be used in conjunction with
low-beam headlamps. Consult your State or
Province Motor Vehicle Regulations
regarding permissible lamp operation.
X Turn the exterior lamp switch to position
T or L (Y page 71).
X Switching on front fog lamps: Pull out the
exterior lamp switch to first stop.
The green indicator lamp N in the
exterior lamp switch comes on. X
Switching on rear fog lamp: Pull out the
exterior lamp switch to second stop.
The rear fog lamp, the front fog lamps, the
green N and the yellow indicator lamp
R in the exterior lamp switch come on.
X Switching off front fog lamps/rear fog
lamp: Push in the exterior lamp switch to
its stop.
Locator lighting and night security
illumination Locator lighting and night security
illumination are described in the “Control
system” section, see “Switching locator
lighting on or off” (Y page 106) and
“Switching night security illumination
(Headlamps delayed shut-off feature) on or
off” (Y page 107). Combination switch
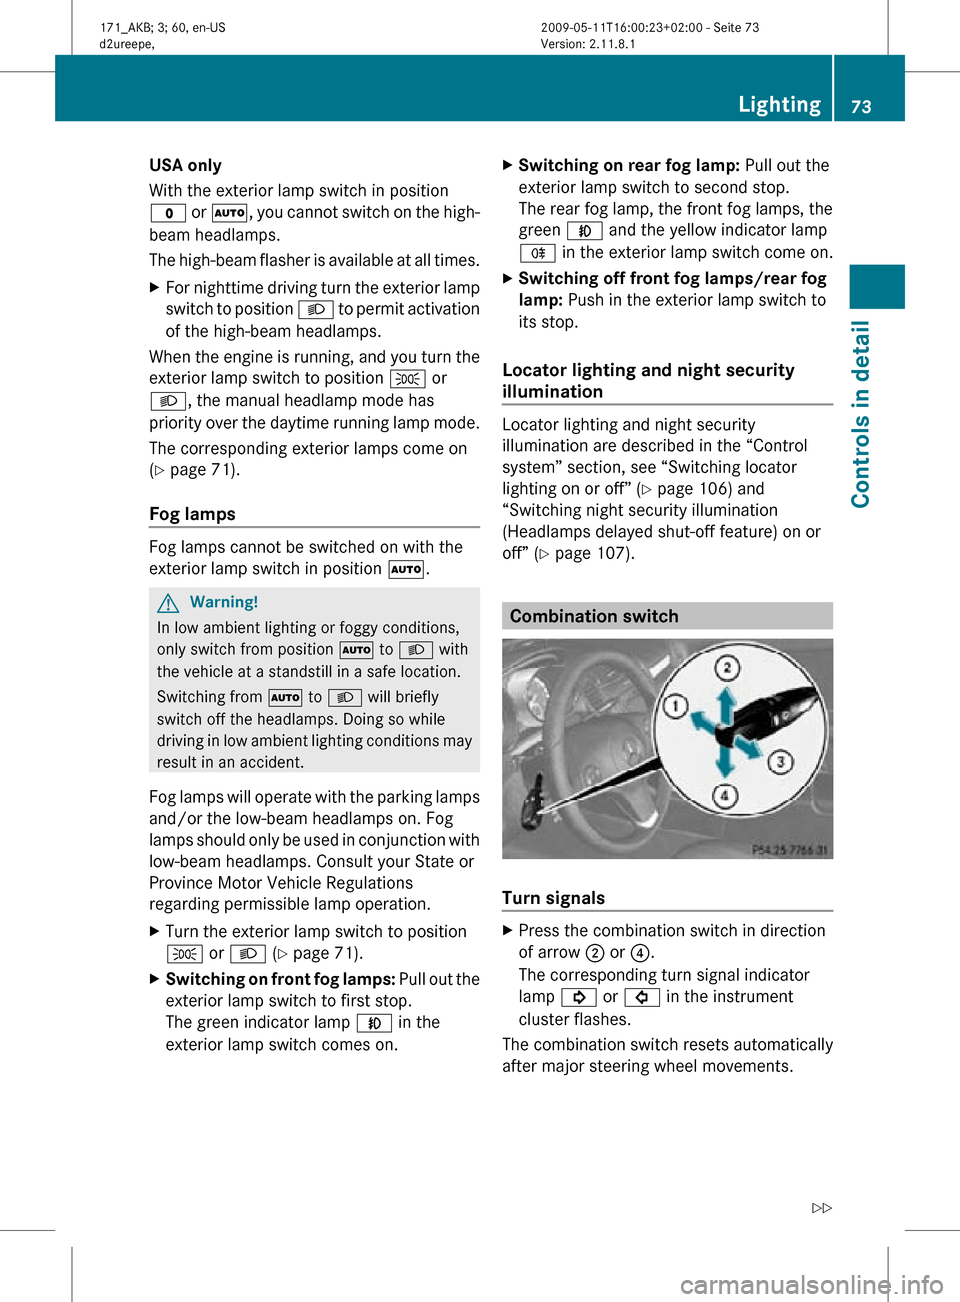
Turn signals
X
Press the combination switch in direction
of arrow ; or ?.
The corresponding turn signal indicator
lamp ! or # in the instrument
cluster flashes.
The combination switch resets automatically
after major steering wheel movements. Lighting
73Controls in detail
171_AKB; 3; 60, en-US
d2ureepe, Version: 2.11.8.1 2009-05-11T16:00:23+02:00 - Seite 73 Z
Page 77 of 312
Corner-illuminating front fog lamps
The corner-illuminating front fog lamps
improve illumination of the area in the
direction into which you are turning.
The corner-illuminating front fog lamps will
only operate
R in low ambient lighting conditions
R at vehicle speeds below 25 mph
(40 km/h)
R with the front fog lamps switched off
R when the engine is running
Switching on X
Turn the exterior lamp switch to position
L or Ã.
or
X Activate the daytime running lamp mode
(Y page 72).
X Switch on the left or right turn signal,
depending on whether you are turning left
or right.
The respective front fog lamp comes on. If
you have switched on the turn signal for
one side but turn the steering wheel in the
other direction, the corner-illuminating
front fog lamp on the side of the turn signal
comes on.
or
X Turn the steering wheel in the desired
direction.
Driving forward: The front fog lamp on the
side of your steering direction comes on.
Driving in reverse: The front fog lamp
opposite to your steering direction comes
on.
The corner-illuminating front fog lamps will
come on automatically depending on the
steering angle, even if you did not switch on
either turn signal. If the corner-illuminating
front fog lamps came on automatically, they
will also go out automatically depending on
the steering angle and vehicle speed. The corner-illuminating front fog lamps
temporarily come on on both sides of the
vehicle if you turn the steering wheel in one
direction and then again in the other direction
shortly thereafter.
The corner-illuminating front fog lamp
remains lit for a short time only. It then goes
out automatically.
Switching off
X
Switch off the left or right turn signal.
or
X Steer straight ahead.
i There may be a brief delay before the
corner-illuminating front fog lamps go out. Interior lighting
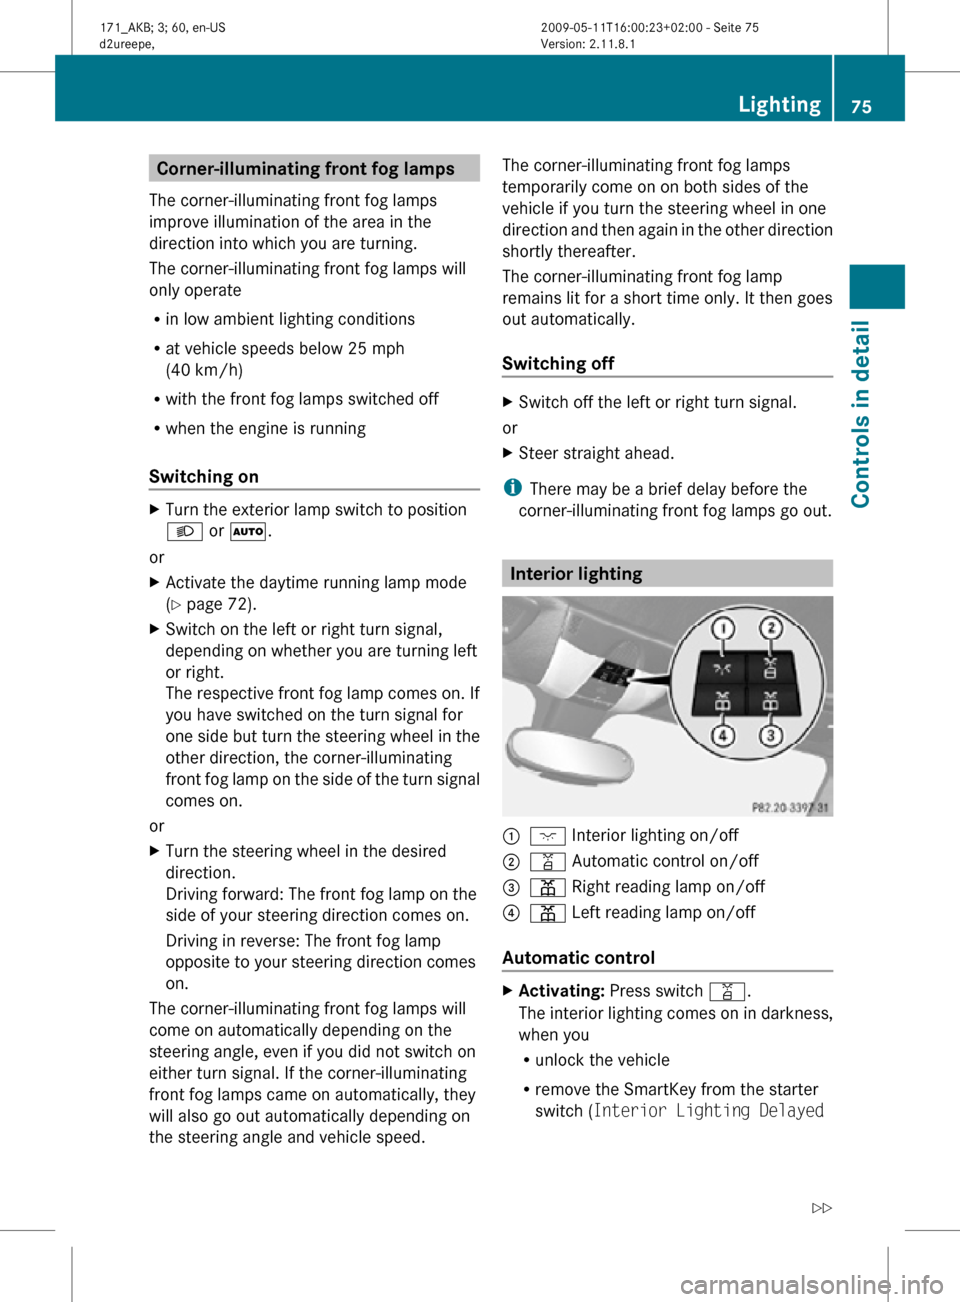
:
c Interior lighting on/off
; q Automatic control on/off
= p Right reading lamp on/off
? p Left reading lamp on/off
Automatic control X
Activating: Press switch q.
The interior lighting comes on in darkness,
when you
R
unlock the vehicle
R remove the SmartKey from the starter
switch ( Interior Lighting Delayed Lighting
75Controls in detail
171_AKB; 3; 60, en-US
d2ureepe, Version: 2.11.8.1 2009-05-11T16:00:23+02:00 - Seite 75 Z
Page 81 of 312
Closing when a door window is blocked
G
Warning!
Make sure that nobody can become trapped
and be seriously or even fatally injured when
closing a door window with greater force or
without automatic reversal function.
If the upward movement of a door window is
blocked during the closing procedure, the
door window will stop and open slightly.
X Immediately after the door window has
stopped because it was blocked, pull and
hold
the respective switch upward until the
door window is fully closed.
The door window closes with greater force.
If the door window is blocked again and opens
slightly:
X Immediately after the door window was
blocked, pull and hold the respective
switch
upward until the door window is fully
closed.
The door window closes without automatic
reversal function. G
Warning!
Pulling and holding the switch to close the
door window immediately after it had been
blocked
two times will cause the door window
to close without any reversal function for as
long as you hold the switch.
Opening and closing the rear side
windows when the hardtop is closed X
Opening: Open the door window.
X Press switch : or ; again.
The corresponding rear side window will
open completely.
X Closing: Close the door window.
X Pull and hold switch : or ;.
The
corresponding rear side window moves
upward until you release the switch. Synchronizing power windows
The windows must be synchronized after the
battery has been disconnected or if the
windows cannot be fully closed (express
operation).
Each window must be synchronized
separately.
X Close all doors.
X Switch on the ignition.
X Pull and hold switch : or ; (Y page 78)
until the respective window is closed.
The window opens again slightly.
X Pull and hold the respective switch once
more immediately until the window is
closed completely.
X Hold the respective switch for
approximately 1 second.
The window is synchronized. Driving and parking
Safety notes
G
Warning!
Make sure absolutely no objects are
obstructing the pedals’ range of movement.
Keep the driver’s footwell clear of all
obstacles. If there are any floormats or
carpets
in the footwell, make sure the pedals
still have sufficient clearance.
During sudden driving or braking maneuvers
the objects could get caught between or
under the pedals. You could then no longer
brake or accelerate. This could lead to
accidents and injury. G
Warning!
With the engine not running, there is no power
assistance for the brake and steering
systems. In this case, it is important to keep
in mind that a considerably higher degree of
effort is necessary to brake and steer the
vehicle. Adapt your driving accordingly. Driving and parking
79
Controls in detail
171_AKB; 3; 60, en-US
d2ureepe, Version: 2.11.8.1 2009-05-11T16:00:23+02:00 - Seite 79 Z
Page 82 of 312
Starting the engine
G
Warning!
Inhalation of exhaust gas is hazardous to your
health. All exhaust gas contains carbon
monoxide (CO), and inhaling it can cause
unconsciousness and possible death.
Do not run the engine in confined areas (such
as a garage) which are not properly ventilated.
If you think that exhaust gas fumes are
entering the vehicle while driving, have the
cause determined and corrected
immediately. If you must drive under these
conditions, drive only with at least one
window fully open at all times.
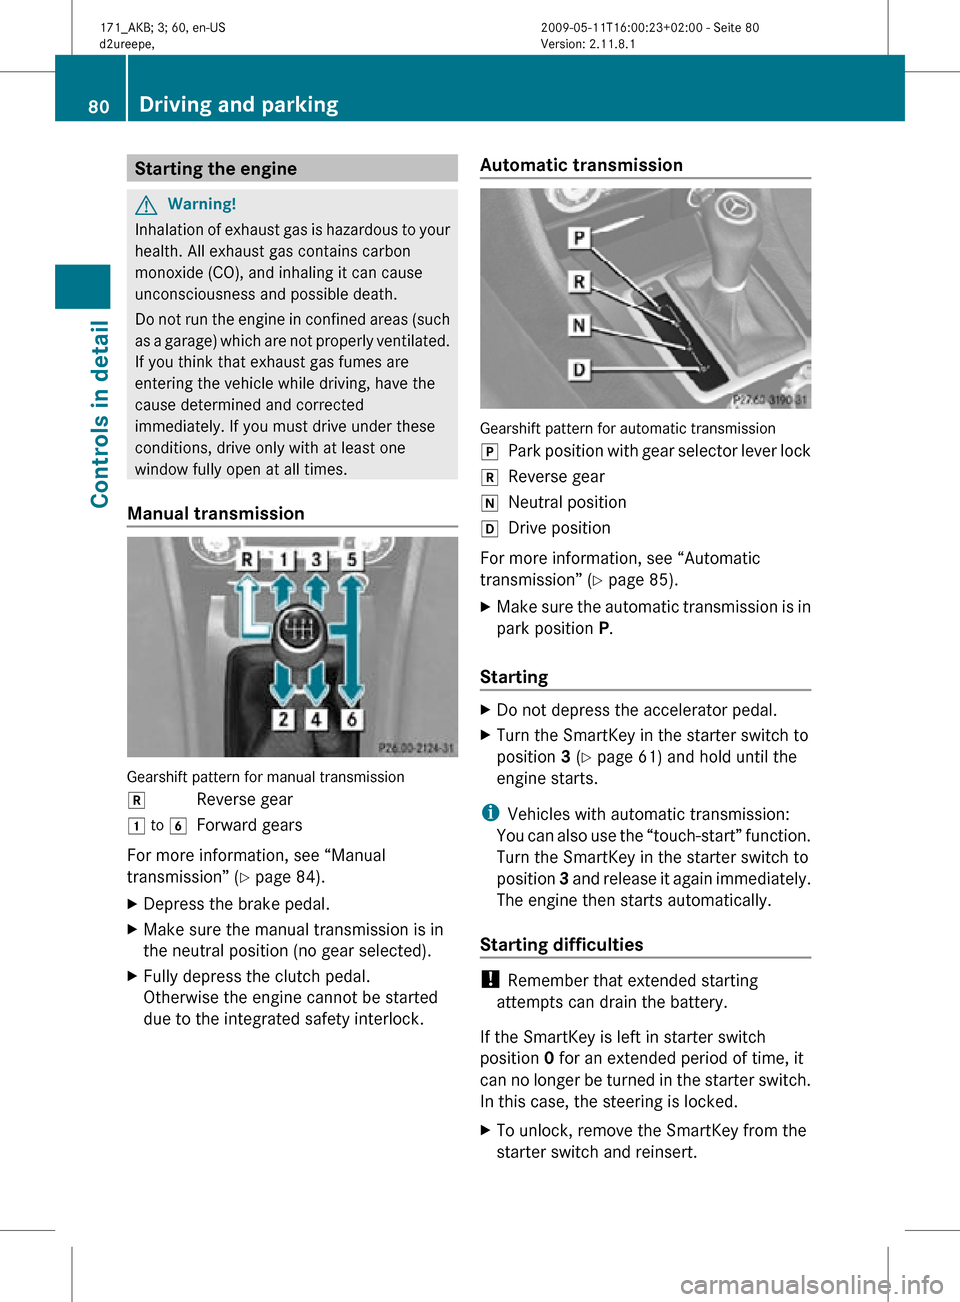
Manual transmission Gearshift pattern for manual transmission
k
Reverse gear
1 to 6 Forward gears
For more information, see “Manual
transmission” (Y page 84).
X Depress the brake pedal.
X Make sure the manual transmission is in
the neutral position (no gear selected).
X Fully depress the clutch pedal.
Otherwise the engine cannot be started
due to the integrated safety interlock. Automatic transmission Gearshift pattern for automatic transmission
j
Park position with gear selector lever lock
k Reverse gear
i Neutral position
h Drive position
For more information, see “Automatic
transmission” (Y page 85).
X Make sure the automatic transmission is in
park position P.
Starting X
Do not depress the accelerator pedal.
X Turn the SmartKey in the starter switch to
position 3 (Y page 61) and hold until the
engine starts.
i Vehicles with automatic transmission:
You can also use the “touch-start” function.
Turn the SmartKey in the starter switch to
position 3 and release it again immediately.
The engine then starts automatically.
Starting difficulties !
Remember that extended starting
attempts can drain the battery.
If the SmartKey is left in starter switch
position 0 for an extended period of time, it
can no longer be turned in the starter switch.
In this case, the steering is locked.
X To unlock, remove the SmartKey from the
starter switch and reinsert. 80
Driving and parkingControls in detail
171_AKB; 3; 60, en-US
d2ureepe,
Version: 2.11.8.1 2009-05-11T16:00:23+02:00 - Seite 80
Page 86 of 312
Turning off the engine
G
Warning!
Do not turn off the engine before the vehicle
has come to a complete stop. With the engine
not running, there is no power assistance for
the brake and steering systems. In this case,
it is important to keep in mind that a
considerably higher degree of effort is
necessary to brake and steer the vehicle.
X Manual transmission: Shift the manual
transmission into 1st gear or reverse gear
R.
X Automatic transmission: Shift the
automatic transmission into park position
P.
X Engage the parking brake.
i Always engage the parking brake in
addition to shifting the automatic
transmission into park position P (manual
transmission: shifting into 1st gear or
reverse gear R).
X Turn the SmartKey in the starter switch to
position 0.
X Remove the SmartKey from the starter
switch.
The immobilizer is activated.
Automatic transmission:
The SmartKey can only be removed from the
starter switch with the automatic
transmission in park position P. Manual transmission
Introduction
For information on driving with a manual
transmission, see “Driving and parking”
(Y page 79). G
Warning!
Make sure absolutely no objects are
obstructing the pedals’ range of movement.
Keep the driver’s footwell clear of all obstacles. If there are any floormats or
carpets in the footwell, make sure the pedals
still have sufficient clearance.
During sudden driving or braking maneuvers
the objects could get caught between or
under the pedals. You could then no longer
brake or accelerate. This could lead to
accidents and injury.
G
Warning!
When working on the vehicle, engage the
parking brake and shift the manual
transmission into 1st gear or reverse gear R.
Otherwise the vehicle could roll away which
could result in an accident and/or serious
personal injury.
! Allow the engine to warm up under low
load use. Do not place full load on the
engine until the operating temperature has
been reached.
Avoid spinning of a drive wheel for an
extended period when driving off on
slippery road surfaces.
This may cause serious damage to the
engine and the drivetrain which is not
covered by the Mercedes-Benz Limited
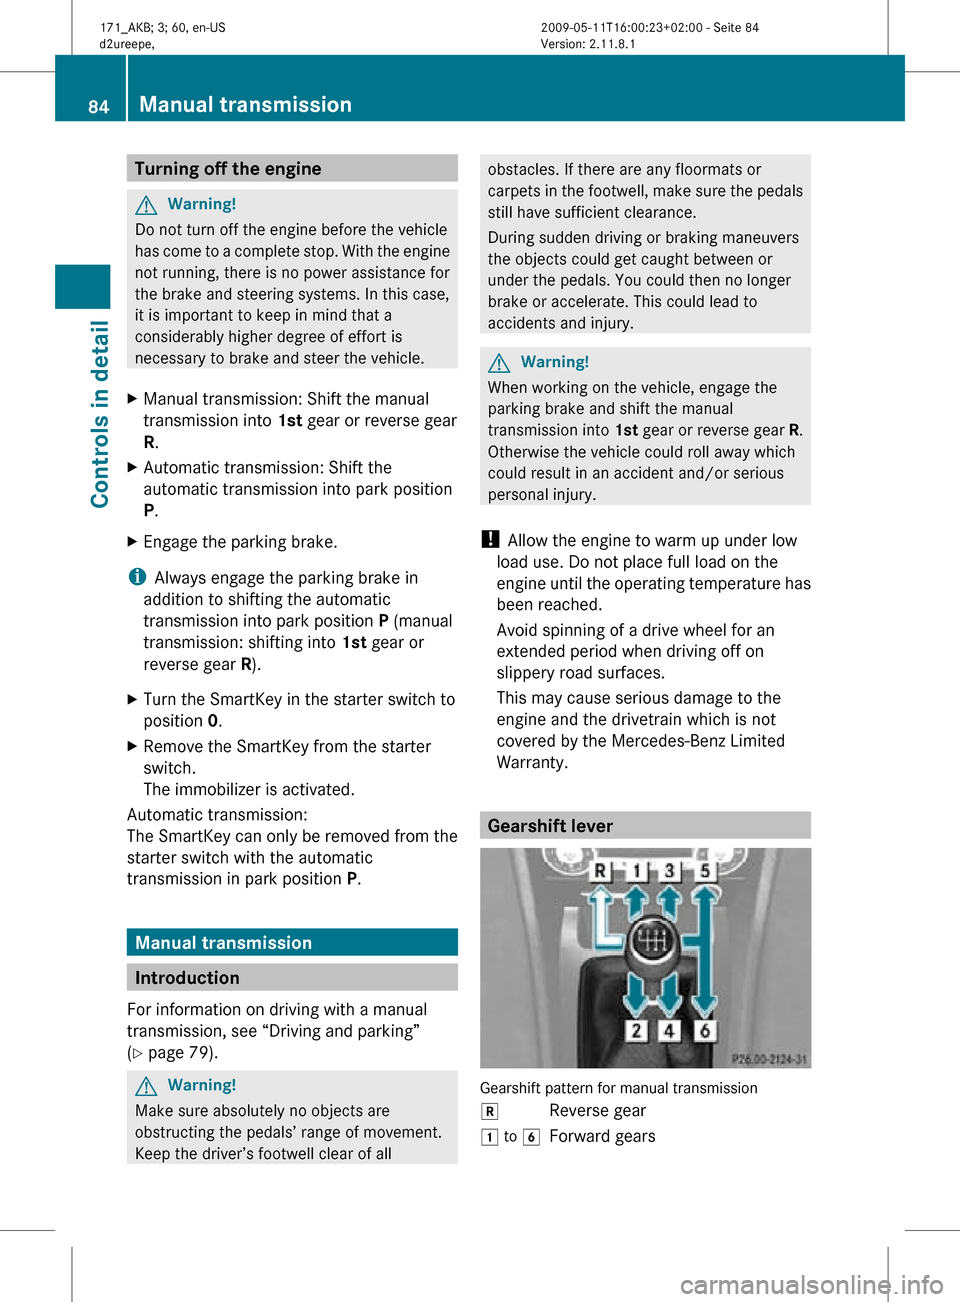
Warranty. Gearshift lever
Gearshift pattern for manual transmission
k
Reverse gear
1 to 6 Forward gears 84
Manual transmissionControls in detail
171_AKB; 3; 60, en-US
d2ureepe,
Version: 2.11.8.1 2009-05-11T16:00:23+02:00 - Seite 84
Page 91 of 312
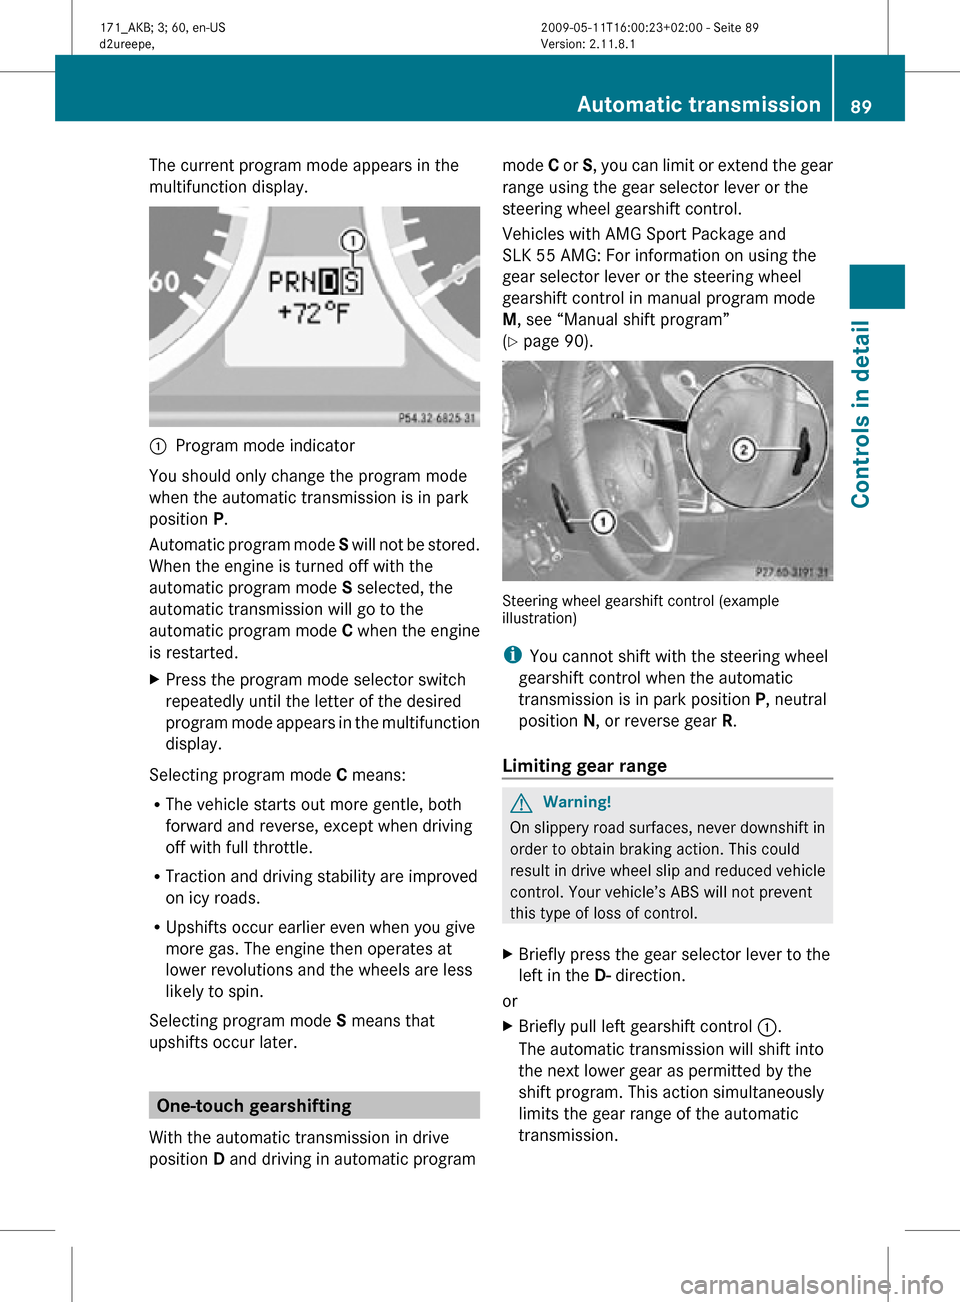
The current program mode appears in the
multifunction display.
:
Program mode indicator
You should only change the program mode
when the automatic transmission is in park
position P.
Automatic program mode S will not be stored.
When the engine is turned off with the
automatic program mode S selected, the
automatic transmission will go to the
automatic program mode C when the engine
is restarted.
X Press the program mode selector switch
repeatedly until the letter of the desired
program mode appears in the multifunction
display.
Selecting program mode C means:
R The vehicle starts out more gentle, both
forward and reverse, except when driving
off with full throttle.
R Traction and driving stability are improved
on icy roads.
R Upshifts occur earlier even when you give
more gas. The engine then operates at
lower revolutions and the wheels are less
likely to spin.
Selecting program mode S means that
upshifts occur later. One-touch gearshifting
With the automatic transmission in drive
position D and driving in automatic program mode
C or S, you can limit or extend the gear
range using the gear selector lever or the
steering wheel gearshift control.
Vehicles with AMG Sport Package and
SLK 55 AMG: For information on using the
gear selector lever or the steering wheel
gearshift control in manual program mode
M, see “Manual shift program”
(Y page 90). Steering wheel gearshift control (example
illustration)
i
You cannot shift with the steering wheel
gearshift control when the automatic
transmission is in park position P, neutral
position N, or reverse gear R.
Limiting gear range G
Warning!
On slippery road surfaces, never downshift in
order to obtain braking action. This could
result in drive wheel slip and reduced vehicle
control. Your vehicle’s ABS will not prevent
this type of loss of control.
X Briefly press the gear selector lever to the
left in the D- direction.
or
X Briefly pull left gearshift control :.
The automatic transmission will shift into
the next lower gear as permitted by the
shift program. This action simultaneously
limits the gear range of the automatic
transmission. Automatic transmission
89Controls in detail
171_AKB; 3; 60, en-US
d2ureepe, Version: 2.11.8.1 2009-05-11T16:00:23+02:00 - Seite 89 Z
Page 92 of 312
i
To avoid overrevving the engine when
downshifting, the automatic transmission
will not shift into a lower gear if the engine’s
maximum speed would be exceeded.
Extending gear range X
Briefly press the gear selector lever to the
right in the D+ direction.
or
X Briefly pull right gearshift control ;.
The automatic transmission will shift into
the next higher gear as permitted by the
shift program. This action simultaneously
extends the gear range of the automatic
transmission.
i If you press on the accelerator pedal
when the engine has reached the
revolution limit of the current gear range,
the automatic transmission will upshift
beyond any gear range limit selected.
Canceling gear range limit X
Press and hold the gear selector lever to
the right in the D+ direction until D
reappears in the multifunction display.
or
X Pull and hold right gearshift control ; until
D reappears in the multifunction display.
The automatic transmission will shift from
the current gear range directly into drive
position D.
Shifting into optimal gear range X
Press and hold the gear selector lever to
the left in the D- direction.
or
X Pull and hold left gearshift control :.
The automatic transmission will select the
gear range suited for optimal acceleration
and deceleration automatically. This will
involve shifting down one or more gears. Manual shift program
The manual shift program is available on
vehicles with AMG Sport Package and on
SLK 55 AMG only.
Manual program mode M differs with regard
to spontaneity, response time, and shifting
smoothness from automatic program mode
S.
In manual program mode M, system-
controlled automatic gearshifting is switched
off. You need to change the gears by manually
upshifting or downshifting using the gear
selector lever or the steering wheel gearshift
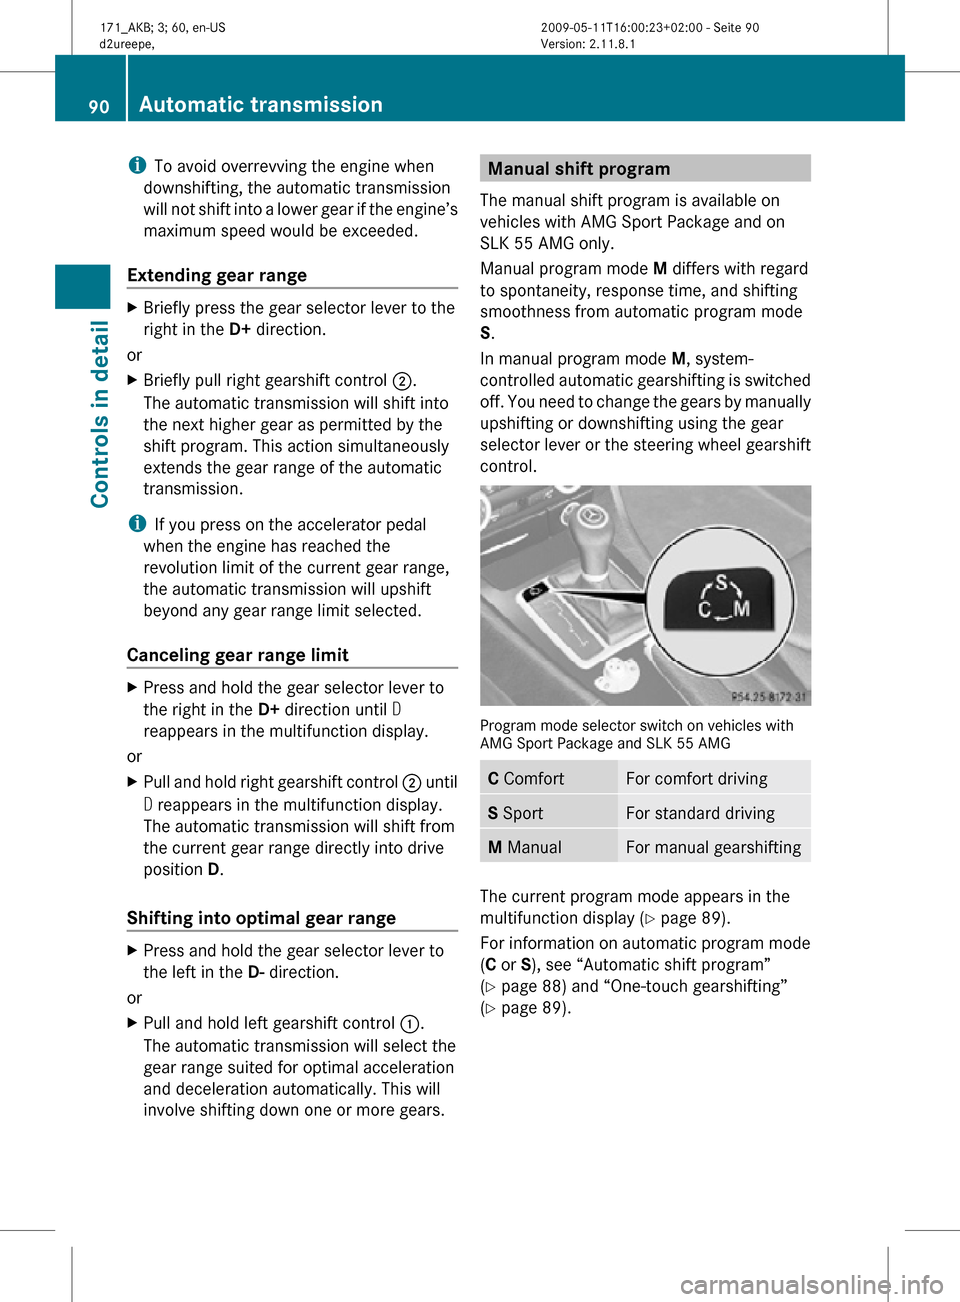
control. Program mode selector switch on vehicles with
AMG Sport Package and SLK 55 AMG
C Comfort For comfort driving
S Sport For standard driving
M Manual For manual gearshifting
The current program mode appears in the
multifunction display (
Y page 89).
For information on automatic program mode
(C or S), see “Automatic shift program”
(Y page 88) and “One-touch gearshifting”
(Y page 89). 90
Automatic transmissionControls in detail
171_AKB; 3; 60, en-US
d2ureepe,
Version: 2.11.8.1 2009-05-11T16:00:23+02:00 - Seite 90
Page 95 of 312
Activating the instrument cluster
The instrument cluster is activated when you
R open the driver’s door
R switch on the ignition
R press reset button .
R switch on the exterior lamps
i Opening the driver’s door or pressing the
reset button . without switching on the
ignition or the exterior lamps activates the
instrument cluster illumination only for
30 seconds. Adjusting the instrument cluster
illumination
X To brighten illumination: Press knob :
briefly.
X To dim illumination: Press knob ;
briefly.
The illumination brightness for the instrument
cluster changes each time you press
knob :
or ;. Several settings are possible.
i The instrument cluster illumination is
dimmed or brightened automatically to suit
ambient light conditions.
You can only adjust the brightness of the
instrument cluster illumination when it is
dark outside.
i With the exterior lighting switched on, the
brightness of the switches in the center
console will also be adjusted when using
knob : or ;. Resetting trip odometer
X Make sure you are viewing the standard
display
(Y page 96) in the multifunction
display.
X Press and hold reset button .
until the trip
odometer is reset. Tachometer
The red marking on the tachometer
(Y
page 26) denotes excessive engine speed.
! Avoid driving at excessive engine speeds,
as it may result in serious engine damage
that is not covered by the Mercedes-Benz
Limited Warranty.
To help protect the engine, the fuel supply is
interrupted if the engine is operated within
the red marking. Clock
In vehicles with the audio system, the clock
can be set via the control system
(Y page 105).
For setting the time with the COMAND
system, see separate COMAND system
operating instructions. Control system
Introduction
The
control system is activated as soon as the
starter switch is in position 1.
The control system enables you to call up
information about your vehicle and to change
vehicle settings.
For example, you can use the control system
to find out when your vehicle is next due for
maintenance service, to set the language for
messages in the instrument cluster display,
and much more. G
Warning!
A driver’s attention to the road and traffic
conditions must always be his/her primary
focus when driving.
For your safety and the safety of others,
selecting features through the multifunction
steering wheel should only be done by the
driver
when traffic and road conditions permit
it to be done safely. Control system
93
Controls in detail
171_AKB; 3; 60, en-US
d2ureepe, Version: 2.11.8.1 2009-05-11T16:00:23+02:00 - Seite 93 Z