2011 MERCEDES-BENZ SLK55AMG inflation pressure
[x] Cancel search: inflation pressurePage 243 of 312
G
Warning!
If the 04 indicator lamp remains illuminated with an adult occupant on the
passenger seat even after performing the above corrective steps, do not have any passenger use
the passenger seat until the system has been repaired.
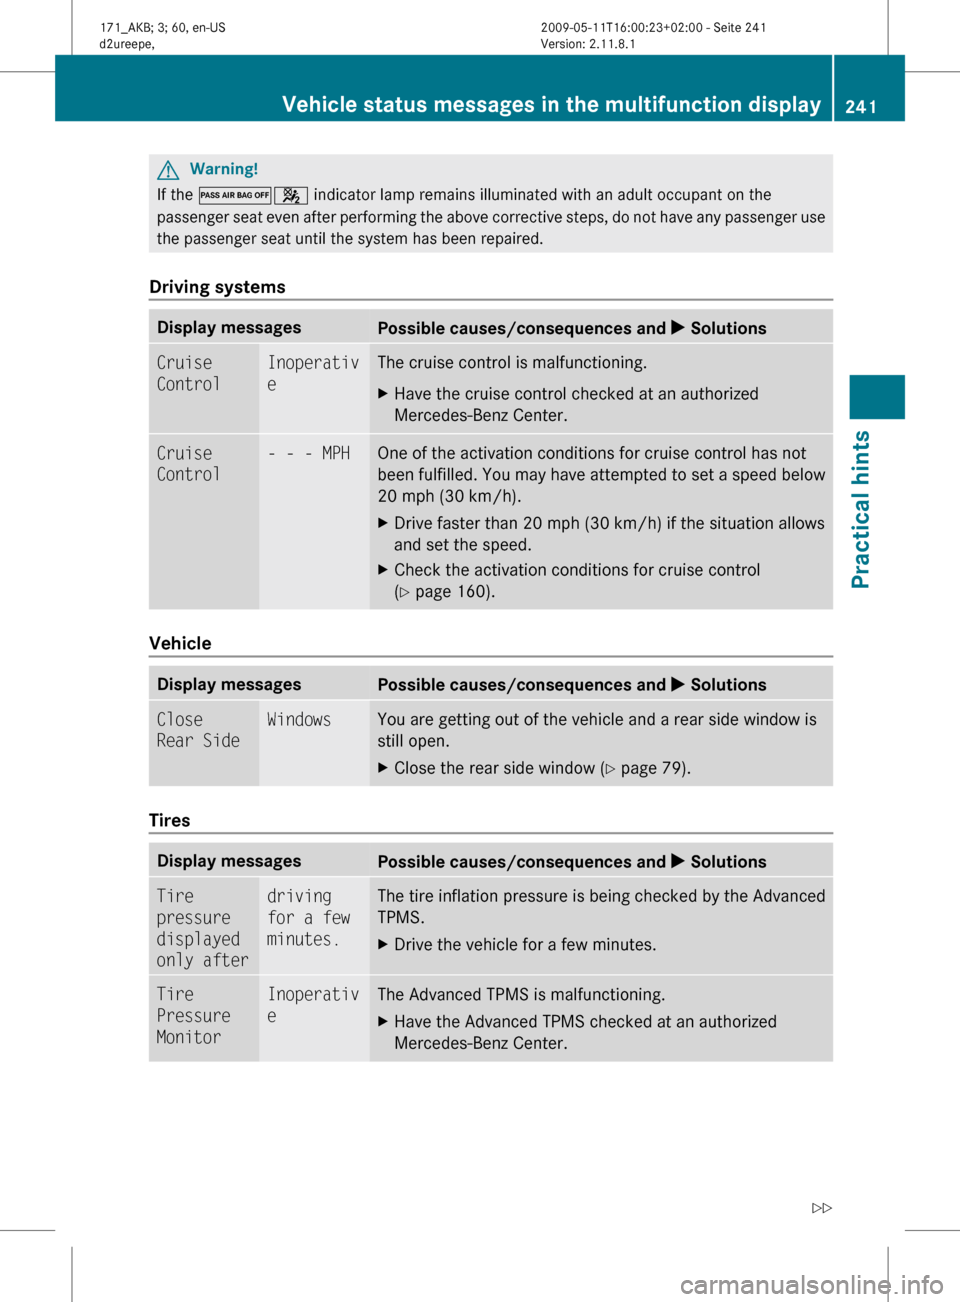
Driving systems Display messages
Possible causes/consequences and
X SolutionsCruise
Control Inoperativ
e The cruise control is malfunctioning.
X
Have the cruise control checked at an authorized
Mercedes-Benz Center. Cruise
Control - - - MPH One of the activation conditions for cruise control has not
been
fulfilled. You may have attempted to set a speed below
20 mph (30 km/h).
X Drive faster than 20 mph (30 km/h) if the situation allows
and set the speed.
X Check the activation conditions for cruise control
(Y page 160). Vehicle
Display messages
Possible causes/consequences and
X SolutionsClose
Rear Side Windows You are getting out of the vehicle and a rear side window is
still open.
X
Close the rear side window ( Y page 79).Tires
Display messages
Possible causes/consequences and
X SolutionsTire
pressure
displayed
only after driving
for a few
minutes. The tire inflation pressure is being checked by the Advanced
TPMS.
X
Drive the vehicle for a few minutes. Tire
Pressure
Monitor Inoperativ
e The Advanced TPMS is malfunctioning.
X
Have the Advanced TPMS checked at an authorized
Mercedes-Benz Center. Vehicle status messages in the multifunction display
241
Practical hints
171_AKB; 3; 60, en-US
d2ureepe,Version: 2.11.8.1 2009-05-11T16:00:23+02:00 - Seite 241 Z
Page 244 of 312
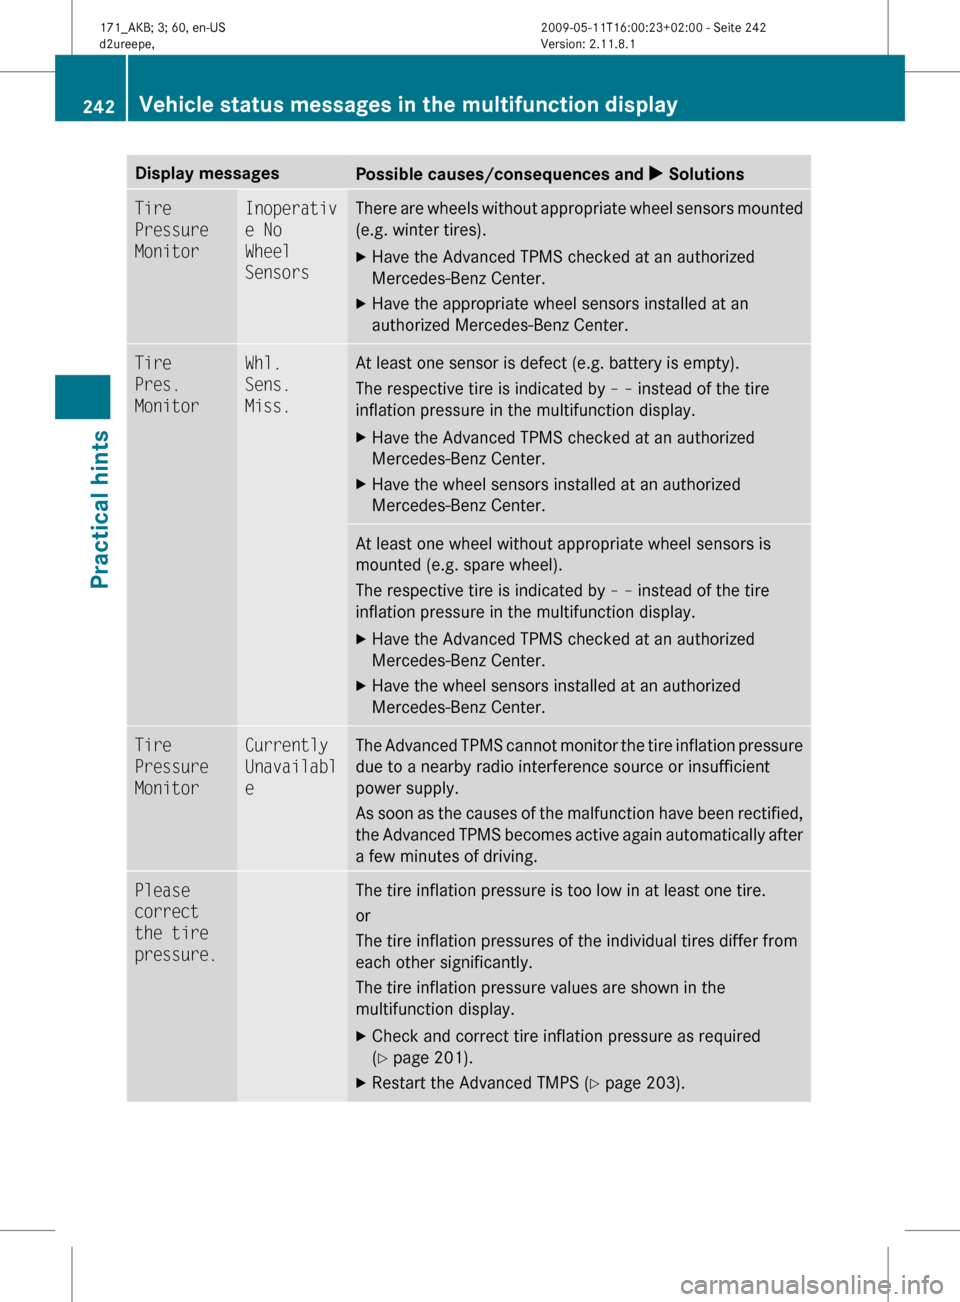
Display messages
Possible causes/consequences and
X SolutionsTire
Pressure
Monitor Inoperativ
e No
Wheel
Sensors There are wheels without appropriate wheel sensors mounted
(e.g. winter tires).
X
Have the Advanced TPMS checked at an authorized
Mercedes-Benz Center.
X Have the appropriate wheel sensors installed at an
authorized Mercedes-Benz Center. Tire
Pres.
Monitor Whl.
Sens.
Miss. At least one sensor is defect (e.g. battery is empty).
The respective tire is indicated by
– – instead of the tire
inflation pressure in the multifunction display.
X Have the Advanced TPMS checked at an authorized
Mercedes-Benz Center.
X Have the wheel sensors installed at an authorized
Mercedes-Benz Center. At least one wheel without appropriate wheel sensors is
mounted (e.g. spare wheel).
The respective tire is indicated by
– – instead of the tire
inflation pressure in the multifunction display.
X Have the Advanced TPMS checked at an authorized
Mercedes-Benz Center.
X Have the wheel sensors installed at an authorized
Mercedes-Benz Center. Tire
Pressure
Monitor Currently
Unavailabl
e The Advanced TPMS cannot monitor the tire inflation pressure
due to a nearby radio interference source or insufficient
power supply.
As
soon as the causes of the malfunction have been rectified,
the Advanced TPMS becomes active again automatically after
a few minutes of driving. Please
correct
the tire
pressure. The tire inflation pressure is too low in at least one tire.
or
The tire inflation pressures of the individual tires differ from
each other significantly.
The tire inflation pressure values are shown in the
multifunction display.
X
Check and correct tire inflation pressure as required
(Y page 201).
X Restart the Advanced TMPS ( Y page 203).242
Vehicle status messages in the multifunction display
Practical hints
171_AKB; 3; 60, en-US
d2ureepe,
Version: 2.11.8.1 2009-05-11T16:00:23+02:00 - Seite 242
Page 245 of 312
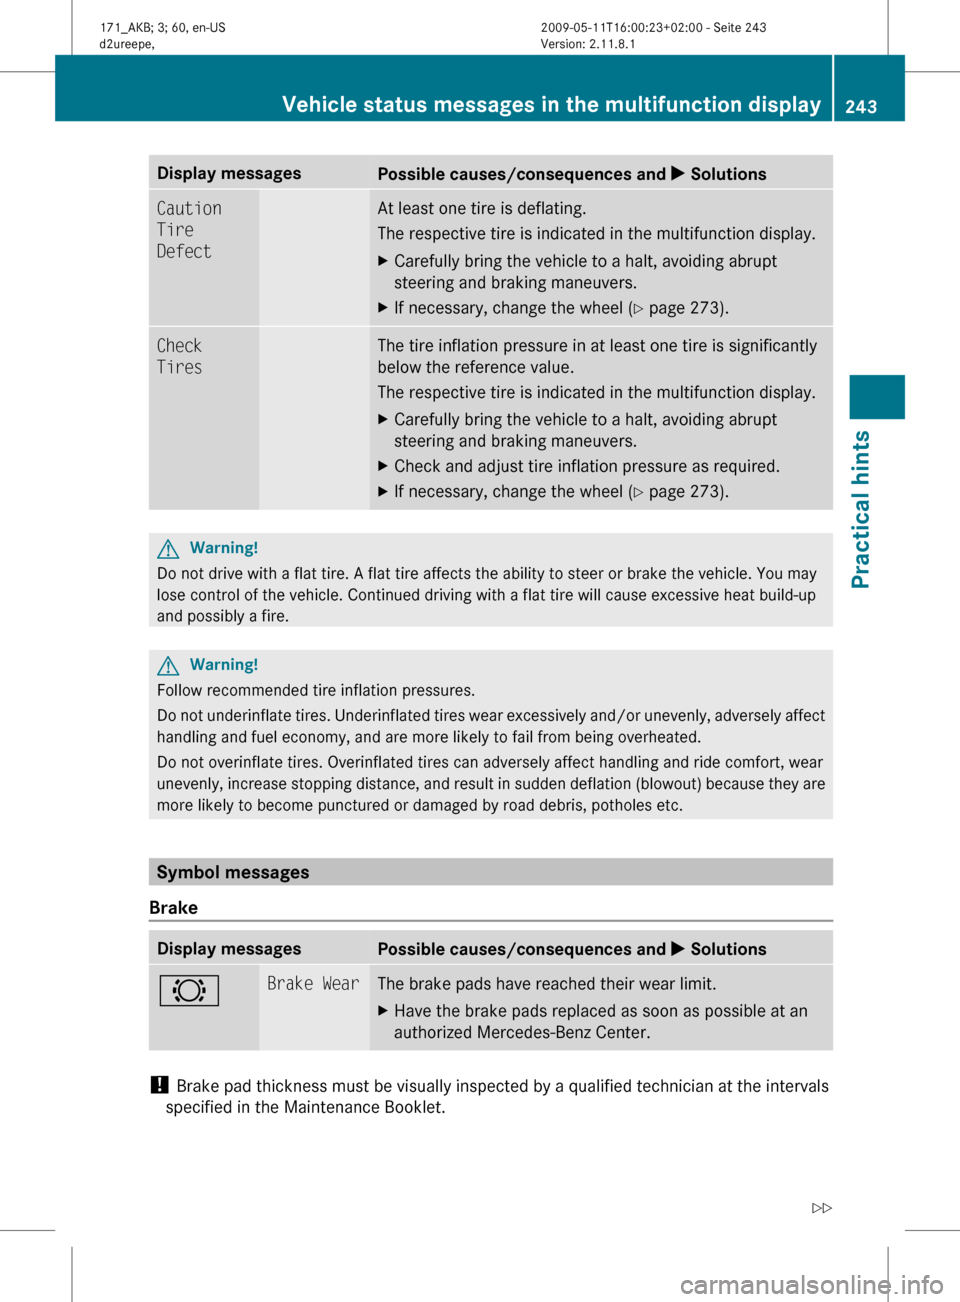
Display messages
Possible causes/consequences and
X SolutionsCaution
Tire
Defect At least one tire is deflating.
The respective tire is indicated in the multifunction display.
X
Carefully bring the vehicle to a halt, avoiding abrupt
steering and braking maneuvers.
X If necessary, change the wheel (Y page 273). Check
Tires The tire inflation pressure in at least one tire is significantly
below the reference value.
The respective tire is indicated in the multifunction display.
X
Carefully bring the vehicle to a halt, avoiding abrupt
steering and braking maneuvers.
X Check and adjust tire inflation pressure as required.
X If necessary, change the wheel (Y page 273). G
Warning!
Do not drive with a flat tire. A flat tire affects the ability to steer or brake the vehicle. You may
lose control of the vehicle. Continued driving with a flat tire will cause excessive heat build-up
and possibly a fire. G
Warning!
Follow recommended tire inflation pressures.
Do not underinflate tires. Underinflated tires wear excessively and/or unevenly, adversely affect
handling and fuel economy, and are more likely to fail from being overheated.
Do not overinflate tires. Overinflated tires can adversely affect handling and ride comfort, wear
unevenly, increase stopping distance, and result in sudden deflation (blowout) because they are
more likely to become punctured or damaged by road debris, potholes etc. Symbol messages
Brake Display messages
Possible causes/consequences and
X Solutions# Brake Wear The brake pads have reached their wear limit.
X
Have the brake pads replaced as soon as possible at an
authorized Mercedes-Benz Center. !
Brake pad thickness must be visually inspected by a qualified technician at the intervals
specified in the Maintenance Booklet. Vehicle status messages in the multifunction display
243
Practical hints
171_AKB; 3; 60, en-US
d2ureepe,Version: 2.11.8.1 2009-05-11T16:00:23+02:00 - Seite 243 Z
Page 257 of 312
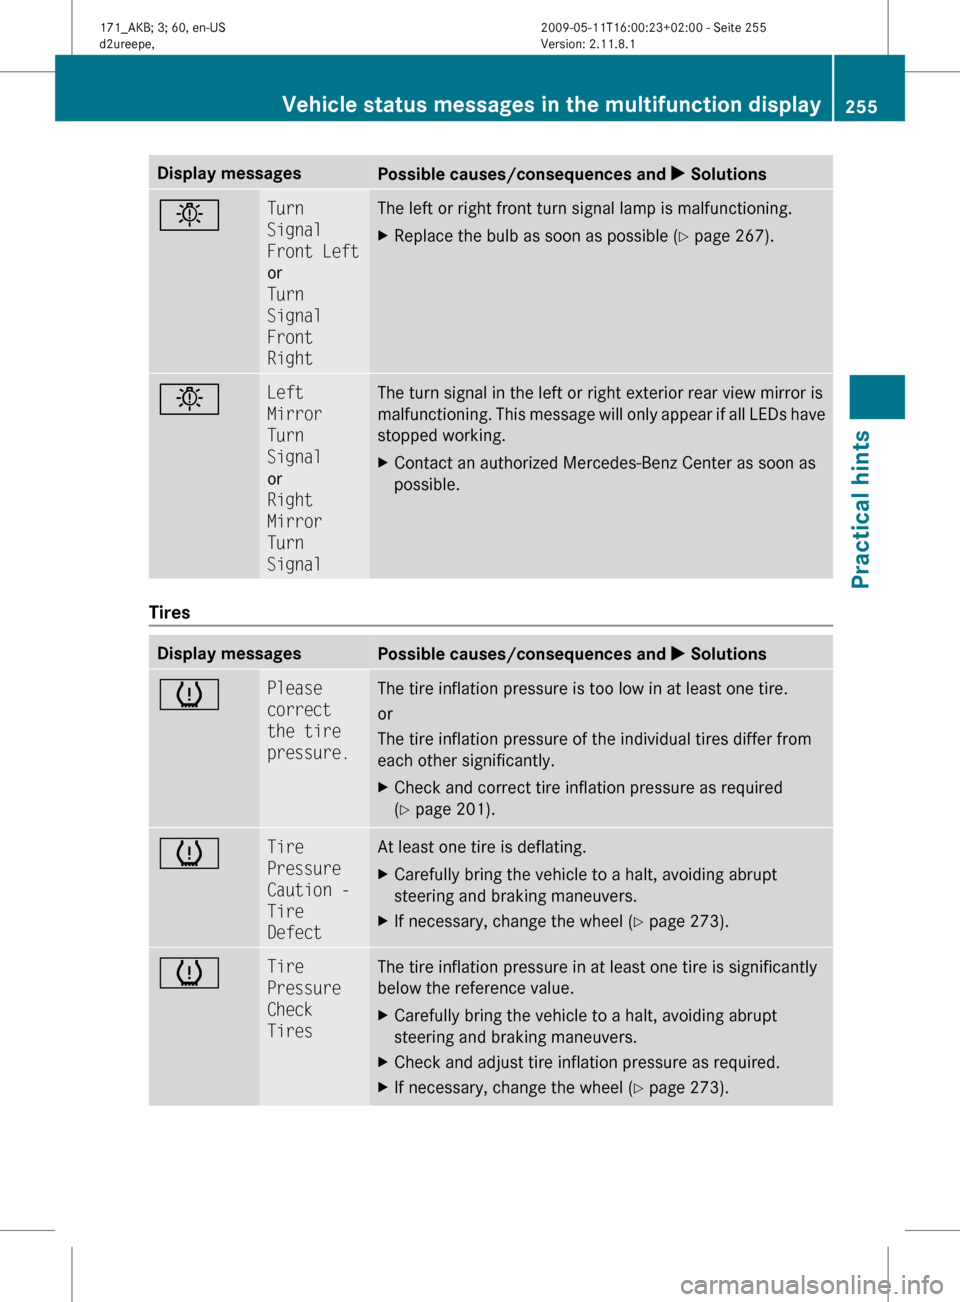
Display messages
Possible causes/consequences and
X Solutionsb Turn
Signal
Front Left
or
Turn
Signal
Front
Right The left or right front turn signal lamp is malfunctioning.
X
Replace the bulb as soon as possible (Y page 267). b Left
Mirror
Turn
Signal
or
Right
Mirror
Turn
Signal The turn signal in the left or right exterior rear view mirror is
malfunctioning.
This message will only appear if all LEDs have
stopped working.
X Contact an authorized Mercedes-Benz Center as soon as
possible. Tires
Display messages
Possible causes/consequences and
X Solutionsh Please
correct
the tire
pressure. The tire inflation pressure is too low in at least one tire.
or
The tire inflation pressure of the individual tires differ from
each other significantly.
X
Check and correct tire inflation pressure as required
(Y page 201). h Tire
Pressure
Caution -
Tire
Defect At least one tire is deflating.
X
Carefully bring the vehicle to a halt, avoiding abrupt
steering and braking maneuvers.
X If necessary, change the wheel (Y page 273). h Tire
Pressure
Check
Tires The tire inflation pressure in at least one tire is significantly
below the reference value.
X
Carefully bring the vehicle to a halt, avoiding abrupt
steering and braking maneuvers.
X Check and adjust tire inflation pressure as required.
X If necessary, change the wheel (Y page 273). Vehicle status messages in the multifunction display
255
Practical hints
171_AKB; 3; 60, en-US
d2ureepe,Version: 2.11.8.1 2009-05-11T16:00:23+02:00 - Seite 255 Z
Page 258 of 312
G
Warning!
Do not drive with a flat tire. A flat tire affects the ability to steer or brake the vehicle. You may
lose control of the vehicle. Continued driving with a flat tire will cause excessive heat build-up
and possibly a fire. G
Warning!
Follow recommended tire inflation pressures.
Do not underinflate tires. Underinflated tires wear excessively and/or unevenly, adversely affect
handling and fuel economy, and are more likely to fail from being overheated.
Do not overinflate tires. Overinflated tires can adversely affect handling and ride comfort, wear
unevenly, increase stopping distance, and result in sudden deflation (blowout) because they are
more likely to become punctured or damaged by road debris, potholes etc. What to do if …
Lamps in instrument cluster
Notes If any of the following lamps in the instrument
cluster fails to come on during the bulb self-
check when switching on the ignition, have
the respective bulb checked and replaced if
necessary.
When you switch on the ignition, all lamps in
the instrument cluster come on. The high-
beam headlamp indicator lamp and turn
signal indicator lamps will only come on if
activated. If a lamp in the instrument cluster
fails
to come on when the ignition is switched
on, have it checked and replaced if necessary. 256
What to do if …
Practical hints
171_AKB; 3; 60, en-US
d2ureepe,
Version: 2.11.8.1 2009-05-11T16:00:23+02:00 - Seite 256
Page 264 of 312
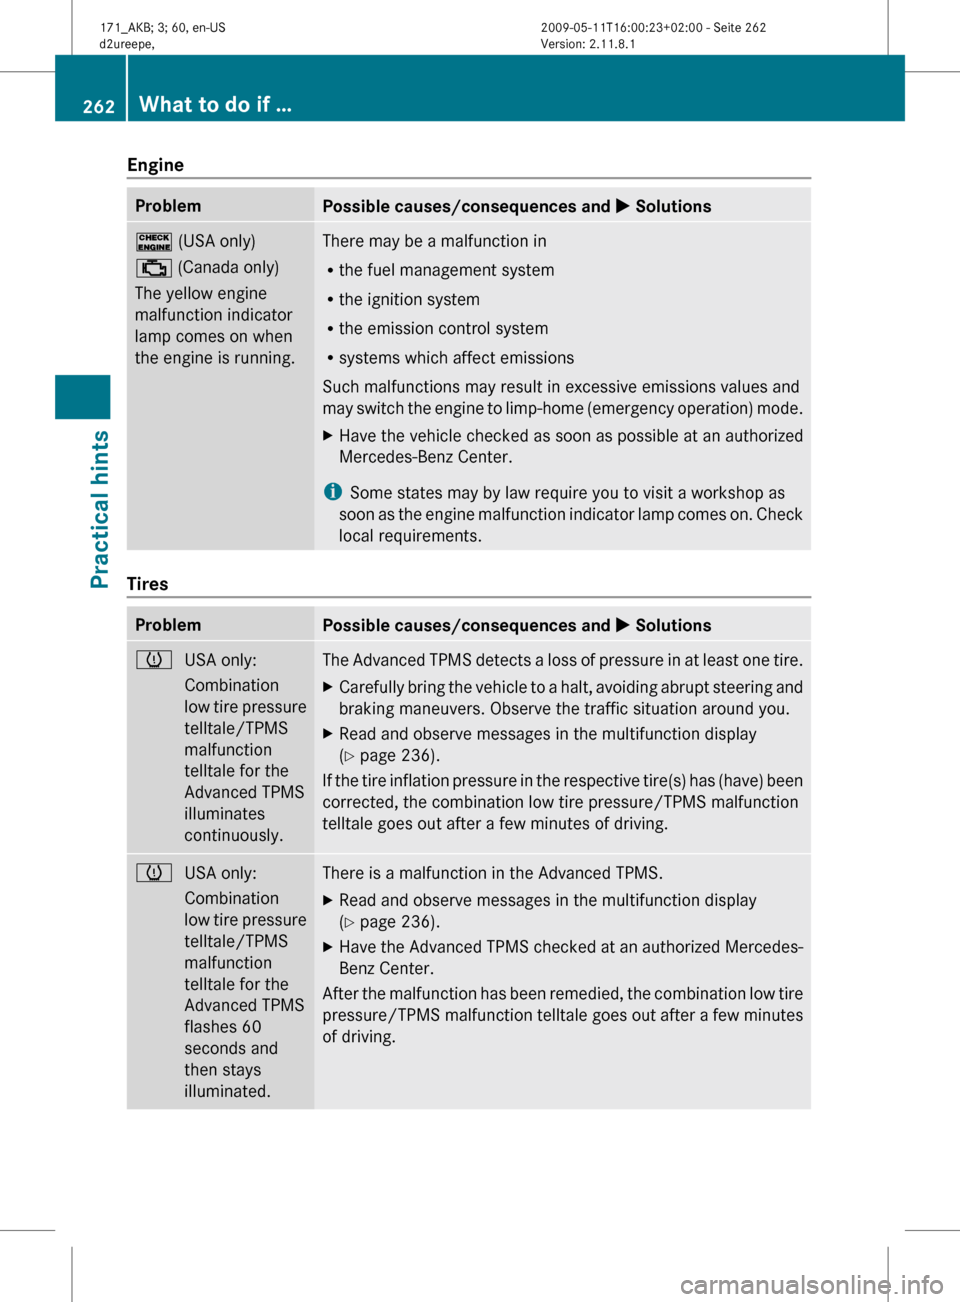
Engine
Problem
Possible causes/consequences and
X Solutions! (USA only)
; (Canada only)
The yellow engine
malfunction indicator
lamp comes on when
the engine is running. There may be a malfunction in
R
the fuel management system
R the ignition system
R the emission control system
R systems which affect emissions
Such malfunctions may result in excessive emissions values and
may
switch the engine to limp-home (emergency operation) mode.
X Have the vehicle checked as soon as possible at an authorized
Mercedes-Benz Center.
i Some states may by law require you to visit a workshop as
soon
as the engine malfunction indicator lamp comes on. Check
local requirements. Tires
Problem
Possible causes/consequences and
X Solutionsh
USA only:
Combination
low
tire pressure
telltale/TPMS
malfunction
telltale for the
Advanced TPMS
illuminates
continuously. The Advanced TPMS detects a loss of pressure in at least one tire.
X
Carefully bring the vehicle to a halt, avoiding abrupt steering and
braking maneuvers. Observe the traffic situation around you.
X Read and observe messages in the multifunction display
(Y page 236).
If the tire inflation pressure in the respective tire(s) has (have) been
corrected, the combination low tire pressure/TPMS malfunction
telltale goes out after a few minutes of driving. h
USA only:
Combination
low
tire pressure
telltale/TPMS
malfunction
telltale for the
Advanced TPMS
flashes 60
seconds and
then stays
illuminated. There is a malfunction in the Advanced TPMS.
X
Read and observe messages in the multifunction display
(Y page 236).
X Have the Advanced TPMS checked at an authorized Mercedes-
Benz Center.
After the malfunction has been remedied, the combination low tire
pressure/TPMS
malfunction telltale goes out after a few minutes
of driving. 262
What to do if …
Practical hints
171_AKB; 3; 60, en-US
d2ureepe,
Version: 2.11.8.1 2009-05-11T16:00:23+02:00 - Seite 262
Page 265 of 312
G
Warning!
Each tire, including the spare (if provided),
should be checked at least once a month
when cold and inflated to the inflation
pressure recommended by the vehicle
manufacturer on the Tire and Loading
Information placard on the driver’s door B-
pillar
or the tire inflation pressure label on the
inside of the fuel filler flap. If your vehicle has
tires of a different size than the size indicated
on the Tire and Loading Information placard
or the tire inflation pressure label, you should
determine the proper tire inflation pressure
for those tires.
As an added safety feature, your vehicle has
been equipped with a tire pressure monitoring
system (TPMS) that illuminates a low tire
pressure telltale when one or more of your
tires are significantly underinflated.
Accordingly, when the low tire pressure
telltale illuminates, you should stop and check
your tires as soon as possible, and inflate
them to the proper pressure. Driving on a
significantly underinflated tire causes the tire
to overheat and can lead to tire failure.
Underinflation also reduces fuel efficiency
and tire tread life, and may affect the vehicle’s
handling and stopping ability. Please note that
the TPMS is not a substitute for proper tire maintenance, and it is the driver’s
responsibility to maintain correct tire
pressure, even if underinflation has not
reached
the level to trigger illumination of the
TPMS low tire pressure telltale.
Your vehicle has also been equipped with a
TPMS malfunction indicator to indicate when
the system is not operating properly. The
TPMS malfunction indicator is combined with
the low tire pressure telltale. When the
system detects a malfunction, the telltale will
flash for approximately 1 minute and then
remain continuously illuminated. This
sequence will continue upon subsequent
vehicle start-ups as long as the malfunction
exists. When the malfunction indicator is
illuminated, the system may not be able to
detect or signal low tire pressure as intended.
TPMS malfunctions may occur for a variety of
reasons, including the installation of
incompatible replacement or alternate tires
or wheels on the vehicle that prevent the
TPMS from functioning properly. Always
check the TPMS malfunction telltale after
replacing one or more tires or wheels on your
vehicle to ensure that the replacement or
alternate tires and wheels allow the TPMS to
continue to function properly. Lamp in center console
Problem
Possible causes/consequences and
X Solutions04
The passenger front air
bag off indicator lamp
illuminates and
remains illuminated
with the weight of a
typical adult or
someone larger than a
small individual on the
passenger seat.
The system is malfunctioning.
X
Have the system checked as soon as possible at an authorized
Mercedes-Benz Center.
X Read and observe messages in the multifunction display and
follow corrective steps (Y page 236). What to do if …
263
Practical hints
171_AKB; 3; 60, en-US
d2ureepe, Version: 2.11.8.1 2009-05-11T16:00:23+02:00 - Seite 263 Z
Page 275 of 312
X
Simultaneously press tabs ? together and
let the wiper blade engage into both
recesses of attachment =.
X Check if the wiper blade is securely
fastened.
X Fold the wiper arm backward to rest on the
windshield.
Make sure you hold on to the wiper arm
when folding it back.
! Make sure the wiper blades are installed
properly.
Improperly installed wiper blades
may cause windshield damage. Flat tire
Safety notes
Your vehicle may be equipped with a TIREFIT
kit or a spare wheel with collapsible tire.
Vehicles
with a TIREFIT kit do not have a spare
wheel.
For information on your vehicle’s equipment,
see “Rims and tires” ( Y page 297).G
Warning!
The dimensions of the spare wheel are
different from those of the road wheels. As a
result, the vehicle handling characteristics
change when driving with a spare wheel
mounted. Adapt your driving style
accordingly.
The spare wheel is for temporary use only.
When driving with a spare wheel mounted,
ensure proper tire inflation pressure and do
not exceed a vehicle speed of 50 mph
(80 km/h).
Contact the nearest authorized Mercedes-
Benz Center as soon as possible to have the
spare wheel replaced with a regular road
wheel.
Never
operate the vehicle with more than one
spare wheel mounted.
Do not switch off the ESP ®
when a spare
wheel is mounted. Preparing the vehicle
X Whenever possible, park the vehicle in a
safe
distance from moving traffic on a hard,
flat surface.
X Turn on the hazard warning flasher.
X Turn the steering wheel so that the front
wheels are in a straight-ahead position.
X Engage the parking brake.
X Shift the automatic transmission into park
position P (manual transmission to 1st or
reverse gear R).
X Turn off the engine.
X Remove the SmartKey from the starter
switch.
X Have any passenger exit the vehicle at a
safe distance from the roadway. Open
doors only when conditions are safe to do
so. Sealing tires with TIREFIT
This section applies to SLK 55 AMG with
Performance Package only.
Small
tire punctures, particularly those in the
tread, can be sealed with TIREFIT.
TIREFIT can be used in ambient temperatures
down to -4‡ (-20†). G
Warning!
TIREFIT is a limited repair device. TIREFIT
cannot be used for cuts or punctures larger
than approximately 0.16 in (4 mm) and tire
damage
caused by driving with extremely low
tire inflation pressure, or on a flat tire, or a
damaged wheel.
Do not drive the vehicle under such
circumstances.
Contact the nearest authorized Mercedes-
Benz Center for assistance or call Roadside
Assistance. Flat tire
273
Practical hints
171_AKB; 3; 60, en-US
d2ureepe, Version: 2.11.8.1 2009-05-11T16:00:23+02:00 - Seite 273 Z