2011 MERCEDES-BENZ SLK55AMG trunk
[x] Cancel search: trunkPage 185 of 312
(1-800-367-6372) (USA only) or
1-888-923-8367
(Canada only).
You will be asked to provide your password.
X Then return to your vehicle at the time
arranged with the Customer Assistance
Center and pull the trunk recessed handle
for a minimum of 20 seconds until the
indicator
lamp in the SOS button is flashing.
The message Connecting Call appears in
the multifunction display.
As an alternative, you may unlock the vehicle
via Internet in the “My Tele Aid” section of
“Owner’s
Online”, using your ID and password
(USA only).
i The remote door unlock feature is
available if the relevant cellular phone
network is available.
The SOS button will flash and the message
Connecting Call will appear in the
multifunction display to indicate receipt of
the door unlock command.
If the trunk recessed handle was pulled for
more than 20 seconds before door unlock
authorization was received by the
Customer Assistance Center, you must
wait 15 minutes before pulling the trunk
recessed handle again.
Stolen Vehicle Recovery Services In the event your vehicle was stolen:
X
Report the incident to the police.
The police will issue a numbered incident
report.
X Pass this number on to the Customer
Assistance Center along with your
password.
The Customer Assistance Center will then
attempt to covertly contact the vehicle’s
Tele Aid system. Once the vehicle is
located, the Customer Assistance Center
will contact the local law enforcement and
you. The vehicle’s location will only be
provided to law enforcement.
i If the anti-theft alarm or the tow-away
alarm stays on for more than 30 seconds, a call to the Customer Assistance Center is
initiated automatically by the Tele Aid
system provided Tele Aid service was
subscribed to and properly activated, and
that necessary cellular service and GPS
coverage are available. See “Anti-theft
alarm system”
(Y page 51) and “Tow-away
alarm” ( Y page 52). Garage door opener
The
integrated remote control can operate up
to three separately controlled devices
compatible with HomeLink ®
or some other
systems. G
Warning!
Before programming the integrated remote
control to a garage door opener or gate
operator, make sure people and objects are
out of the way of the device to prevent
potential harm or damage. When
programming
a garage door opener, the door
moves up or down. When programming a gate
operator, the gate opens or closes.
Do not use the integrated remote control with
any garage door opener that lacks safety stop
and reverse features as required by U.S.
federal safety standards (this includes any
garage door opener model manufactured
before April 1, 1982). A garage door that
cannot detect an object - signaling the door
to stop and reverse - does not meet current
U.S. federal safety standards.
When programming a garage door opener,
park vehicle outside the garage.
Do not run the engine while programming the
integrated remote control. Inhalation of
exhaust gas is hazardous to your health. All
exhaust gas contains carbon monoxide (CO),
and inhaling it can cause unconsciousness
and possible death. Useful features
183
Controls in detail
171_AKB; 3; 60, en-US
d2ureepe, Version: 2.11.8.1 2009-05-11T16:00:23+02:00 - Seite 183 Z
Page 236 of 312
Vehicle equipment
i This Operator’s Manual describes all
features, standard or optional, potentially
available for your vehicle at the time of
purchase. Please be aware that your
vehicle might not be equipped with all
features described in this manual. Where will I find ...?
First aid kit
i Check expiration dates and contents for
completeness at least once a year and
replace missing/expired items.
The first aid kit is located in a parcel net
behind the driver’s seat. Vehicle tool kit
The vehicle tool kit is located in the space
underneath the trunk floor.
i Vehicles without spare wheel are not
factory-equipped with the tools required for
a wheel change such as a jack or a wheel
wrench. Some tools required for a wheel
change are specific to your vehicle.
Contact an authorized Mercedes-Benz
Center to obtain the tools approved for
your vehicle.
X Removing: Open the trunk (Y page 59).
X Lift the trunk floor.
X Remove the spare wheel (if so equipped)
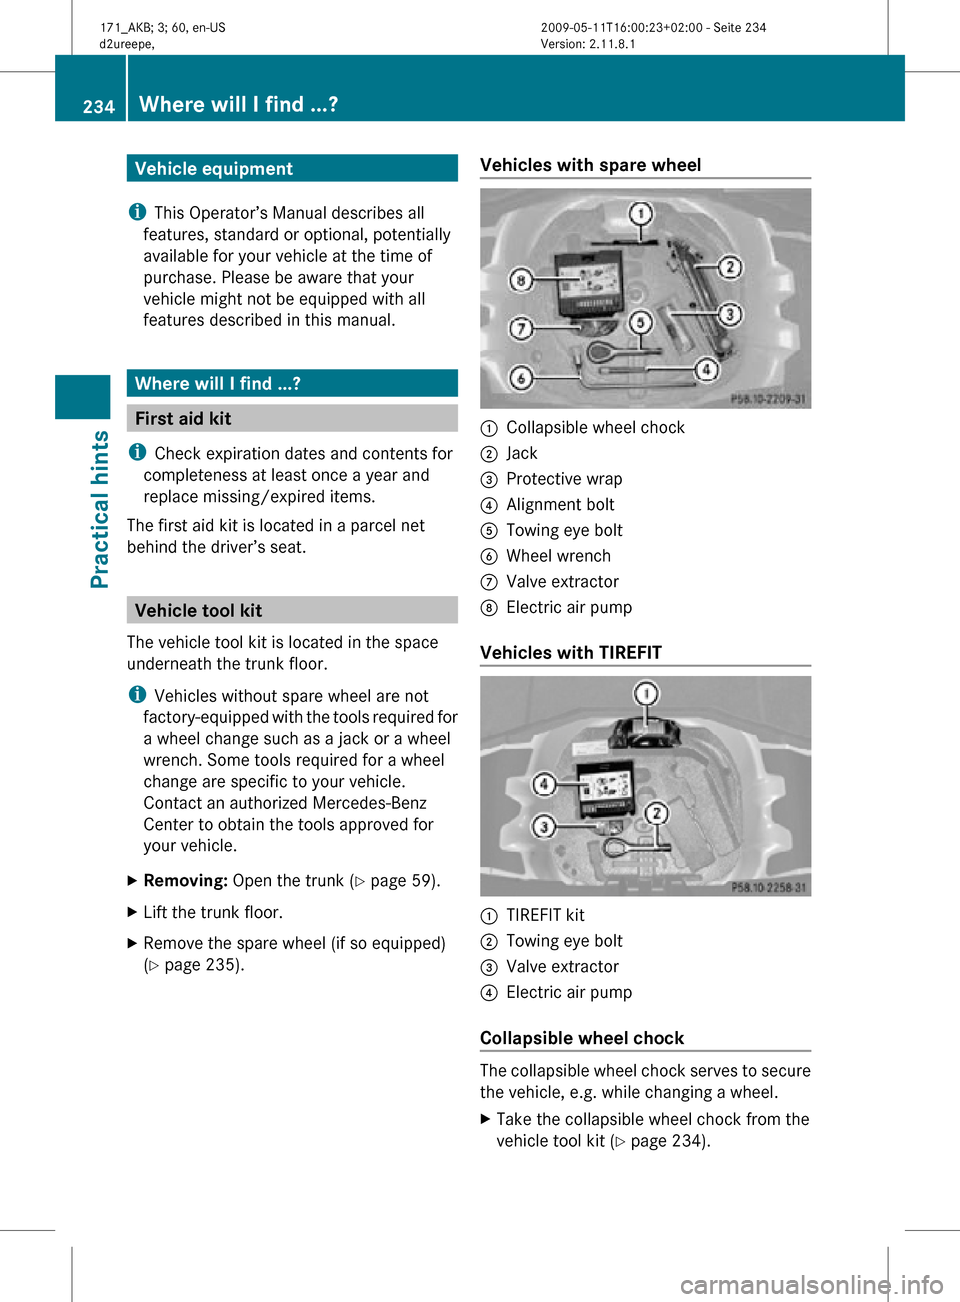
(Y page 235). Vehicles with spare wheel :
Collapsible wheel chock
; Jack
= Protective wrap
? Alignment bolt
A Towing eye bolt
B Wheel wrench
C Valve extractor
D Electric air pump
Vehicles with TIREFIT :
TIREFIT kit
; Towing eye bolt
= Valve extractor
? Electric air pump
Collapsible wheel chock The collapsible wheel chock serves to secure
the vehicle, e.g. while changing a wheel.
X
Take the collapsible wheel chock from the
vehicle tool kit (Y page 234). 234
Where will I find ...?Practical hints
171_AKB; 3; 60, en-US
d2ureepe,
Version: 2.11.8.1 2009-05-11T16:00:23+02:00 - Seite 234
Page 237 of 312
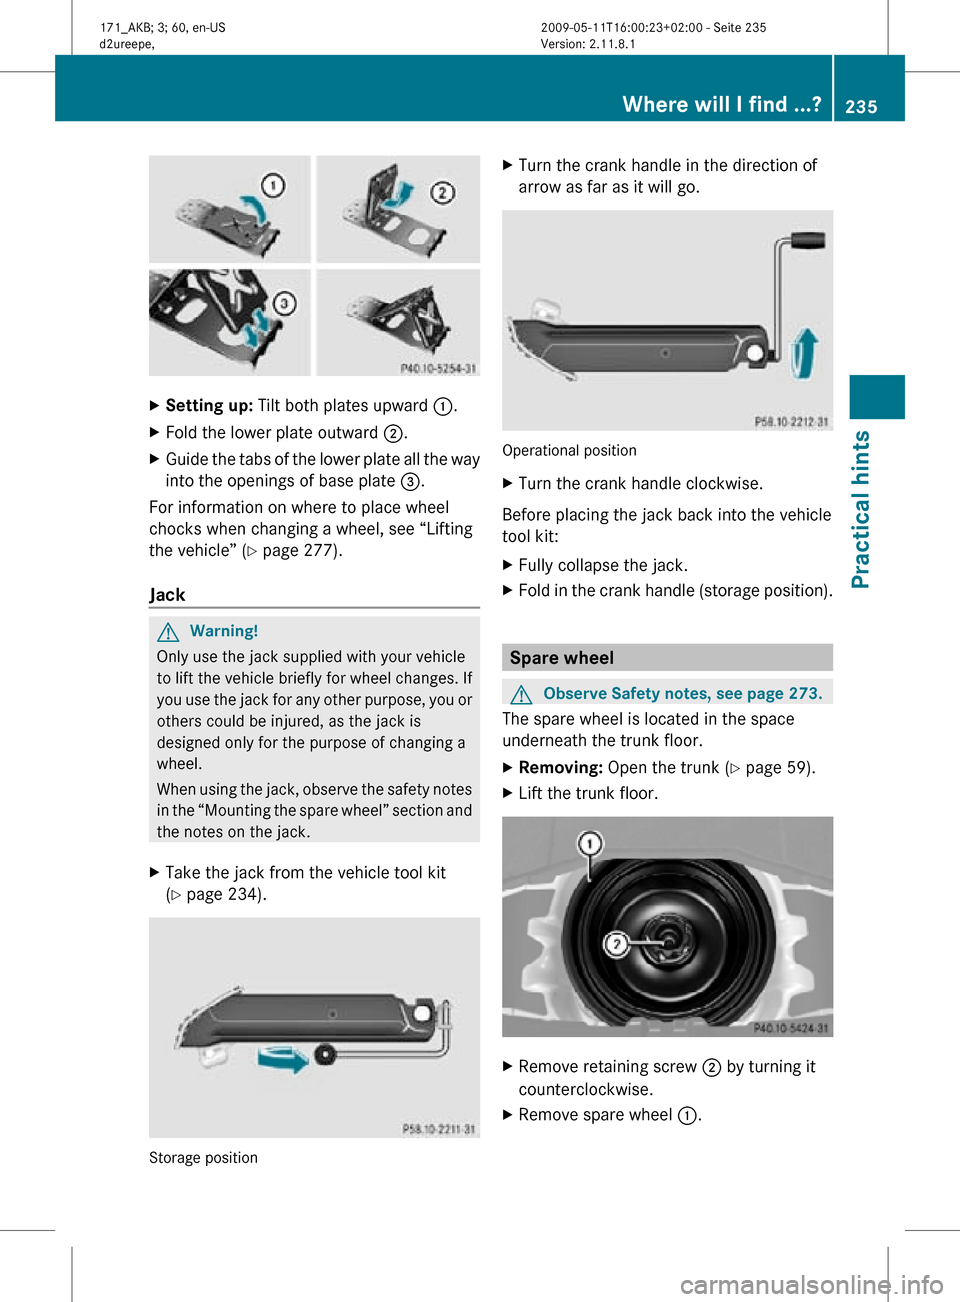
X
Setting up: Tilt both plates upward :.
X Fold the lower plate outward ;.
X Guide the tabs of the lower plate all the way
into the openings of base plate =.
For information on where to place wheel
chocks when changing a wheel, see “Lifting
the vehicle” ( Y page 277).
Jack G
Warning!
Only use the jack supplied with your vehicle
to lift the vehicle briefly for wheel changes. If
you use the jack for any other purpose, you or
others could be injured, as the jack is
designed only for the purpose of changing a
wheel.
When using the jack, observe the safety notes
in the “Mounting the spare wheel” section and
the notes on the jack.
X Take the jack from the vehicle tool kit
(Y page 234). Storage position X
Turn the crank handle in the direction of
arrow as far as it will go. Operational position
X
Turn the crank handle clockwise.
Before placing the jack back into the vehicle
tool kit:
X Fully collapse the jack.
X Fold in the crank handle (storage position). Spare wheel
G
Observe Safety notes, see page 273.
The spare wheel is located in the space
underneath the trunk floor.
X Removing: Open the trunk (Y page 59).
X Lift the trunk floor. X
Remove retaining screw ; by turning it
counterclockwise.
X Remove spare wheel :. Where will I find ...?
235Practical hints
171_AKB; 3; 60, en-US
d2ureepe, Version: 2.11.8.1 2009-05-11T16:00:23+02:00 - Seite 235 Z
Page 247 of 312
Safety systems
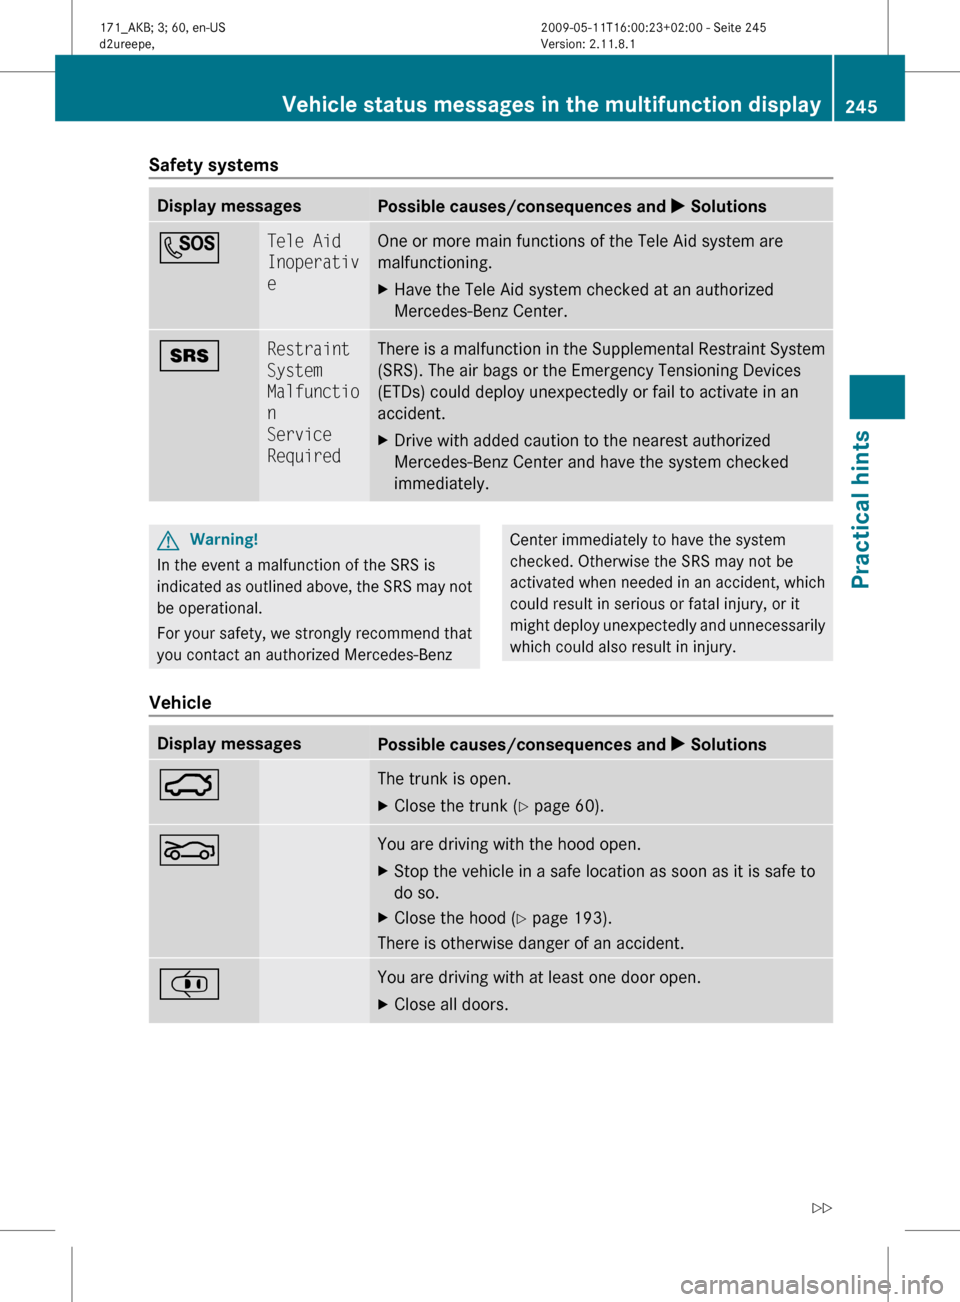
Display messages
Possible causes/consequences and
X SolutionsG Tele Aid
Inoperativ
e One or more main functions of the Tele Aid system are
malfunctioning.
X
Have the Tele Aid system checked at an authorized
Mercedes-Benz Center. + Restraint
System
Malfunctio
n
Service
Required There is a malfunction in the Supplemental Restraint System
(SRS). The air bags or the Emergency Tensioning Devices
(ETDs) could deploy unexpectedly or fail to activate in an
accident.
X
Drive with added caution to the nearest authorized
Mercedes-Benz Center and have the system checked
immediately. G
Warning!
In the event a malfunction of the SRS is
indicated as outlined above, the SRS may not
be operational.
For your safety, we strongly recommend that
you contact an authorized Mercedes-Benz Center immediately to have the system
checked. Otherwise the SRS may not be
activated
when needed in an accident, which
could result in serious or fatal injury, or it
might deploy unexpectedly and unnecessarily
which could also result in injury.
Vehicle Display messages
Possible causes/consequences and
X Solutions: The trunk is open.
X
Close the trunk (Y page 60). L You are driving with the hood open.
X
Stop the vehicle in a safe location as soon as it is safe to
do so.
X Close the hood ( Y page 193).
There is otherwise danger of an accident. ¡ You are driving with at least one door open.
X
Close all doors. Vehicle status messages in the multifunction display
245
Practical hints
171_AKB; 3; 60, en-US
d2ureepe,Version: 2.11.8.1 2009-05-11T16:00:23+02:00 - Seite 245 Z
Page 248 of 312
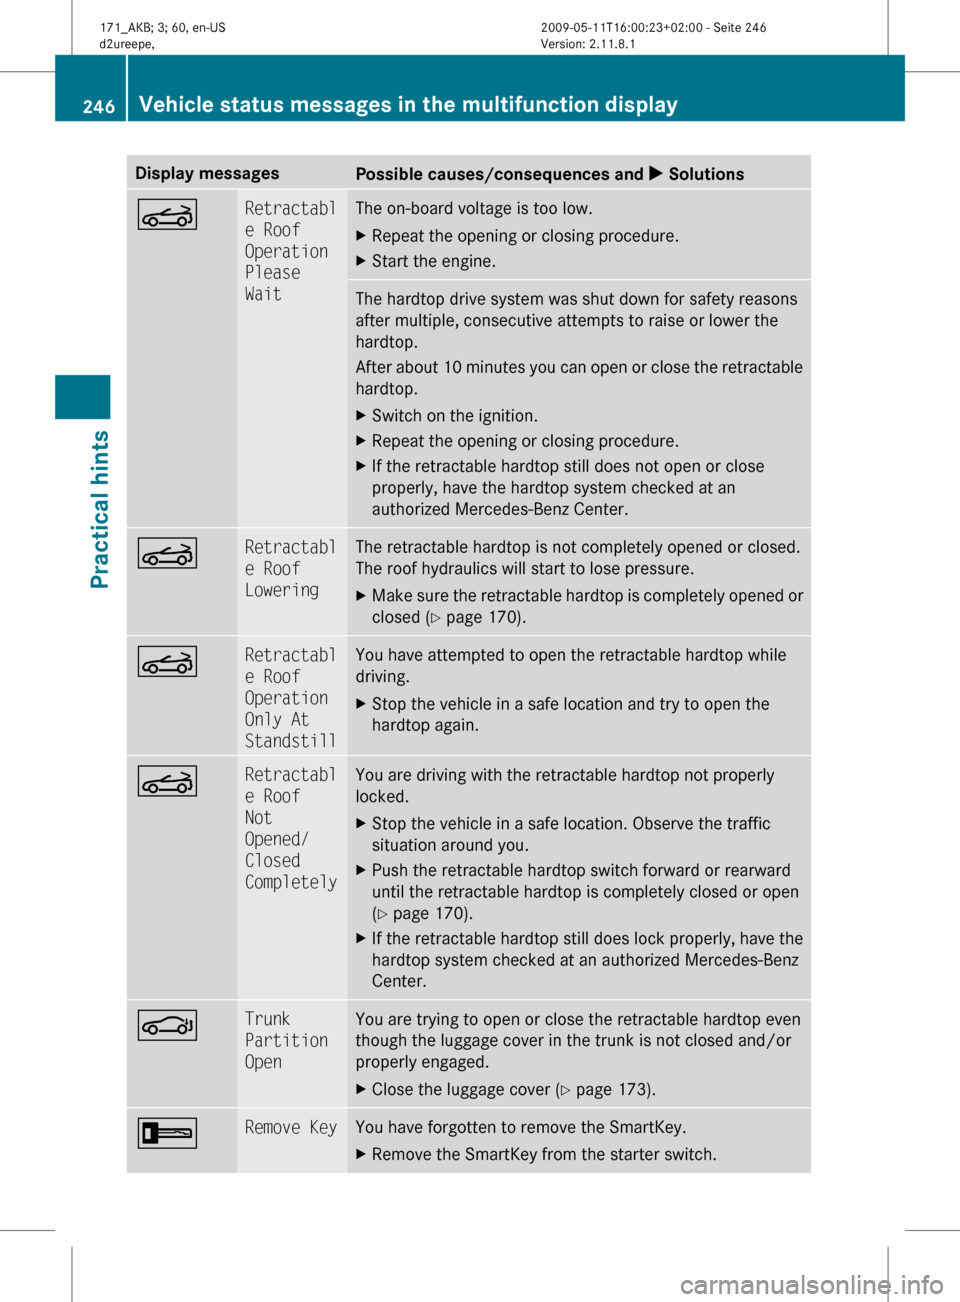
Display messages
Possible causes/consequences and
X SolutionsK Retractabl
e Roof
Operation
Please
Wait The on-board voltage is too low.
X
Repeat the opening or closing procedure.
X Start the engine. The hardtop drive system was shut down for safety reasons
after multiple, consecutive attempts to raise or lower the
hardtop.
After
about 10 minutes you can open or close the retractable
hardtop.
X Switch on the ignition.
X Repeat the opening or closing procedure.
X If the retractable hardtop still does not open or close
properly, have the hardtop system checked at an
authorized Mercedes-Benz Center. K Retractabl
e Roof
Lowering The retractable hardtop is not completely opened or closed.
The roof hydraulics will start to lose pressure.
X
Make sure the retractable hardtop is completely opened or
closed ( Y page 170). K Retractabl
e Roof
Operation
Only At
Standstill You have attempted to open the retractable hardtop while
driving.
X
Stop the vehicle in a safe location and try to open the
hardtop again. K Retractabl
e Roof
Not
Opened/
Closed
Completely You are driving with the retractable hardtop not properly
locked.
X
Stop the vehicle in a safe location. Observe the traffic
situation around you.
X Push the retractable hardtop switch forward or rearward
until the retractable hardtop is completely closed or open
(Y page 170).
X If the retractable hardtop still does lock properly, have the
hardtop system checked at an authorized Mercedes-Benz
Center. J Trunk
Partition
Open You are trying to open or close the retractable hardtop even
though the luggage cover in the trunk is not closed and/or
properly engaged.
X
Close the luggage cover ( Y page 173).+ Remove Key You have forgotten to remove the SmartKey.
X
Remove the SmartKey from the starter switch. 246
Vehicle status messages in the multifunction display
Practical hints
171_AKB; 3; 60, en-US
d2ureepe,
Version: 2.11.8.1 2009-05-11T16:00:23+02:00 - Seite 246
Page 266 of 312
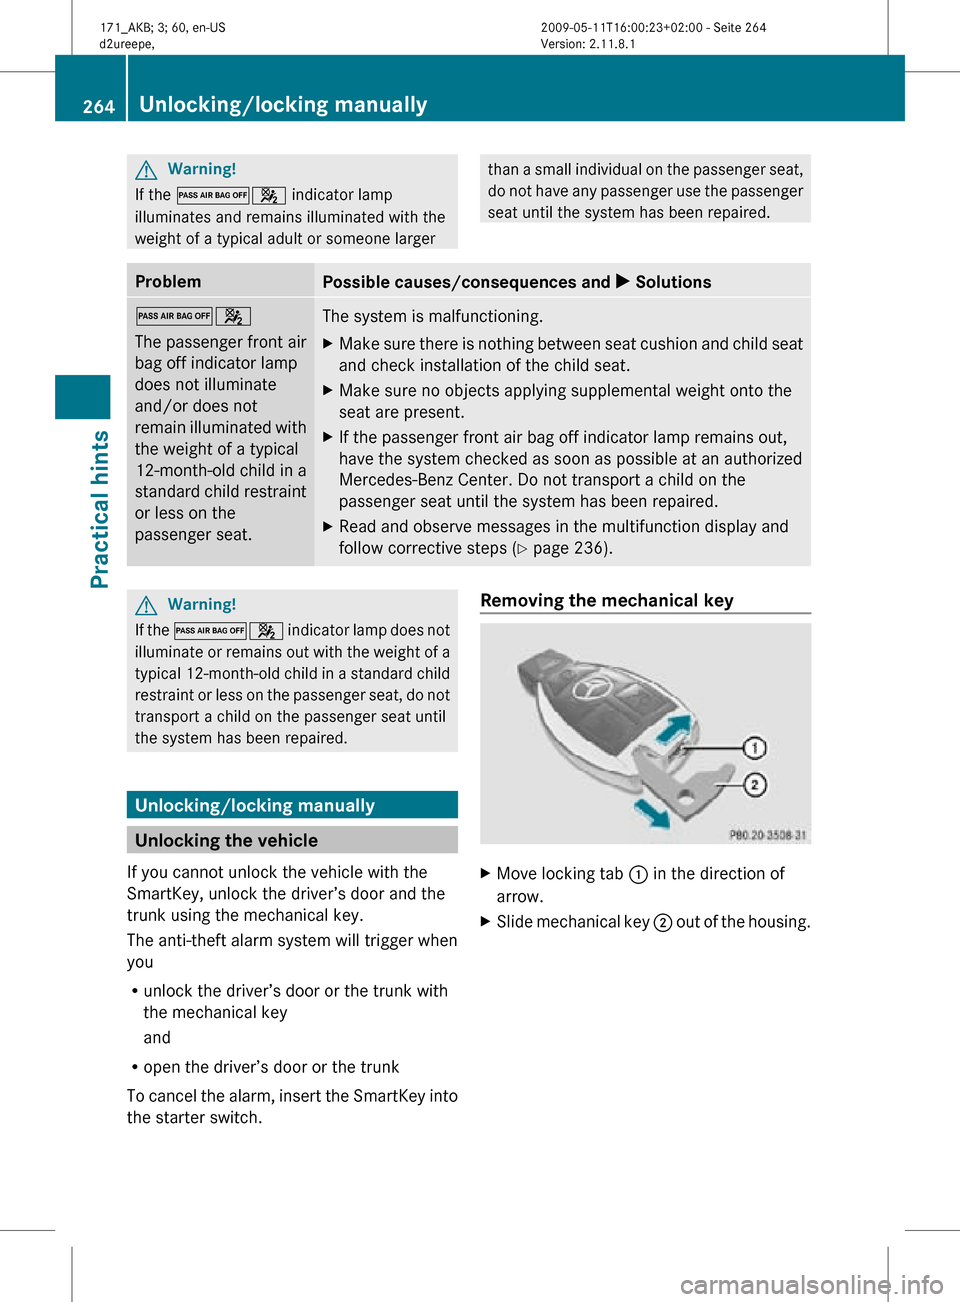
G
Warning!
If the 04 indicator lamp
illuminates and remains illuminated with the
weight of a typical adult or someone larger than a small individual on the passenger seat,
do not have any passenger use the passenger
seat until the system has been repaired.
Problem
Possible causes/consequences and
X Solutions04
The passenger front air
bag off indicator lamp
does not illuminate
and/or does not
remain illuminated with
the weight of a typical
12-month-old child in a
standard child restraint
or less on the
passenger seat.
The system is malfunctioning.
X
Make sure there is nothing between seat cushion and child seat
and check installation of the child seat.
X Make sure no objects applying supplemental weight onto the
seat are present.
X If the passenger front air bag off indicator lamp remains out,
have the system checked as soon as possible at an authorized
Mercedes-Benz Center. Do not transport a child on the
passenger seat until the system has been repaired.
X Read and observe messages in the multifunction display and
follow corrective steps (Y page 236). G
Warning!
If the 04 indicator lamp does not
illuminate or remains out with the weight of a
typical 12-month-old child in a standard child
restraint or less on the passenger seat, do not
transport a child on the passenger seat until
the system has been repaired. Unlocking/locking manually
Unlocking the vehicle
If you cannot unlock the vehicle with the
SmartKey, unlock the driver’s door and the
trunk using the mechanical key.
The anti-theft alarm system will trigger when
you
R unlock the driver’s door or the trunk with
the mechanical key
and
R open the driver’s door or the trunk
To cancel the alarm, insert the SmartKey into
the starter switch. Removing the mechanical key
X
Move locking tab : in the direction of
arrow.
X Slide mechanical key ; out of the housing.264
Unlocking/locking manuallyPractical hints
171_AKB; 3; 60, en-US
d2ureepe,
Version: 2.11.8.1 2009-05-11T16:00:23+02:00 - Seite 264
Page 267 of 312
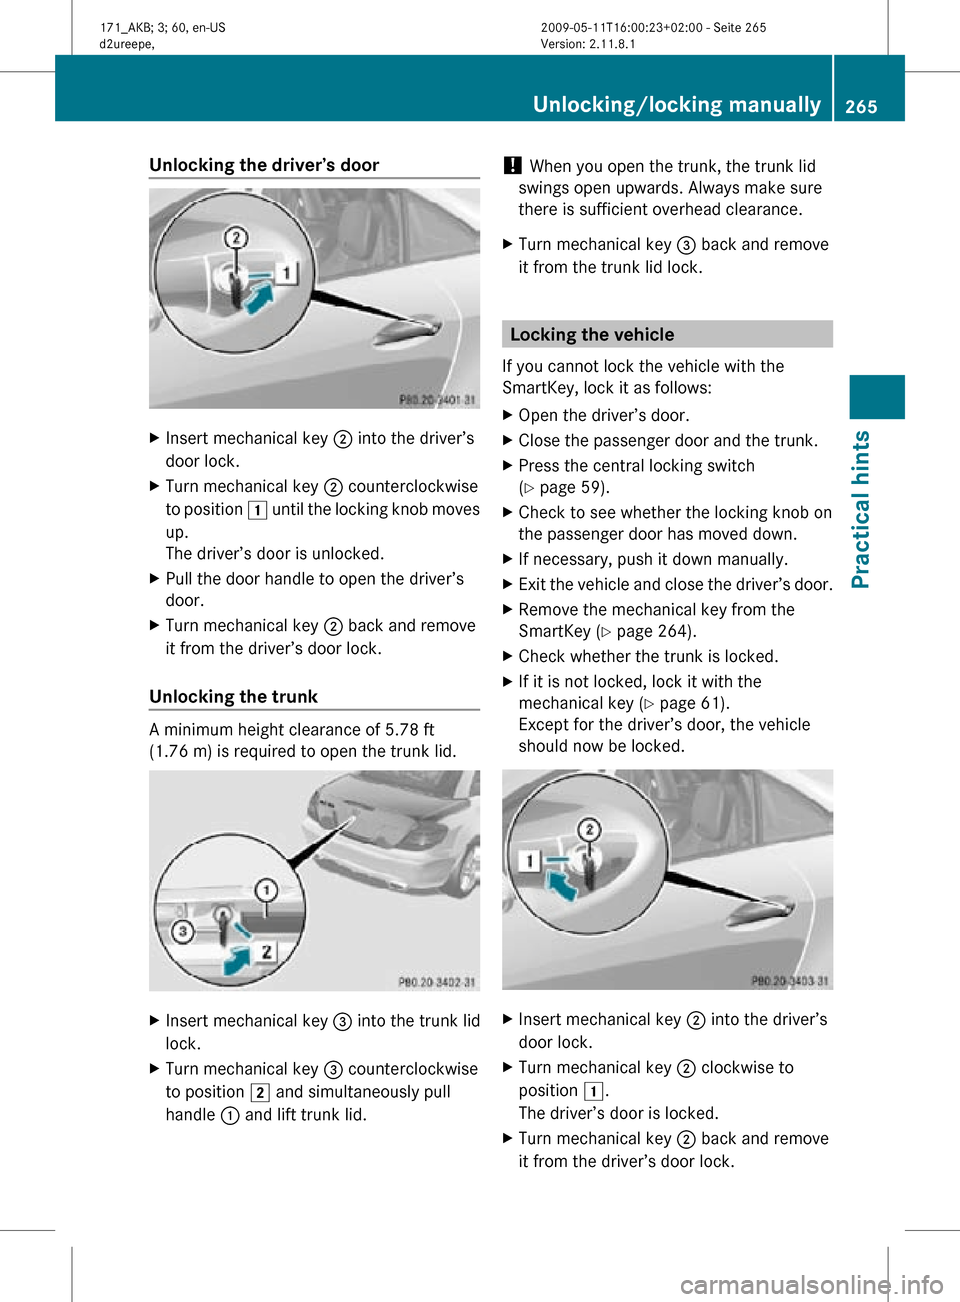
Unlocking the driver’s door
X
Insert mechanical key ; into the driver’s
door lock.
X Turn mechanical key ; counterclockwise
to position 1 until the locking knob moves
up.
The driver’s door is unlocked.
X Pull the door handle to open the driver’s
door.
X Turn mechanical key ; back and remove
it from the driver’s door lock.
Unlocking the trunk A minimum height clearance of 5.78 ft
(1.76 m) is required to open the trunk lid.
X
Insert mechanical key = into the trunk lid
lock.
X Turn mechanical key = counterclockwise
to position 2 and simultaneously pull
handle : and lift trunk lid. !
When you open the trunk, the trunk lid
swings open upwards. Always make sure
there is sufficient overhead clearance.
X Turn mechanical key = back and remove
it from the trunk lid lock. Locking the vehicle
If you cannot lock the vehicle with the
SmartKey, lock it as follows:
X Open the driver’s door.
X Close the passenger door and the trunk.
X Press the central locking switch
(Y page 59).
X Check to see whether the locking knob on
the passenger door has moved down.
X If necessary, push it down manually.
X Exit the vehicle and close the driver’s door.
X Remove the mechanical key from the
SmartKey (Y page 264).
X Check whether the trunk is locked.
X If it is not locked, lock it with the
mechanical key ( Y page 61).
Except for the driver’s door, the vehicle
should now be locked. X
Insert mechanical key ; into the driver’s
door lock.
X Turn mechanical key ; clockwise to
position 1.
The driver’s door is locked.
X Turn mechanical key ; back and remove
it from the driver’s door lock. Unlocking/locking manually
265Practical hints
171_AKB; 3; 60, en-US
d2ureepe, Version: 2.11.8.1 2009-05-11T16:00:23+02:00 - Seite 265 Z
Page 273 of 312
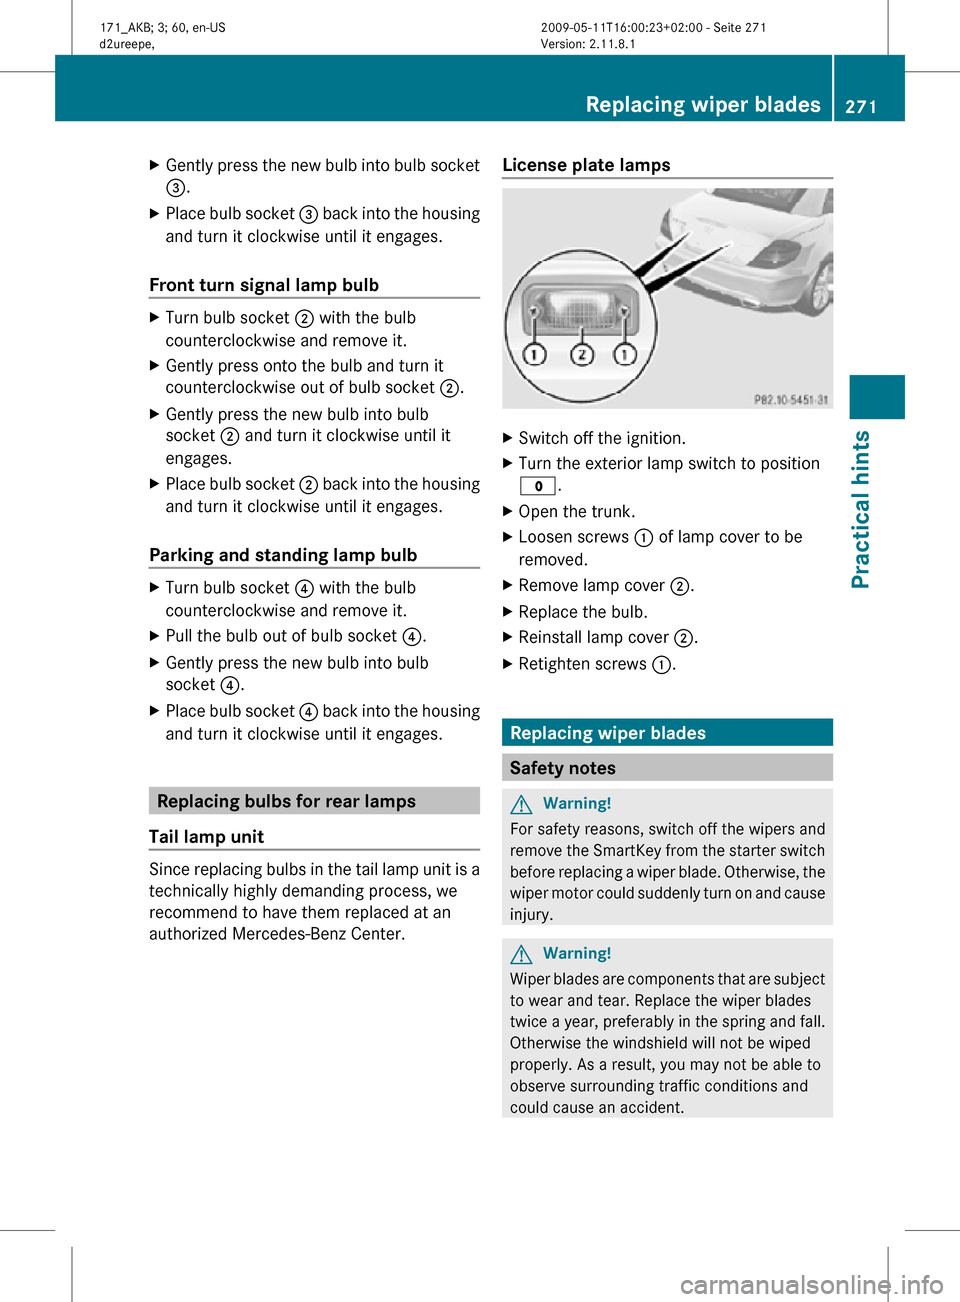
X
Gently press the new bulb into bulb socket
=.
X Place bulb socket = back into the housing
and turn it clockwise until it engages.
Front turn signal lamp bulb X
Turn bulb socket ; with the bulb
counterclockwise and remove it.
X Gently press onto the bulb and turn it
counterclockwise out of bulb socket ;.
X Gently press the new bulb into bulb
socket ; and turn it clockwise until it
engages.
X Place bulb socket ; back into the housing
and turn it clockwise until it engages.
Parking and standing lamp bulb X
Turn bulb socket ? with the bulb
counterclockwise and remove it.
X Pull the bulb out of bulb socket ?.
X Gently press the new bulb into bulb
socket ?.
X Place bulb socket ? back into the housing
and turn it clockwise until it engages. Replacing bulbs for rear lamps
Tail lamp unit Since replacing bulbs in the tail lamp unit is a
technically highly demanding process, we
recommend to have them replaced at an
authorized Mercedes-Benz Center. License plate lamps X
Switch off the ignition.
X Turn the exterior lamp switch to position
$.
X Open the trunk.
X Loosen screws : of lamp cover to be
removed.
X Remove lamp cover ;.
X Replace the bulb.
X Reinstall lamp cover ;.
X Retighten screws :. Replacing wiper blades
Safety notes
G
Warning!
For safety reasons, switch off the wipers and
remove the SmartKey from the starter switch
before replacing a wiper blade. Otherwise, the
wiper motor could suddenly turn on and cause
injury. G
Warning!
Wiper blades are components that are subject
to wear and tear. Replace the wiper blades
twice a year, preferably in the spring and fall.
Otherwise the windshield will not be wiped
properly. As a result, you may not be able to
observe surrounding traffic conditions and
could cause an accident. Replacing wiper blades
271Practical hints
171_AKB; 3; 60, en-US
d2ureepe, Version: 2.11.8.1 2009-05-11T16:00:23+02:00 - Seite 271 Z