2011 MERCEDES-BENZ SLK55AMG warning
[x] Cancel search: warningPage 266 of 312
G
Warning!
If the 04 indicator lamp
illuminates and remains illuminated with the
weight of a typical adult or someone larger than a small individual on the passenger seat,
do not have any passenger use the passenger
seat until the system has been repaired.
Problem
Possible causes/consequences and
X Solutions04
The passenger front air
bag off indicator lamp
does not illuminate
and/or does not
remain illuminated with
the weight of a typical
12-month-old child in a
standard child restraint
or less on the
passenger seat.
The system is malfunctioning.
X
Make sure there is nothing between seat cushion and child seat
and check installation of the child seat.
X Make sure no objects applying supplemental weight onto the
seat are present.
X If the passenger front air bag off indicator lamp remains out,
have the system checked as soon as possible at an authorized
Mercedes-Benz Center. Do not transport a child on the
passenger seat until the system has been repaired.
X Read and observe messages in the multifunction display and
follow corrective steps (Y page 236). G
Warning!
If the 04 indicator lamp does not
illuminate or remains out with the weight of a
typical 12-month-old child in a standard child
restraint or less on the passenger seat, do not
transport a child on the passenger seat until
the system has been repaired. Unlocking/locking manually
Unlocking the vehicle
If you cannot unlock the vehicle with the
SmartKey, unlock the driver’s door and the
trunk using the mechanical key.
The anti-theft alarm system will trigger when
you
R unlock the driver’s door or the trunk with
the mechanical key
and
R open the driver’s door or the trunk
To cancel the alarm, insert the SmartKey into
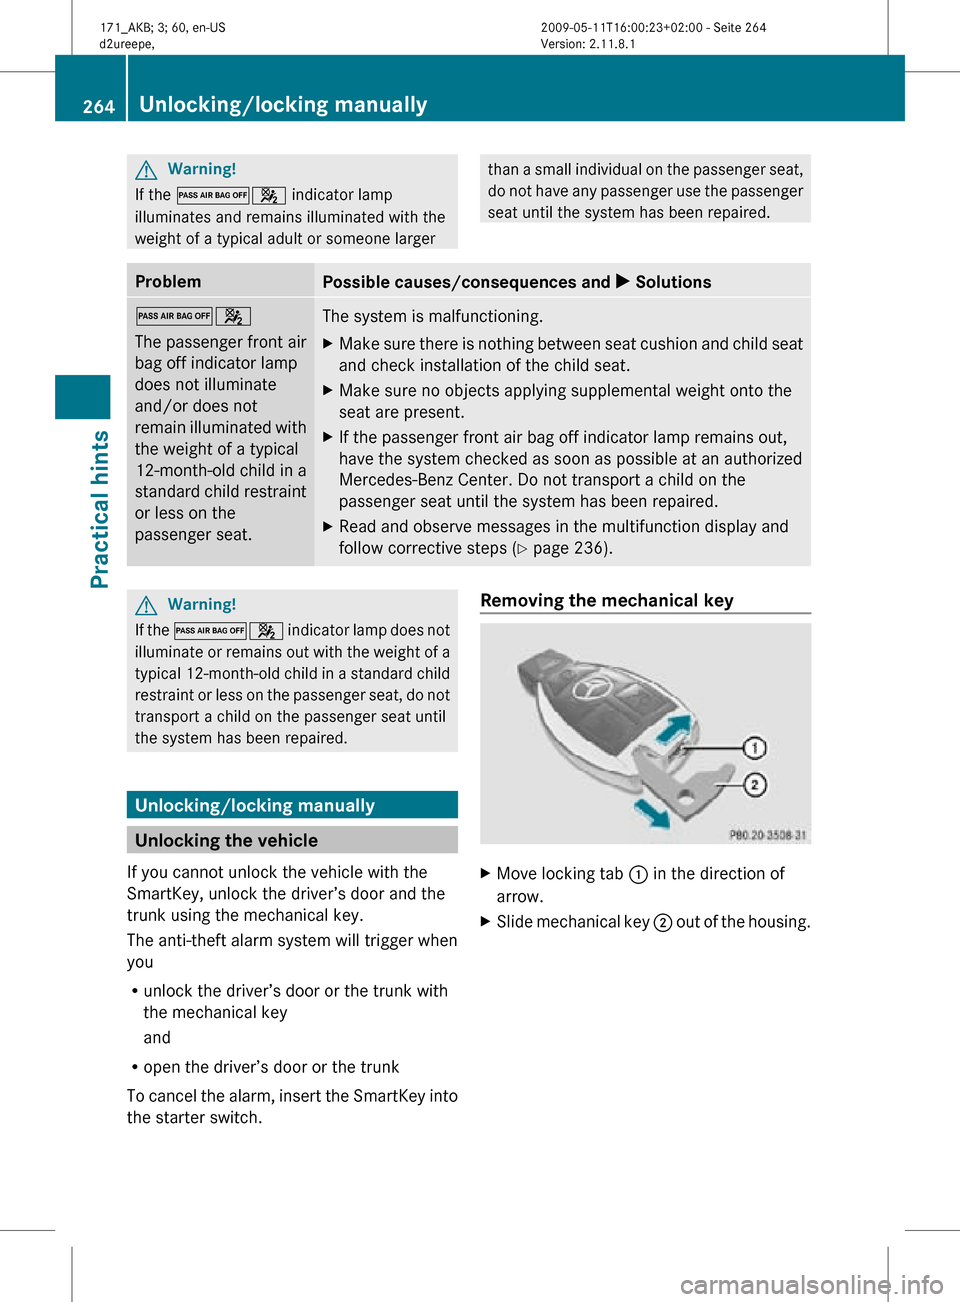
the starter switch. Removing the mechanical key
X
Move locking tab : in the direction of
arrow.
X Slide mechanical key ; out of the housing.264
Unlocking/locking manuallyPractical hints
171_AKB; 3; 60, en-US
d2ureepe,
Version: 2.11.8.1 2009-05-11T16:00:23+02:00 - Seite 264
Page 268 of 312
i
This procedure does not arm the anti-
theft alarm system, nor does it lock the fuel
filler flap and the storage compartments. Manually unlocking the gear selector
lever
If the vehicle’s electrical system is
malfunctioning, the gear selector lever could
remain locked in park position P. In this case
the gear selector lever can be unlocked
manually, e.g. to tow the vehicle.
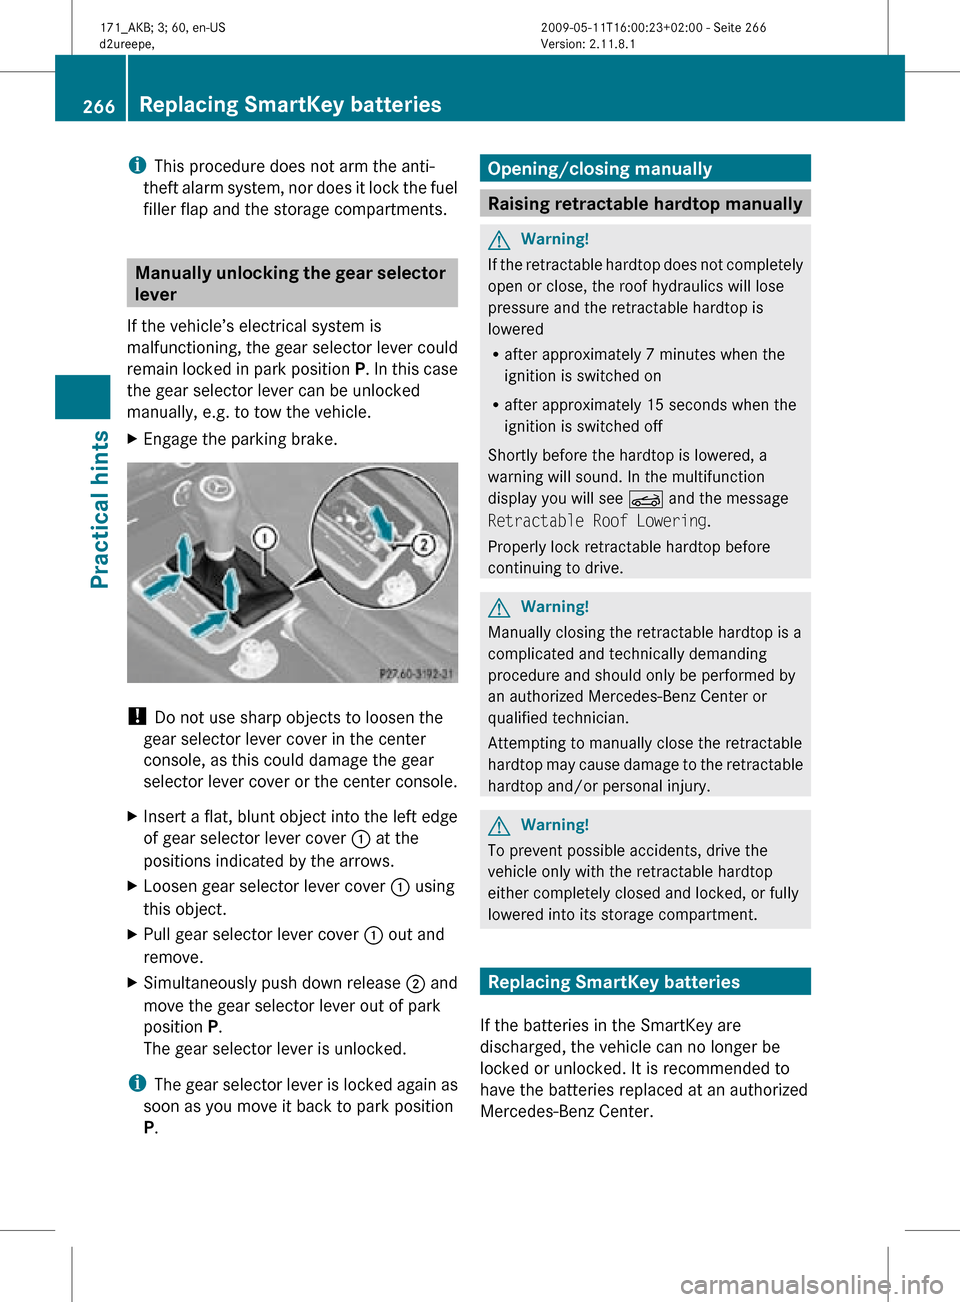
X Engage the parking brake. !
Do not use sharp objects to loosen the
gear selector lever cover in the center
console, as this could damage the gear
selector lever cover or the center console.
X Insert a flat, blunt object into the left edge
of gear selector lever cover : at the
positions indicated by the arrows.
X Loosen gear selector lever cover : using
this object.
X Pull gear selector lever cover : out and
remove.
X Simultaneously push down release ; and
move the gear selector lever out of park
position P.
The gear selector lever is unlocked.
i The gear selector lever is locked again as
soon as you move it back to park position
P. Opening/closing manually
Raising retractable hardtop manually
G
Warning!
If the retractable hardtop does not completely
open or close, the roof hydraulics will lose
pressure and the retractable hardtop is
lowered
R after approximately 7 minutes when the
ignition is switched on
R after approximately 15 seconds when the
ignition is switched off
Shortly before the hardtop is lowered, a
warning will sound. In the multifunction
display you will see K and the message
Retractable Roof Lowering.
Properly lock retractable hardtop before
continuing to drive. G
Warning!
Manually closing the retractable hardtop is a
complicated and technically demanding
procedure and should only be performed by
an authorized Mercedes-Benz Center or
qualified technician.
Attempting to manually close the retractable
hardtop may cause damage to the retractable
hardtop and/or personal injury. G
Warning!
To prevent possible accidents, drive the
vehicle only with the retractable hardtop
either completely closed and locked, or fully
lowered into its storage compartment. Replacing SmartKey batteries
If the batteries in the SmartKey are
discharged, the vehicle can no longer be
locked or unlocked. It is recommended to
have the batteries replaced at an authorized
Mercedes-Benz Center. 266
Replacing SmartKey batteriesPractical hints
171_AKB; 3; 60, en-US
d2ureepe,
Version: 2.11.8.1 2009-05-11T16:00:23+02:00 - Seite 266
Page 269 of 312
G
Warning!
Batteries contain poisonous and corrosive
substances. Therefore, keep the batteries out
of reach of children.
If a battery is swallowed, seek medical help
immediately. G
Warning!
SmartKey batteries contain perchlorate
material, which may require special handling
and regard for the environment. Check with
your local government’s disposal guidelines.
California residents, see www.dtsc.ca.gov/
HazardousWaste/Perchlorate/
index.cfm.
Batteries contain materials that can harm the
environment if disposed of improperly.
Recycling of batteries is the preferred method
of disposal. Many states (USA only) or
provinces (Canada only) require sellers of
batteries to accept old batteries for recycling.
When inserting the batteries, make sure they
are clean and free of lint.
When replacing batteries, always replace
both batteries.
i The required replacement batteries are
available at any authorized Mercedes-Benz
Center.
Replacement batteries: Lithium, type
CR 2025 or equivalent.
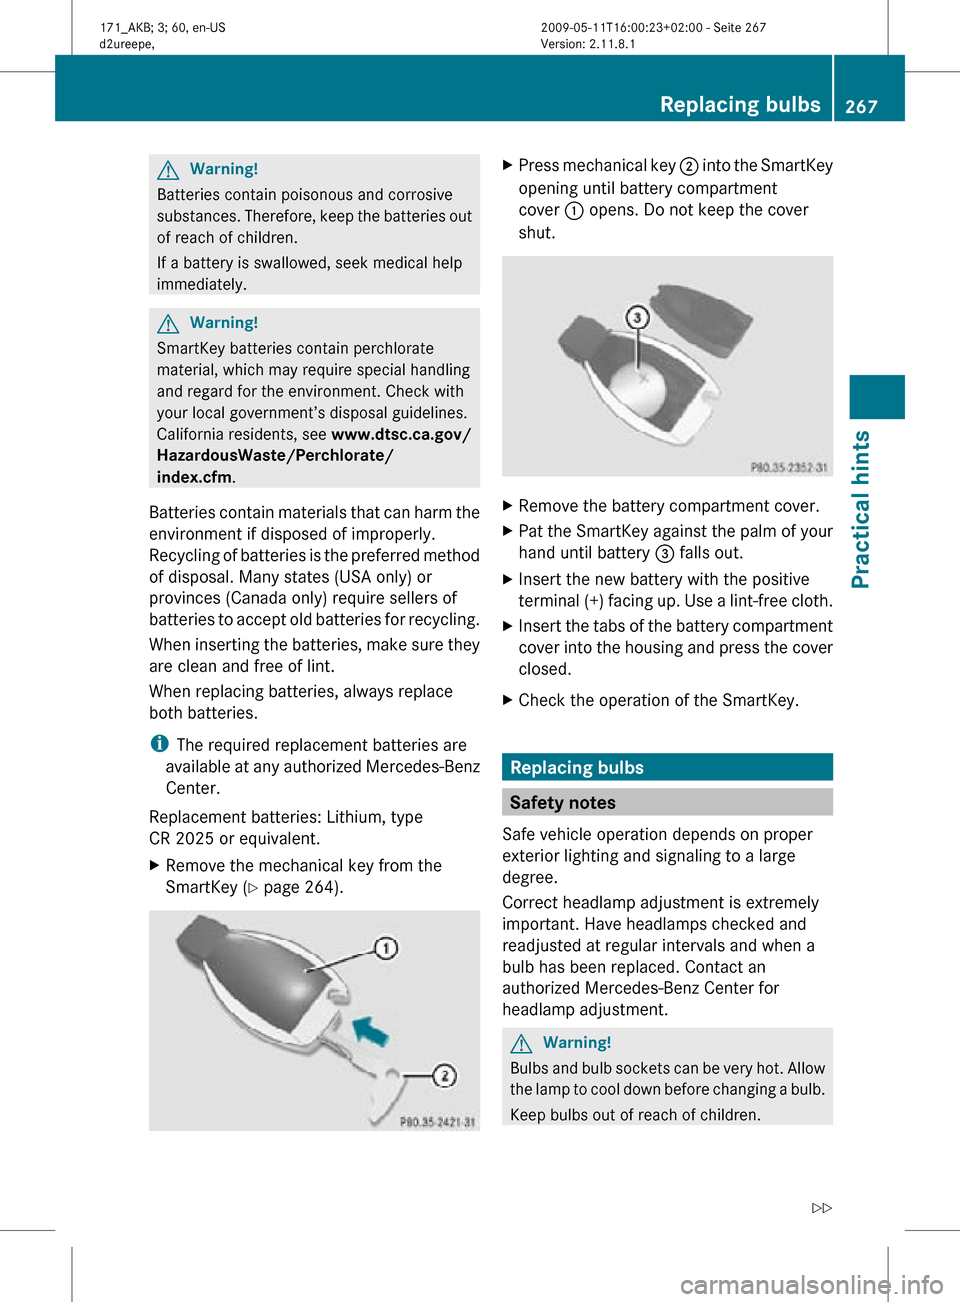
X Remove the mechanical key from the
SmartKey (Y page 264). X
Press mechanical key ; into the SmartKey
opening until battery compartment
cover : opens. Do not keep the cover
shut. X
Remove the battery compartment cover.
X Pat the SmartKey against the palm of your
hand until battery = falls out.
X Insert the new battery with the positive
terminal (+) facing up. Use a lint-free cloth.
X Insert the tabs of the battery compartment
cover into the housing and press the cover
closed.
X Check the operation of the SmartKey. Replacing bulbs
Safety notes
Safe vehicle operation depends on proper
exterior lighting and signaling to a large
degree.
Correct headlamp adjustment is extremely
important. Have headlamps checked and
readjusted at regular intervals and when a
bulb has been replaced. Contact an
authorized Mercedes-Benz Center for
headlamp adjustment. G
Warning!
Bulbs and bulb sockets can be very hot. Allow
the lamp to cool down before changing a bulb.
Keep bulbs out of reach of children. Replacing bulbs
267Practical hints
171_AKB; 3; 60, en-US
d2ureepe, Version: 2.11.8.1 2009-05-11T16:00:23+02:00 - Seite 267 Z
Page 272 of 312
G
Observe Safety notes, see page 267.
R Only use 12-volt bulbs of the same type and
with the specified watt rating.
R Switch the lights off before changing a bulb
to prevent short circuits.
R Always use a clean lint-free cloth when
handling bulbs.
R Your hands should be dry and free of oil and
grease.
R If the newly installed bulb does not come
on, contact an authorized Mercedes-Benz
Center.
i Mercedes-Benz recommends using
Longlife (LL) bulbs. Replacing bulbs for front lamps
Before you start to replace a bulb for a front
lamp, do the following:
X Switch off the ignition.
X Turn the exterior lamp switch to position
$.
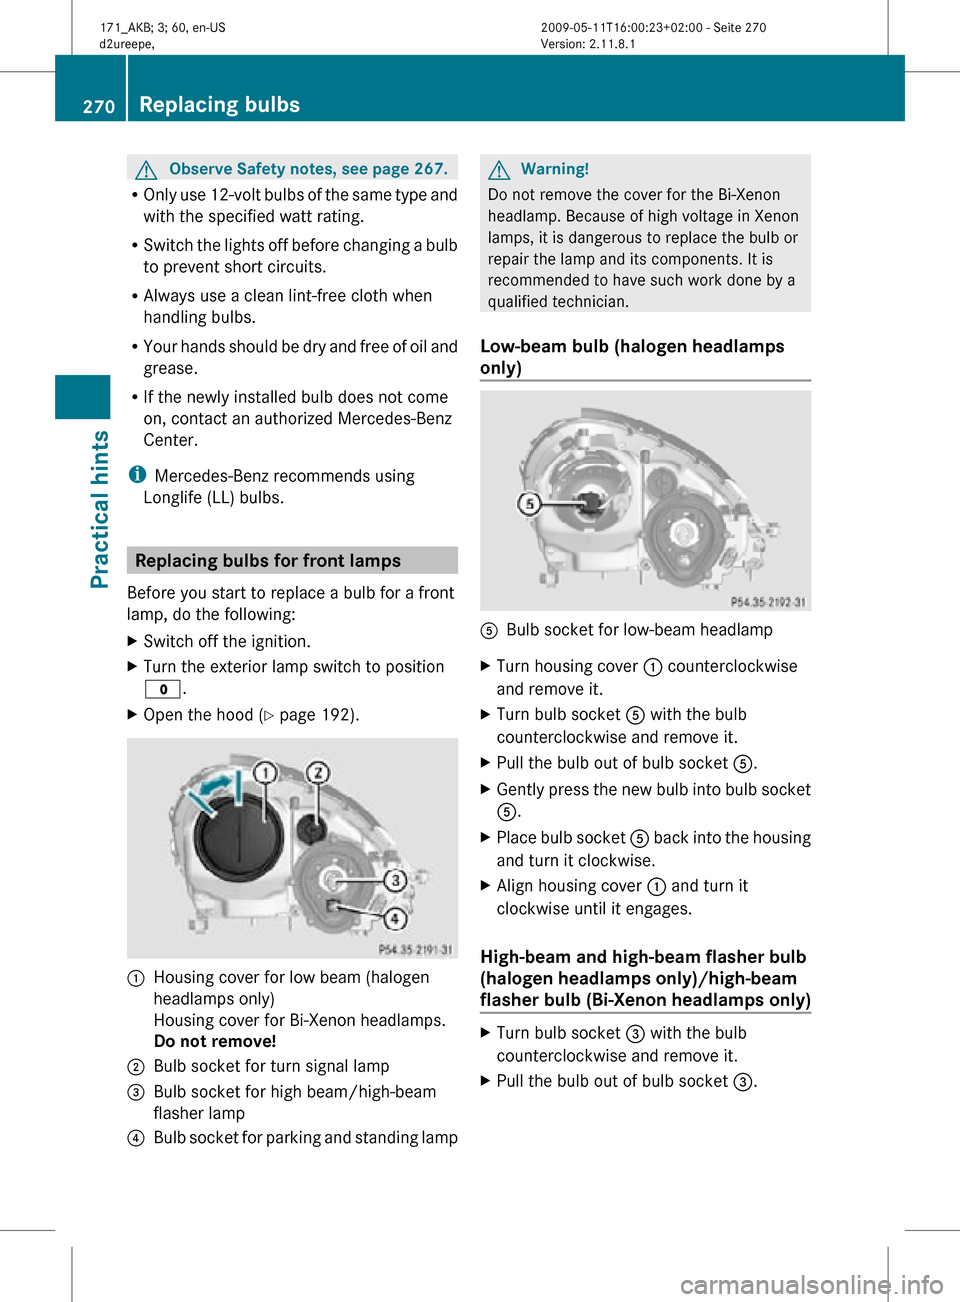
X Open the hood (Y page 192). :
Housing cover for low beam (halogen
headlamps only)
Housing cover for Bi-Xenon headlamps.
Do not remove!
; Bulb socket for turn signal lamp
= Bulb socket for high beam/high-beam
flasher lamp
? Bulb socket for parking and standing lamp G
Warning!
Do not remove the cover for the Bi-Xenon
headlamp. Because of high voltage in Xenon
lamps, it is dangerous to replace the bulb or
repair the lamp and its components. It is
recommended to have such work done by a
qualified technician.
Low-beam bulb (halogen headlamps
only) A
Bulb socket for low-beam headlamp
X Turn housing cover : counterclockwise
and remove it.
X Turn bulb socket A with the bulb
counterclockwise and remove it.
X Pull the bulb out of bulb socket A.
X Gently press the new bulb into bulb socket
A.
X Place bulb socket A back into the housing
and turn it clockwise.
X Align housing cover : and turn it
clockwise until it engages.
High-beam and high-beam flasher bulb
(halogen headlamps only)/high-beam
flasher bulb (Bi-Xenon headlamps only) X
Turn bulb socket = with the bulb
counterclockwise and remove it.
X Pull the bulb out of bulb socket =.270
Replacing bulbsPractical hints
171_AKB; 3; 60, en-US
d2ureepe,
Version: 2.11.8.1 2009-05-11T16:00:23+02:00 - Seite 270
Page 273 of 312
X
Gently press the new bulb into bulb socket
=.
X Place bulb socket = back into the housing
and turn it clockwise until it engages.
Front turn signal lamp bulb X
Turn bulb socket ; with the bulb
counterclockwise and remove it.
X Gently press onto the bulb and turn it
counterclockwise out of bulb socket ;.
X Gently press the new bulb into bulb
socket ; and turn it clockwise until it
engages.
X Place bulb socket ; back into the housing
and turn it clockwise until it engages.
Parking and standing lamp bulb X
Turn bulb socket ? with the bulb
counterclockwise and remove it.
X Pull the bulb out of bulb socket ?.
X Gently press the new bulb into bulb
socket ?.
X Place bulb socket ? back into the housing
and turn it clockwise until it engages. Replacing bulbs for rear lamps
Tail lamp unit Since replacing bulbs in the tail lamp unit is a
technically highly demanding process, we
recommend to have them replaced at an
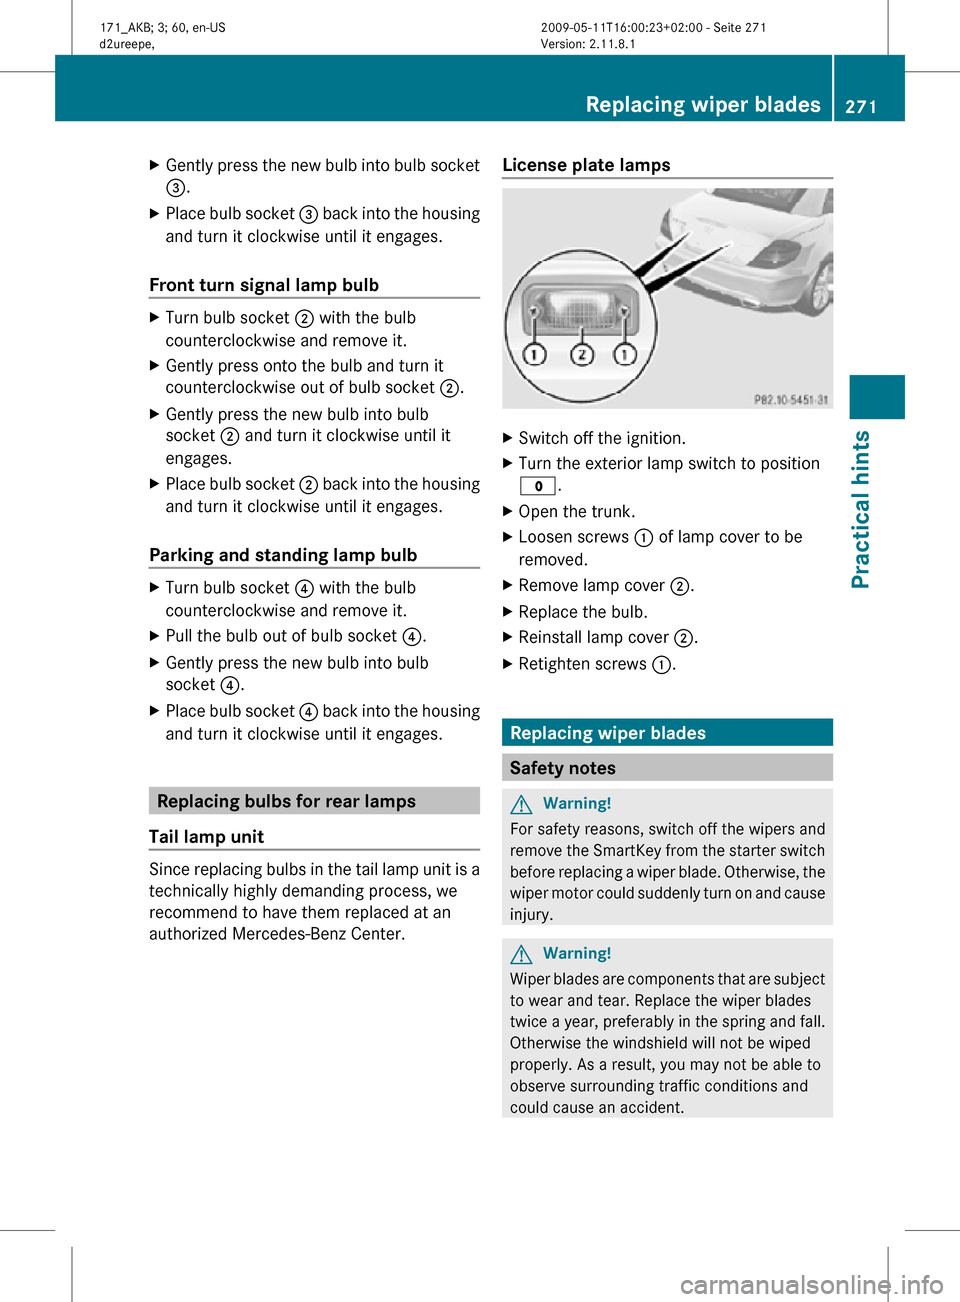
authorized Mercedes-Benz Center. License plate lamps X
Switch off the ignition.
X Turn the exterior lamp switch to position
$.
X Open the trunk.
X Loosen screws : of lamp cover to be
removed.
X Remove lamp cover ;.
X Replace the bulb.
X Reinstall lamp cover ;.
X Retighten screws :. Replacing wiper blades
Safety notes
G
Warning!
For safety reasons, switch off the wipers and
remove the SmartKey from the starter switch
before replacing a wiper blade. Otherwise, the
wiper motor could suddenly turn on and cause
injury. G
Warning!
Wiper blades are components that are subject
to wear and tear. Replace the wiper blades
twice a year, preferably in the spring and fall.
Otherwise the windshield will not be wiped
properly. As a result, you may not be able to
observe surrounding traffic conditions and
could cause an accident. Replacing wiper blades
271Practical hints
171_AKB; 3; 60, en-US
d2ureepe, Version: 2.11.8.1 2009-05-11T16:00:23+02:00 - Seite 271 Z
Page 275 of 312
X
Simultaneously press tabs ? together and
let the wiper blade engage into both
recesses of attachment =.
X Check if the wiper blade is securely
fastened.
X Fold the wiper arm backward to rest on the
windshield.
Make sure you hold on to the wiper arm
when folding it back.
! Make sure the wiper blades are installed
properly.
Improperly installed wiper blades
may cause windshield damage. Flat tire
Safety notes
Your vehicle may be equipped with a TIREFIT
kit or a spare wheel with collapsible tire.
Vehicles
with a TIREFIT kit do not have a spare
wheel.
For information on your vehicle’s equipment,
see “Rims and tires” ( Y page 297).G
Warning!
The dimensions of the spare wheel are
different from those of the road wheels. As a
result, the vehicle handling characteristics
change when driving with a spare wheel
mounted. Adapt your driving style
accordingly.
The spare wheel is for temporary use only.
When driving with a spare wheel mounted,
ensure proper tire inflation pressure and do
not exceed a vehicle speed of 50 mph
(80 km/h).
Contact the nearest authorized Mercedes-
Benz Center as soon as possible to have the
spare wheel replaced with a regular road
wheel.
Never
operate the vehicle with more than one
spare wheel mounted.
Do not switch off the ESP ®
when a spare
wheel is mounted. Preparing the vehicle
X Whenever possible, park the vehicle in a
safe
distance from moving traffic on a hard,
flat surface.
X Turn on the hazard warning flasher.
X Turn the steering wheel so that the front
wheels are in a straight-ahead position.
X Engage the parking brake.
X Shift the automatic transmission into park
position P (manual transmission to 1st or
reverse gear R).
X Turn off the engine.
X Remove the SmartKey from the starter
switch.
X Have any passenger exit the vehicle at a
safe distance from the roadway. Open
doors only when conditions are safe to do
so. Sealing tires with TIREFIT
This section applies to SLK 55 AMG with
Performance Package only.
Small
tire punctures, particularly those in the
tread, can be sealed with TIREFIT.
TIREFIT can be used in ambient temperatures
down to -4‡ (-20†). G
Warning!
TIREFIT is a limited repair device. TIREFIT
cannot be used for cuts or punctures larger
than approximately 0.16 in (4 mm) and tire
damage
caused by driving with extremely low
tire inflation pressure, or on a flat tire, or a
damaged wheel.
Do not drive the vehicle under such
circumstances.
Contact the nearest authorized Mercedes-
Benz Center for assistance or call Roadside
Assistance. Flat tire
273
Practical hints
171_AKB; 3; 60, en-US
d2ureepe, Version: 2.11.8.1 2009-05-11T16:00:23+02:00 - Seite 273 Z
Page 276 of 312
X
Foreign objects (e.g. screws or nails)
should not be removed from the tire.
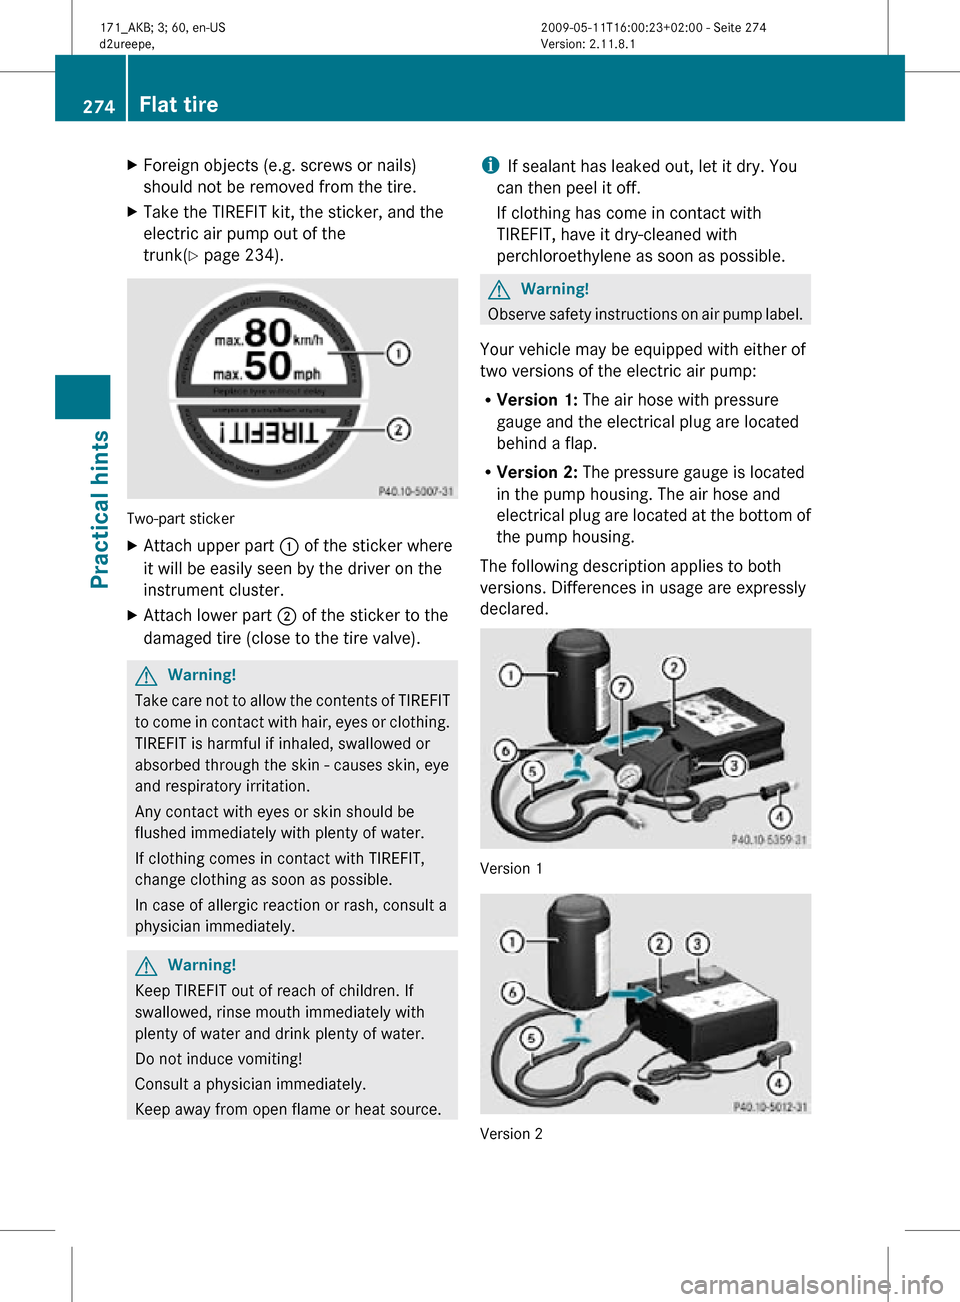
X Take the TIREFIT kit, the sticker, and the
electric air pump out of the
trunk(Y page 234). Two-part sticker
X
Attach upper part : of the sticker where
it will be easily seen by the driver on the
instrument cluster.
X Attach lower part ; of the sticker to the
damaged tire (close to the tire valve). G
Warning!
Take care not to allow the contents of TIREFIT
to come in contact with hair, eyes or clothing.
TIREFIT is harmful if inhaled, swallowed or
absorbed through the skin - causes skin, eye
and respiratory irritation.
Any contact with eyes or skin should be
flushed immediately with plenty of water.
If clothing comes in contact with TIREFIT,
change clothing as soon as possible.
In case of allergic reaction or rash, consult a
physician immediately. G
Warning!
Keep TIREFIT out of reach of children. If
swallowed, rinse mouth immediately with
plenty of water and drink plenty of water.
Do not induce vomiting!
Consult a physician immediately.
Keep away from open flame or heat source. i
If sealant has leaked out, let it dry. You
can then peel it off.
If clothing has come in contact with
TIREFIT, have it dry-cleaned with
perchloroethylene as soon as possible. G
Warning!
Observe safety instructions on air pump label.
Your vehicle may be equipped with either of
two versions of the electric air pump:
R Version 1: The air hose with pressure
gauge and the electrical plug are located
behind a flap.
R Version 2: The pressure gauge is located
in the pump housing. The air hose and
electrical plug are located at the bottom of
the pump housing.
The following description applies to both
versions. Differences in usage are expressly
declared. Version 1
Version 2274
Flat tirePractical hints
171_AKB; 3; 60, en-US
d2ureepe,
Version: 2.11.8.1 2009-05-11T16:00:23+02:00 - Seite 274
Page 277 of 312
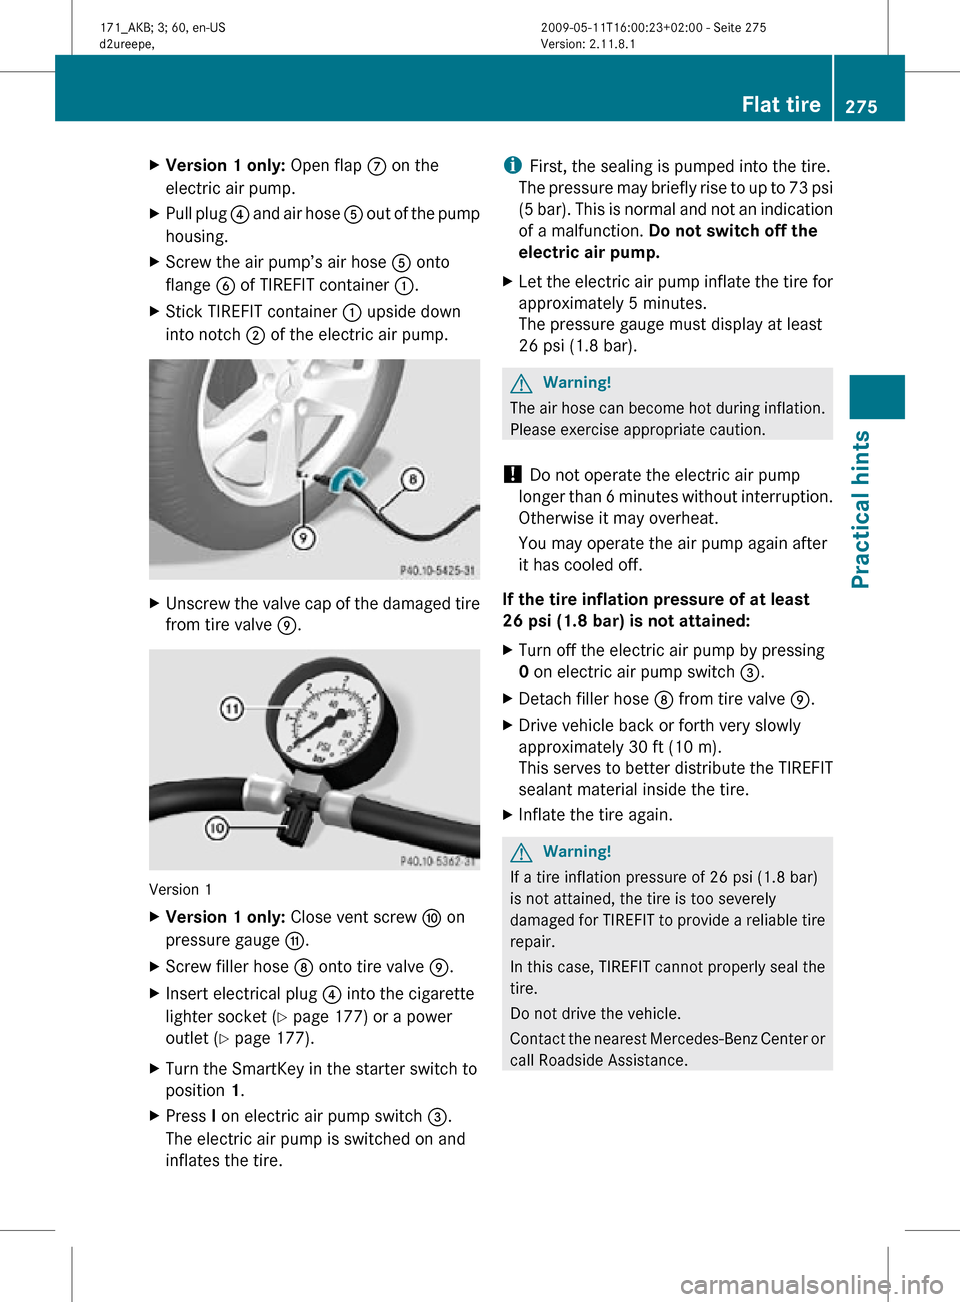
X
Version 1 only: Open flap C on the
electric air pump.
X Pull plug ? and air hose A out of the pump
housing.
X Screw the air pump’s air hose A onto
flange B of TIREFIT container :.
X Stick TIREFIT container : upside down
into notch ; of the electric air pump. X
Unscrew the valve cap of the damaged tire
from tire valve E. Version 1
X
Version 1 only: Close vent screw F on
pressure gauge G.
X Screw filler hose D onto tire valve E.
X Insert electrical plug ? into the cigarette
lighter socket ( Y page 177) or a power
outlet (Y page 177).
X Turn the SmartKey in the starter switch to
position 1.
X Press I on electric air pump switch =.
The electric air pump is switched on and
inflates the tire. i
First, the sealing is pumped into the tire.
The pressure may briefly rise to up to 73 psi
(5 bar). This is normal and not an indication
of a malfunction. Do not switch off the
electric air pump.
X Let the electric air pump inflate the tire for
approximately 5 minutes.
The pressure gauge must display at least
26 psi (1.8 bar). G
Warning!
The air hose can become hot during inflation.
Please exercise appropriate caution.
! Do not operate the electric air pump
longer than 6 minutes without interruption.
Otherwise it may overheat.
You may operate the air pump again after
it has cooled off.
If the tire inflation pressure of at least
26 psi (1.8 bar) is not attained:
X Turn off the electric air pump by pressing
0 on electric air pump switch =.
X Detach filler hose D from tire valve E.
X Drive vehicle back or forth very slowly
approximately 30 ft (10 m).
This serves to better distribute the TIREFIT
sealant material inside the tire.
X Inflate the tire again. G
Warning!
If a tire inflation pressure of 26 psi (1.8 bar)
is not attained, the tire is too severely
damaged for TIREFIT to provide a reliable tire
repair.
In this case, TIREFIT cannot properly seal the
tire.
Do not drive the vehicle.
Contact the nearest Mercedes-Benz Center or
call Roadside Assistance. Flat tire
275Practical hints
171_AKB; 3; 60, en-US
d2ureepe, Version: 2.11.8.1 2009-05-11T16:00:23+02:00 - Seite 275 Z